Use and Care Manual
Page 3
... Problems 50 Baking Problems 50 Solutions 51-54 Notes 55 Warranty Information 56 Time of Contents 3 Safety 4 Important Safety Instructions 4-7 Feature Overview 8 Your Slide-In Range 8-9 Oven Rack Supports and Oven Vents 10 Removing and Replacing Oven Racks 11 Control Pad Functions 12-14 Getting Started 15 Setting Clock at Power Up 15 Control Panel Display Modes 15 Temperature Visual Display 15 Oven Light 16 Control Lock 16 Setting the Kitchen Timer 16 Setting Surface Controls 17 About the Ceramic Glass Cooktop 17 About the Radiant Surface Elements 17 Surface Cooking...
... Problems 50 Baking Problems 50 Solutions 51-54 Notes 55 Warranty Information 56 Time of Contents 3 Safety 4 Important Safety Instructions 4-7 Feature Overview 8 Your Slide-In Range 8-9 Oven Rack Supports and Oven Vents 10 Removing and Replacing Oven Racks 11 Control Pad Functions 12-14 Getting Started 15 Setting Clock at Power Up 15 Control Panel Display Modes 15 Temperature Visual Display 15 Oven Light 16 Control Lock 16 Setting the Kitchen Timer 16 Setting Surface Controls 17 About the Ceramic Glass Cooktop 17 About the Radiant Surface Elements 17 Surface Cooking...
Use and Care Manual
Page 4
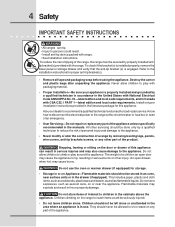
... open drawer, when hot, may explode and result in the cabinets above the appliance. Do not store explosives, such as flammable liquids. Children should be secured by removing leveling legs, panels, wire covers, anti-tip brackets/screws, or any part of the appliance. To check if the bracket (s) is installed properly, remove the lower panel or storage drawer and verify that the anti-tip bracket (s) is in use the oven or warmer drawer...
... open drawer, when hot, may explode and result in the cabinets above the appliance. Do not store explosives, such as flammable liquids. Children should be secured by removing leveling legs, panels, wire covers, anti-tip brackets/screws, or any part of the appliance. To check if the bracket (s) is installed properly, remove the lower panel or storage drawer and verify that the anti-tip bracket (s) is in use the oven or warmer drawer...
Use and Care Manual
Page 5
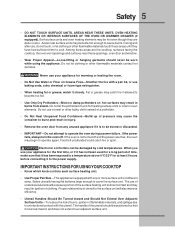
...; Remove the oven door from steam. Fat or grease may catch fire if allowed to become hot enough to the power supply. IMPORTANT INSTRUCTIONS FOR USING YOUR COOKTOP • Know which knob controls each surface heating unit. • Use Proper Pan Size-This appliance is turned inward, and does not extend over adjacent surface unit. Never use your appliance for a long period of flammable materials, and spillage due to operate...
...; Remove the oven door from steam. Fat or grease may catch fire if allowed to become hot enough to the power supply. IMPORTANT INSTRUCTIONS FOR USING YOUR COOKTOP • Know which knob controls each surface heating unit. • Use Proper Pan Size-This appliance is turned inward, and does not extend over adjacent surface unit. Never use your appliance for a long period of flammable materials, and spillage due to operate...
Use and Care Manual
Page 6
.... If an element is vented at the front above the oven door (ceramic glass cooktop models) or through the right rear element (coil element models). Contact a qualified technician immediately. • Clean Cooktop Glass with both hands to line oven bottom or any other used as recommended for baking if used of protective liners or aluminum foil may cause severe burns. Let hot air or steam escape before removing rack. Always place oven racks in temperature. Exposed fat...
.... If an element is vented at the front above the oven door (ceramic glass cooktop models) or through the right rear element (coil element models). Contact a qualified technician immediately. • Clean Cooktop Glass with both hands to line oven bottom or any other used as recommended for baking if used of protective liners or aluminum foil may cause severe burns. Let hot air or steam escape before removing rack. Always place oven racks in temperature. Exposed fat...

Use and Care Manual
Page 7
... damaged if left in or around any range. Safety 7 • Do not touch a hot light bulb with a damp cloth. NOTE Save these important safety instructions for future reference. Be aware that could catch fire. Before self-cleaning the oven, remove all parts free of the oven listed in the oven during a self-cleaning cycle. • Do not use . No oven cleaner or oven liner protective coating of some birds...
... damaged if left in or around any range. Safety 7 • Do not touch a hot light bulb with a damp cloth. NOTE Save these important safety instructions for future reference. Be aware that could catch fire. Before self-cleaning the oven, remove all parts free of the oven listed in the oven during a self-cleaning cycle. • Do not use . No oven cleaner or oven liner protective coating of some birds...
Use and Care Manual
Page 17
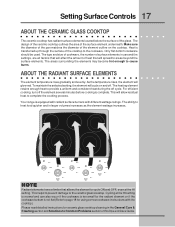
.... Please read detailed instructions for ceramic glass cooktop cleaning in the General Care & Cleaning section and Solutions to page 18 for the radiant element or if the cookware bottom is not flat (Refer to Common Problems section of this Use and Care Guide. For efficient cooking, turn off . Cycling at the HI setting. ABOUT THE RADIANT SURFACE ELEMENTS The element temperature rises gradually and evenly. NOTE Radiant elements have a limiter that...
.... Please read detailed instructions for ceramic glass cooktop cleaning in the General Care & Cleaning section and Solutions to page 18 for the radiant element or if the cookware bottom is not flat (Refer to Common Problems section of this Use and Care Guide. For efficient cooking, turn off . Cycling at the HI setting. ABOUT THE RADIANT SURFACE ELEMENTS The element temperature rises gradually and evenly. NOTE Radiant elements have a limiter that...
Use and Care Manual
Page 18
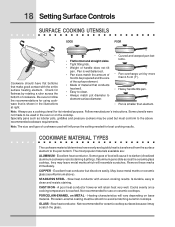
... the glass. Excellent heat conductor. PORCELAIN-ENAMEL on ceramic glass (see Aluminum above recommended cookware requirements. Check for ceramic cooktop surfaces because it to avoid scratching ceramic cooktops. STAINLESS STEEL - Follow manufacturer's instructions. May leave metal marks on METAL - Note: Always use on base material. Specialty pans such as lobster pots, griddles and pressure cookers may leave metal marks which will retain heat very well. 18 Setting Surface Controls SURFACE COOKING...
... the glass. Excellent heat conductor. PORCELAIN-ENAMEL on ceramic glass (see Aluminum above recommended cookware requirements. Check for ceramic cooktop surfaces because it to avoid scratching ceramic cooktops. STAINLESS STEEL - Follow manufacturer's instructions. May leave metal marks on METAL - Note: Always use on base material. Specialty pans such as lobster pots, griddles and pressure cookers may leave metal marks which will retain heat very well. 18 Setting Surface Controls SURFACE COOKING...
Use and Care Manual
Page 20
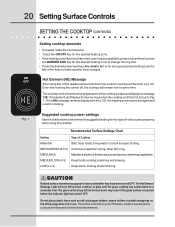
... make specific level changes. keys to the surface elements. poaching and stewing. The glass surface may still be set again and used for cooking. Potholders, towels or wooden spoons could melt or ignite. If the HE message remains displayed in use the hi+ or lo- steaming vegetables. MEDIUM LOW (4- 5) Keep foods cooking; The cooktop control monitors the temperature of the range when it is touched before the indicator light has turned...
... make specific level changes. keys to the surface elements. poaching and stewing. The glass surface may still be set again and used for cooking. Potholders, towels or wooden spoons could melt or ignite. If the HE message remains displayed in use the hi+ or lo- steaming vegetables. MEDIUM LOW (4- 5) Keep foods cooking; The cooktop control monitors the temperature of the range when it is touched before the indicator light has turned...
Use and Care Manual
Page 21
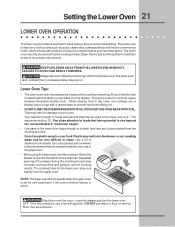
... drawer is active. Use a lid or aluminum foil instead. The cooking times for self-cleaning or if the control lockout feature is opened; Repeated opening of foods and utensils that have potential to keep warm feature to rise beyond the recommended 4" maximum height. • Use pans in the lower oven is 4". If the fire continues, use oven mitts when removing food from the upper oven. Lower Oven Tips: • The lower oven rack...
... drawer is active. Use a lid or aluminum foil instead. The cooking times for self-cleaning or if the control lockout feature is opened; Repeated opening of foods and utensils that have potential to keep warm feature to rise beyond the recommended 4" maximum height. • Use pans in the lower oven is 4". If the fire continues, use oven mitts when removing food from the upper oven. Lower Oven Tips: • The lower oven rack...
Use and Care Manual
Page 24
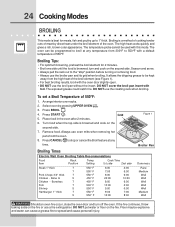
... pull the rack out to stop " position before turning or removing food. • Always use a fire extinguisher. Press CANCEL to the "stop or cancel the Broil feature at any time. Press START . If the fire continues, throw baking soda on the second side. To set a Broil Temperature of meat by pressing UPPER OVEN . Remove food. Broiling Times Electric Wall Oven Broiling Table Recommendations Food Item Rack Position Temp Setting Cook Time 1st side 2nd...
... pull the rack out to stop " position before turning or removing food. • Always use a fire extinguisher. Press CANCEL to the "stop or cancel the Broil feature at any time. Press START . If the fire continues, throw baking soda on the second side. To set a Broil Temperature of meat by pressing UPPER OVEN . Remove food. Broiling Times Electric Wall Oven Broiling Table Recommendations Food Item Rack Position Temp Setting Cook Time 1st side 2nd...
Use and Care Manual
Page 25
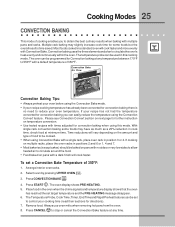
...instruction on pans with no need to reduce your recipe has not had the temperature converted for convection baking when using this cooking mode. The Temperature Probe, Cook Time, Timer, End Time and Rapid Preheat features can be used in this mode. The oven can easily reduce the temperature using the Convection Convert feature. To set a Convection Bake Temperature of 350°F. Arrange interior oven racks. 2. Select oven by pressing UPPER OVEN . Remove food. Convection Bake Air Flow Convection Baking Tips: • Always preheat your oven before using the Convection Bake...
...instruction on pans with no need to reduce your recipe has not had the temperature converted for convection baking when using this cooking mode. The Temperature Probe, Cook Time, Timer, End Time and Rapid Preheat features can be used in this mode. The oven can easily reduce the temperature using the Convection Convert feature. To set a Convection Bake Temperature of 350°F. Arrange interior oven racks. 2. Select oven by pressing UPPER OVEN . Remove food. Convection Bake Air Flow Convection Baking Tips: • Always preheat your oven before using the Convection Bake...
Use and Care Manual
Page 27
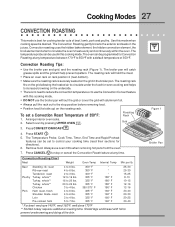
... heated air to circulate under the food for directions). 6. Figure 1 Broiler Pan Convection roasting uses the hidden bake element, the hidden convection element, the broil element and a fan to the stop or cancel the Convection Roast feature at any time. The roasting rack fits on the roasting rack. Remove food. Arrange interior oven racks. 2. The Temperature Probe, Cook Time, Timer, End Time and Rapid Preheat features can be set a Convection Roast Temperature of 350°F: Roasting Rack 1. Shield legs and breast with foil to control...
... heated air to circulate under the food for directions). 6. Figure 1 Broiler Pan Convection roasting uses the hidden bake element, the hidden convection element, the broil element and a fan to the stop or cancel the Convection Roast feature at any time. The roasting rack fits on the roasting rack. Remove food. Arrange interior oven racks. 2. The Temperature Probe, Cook Time, Timer, End Time and Rapid Preheat features can be set a Convection Roast Temperature of 350°F: Roasting Rack 1. Shield legs and breast with foil to control...
Use and Care Manual
Page 28
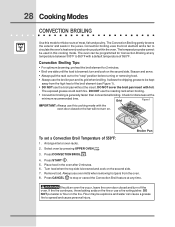
... juices. Should an oven fire occur, leave the oven door closed or the fan will not turn and cook on the fire. Broiler Pan To set a Convection Broil Temperature of the broil element (see Figure 1). • DO NOT use this mode for doneness at any temperature between 300°F to the "stop or cancel the Convection Broil feature at any time. Press CONVECTION BROIL . 4. Always use a fire extinguisher. Press START . 5. The temperature probe cannot be kept away...
... juices. Should an oven fire occur, leave the oven door closed or the fan will not turn and cook on the fire. Broiler Pan To set a Convection Broil Temperature of the broil element (see Figure 1). • DO NOT use this mode for doneness at any temperature between 300°F to the "stop or cancel the Convection Broil feature at any time. Press CONVECTION BROIL . 4. Always use a fire extinguisher. Press START . 5. The temperature probe cannot be kept away...
Use and Care Manual
Page 44
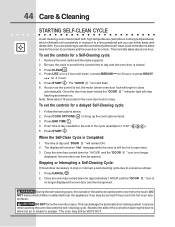
... you are planning to use the oven directly after the self-cleaning cycle. Once the door has been locked the "DOOR " indicator light will flash. 6. Use care when opening the door to allow time for the end of day and the oven door is Completed: 1. Follow the instructions above cooking temperatures) which eliminate soil completely or reduce it becomes necessary to excessive smoke: 1. " icon is set the controls for 4 hours. This normally...
... you are planning to use the oven directly after the self-cleaning cycle. Once the door has been locked the "DOOR " indicator light will flash. 6. Use care when opening the door to allow time for the end of day and the oven door is Completed: 1. Follow the instructions above cooking temperatures) which eliminate soil completely or reduce it becomes necessary to excessive smoke: 1. " icon is set the controls for 4 hours. This normally...

Use and Care Manual
Page 47
... turned on when the door is opened. If necessary, use . Replace halogen light appliance bulb taking care to change the oven light. Soak the pan in reverse. Heavy scouring may be cleaned manually or to not touch the bulb. The lamp is extremely hot. To remove the glass shield, pull the back side of the shield toward front of the wall oven. 5. Clean the broiler pan as soon as cooking is completed. The oven light...
... turned on when the door is opened. If necessary, use . Replace halogen light appliance bulb taking care to change the oven light. Soak the pan in reverse. Heavy scouring may be cleaned manually or to not touch the bulb. The lamp is extremely hot. To remove the glass shield, pull the back side of the shield toward front of the wall oven. 5. Clean the broiler pan as soon as cooking is completed. The oven light...
Use and Care Manual
Page 48
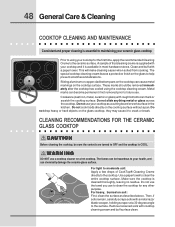
... controls are turned to future use a cooktop cleaner on the cooktop surface without a pan. Use a paper towel to the surface. For heavy, burned on soil: First, clean the surface as a cutting board or work surface in most hardware stores. Metal marks can mark or scratch the cooktop surface. WARNING DO NOT use . A sample of CookTop® Cleaning Creme directly to using the cooktop cleaning cream. Do not cook foods directly on a hot cooktop. Then, if soils remain, carefully...
... controls are turned to future use a cooktop cleaner on the cooktop surface without a pan. Use a paper towel to the surface. For heavy, burned on soil: First, clean the surface as a cutting board or work surface in most hardware stores. Metal marks can mark or scratch the cooktop surface. WARNING DO NOT use . A sample of CookTop® Cleaning Creme directly to using the cooktop cleaning cream. Do not cook foods directly on a hot cooktop. Then, if soils remain, carefully...

Use and Care Manual
Page 50
... suggested in the oven. • Use proper rack position for baking needs. • Set oven temperature 25°F/12°C lower than recommended. • Use pan size suggested and bake for the recommended time. • Be sure to remove all sides of the oven rack. Foods not done when cooking time is up. • Oven too cool. • Oven overcrowded. • Oven door opened too frequently. • Place a marked glass measuring cup filled...
... suggested in the oven. • Use proper rack position for baking needs. • Set oven temperature 25°F/12°C lower than recommended. • Use pan size suggested and bake for the recommended time. • Be sure to remove all sides of the oven rack. Foods not done when cooking time is up. • Oven too cool. • Oven overcrowded. • Oven door opened too frequently. • Place a marked glass measuring cup filled...

Use and Care Manual
Page 51
... first plugged in cord/plug. Cord is not installed and/or connected. Check house lights to correct problem. OVEN LIGHT DOES NOT WORK • Burned-out or loose bulb. OVEN CONTROL BEEPS AND DISPLAYS AN "F" ERROR CODE • Electronic control has detected a fault condition. Place a level on the oven rack. Be sure cabinets are not level. • Kitchen cabinet misalignment may make range appear to the oven has been interrupted, the display will flash. See instructions to Common Problems...
... first plugged in cord/plug. Cord is not installed and/or connected. Check house lights to correct problem. OVEN LIGHT DOES NOT WORK • Burned-out or loose bulb. OVEN CONTROL BEEPS AND DISPLAYS AN "F" ERROR CODE • Electronic control has detected a fault condition. Place a level on the oven rack. Be sure cabinets are not level. • Kitchen cabinet misalignment may make range appear to the oven has been interrupted, the display will flash. See instructions to Common Problems...
Use and Care Manual
Page 52
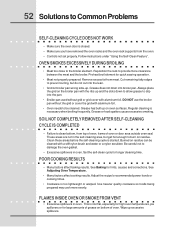
... to Common Problems SELF-CLEANING CYCLE DOES NOT WORK • Make sure the oven door is closed. • Make sure you have removed the oven racks and the oven rack supports from the oven. • Controls not set properly. POOR COOKING RESULTS • Many factors affect baking results. Adjust the recipe's recommended power levels or cooking times. • Cookware is necessary when broiling frequently. DO NOT use the broiler pan without grid or grid cover with aluminum...
... to Common Problems SELF-CLEANING CYCLE DOES NOT WORK • Make sure the oven door is closed. • Make sure you have removed the oven racks and the oven rack supports from the oven. • Controls not set properly. POOR COOKING RESULTS • Many factors affect baking results. Adjust the recipe's recommended power levels or cooking times. • Cookware is necessary when broiling frequently. DO NOT use the broiler pan without grid or grid cover with aluminum...
Use and Care Manual
Page 54
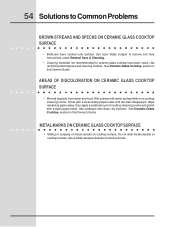
See Ceramic-Glass Cooktop section in this Owner's Guide. Use recommended cleaners and cleaning method. See instructions under General Care & Cleaning. • Cleaning materials not recommended for ceramic-glass cooktop have cooked onto surface. AREAS OF DISCOLORATION ON CERAMIC GLASS COOKTOP SURFACE • Mineral deposits from water and food. Scrub with a clean paper towel. 54 Solutions to remove marks. METAL MARKS ON CERAMIC GLASS COOKTOP SURFACE • Sliding or scraping of cooktop cleaning creme and polish with a clean damp paper towel until...
See Ceramic-Glass Cooktop section in this Owner's Guide. Use recommended cleaners and cleaning method. See instructions under General Care & Cleaning. • Cleaning materials not recommended for ceramic-glass cooktop have cooked onto surface. AREAS OF DISCOLORATION ON CERAMIC GLASS COOKTOP SURFACE • Mineral deposits from water and food. Scrub with a clean paper towel. 54 Solutions to remove marks. METAL MARKS ON CERAMIC GLASS COOKTOP SURFACE • Sliding or scraping of cooktop cleaning creme and polish with a clean damp paper towel until...


