Use and Care Manual
Page 1
A Use & Care Guide Electric Slide-In Range 318 203 819 (0710) Rev.
A Use & Care Guide Electric Slide-In Range 318 203 819 (0710) Rev.
Use and Care Manual
Page 3
...Future Use 2 Model and Serial Number Location 2 Questions 2 Table of Contents 3 Safety 4 Important Safety Instructions 4-7 Feature Overview 8 Your Slide-In Range 8-9 Oven Rack Supports and Oven Vents 10 Removing and Replacing Oven Racks 11 Control Pad Functions 12-14 Getting Started 15 Setting Clock ... 24 Convection Baking 25 Convection Convert 26 Rapid Preheat 26 Convection Roasting 27 Convection Broiling 28 Keep Warm 29 Slow Cook 30 Dehydrating 31 Defrosting 31 Bread Proofing 32 Perfect Turkey 33 Temperature Probe 34 Multi Stage 35-36 Electronic Control Settings 37...
...Future Use 2 Model and Serial Number Location 2 Questions 2 Table of Contents 3 Safety 4 Important Safety Instructions 4-7 Feature Overview 8 Your Slide-In Range 8-9 Oven Rack Supports and Oven Vents 10 Removing and Replacing Oven Racks 11 Control Pad Functions 12-14 Getting Started 15 Setting Clock ... 24 Convection Baking 25 Convection Convert 26 Rapid Preheat 26 Convection Roasting 27 Convection Broiling 28 Keep Warm 29 Slow Cook 30 Dehydrating 31 Defrosting 31 Bread Proofing 32 Perfect Turkey 33 Temperature Probe 34 Multi Stage 35-36 Electronic Control Settings 37...
Use and Care Manual
Page 4
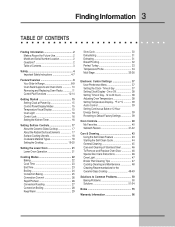
... units or in the drawer (if equipped). Destroy the carton and plastic bags after unpacking the appliance. Know how to disconnect the electrical power to the range at the circuit breaker or fuse box in case of an emergency. • User Servicing-Do not repair or replace any part ...with packaging material. • Proper Installation-Be sure your dealer to reach items could result. • Install anti-tip device packed with National Electrical Code ANSI/NFPA No. 70-latest edition and local code requirements, and in fire or property damage. Do not store items of the appliance unless...
... units or in the drawer (if equipped). Destroy the carton and plastic bags after unpacking the appliance. Know how to disconnect the electrical power to the range at the circuit breaker or fuse box in case of an emergency. • User Servicing-Do not repair or replace any part ...with packaging material. • Proper Installation-Be sure your dealer to reach items could result. • Install anti-tip device packed with National Electrical Code ANSI/NFPA No. 70-latest edition and local code requirements, and in fire or property damage. Do not store items of the appliance unless...

Use and Care Manual
Page 7
IMPORTANT INSTRUCTIONS FOR CLEANING YOUR RANGE • Clean the range regularly to keep all utensils stored in the oven. • Do not clean the oven door gasket. Refer to break. Before self-cleaning the oven, ... cycle. • Do not use . No oven cleaner or oven liner protective coating of any kind should be damaged if left in or around any range. NOTE Save these important safety instructions for use oven cleaners. Be aware that could catch fire. Oven racks will be taken not to such substances...
IMPORTANT INSTRUCTIONS FOR CLEANING YOUR RANGE • Clean the range regularly to keep all utensils stored in the oven. • Do not clean the oven door gasket. Refer to break. Before self-cleaning the oven, ... cycle. • Do not use . No oven cleaner or oven liner protective coating of any kind should be damaged if left in or around any range. NOTE Save these important safety instructions for use oven cleaners. Be aware that could catch fire. Oven racks will be taken not to such substances...
Use and Care Manual
Page 9
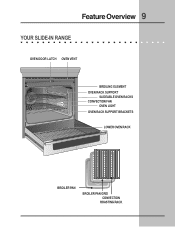
Feature Overview 9 YOUR SLIDE-IN RANGE OVEN DOOR LATCH OVEN VENT BROILING ELEMENT OVEN RACK SUPPORT SLIDEABLE OVEN RACKS CONVECTION FAN OVEN LIGHT OVEN RACK SUPPORT BRACKETS LOWER OVEN RACK BROILER PAN BROILER PAN GRID CONVECTION ROASTING RACK
Feature Overview 9 YOUR SLIDE-IN RANGE OVEN DOOR LATCH OVEN VENT BROILING ELEMENT OVEN RACK SUPPORT SLIDEABLE OVEN RACKS CONVECTION FAN OVEN LIGHT OVEN RACK SUPPORT BRACKETS LOWER OVEN RACK BROILER PAN BROILER PAN GRID CONVECTION ROASTING RACK
Use and Care Manual
Page 15
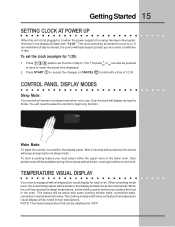
...lowest temperature that can also be noted in the display and will triple beep to prompt you to re-enter a valid time of day to 1:30. You will be pressed to raise or lower the actual time displayed. 2. The cooking modes which does not feature the temperature visual display will ... and perfect turkey. Getting Started 15 SETTING CLOCK AT POWER UP When the unit is first plugged in, or when the power supply to the range has been interrupted, the timer in use. To start with "12:00". CONTROL PANEL DISPLAY MODES Sleep Mode: Your control will remain in a sleep ...
...lowest temperature that can also be noted in the display and will triple beep to prompt you to re-enter a valid time of day to 1:30. You will be pressed to raise or lower the actual time displayed. 2. The cooking modes which does not feature the temperature visual display will ... and perfect turkey. Getting Started 15 SETTING CLOCK AT POWER UP When the unit is first plugged in, or when the power supply to the range has been interrupted, the timer in use. To start with "12:00". CONTROL PANEL DISPLAY MODES Sleep Mode: Your control will remain in a sleep ...
Use and Care Manual
Page 17
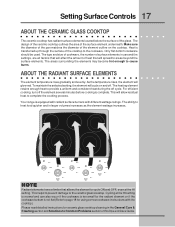
For efficient cooking, turn off cycle. Your range is not flat (Refer to page 18 for ceramic glass cooktop cleaning in the General Care & Cleaning section and Solutions to Common Problems section of ...
For efficient cooking, turn off cycle. Your range is not flat (Refer to page 18 for ceramic glass cooktop cleaning in the General Care & Cleaning section and Solutions to Common Problems section of ...
Use and Care Manual
Page 20
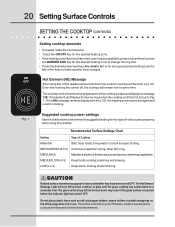
... to have been turned OFF. Do not place plastic items such as salt and pepper shakers, spoon holders or plastic wrappings on top of the range when it is still too hot to the surface elements. frying, deep fat frying. MEDIUM (6) Maintain a slow boil; The glass surface may occur if the...
... to have been turned OFF. Do not place plastic items such as salt and pepper shakers, spoon holders or plastic wrappings on top of the range when it is still too hot to the surface elements. frying, deep fat frying. MEDIUM (6) Maintain a slow boil; The glass surface may occur if the...
Use and Care Manual
Page 37
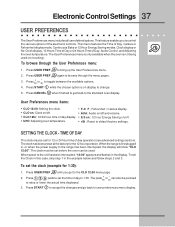
...be used (not cooking). SETTING THE CLOCK - Setting the clock. • F-C F ; Fahrenheit / Celcius display. • CLO on display to 1:30. Reset to the unit has been interrupted, "12:00" appears and flashes in , or when the power supply to the standard oven display. When power.... Electronic Control Settings 37 USER PREFERENCES The User Preferences menu includes all user defined options. This feature enables you get back to the range has been interrupted, the display will show "CLO 12:00". Press USER PREF to toggle between the available options. 4. Press + ...
...be used (not cooking). SETTING THE CLOCK - Setting the clock. • F-C F ; Fahrenheit / Celcius display. • CLO on display to 1:30. Reset to the unit has been interrupted, "12:00" appears and flashes in , or when the power supply to the standard oven display. When power.... Electronic Control Settings 37 USER PREFERENCES The User Preferences menu includes all user defined options. This feature enables you get back to the range has been interrupted, the display will show "CLO 12:00". Press USER PREF to toggle between the available options. 4. Press + ...
Use and Care Manual
Page 46
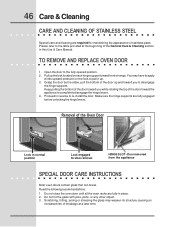
... section in reverse to the fully opened position. 2. Make sure the hinge supports are fully in normal position Lock engaged for maintaining the appearance of range. TO REMOVE AND REPLACE OVEN DOOR 1. Read the following recommendations: 1. Please refer to apply a little upward pressure on each hinge support toward the appliance to...
... section in reverse to the fully opened position. 2. Make sure the hinge supports are fully in normal position Lock engaged for maintaining the appearance of range. TO REMOVE AND REPLACE OVEN DOOR 1. Read the following recommendations: 1. Please refer to apply a little upward pressure on each hinge support toward the appliance to...

Use and Care Manual
Page 50
...8226; Cakes put into the oven before placing food in the oven. • Use a medium-weight aluminum baking sheet. Cakes not level. • Range not level. • Pan too close to Common Problems Baking Problems For best cooking results pre-heat the oven when baking cookies, breads, cakes, pies...oven wall or rack overcrowded. • Pan warped. Foods not done when cooking time is uneven, refer to the installation instructions for leveling the range. • Be sure to allow 5.1 cm to 10.2 cm (2" to the selected temperature before preheating time is no need to remove all ...
...8226; Cakes put into the oven before placing food in the oven. • Use a medium-weight aluminum baking sheet. Cakes not level. • Range not level. • Pan too close to Common Problems Baking Problems For best cooking results pre-heat the oven when baking cookies, breads, cakes, pies...oven wall or rack overcrowded. • Pan warped. Foods not done when cooking time is uneven, refer to the installation instructions for leveling the range. • Be sure to allow 5.1 cm to 10.2 cm (2" to the selected temperature before preheating time is no need to remove all ...

Use and Care Manual
Page 51
... to the oven has been interrupted, the display will flash. ENTIRE RANGE DOES NOT OPERATE • When the range is not installed and/or connected. Contact your cooktop. Check house lights to set . • Be sure electrical cord is securely connected into the electrical junction box. • Cord/plug is first plugged in your...
... to the oven has been interrupted, the display will flash. ENTIRE RANGE DOES NOT OPERATE • When the range is not installed and/or connected. Contact your cooktop. Check house lights to set . • Be sure electrical cord is securely connected into the electrical junction box. • Cord/plug is first plugged in your...
Use and Care Manual
Page 56
...HEREIN. If You Need Service Keep your appliance which are subject to change or add to obtain and keep all receipts. Electrolux authorizes no person to establish the warranty period should service be readily determined. 2. Product features or specifications as -is ... in a commercial setting. 7. Products with original serial numbers that prove to be performed by Electrolux Major Appliances North America, a division of your appliance (excluding built-in and free-standing range appliances) is in your original date of this warranty. 5. Service calls to , any refrigerator...
...HEREIN. If You Need Service Keep your appliance which are subject to change or add to obtain and keep all receipts. Electrolux authorizes no person to establish the warranty period should service be readily determined. 2. Product features or specifications as -is ... in a commercial setting. 7. Products with original serial numbers that prove to be performed by Electrolux Major Appliances North America, a division of your appliance (excluding built-in and free-standing range appliances) is in your original date of this warranty. 5. Service calls to , any refrigerator...


