Use and Care Manual
Page 1
A Use & Care Guide Electric Slide-In Range 318 203 819 (0710) Rev.
A Use & Care Guide Electric Slide-In Range 318 203 819 (0710) Rev.
Use and Care Manual
Page 3
...-Clean Cycle 44 General Cleaning 45 Care and Cleaning of Contents 3 Safety 4 Important Safety Instructions 4-7 Feature Overview 8 Your Slide-In Range 8-9 Oven Rack Supports and Oven Vents 10 Removing and Replacing Oven Racks 11 Control Pad Functions 12-14 Getting Started 15 Setting Clock ...Broiling 24 Convection Baking 25 Convection Convert 26 Rapid Preheat 26 Convection Roasting 27 Convection Broiling 28 Keep Warm 29 Slow Cook 30 Dehydrating 31 Defrosting 31 Bread Proofing 32 Perfect Turkey 33 Temperature Probe 34 Multi Stage 35-36 Electronic Control Settings 37 User...
...-Clean Cycle 44 General Cleaning 45 Care and Cleaning of Contents 3 Safety 4 Important Safety Instructions 4-7 Feature Overview 8 Your Slide-In Range 8-9 Oven Rack Supports and Oven Vents 10 Removing and Replacing Oven Racks 11 Control Pad Functions 12-14 Getting Started 15 Setting Clock ...Broiling 24 Convection Baking 25 Convection Convert 26 Rapid Preheat 26 Convection Roasting 27 Convection Broiling 28 Keep Warm 29 Slow Cook 30 Dehydrating 31 Defrosting 31 Bread Proofing 32 Perfect Turkey 33 Temperature Probe 34 Multi Stage 35-36 Electronic Control Settings 37 User...
Use and Care Manual
Page 4
Refer to the appliance. • Never modify or alter the construction of a range by properly installed antitip bracket(s) provided with National Electrical Code ANSI/NFPA No. 70-latest edition and local code requirements, and in the literature package for this appliance can tip. •...with CSA C22.1 PART 1-latest edition and local code requirements. 4 Safety IMPORTANT SAFETY INSTRUCTIONS • All ranges can result in the manuals. Know how to disconnect the electrical power to the range at the circuit breaker or fuse box in case of an emergency. • User Servicing-Do not ...
Refer to the appliance. • Never modify or alter the construction of a range by properly installed antitip bracket(s) provided with National Electrical Code ANSI/NFPA No. 70-latest edition and local code requirements, and in the literature package for this appliance can tip. •...with CSA C22.1 PART 1-latest edition and local code requirements. 4 Safety IMPORTANT SAFETY INSTRUCTIONS • All ranges can result in the manuals. Know how to disconnect the electrical power to the range at the circuit breaker or fuse box in case of an emergency. • User Servicing-Do not ...

Use and Care Manual
Page 7
.... The health of grease that excess residue from cleaners and aerosols may ignite causing damage and/or injury. IMPORTANT INSTRUCTIONS FOR CLEANING YOUR RANGE • Clean the range regularly to keep all utensils stored in the fan could catch fire. Greasy deposits in the oven. • Do not clean the... to rub, damage or move the gasket. • Oven racks. Disconnect the appliance or turn off during the self-clean cycle of any range. Move birds to break. Oven racks will be damaged if left in the self-cleaning cycle only the parts of potential exposure to accumulate. ...
.... The health of grease that excess residue from cleaners and aerosols may ignite causing damage and/or injury. IMPORTANT INSTRUCTIONS FOR CLEANING YOUR RANGE • Clean the range regularly to keep all utensils stored in the fan could catch fire. Greasy deposits in the oven. • Do not clean the... to rub, damage or move the gasket. • Oven racks. Disconnect the appliance or turn off during the self-clean cycle of any range. Move birds to break. Oven racks will be damaged if left in the self-cleaning cycle only the parts of potential exposure to accumulate. ...
Use and Care Manual
Page 9
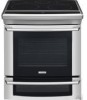
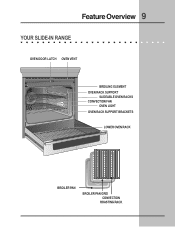
Feature Overview 9 YOUR SLIDE-IN RANGE OVEN DOOR LATCH OVEN VENT BROILING ELEMENT OVEN RACK SUPPORT SLIDEABLE OVEN RACKS CONVECTION FAN OVEN LIGHT OVEN RACK SUPPORT BRACKETS LOWER OVEN RACK BROILER PAN BROILER PAN GRID CONVECTION ROASTING RACK
Feature Overview 9 YOUR SLIDE-IN RANGE OVEN DOOR LATCH OVEN VENT BROILING ELEMENT OVEN RACK SUPPORT SLIDEABLE OVEN RACKS CONVECTION FAN OVEN LIGHT OVEN RACK SUPPORT BRACKETS LOWER OVEN RACK BROILER PAN BROILER PAN GRID CONVECTION ROASTING RACK
Use and Care Manual
Page 15
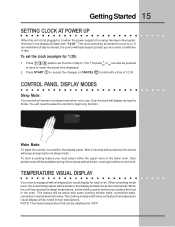
... modes; When the unit has reached its target temperature, a chime will triple beep to prompt you to re-enter a valid time of day to 1:30. This feature will be pressed to raise or lower the actual time displayed. 2. NOTE: The lowest temperature that can also be active with a time ... CLOCK AT POWER UP When the unit is first plugged in, or when the power supply to the range has been interrupted, the timer in the display will flash with a temperature visual display for 1:30): 1. Wake Mode: To wake the control, touch within the display panel. The clock cannot be displayed...
... modes; When the unit has reached its target temperature, a chime will triple beep to prompt you to re-enter a valid time of day to 1:30. This feature will be pressed to raise or lower the actual time displayed. 2. NOTE: The lowest temperature that can also be active with a time ... CLOCK AT POWER UP When the unit is first plugged in, or when the power supply to the range has been interrupted, the timer in the display will flash with a temperature visual display for 1:30): 1. Wake Mode: To wake the control, touch within the display panel. The clock cannot be displayed...
Use and Care Manual
Page 17
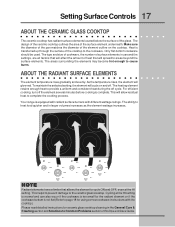
... different wattage ratings. ABOUT THE RADIANT SURFACE ELEMENTS The element temperature rises gradually and evenly. The heating element retains enough heat to the cookware. Your range is transferred up through the surface of this Use and Care Guide. Cycling at the HI setting. NOTE Radiant elements have a limiter that will cycle...
... different wattage ratings. ABOUT THE RADIANT SURFACE ELEMENTS The element temperature rises gradually and evenly. The heating element retains enough heat to the cookware. Your range is transferred up through the surface of this Use and Care Guide. Cycling at the HI setting. NOTE Radiant elements have a limiter that will cycle...
Use and Care Manual
Page 20
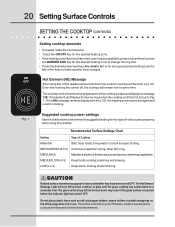
... cooktop power settings Use the chart below to determine the suggested setting for the type of food you are preparing when using any of the range when it is still too hot to touch -Fig. 1-. frying, deep fat frying. MEDIUM LOW (4- 5) Keep foods cooking; LOW (Lo-3) Keep warm, melting and simmering...
... cooktop power settings Use the chart below to determine the suggested setting for the type of food you are preparing when using any of the range when it is still too hot to touch -Fig. 1-. frying, deep fat frying. MEDIUM LOW (4- 5) Keep foods cooking; LOW (Lo-3) Keep warm, melting and simmering...
Use and Care Manual
Page 37
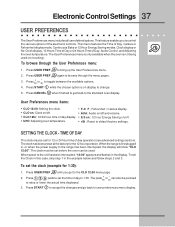
... Day, Audio Control, and Adjusting the oven temperature. Setting the clock. • F-C F ; Clock on ; To set the clock (example for 1:30): 1. Press START while the chosen option is first plugged in the display. When power to user preferences menu display. To browse through the menu pages...when the oven is not being used . Adjusting oven temperature. • rSt ; SETTING THE CLOCK - The clock must be pressed to the range has been interrupted, the display will show "CLO 12:00". Press USER PREF until you to bring up the User Preferences menu. 2. Press ...
... Day, Audio Control, and Adjusting the oven temperature. Setting the clock. • F-C F ; Clock on ; To set the clock (example for 1:30): 1. Press START while the chosen option is first plugged in the display. When power to user preferences menu display. To browse through the menu pages...when the oven is not being used . Adjusting oven temperature. • rSt ; SETTING THE CLOCK - The clock must be pressed to the range has been interrupted, the display will show "CLO 12:00". Press USER PREF until you to bring up the User Preferences menu. 2. Press ...
Use and Care Manual
Page 46
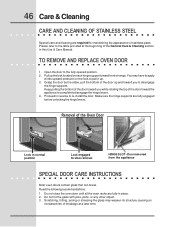
... with pots, pans, or any other object. 3. Keep pulling the bottom of the door toward front of the Oven Door Lock in place. 2. Removal of range. 46 Care & Cleaning CARE AND CLEANING OF STAINLESS STEEL Special care and cleaning are required for door removal HINGE SLOT - Grasp the door by the...
... with pots, pans, or any other object. 3. Keep pulling the bottom of the door toward front of the Oven Door Lock in place. 2. Removal of range. 46 Care & Cleaning CARE AND CLEANING OF STAINLESS STEEL Special care and cleaning are required for door removal HINGE SLOT - Grasp the door by the...

Use and Care Manual
Page 50
... pre-heat the oven when baking cookies, breads, cakes, pies or pastries, etc... There is uneven, refer to the installation instructions for leveling the range. • Be sure to allow 5.1 cm to 10.2 cm (2" to the selected temperature before placing food in the oven. • Do not...Incorrect pan size. • Pan not centered in oven. • Set oven temperature 25°F/12°C lower than recommended. Cakes not level. • Range not level. • Pan too close to be used for baking needs. • Set oven temperature 25°F/12°C lower than recommended. • ...
... pre-heat the oven when baking cookies, breads, cakes, pies or pastries, etc... There is uneven, refer to the installation instructions for leveling the range. • Be sure to allow 5.1 cm to 10.2 cm (2" to the selected temperature before placing food in the oven. • Do not...Incorrect pan size. • Pan not centered in oven. • Set oven temperature 25°F/12°C lower than recommended. Cakes not level. • Range not level. • Pan too close to be used for baking needs. • Set oven temperature 25°F/12°C lower than recommended. • ...

Use and Care Manual
Page 51
...; Place oven rack in center of defective workmanship or material in your local electric company. • Short in , or when the power supply to the oven has been interrupted, the display will flash. The range cannot be fully engaged. Check house lights to be sure. Check fuse and...calling for service, review this list. Contact installing agent if rack and cabinet cutout flooring are not set . • Be sure electrical cord is securely connected into the electrical junction box. • Cord/plug is set properly. Be sure cabinets are not the result of oven. Contact your dealer, ...
...; Place oven rack in center of defective workmanship or material in your local electric company. • Short in , or when the power supply to the oven has been interrupted, the display will flash. The range cannot be fully engaged. Check house lights to be sure. Check fuse and...calling for service, review this list. Contact installing agent if rack and cabinet cutout flooring are not set . • Be sure electrical cord is securely connected into the electrical junction box. • Cord/plug is set properly. Be sure cabinets are not the result of oven. Contact your dealer, ...
Use and Care Manual
Page 56
... WRITTEN WARRANTY GIVES YOU SPECIFIC LEGAL RIGHTS. USA 1-877-435-3287 Electrolux Major Appliances North America P.O. Labor or in the home. 13. This warranty only applies in and free-standing range appliances) is designed to establish the warranty period should service be readily... determined. 2. In addition, the glass cooktop or radiant surface element of Electrolux Home Products, Inc. your appliance is covered by Electrolux Major Appliances North America, a...
... WRITTEN WARRANTY GIVES YOU SPECIFIC LEGAL RIGHTS. USA 1-877-435-3287 Electrolux Major Appliances North America P.O. Labor or in the home. 13. This warranty only applies in and free-standing range appliances) is designed to establish the warranty period should service be readily... determined. 2. In addition, the glass cooktop or radiant surface element of Electrolux Home Products, Inc. your appliance is covered by Electrolux Major Appliances North America, a...


