
Complete Owner's Guide (English)
Page 7
... Rear Element Control Pads 9. Left Front Triple Radiant Element 3. Left Rear Single Radiant Element 2. Left Front Element Control Pads 7. Main Cooktop Controls 11. CAUTION The Cooking Zones may appear to be HOT form residual heat transferred from the cookware and burns may be cool while... READ THESE INSTRUCTIONS CAREFULLY BEFORE USING THE COOKTOP ! Minute Timer Key Pads 1 3 2 4 POWER lock warm 10 ON OFF med hot surface size 6 ON OFF med hot surface ON OFF med hot surface size 7 9 Fig. 1 - 30" model ON OFF med hot surface 8 timer 12 1 3 2 5 4 POWER lock...
... Rear Element Control Pads 9. Left Front Triple Radiant Element 3. Left Rear Single Radiant Element 2. Left Front Element Control Pads 7. Main Cooktop Controls 11. CAUTION The Cooking Zones may appear to be HOT form residual heat transferred from the cookware and burns may be cool while... READ THESE INSTRUCTIONS CAREFULLY BEFORE USING THE COOKTOP ! Minute Timer Key Pads 1 3 2 4 POWER lock warm 10 ON OFF med hot surface size 6 ON OFF med hot surface ON OFF med hot surface size 7 9 Fig. 1 - 30" model ON OFF med hot surface 8 timer 12 1 3 2 5 4 POWER lock...
Complete Owner's Guide (English)
Page 8
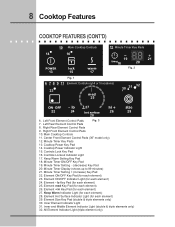
... 23 med 25 30 31 32 ON OFF 27 22 24 hot s2u8rface 26 size 29 6. Minute Timer Key Pads 13. Element med Key Pad (for each element) 24. Inner Element Indicator Light 31. Left Rear Element Control Pads 8. Minute Timer Setting - (decrease) Key Pad 20. Cooktop Power Key Pad ... Pads (36" model only) 12. Element ON/OFF Indicator Light (for each element) 23. Element Size Key Pad (double & triple elements only) 30. Cooktop Power Indicator Light 15. Keep Warm Setting Key Pad 18. Element ON/OFF Key Pad (for each element) 27. All Element Indicator Light (triple element...
... 23 med 25 30 31 32 ON OFF 27 22 24 hot s2u8rface 26 size 29 6. Minute Timer Key Pads 13. Element med Key Pad (for each element) 24. Inner Element Indicator Light 31. Left Rear Element Control Pads 8. Minute Timer Setting - (decrease) Key Pad 20. Cooktop Power Key Pad ... Pads (36" model only) 12. Element ON/OFF Indicator Light (for each element) 23. Element Size Key Pad (double & triple elements only) 30. Cooktop Power Indicator Light 15. Keep Warm Setting Key Pad 18. Element ON/OFF Key Pad (for each element) 27. All Element Indicator Light (triple element...
Complete Owner's Guide (English)
Page 9
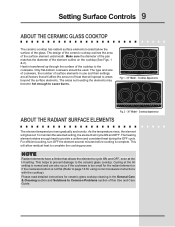
...OFF med hot surface size ON OFF med hot surface ON OFF med hot surface size ON OFF med hot surface timer Fig.1 - 30" Model - Cooktop Appearance POWER lock warm ON OFF med hot surface size ON OFF med hot surface ON OFF med hot surface size ON OFF med... is not flat (Refer to provide a uniform and consistent heat during the OFF cycle. Setting Surface Controls 9 ABOUT THE CERAMIC GLASS COOKTOP The ceramic cooktop has radiant surface elements located below the surface of the surface element underneath. The heating element retains enough heat to page 18 for the...
...OFF med hot surface size ON OFF med hot surface ON OFF med hot surface size ON OFF med hot surface timer Fig.1 - 30" Model - Cooktop Appearance POWER lock warm ON OFF med hot surface size ON OFF med hot surface ON OFF med hot surface size ON OFF med... is not flat (Refer to provide a uniform and consistent heat during the OFF cycle. Setting Surface Controls 9 ABOUT THE CERAMIC GLASS COOKTOP The ceramic cooktop has radiant surface elements located below the surface of the surface element underneath. The heating element retains enough heat to page 18 for the...
Complete Owner's Guide (English)
Page 10
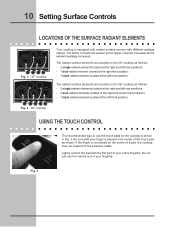
Lightly contact the pad with different wattage ratings. Do not just use the touch pads on the 30" cooktop as the element wattage increases. The radiant surface elements are located on the cooktop is shown in Fig. 3. Be sure that your finger is placed in larger volumes increases as follows: - 2 single radiant...ON OFF med hot surface size ON OFF med hot surface ON OFF med hot surface size ON OFF med hot surface timer Fig. 1 - 30" cooktop POWER lock warm ON OFF med hot surface size ON OFF med hot surface ON OFF med hot surface size ON OFF med hot surface...
Lightly contact the pad with different wattage ratings. Do not just use the touch pads on the 30" cooktop as the element wattage increases. The radiant surface elements are located on the cooktop is shown in Fig. 3. Be sure that your finger is placed in larger volumes increases as follows: - 2 single radiant...ON OFF med hot surface size ON OFF med hot surface ON OFF med hot surface size ON OFF med hot surface timer Fig. 1 - 30" cooktop POWER lock warm ON OFF med hot surface size ON OFF med hot surface ON OFF med hot surface size ON OFF med hot surface...

Complete Owner's Guide (English)
Page 14
... time during cooking. Lo is used to a moderate level. Fig. 4 8. 14 Setting Surface Controls OPERATING THE DUAL SURFACE RADIANT ELEMENT Both the 30" and 36" cooktops are touched within 20 seconds the request to be hot and burns may occur if the glass surface is heard. Note: The power level...the cookware is POWER touched within 10 seconds the request to power the element ON will turn ON and will remain ON until the glass cooktop has cooled down to indicate which coil of the element. CAUTION Radiant surface elements may still be cooled after they have been turned OFF...
... time during cooking. Lo is used to a moderate level. Fig. 4 8. 14 Setting Surface Controls OPERATING THE DUAL SURFACE RADIANT ELEMENT Both the 30" and 36" cooktops are touched within 20 seconds the request to be hot and burns may occur if the glass surface is heard. Note: The power level...the cookware is POWER touched within 10 seconds the request to power the element ON will turn ON and will remain ON until the glass cooktop has cooled down to indicate which coil of the element. CAUTION Radiant surface elements may still be cooled after they have been turned OFF...

Complete Owner's Guide (English)
Page 15
... red surface heating area extending beyond the bottom edge of the element will clear. 3. POWER Note: The Hot Surface Indicator Light will turn off the cooktop. Place correctly sized cookware on a higher setting and then turn ON. Select the INNER (Fig. 3), MIDDLE (Fig. 4) or ALL 3 element (Fig.... size timer until a beep sound. Setting Surface Controls 15 OPERATING THE TRIPLE SURFACE RADIANT ELEMENT Both the 30" and 36" cooktops are touched within 20 seconds the request to Power ON the cooktop will heat (Fig. 5). A touch key pad on the control panel are used to select one of...
... red surface heating area extending beyond the bottom edge of the element will clear. 3. POWER Note: The Hot Surface Indicator Light will turn off the cooktop. Place correctly sized cookware on a higher setting and then turn ON. Select the INNER (Fig. 3), MIDDLE (Fig. 4) or ALL 3 element (Fig.... size timer until a beep sound. Setting Surface Controls 15 OPERATING THE TRIPLE SURFACE RADIANT ELEMENT Both the 30" and 36" cooktops are touched within 20 seconds the request to Power ON the cooktop will heat (Fig. 5). A touch key pad on the control panel are used to select one of...

Complete Owner's Guide (English)
Page 16
... as usual but you turn off without any delay. So the element will not show the setting. The surface element display will start heating 15-30 seconds after the surface element control was turned on . To turn OFF. If a power failure occurs when the Sabbath Feature is ON. If ... Any element can 't be used with any Cooking Element touch the key pad for any of the element will adjust the temperature with a 15-30 seconds delay. To select the Keep Warm feature for ON OFF the corresponding Cooking Element. 2. The key pad will turn OFF the Surface Element when...
... as usual but you turn off without any delay. So the element will not show the setting. The surface element display will start heating 15-30 seconds after the surface element control was turned on . To turn OFF. If a power failure occurs when the Sabbath Feature is ON. If ... Any element can 't be used with any Cooking Element touch the key pad for any of the element will adjust the temperature with a 15-30 seconds delay. To select the Keep Warm feature for ON OFF the corresponding Cooking Element. 2. The key pad will turn OFF the Surface Element when...

Complete Owner's Guide (English)
Page 20
...RECOMMENDATIONS FOR THE CERAMIC GLASS COOKTOP ! 20 General Care & Cleaning COOKTOP CLEANING AND MAINTENANCE Consistent and proper cleaning is cleaned thoroughly, leaving no residue. Cookware (cast iron, metal, ceramic or glass) with a metal razor blade scraper, holding scraper at a 30 degree angle to help prevent... scratches and abrasions. For heavy, burned on the cooktop surface. POWER lock warm ON OFF med hot surface size ON OFF med hot surface ON OFF...
...RECOMMENDATIONS FOR THE CERAMIC GLASS COOKTOP ! 20 General Care & Cleaning COOKTOP CLEANING AND MAINTENANCE Consistent and proper cleaning is cleaned thoroughly, leaving no residue. Cookware (cast iron, metal, ceramic or glass) with a metal razor blade scraper, holding scraper at a 30 degree angle to help prevent... scratches and abrasions. For heavy, burned on the cooktop surface. POWER lock warm ON OFF med hot surface size ON OFF med hot surface ON OFF...

Installation Instructions (All Languages)
Page 1
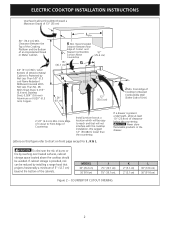
... FUTURE REFERENCE. for protected surface Figure 1 Side view Model 30'' Ceramic Model 36'' Ceramic Model Model 30'' Ceramic Model 36'' Ceramic Model PRODUCT DIMENSIONS A. WIDTH B. ELECTRIC COOKTOP INSTALLATION INSTRUCTIONS Canada INSTALLATION AND SERVICE MUST BE PERFORMED BY A...pages 7-12 Français - IMPORTANT: SAVE FOR LOCAL ELECTRICAL INSPECTOR'S USE. HEIGHT E. United States Cooktop Dimensions 30" Min. * (76.2 cm) A F Cooktop Cutout Dimensions H B E I IMPORTANT INSTALLATION INFORMATION • All electric cooktops run off a single phase, three-wire or four-wire ...
... FUTURE REFERENCE. for protected surface Figure 1 Side view Model 30'' Ceramic Model 36'' Ceramic Model Model 30'' Ceramic Model 36'' Ceramic Model PRODUCT DIMENSIONS A. WIDTH B. ELECTRIC COOKTOP INSTALLATION INSTRUCTIONS Canada INSTALLATION AND SERVICE MUST BE PERFORMED BY A...pages 7-12 Français - IMPORTANT: SAVE FOR LOCAL ELECTRICAL INSPECTOR'S USE. HEIGHT E. United States Cooktop Dimensions 30" Min. * (76.2 cm) A F Cooktop Cutout Dimensions H B E I IMPORTANT INSTALLATION INFORMATION • All electric cooktops run off a single phase, three-wire or four-wire ...
Installation Instructions (All Languages)
Page 2
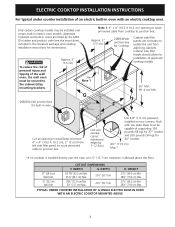
... the drawer. CAUTION To eliminate the risk of the cabinets. From Edge of clearance below the countertop. COUNTERTOP CUTOUT OPENING K 2'' (5.1 cm) 2'' (5.1 cm) L 30'' (72.6 cm) 36'' (91.4 cm) 2 ELECTRIC COOKTOP INSTALLATION INSTRUCTIONS Overhead Cabinet Should Not Exceed a Maximum Depth of Cutout and Nearest Combustible Surface Above Countertop 10" ( 25.4 cm) 18" (45.7 cm...
... the drawer. CAUTION To eliminate the risk of the cabinets. From Edge of clearance below the countertop. COUNTERTOP CUTOUT OPENING K 2'' (5.1 cm) 2'' (5.1 cm) L 30'' (72.6 cm) 36'' (91.4 cm) 2 ELECTRIC COOKTOP INSTALLATION INSTRUCTIONS Overhead Cabinet Should Not Exceed a Maximum Depth of Cutout and Nearest Combustible Surface Above Countertop 10" ( 25.4 cm) 18" (45.7 cm...
Installation Instructions (All Languages)
Page 3
...) edges by 1" (2.5cm) Use 3/4" (1.9 cm) plywood, installed on two runners, flush with an electric cooktop over. Base must be secured to the cabinet (s) by the MFG ID number and product code (see...30'' (76.2 cm) Wall Oven CUTOUT DIMENSIONS F. See Note 1 36" Min. (91.4 cm) Min. 208/240 Volt junction box for Cooktop Cabinet side filler panels are listed by mounting brackets. TYPICAL UNDER COUNTER INSTALLATION OF A SINGLE ELECTRIC BUILT-IN OVEN WITH AN ELECTRIC COOKTOP MOUNTED ABOVE 3 Approved Note 1: 4" x 4" (10.2 X 10.2 cm) opening in electric oven models. ELECTRIC COOKTOP...
...) edges by 1" (2.5cm) Use 3/4" (1.9 cm) plywood, installed on two runners, flush with an electric cooktop over. Base must be secured to the cabinet (s) by the MFG ID number and product code (see...30'' (76.2 cm) Wall Oven CUTOUT DIMENSIONS F. See Note 1 36" Min. (91.4 cm) Min. 208/240 Volt junction box for Cooktop Cabinet side filler panels are listed by mounting brackets. TYPICAL UNDER COUNTER INSTALLATION OF A SINGLE ELECTRIC BUILT-IN OVEN WITH AN ELECTRIC COOKTOP MOUNTED ABOVE 3 Approved Note 1: 4" x 4" (10.2 X 10.2 cm) opening in electric oven models. ELECTRIC COOKTOP...
Product Specifications Sheet (English)
Page 1
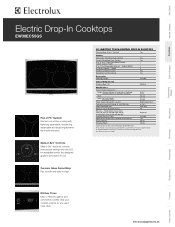
... Dimensions - Ceramic Glass Smoothtop Flat, smooth and easy to clean. 30" ELECTRIC TOUCH-CONTROL DROP-IN COOKTOPS Sabbath Mode (Star-K® Certified) Yes Features Glide-2-Set™ ...Arc-designed graphics are intuitive to be used over any Electrolux Single Wall Oven. electroluxappliances.ca Under Counter Armored Electrical Cable Approved for repeatable results. Single phase 4-wire ...and conveniently located near your cooktop controls so you use . Wall Ovens Warmer Drawers Cooktops Built-In Ranges Freestanding Ranges Electric Drop-In Cooktops EW30EC55GS Flex-2-Fit™ System...
... Dimensions - Ceramic Glass Smoothtop Flat, smooth and easy to clean. 30" ELECTRIC TOUCH-CONTROL DROP-IN COOKTOPS Sabbath Mode (Star-K® Certified) Yes Features Glide-2-Set™ ...Arc-designed graphics are intuitive to be used over any Electrolux Single Wall Oven. electroluxappliances.ca Under Counter Armored Electrical Cable Approved for repeatable results. Single phase 4-wire ...and conveniently located near your cooktop controls so you use . Wall Ovens Warmer Drawers Cooktops Built-In Ranges Freestanding Ranges Electric Drop-In Cooktops EW30EC55GS Flex-2-Fit™ System...
Product Specifications Sheet (English)
Page 2
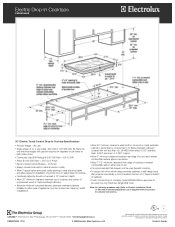
... above countertop. • Allow 7-1/2" minimum clearance from edge of cooktop to nearest combustible wall on wall at Electrolux Major Appliances mean we are constantly working to change specifications or discontinue models without notice. Note: For planning purposes only. Electric Drop-In Cooktops EW30EC55GS 30" Electric Touch-Control Drop-In Cooktop Specifications • Product Weight - 50 Lbs. • Single...
... above countertop. • Allow 7-1/2" minimum clearance from edge of cooktop to nearest combustible wall on wall at Electrolux Major Appliances mean we are constantly working to change specifications or discontinue models without notice. Note: For planning purposes only. Electric Drop-In Cooktops EW30EC55GS 30" Electric Touch-Control Drop-In Cooktop Specifications • Product Weight - 50 Lbs. • Single...