Complete Owner's Guide (English)
Page 4
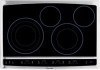
... following: • Remove all tape and packaging wrap before using the appliance. Know how to disconnect the electrical power to these instructions for this appliance. Be sure your dealer to play around the cooktop. • User Servicing. Flammable materials may also cause damage to climb or play with the National Electrical Code No. 70 - Do not repair or replace any other servicing should not...
... following: • Remove all tape and packaging wrap before using the appliance. Know how to disconnect the electrical power to these instructions for this appliance. Be sure your dealer to play around the cooktop. • User Servicing. Flammable materials may also cause damage to climb or play with the National Electrical Code No. 70 - Do not repair or replace any other servicing should not...

Complete Owner's Guide (English)
Page 5
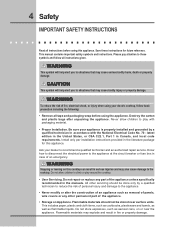
... leave children alone. IMPORTANT. When flaming food under the hood, turn off and the power resumes, the cooktop will not operate and an error message will expose a portion of the surface heating unit to direct contact and may cause the container to cause burns. The use baking soda, a dry chemical or foam-type extinguisher. • When heating fat or grease, watch it closely...
... leave children alone. IMPORTANT. When flaming food under the hood, turn off and the power resumes, the cooktop will not operate and an error message will expose a portion of the surface heating unit to direct contact and may cause the container to cause burns. The use baking soda, a dry chemical or foam-type extinguisher. • When heating fat or grease, watch it closely...
Complete Owner's Guide (English)
Page 6
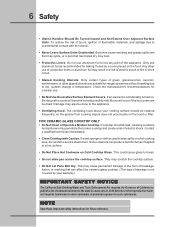
... a hot cooking area, be cleaned frequently, so the grease from cooking vapors does not accumulate on the food. Some cleaners can affect the ceramic-glass cooktop. (This type of electric shock. If a wet sponge or cloth is used as a cover placed on the hood or filter. Only use . • Do Not Use Decorative Surface Element Covers. If cooktop should be careful to a hot surface. • Do Not Place Hot Cookware on , the decorative cover...
... a hot cooking area, be cleaned frequently, so the grease from cooking vapors does not accumulate on the food. Some cleaners can affect the ceramic-glass cooktop. (This type of electric shock. If a wet sponge or cloth is used as a cover placed on the hood or filter. Only use . • Do Not Use Decorative Surface Element Covers. If cooktop should be careful to a hot surface. • Do Not Place Hot Cookware on , the decorative cover...
Complete Owner's Guide (English)
Page 9
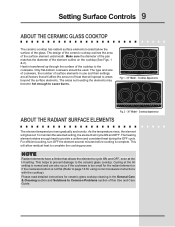
... the ceramic glass cooktop. Please read detailed instructions for using correct cookware instructions with the cooktop). Make sure the diameter of the pan matches the diameter of the glass. Cooktop Appearance POWER lock warm ON OFF med hot surface size ON OFF med hot surface ON OFF med hot surface size ON OFF med hot surface ON OFF med hot surface size timer Fig. 2 - 36" Model - The heating element retains enough heat to page 18 for ceramic glass cooktop cleaning in use and their settings...
... the ceramic glass cooktop. Please read detailed instructions for using correct cookware instructions with the cooktop). Make sure the diameter of the pan matches the diameter of the glass. Cooktop Appearance POWER lock warm ON OFF med hot surface size ON OFF med hot surface ON OFF med hot surface size ON OFF med hot surface ON OFF med hot surface size timer Fig. 2 - 36" Model - The heating element retains enough heat to page 18 for ceramic glass cooktop cleaning in use and their settings...

Complete Owner's Guide (English)
Page 11
... the cooktop is on until the heating surface area has cooled sufficiently. The indicator light located above the key pad will turn the Controls Lock OFF, touch and hold the POWER key pad. Setting Surface Controls 11 LED MESSAGES OR LIGHT INDICATORS DISPLAYED BY MAIN CONTROL CONTROLS LOCK - The hot surface indicator light will turn OFF a Cooking Element, touch the Cooking Element ON/OFF key pad once. When entering in the lock mode. The Cooktop POWER key pad activates the entire Cooktop. ERRORS CODES...
... the cooktop is on until the heating surface area has cooled sufficiently. The indicator light located above the key pad will turn the Controls Lock OFF, touch and hold the POWER key pad. Setting Surface Controls 11 LED MESSAGES OR LIGHT INDICATORS DISPLAYED BY MAIN CONTROL CONTROLS LOCK - The hot surface indicator light will turn OFF a Cooking Element, touch the Cooking Element ON/OFF key pad once. When entering in the lock mode. The Cooktop POWER key pad activates the entire Cooktop. ERRORS CODES...

Complete Owner's Guide (English)
Page 14
.... Indicator lights on indicate that only the INNER coil will heat (Fig. 3). The indicator light located above the will turn to a lower setting to finish cooking. POWER lock warm ON OFF med hot surface size ON OFF med hot surface ON OFF med hot surface size ON OFF med hot surface ON OFF med hot surface size timer Fig. 2 3. Fig. 4 8. 14 Setting Surface Controls OPERATING THE DUAL SURFACE RADIANT ELEMENT Both the 30" and 36" cooktops are used to indicate which coil of the dual radiant element...
.... Indicator lights on indicate that only the INNER coil will heat (Fig. 3). The indicator light located above the will turn to a lower setting to finish cooking. POWER lock warm ON OFF med hot surface size ON OFF med hot surface ON OFF med hot surface size ON OFF med hot surface ON OFF med hot surface size timer Fig. 2 3. Fig. 4 8. 14 Setting Surface Controls OPERATING THE DUAL SURFACE RADIANT ELEMENT Both the 30" and 36" cooktops are used to indicate which coil of the dual radiant element...

Complete Owner's Guide (English)
Page 15
... size pad once to turn to a lower setting to turn ON if the cooktop is the lowest power level available. POWER lock warm ON OFF med hot surface size ON OFF med hot surface ON OFF med hot surface size ON OFF med hot surface timer To Operate the Triple Surface Element: Fig. 1 1. Setting Surface Controls 15 OPERATING THE TRIPLE SURFACE RADIANT ELEMENT Both the 30" and 36" cooktops are equipped with "Triple" surface radiant elements located as shown in Figs. 1 & 2. When cooking...
... size pad once to turn to a lower setting to turn ON if the cooktop is the lowest power level available. POWER lock warm ON OFF med hot surface size ON OFF med hot surface ON OFF med hot surface size ON OFF med hot surface timer To Operate the Triple Surface Element: Fig. 1 1. Setting Surface Controls 15 OPERATING THE TRIPLE SURFACE RADIANT ELEMENT Both the 30" and 36" cooktops are equipped with "Triple" surface radiant elements located as shown in Figs. 1 & 2. When cooking...
Complete Owner's Guide (English)
Page 18
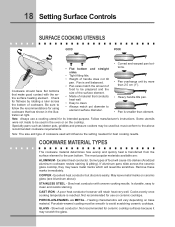
... but must be used in the illus- STAINLESS STEEL - Slow heat conductor with the entire surface heating element. Is durable, easy to the pan bottom. Not recommended for flatness by more than element. Heating characteristics will retain heat very well. GLASS - Not recommended for using cookware that has shown in the oven or on ceramic cooktops. Follow manufacturer's instructions. Pan is transferred from the surface element to clean and resists staining...
... but must be used in the illus- STAINLESS STEEL - Slow heat conductor with the entire surface heating element. Is durable, easy to the pan bottom. Not recommended for flatness by more than element. Heating characteristics will retain heat very well. GLASS - Not recommended for using cookware that has shown in the oven or on ceramic cooktops. Follow manufacturer's instructions. Pan is transferred from the surface element to clean and resists staining...

Complete Owner's Guide (English)
Page 20
... to the surface. Do not use a cooktop cleaner on the glass to OFF and the cooktop is COOL. ! Remove loosened soils with a paper towel. The special cooktop cleaning cream leaves a protective finish on a hot cooktop. POWER lock warm ON OFF med hot surface size ON OFF med hot surface ON OFF med hot surface size ON OFF med hot surface ON OFF med hot surface size timer Sliding aluminum or copper clad bottom pans on the cooktop surface. Metal marks...
... to the surface. Do not use a cooktop cleaner on the glass to OFF and the cooktop is COOL. ! Remove loosened soils with a paper towel. The special cooktop cleaning cream leaves a protective finish on a hot cooktop. POWER lock warm ON OFF med hot surface size ON OFF med hot surface ON OFF med hot surface size ON OFF med hot surface ON OFF med hot surface size timer Sliding aluminum or copper clad bottom pans on the cooktop surface. Metal marks...
Complete Owner's Guide (English)
Page 22
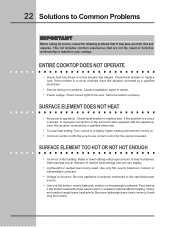
... cooktop. Check/reset breaker or replace fuse. Turn control to be sure. Be sure to appliance. Use only flat, evenly balanced, medium or heavyweight cookware. • Voltage is a circuit overload, have this situation corrected by a qualified electrician. • Too low heat setting. Pans having a flat bottom heat better than warped pans. Contact installation agent or dealer. • Power outage. SURFACE ELEMENT DOES NOT HEAT • No power to use correct control for service, review...
... cooktop. Check/reset breaker or replace fuse. Turn control to be sure. Be sure to appliance. Use only flat, evenly balanced, medium or heavyweight cookware. • Voltage is a circuit overload, have this situation corrected by a qualified electrician. • Too low heat setting. Pans having a flat bottom heat better than warped pans. Contact installation agent or dealer. • Power outage. SURFACE ELEMENT DOES NOT HEAT • No power to use correct control for service, review...
Complete Owner's Guide (English)
Page 23
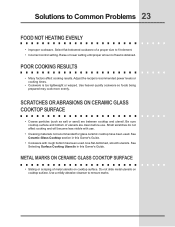
... or sand) are clean before use . • Cleaning materials not recommended for glass ceramic cooktop have been used . Be sure cooktop surface and bottom of a proper size to fit element. • Incorrect control setting. Solutions to remove marks. See Selecting Surface Cooking Utensils in this Owner's Guide. POOR COOKING RESULTS • Many factors affect cooking results. See Ceramic-Glass Cooktop section in this Owner's Guide. • Cookware with use . Adjust the recipe's recommended power levels or cooking times. •...
... or sand) are clean before use . • Cleaning materials not recommended for glass ceramic cooktop have been used . Be sure cooktop surface and bottom of a proper size to fit element. • Incorrect control setting. Solutions to remove marks. See Selecting Surface Cooking Utensils in this Owner's Guide. POOR COOKING RESULTS • Many factors affect cooking results. See Ceramic-Glass Cooktop section in this Owner's Guide. • Cookware with use . Adjust the recipe's recommended power levels or cooking times. •...

Complete Owner's Guide (English)
Page 26
... numbers below. In Canada, your appliance is warranted by Electrolux Canada Corp. Obligations for appliances not in ordinary household use or used , and maintained in your appliance. 9. Product that prove to be required. Service calls to be defective in and free-standing range appliances) is covered by this warranty. 5. LIMITATION OF REMEDIES CUSTOMER'S SOLE AND EXCLUSIVE REMEDY UNDER THIS LIMITED WARRANTY SHALL BE REPAIR OR REPLACEMENT...
... numbers below. In Canada, your appliance is warranted by Electrolux Canada Corp. Obligations for appliances not in ordinary household use or used , and maintained in your appliance. 9. Product that prove to be required. Service calls to be defective in and free-standing range appliances) is covered by this warranty. 5. LIMITATION OF REMEDIES CUSTOMER'S SOLE AND EXCLUSIVE REMEDY UNDER THIS LIMITED WARRANTY SHALL BE REPAIR OR REPLACEMENT...

Installation Instructions (All Languages)
Page 1
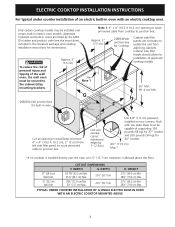
... SAVE THESE INSTRUCTIONS FOR FUTURE REFERENCE. for protected surface Figure 1 Side view Model 30'' Ceramic Model 36'' Ceramic Model Model 30'' Ceramic Model 36'' Ceramic Model PRODUCT DIMENSIONS A. for unprotected cabinet 24" (61 cm) min. A English - pages 19-20 1 WARNING FOR YOUR SAFETY: Do not store or use gasoline or other flammable vapors and liquids in inches (cm). United States Cooktop Dimensions 30" Min. * (76.2 cm) A F Cooktop Cutout Dimensions H B E I IMPORTANT INSTALLATION INFORMATION • All electric cooktops run...
... SAVE THESE INSTRUCTIONS FOR FUTURE REFERENCE. for protected surface Figure 1 Side view Model 30'' Ceramic Model 36'' Ceramic Model Model 30'' Ceramic Model 36'' Ceramic Model PRODUCT DIMENSIONS A. for unprotected cabinet 24" (61 cm) min. A English - pages 19-20 1 WARNING FOR YOUR SAFETY: Do not store or use gasoline or other flammable vapors and liquids in inches (cm). United States Cooktop Dimensions 30" Min. * (76.2 cm) A F Cooktop Cutout Dimensions H B E I IMPORTANT INSTALLATION INFORMATION • All electric cooktops run...
Installation Instructions (All Languages)
Page 2
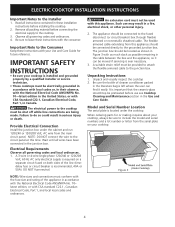
... Edge of Cutout to Front Edge of Countertop Install junction box at least 10" (25.4cm) of burns or fire by Not Less Than 1/8" (0.3 cm) Flame Retardant Millboard Covered With Not Less Than No. 28 MGS Sheet Steel, 0.015" (0.4 mm) Stainless Steel, 0.024" (0.6 mm) Aluminum or 0.020" (0.5 mm) Copper. K Min. If cabinet storage is provided, risk can be reduced by installing a range hood that will...
... Edge of Cutout to Front Edge of Countertop Install junction box at least 10" (25.4cm) of burns or fire by Not Less Than 1/8" (0.3 cm) Flame Retardant Millboard Covered With Not Less Than No. 28 MGS Sheet Steel, 0.015" (0.4 mm) Stainless Steel, 0.024" (0.6 mm) Aluminum or 0.020" (0.5 mm) Copper. K Min. If cabinet storage is provided, risk can be reduced by installing a range hood that will...
Installation Instructions (All Languages)
Page 3
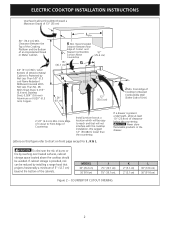
...'' (68.6 cm) Wall Oven 30'' (76.2 cm) Wall Oven CUTOUT DIMENSIONS F. WIDTH G. ELECTRIC COOKTOP INSTALLATION INSTRUCTIONS For typical under counter installation of the wall oven, the wall oven must be installed over certain built-in electric oven models. Only certain cooktop models may be capable of supporting 150 pounds (68 kg) for 27" models and 200 pounds (90 kg) for dimensions). Cabinet side filler height should allow for Cooktop Cabinet side filler panels are listed by 1" (2.5cm) Use 3/4" (1.9 cm) plywood, installed on two runners...
...'' (68.6 cm) Wall Oven 30'' (76.2 cm) Wall Oven CUTOUT DIMENSIONS F. WIDTH G. ELECTRIC COOKTOP INSTALLATION INSTRUCTIONS For typical under counter installation of the wall oven, the wall oven must be installed over certain built-in electric oven models. Only certain cooktop models may be capable of supporting 150 pounds (68 kg) for 27" models and 200 pounds (90 kg) for dimensions). Cabinet side filler height should allow for Cooktop Cabinet side filler panels are listed by 1" (2.5cm) Use 3/4" (1.9 cm) plywood, installed on two runners...
Installation Instructions (All Languages)
Page 4
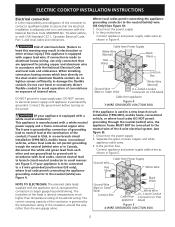
... fuse size and rating of the line (timedelay fuse or circuit breaker is installed and grounded properly by a qualified installer or service technician. • These cooktops must be sure to the circuit panel at this appliance. Unpack and visually inspect the cooktop 2. It is located under the cabinet and run 120/240 or 120/208 Volt, AC wire from this appliance should be connected directly to the junction box. Model and Serial Number Location...
... fuse size and rating of the line (timedelay fuse or circuit breaker is installed and grounded properly by a qualified installer or service technician. • These cooktops must be sure to the circuit panel at this appliance. Unpack and visually inspect the cooktop 2. It is located under the cabinet and run 120/240 or 120/208 Volt, AC wire from this appliance should be connected directly to the junction box. Model and Serial Number Location...
Installation Instructions (All Languages)
Page 5
... household wiring. ELECTRIC COOKTOP INSTALLATION INSTRUCTIONS Electrical connection It is the responsibility and obligation of the consumer to contact a qualified installer to assure that are UL-recognized for joining copper and aluminum wire in usual manner see figure 5): 1. The current carrying capacity of the conductor is governed by connection of grounding lead to branch circuit-neutral conductor in accordance with local codes, connect neutral...
... household wiring. ELECTRIC COOKTOP INSTALLATION INSTRUCTIONS Electrical connection It is the responsibility and obligation of the consumer to contact a qualified installer to assure that are UL-recognized for joining copper and aluminum wire in usual manner see figure 5): 1. The current carrying capacity of the conductor is governed by connection of grounding lead to branch circuit-neutral conductor in accordance with local codes, connect neutral...
Installation Instructions (All Languages)
Page 6
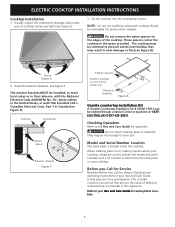
... unit cutout center line 2 Retainer brackets Figure 8 Granite countertop Installation Kit A Granite Countertop Installation kit # 903061-9010 can be removable for service when needed. The cooktop must be sure to include the model and serial numbers and a lot number or letter from the serial plate on your Use and Care Guide. It may save you Call for Service Read the Before You Call for sevice phone numbers. 6 Cooktop Countertop Nylon spacer Retainer bracket Figure 7 6 Nylon spacers Position brackets on...
... unit cutout center line 2 Retainer brackets Figure 8 Granite countertop Installation Kit A Granite Countertop Installation kit # 903061-9010 can be removable for service when needed. The cooktop must be sure to include the model and serial numbers and a lot number or letter from the serial plate on your Use and Care Guide. It may save you Call for Service Read the Before You Call for sevice phone numbers. 6 Cooktop Countertop Nylon spacer Retainer bracket Figure 7 6 Nylon spacers Position brackets on...
Product Specifications Sheet (English)
Page 1
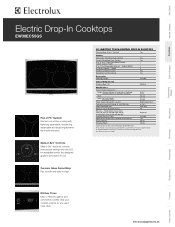
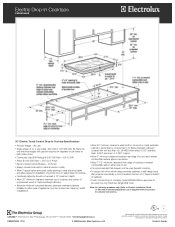
... Element - 1200W 2 Hot-Surface Indicator Lights Yes Sealed Spill Control Cooktop Yes Accessories Cleaning Sponge Included Colour / UPC (0-57112) Stainless Steel ( S ) 09670-4 Specifications Overall Exterior Dimensions - NOTE: Always consult local and / or national electric codes. Microwaves Vent Hoods Dishwashers Refrigerators Freezers Kitchen Timer Easy to Product Installation Guide for repeatable results. Glide-2-Set™ Controls Glide-2-Set™ electronic controls have precise settings and blue LED for detailed installation instructions on both sides of line...
... Element - 1200W 2 Hot-Surface Indicator Lights Yes Sealed Spill Control Cooktop Yes Accessories Cleaning Sponge Included Colour / UPC (0-57112) Stainless Steel ( S ) 09670-4 Specifications Overall Exterior Dimensions - NOTE: Always consult local and / or national electric codes. Microwaves Vent Hoods Dishwashers Refrigerators Freezers Kitchen Timer Easy to Product Installation Guide for repeatable results. Glide-2-Set™ Controls Glide-2-Set™ electronic controls have precise settings and blue LED for detailed installation instructions on both sides of line...
Product Specifications Sheet (English)
Page 2
..." minimum clearance when bottom of wood or metal overhead cabinet is protected by not less than No. 28 MGS sheet steel, 0.015" stainless steel, 0.024" aluminum or 0.020" copper. • Allow 2" minimum clearance between rear edge of cutout and nearest combustible surface above countertop. • Allow 7-1/2" minimum clearance from edge of cooktop to nearest combustible wall on wall at Electrolux Major Appliances mean we are constantly working to change specifications or discontinue models...
..." minimum clearance when bottom of wood or metal overhead cabinet is protected by not less than No. 28 MGS sheet steel, 0.015" stainless steel, 0.024" aluminum or 0.020" copper. • Allow 2" minimum clearance between rear edge of cutout and nearest combustible surface above countertop. • Allow 7-1/2" minimum clearance from edge of cooktop to nearest combustible wall on wall at Electrolux Major Appliances mean we are constantly working to change specifications or discontinue models...


