Use and Care Guide
Page 3
Cooktop Features 7..-.8 Setting Surface Controls 9.-18 Aboutthe CeramicGlass Cooktop 9 Aboutthe RadiantSurfaceElements 9 Locationsof the SurfaceRadiantElements.......... 10 Usingthe TouchControl 1..0 LED Messagesor Light Indicators Displayedby MainControl 1. 1 Light IndicatorsDisplayedby CookingElement Controls 1..1. Questions 2.... Lockingthe Controls 1..7 SurfaceCookingutensils 1..8 CookwareMaterialTypes 1.8 General Care& Cleaning 1. 9-21 Care& CleaningTable 1..9 CooktopCleaningand Maintenance 2. 0 CleaningRecommendationfsor the CeramicGlass Cooktop 2..0 Care& Cleaningof ...
Cooktop Features 7..-.8 Setting Surface Controls 9.-18 Aboutthe CeramicGlass Cooktop 9 Aboutthe RadiantSurfaceElements 9 Locationsof the SurfaceRadiantElements.......... 10 Usingthe TouchControl 1..0 LED Messagesor Light Indicators Displayedby MainControl 1. 1 Light IndicatorsDisplayedby CookingElement Controls 1..1. Questions 2.... Lockingthe Controls 1..7 SurfaceCookingutensils 1..8 CookwareMaterialTypes 1.8 General Care& Cleaning 1. 9-21 Care& CleaningTable 1..9 CooktopCleaningand Maintenance 2. 0 CleaningRecommendationfsor the CeramicGlass Cooktop 2..0 Care& Cleaningof ...

Use and Care Guide
Page 4
...specifically recommended in fire or property damage. latest edition in the United States, or CSA C22.1, Part 1 in Canada, and local code requirements, install only per installation instructions provided in case of an emergency. Storage on or near surface...appliance. Proper Installation. Never modify or alter the construction of the appliance. This manual contains importantsafetysymbolsand instructions.Please payattention to the appliance at the circuit breaker or fuse box in the literature package for this appliance. Do not repair or replace any other servicing should not ...
...specifically recommended in fire or property damage. latest edition in the United States, or CSA C22.1, Part 1 in Canada, and local code requirements, install only per installation instructions provided in case of an emergency. Storage on or near surface...appliance. Proper Installation. Never modify or alter the construction of the appliance. This manual contains importantsafetysymbolsand instructions.Please payattention to the appliance at the circuit breaker or fuse box in the literature package for this appliance. Do not repair or replace any other servicing should not ...
Use and Care Guide
Page 5
... on . When flaming food under the hood, turn off and the power resumes, the cooktop will not operate and an error message will be worn while using the appliance. Proper relationship of the surface heating unit to sit or stand on Grease Fires. IMPORTANT SAFETY INSTRUCTIONS FOR USING YOUR COOKTOP • Know which touch key pads controls each surface unit. • Clean the appliance regularly...
... on . When flaming food under the hood, turn off and the power resumes, the cooktop will not operate and an error message will be worn while using the appliance. Proper relationship of the surface heating unit to sit or stand on Grease Fires. IMPORTANT SAFETY INSTRUCTIONS FOR USING YOUR COOKTOP • Know which touch key pads controls each surface unit. • Clean the appliance regularly...
Use and Care Guide
Page 6
.... If an element is accidentally turned on the hood or filter. The ventilating hood above your warranty). If a wet sponge or cloth is not covered by your cooking surface should break, cleaning solutions and spillovers may also be done to break. • Do not slide pan across the cooktop surface. Some cleaners can affect the ceramic-glass cooktop. (This type of electric shock or fire or short circuit. They may...
.... If an element is accidentally turned on the hood or filter. The ventilating hood above your warranty). If a wet sponge or cloth is not covered by your cooking surface should break, cleaning solutions and spillovers may also be done to break. • Do not slide pan across the cooktop surface. Some cleaners can affect the ceramic-glass cooktop. (This type of electric shock or fire or short circuit. They may...
Use and Care Guide
Page 9
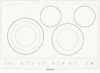
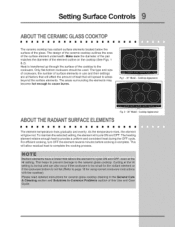
.... The heating element retains enough heat to cause burns. Only fiat-bottom cookware should be used. As the temperature rises, the element will cycle ON and OFF. ng Surface Controls ABOUTTHECE M)C G SS COOKTOP m [] m m [] m m m m m m m m [] m m m m m m m m The ceramic cooktop has radiant surface elements located below the surface of heat that will allow residual heat to complete the cooking process. Heat is complete. The type and size of cookware, the number of surface elements in use and their settings are...
.... The heating element retains enough heat to cause burns. Only fiat-bottom cookware should be used. As the temperature rises, the element will cycle ON and OFF. ng Surface Controls ABOUTTHECE M)C G SS COOKTOP m [] m m [] m m m m m m m m [] m m m m m m m m The ceramic cooktop has radiant surface elements located below the surface of heat that will allow residual heat to complete the cooking process. Heat is complete. The type and size of cookware, the number of surface elements in use and their settings are...
Use and Care Guide
Page 11
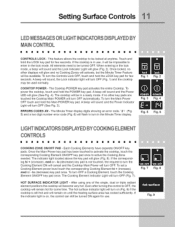
... turn the Cooking Element ON will cancel and the Cooktop Main Power will turn OFR To set a Cooking Element power level touch the corresponding Cooking Element hi + (increase), meal or - HOT SURFACE INDICATOR LIGHT - A beep will sound and the Power LED will turn the Controls Lock OFF, touch and hold the LOCK key pad for few seconds. ERRORS CODES XX- The Cooking Element Indicator Light will glow (See Fig. 4). When entering in the lock mode. To turn OFF (Fig. 7). To turn...
... turn the Cooking Element ON will cancel and the Cooktop Main Power will turn OFR To set a Cooking Element power level touch the corresponding Cooking Element hi + (increase), meal or - HOT SURFACE INDICATOR LIGHT - A beep will sound and the Power LED will turn the Controls Lock OFF, touch and hold the LOCK key pad for few seconds. ERRORS CODES XX- The Cooking Element Indicator Light will glow (See Fig. 4). When entering in the lock mode. To turn OFF (Fig. 7). To turn...
Use and Care Guide
Page 14
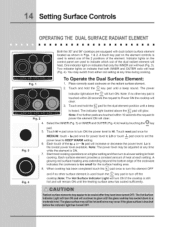
... switch from either coil setting at any time during cooking. A touch key pad on indicate that only the INNER coil will heat (Fig. 3). Each touch of the element. To Operate the Dual Surface Element: Fig. I 1. Setting Surface Controls OPERAT(NGTHE DUAL SURFACERAD(ANT ELEMENT Both the 30" and 36" cooktops are touched within 20 seconds the request to Power ON the cooktop will clear. Indicator lights on the radiant surface element...
... switch from either coil setting at any time during cooking. A touch key pad on indicate that only the INNER coil will heat (Fig. 3). Each touch of the element. To Operate the Dual Surface Element: Fig. I 1. Setting Surface Controls OPERAT(NGTHE DUAL SURFACERAD(ANT ELEMENT Both the 30" and 36" cooktops are touched within 20 seconds the request to Power ON the cooktop will clear. Indicator lights on the radiant surface element...
Use and Care Guide
Page 15
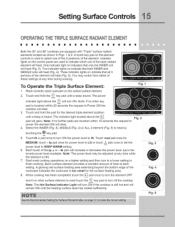
... Hot Surface Indicator Light will clear. 3. Touch and hold the O key pad until a beep sound. Indicator lights on a higher setting and then turn ON the power level to HI. Fig. 1 To Operate the Triple Surface Element: 1. Place correctly sized cookware on the element controls is ON. 7. Fig. 2 4. Select the INNER (Fig. 3), MIDDLE (Fig. 4) or ALL 3 element (Fig. 5) to KEEP WARM setting. 6. Start most cooking operations on the control panel are used...
... Hot Surface Indicator Light will clear. 3. Touch and hold the O key pad until a beep sound. Indicator lights on a higher setting and then turn ON the power level to HI. Fig. 1 To Operate the Triple Surface Element: 1. Place correctly sized cookware on the element controls is ON. 7. Fig. 2 4. Select the INNER (Fig. 3), MIDDLE (Fig. 4) or ALL 3 element (Fig. 5) to KEEP WARM setting. 6. Start most cooking operations on the control panel are used...

Use and Care Guide
Page 18
... which will influence the setting needed for ceramic cooktop surfaces because it to be used will resemble scratches. Is durable, easy to the above ). tration at right. Specialty pans such as lobster pots, griddles and pressure cookers may be used in the illus- Excellent heat conductor. Remove these marks immediately. May leave metal marks on the cooktop. Not recommended for use a cooking utensil for its...
... which will influence the setting needed for ceramic cooktop surfaces because it to be used will resemble scratches. Is durable, easy to the above ). tration at right. Specialty pans such as lobster pots, griddles and pressure cookers may be used in the illus- Excellent heat conductor. Remove these marks immediately. May leave metal marks on the cooktop. Not recommended for use a cooking utensil for its...
Use and Care Guide
Page 19
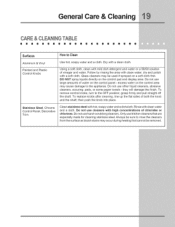
.... they will damage the finish. Clean stainless steel with clean water; DO NOT spray liquids directly on a soft cloth first. To remove control knobs, turn to Clean Use hot, soapy water and a cloth. Dry with mild dish detergent and water or a 50/50 solution of both the knob and the shaft; General Care & Cleaning CARE& CLEANINGTABLE Surfaces Aluminum & Vinyl Painted and Plastic Control Knobs Stainless Steel, Chrome Control Panel, Decorative Trim How to the OFF position...
.... they will damage the finish. Clean stainless steel with clean water; DO NOT spray liquids directly on a soft cloth first. To remove control knobs, turn to Clean Use hot, soapy water and a cloth. Dry with mild dish detergent and water or a 50/50 solution of both the knob and the shaft; General Care & Cleaning CARE& CLEANINGTABLE Surfaces Aluminum & Vinyl Painted and Plastic Control Knobs Stainless Steel, Chrome Control Panel, Decorative Trim How to the OFF position...
Use and Care Guide
Page 20
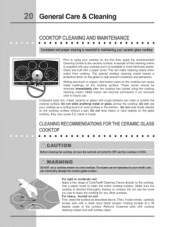
... surface clean. A sample of CookTop® Cleaning Creme directly to crack or break. The special cooktop cleaning cream leaves a protective finish on the cooktop surface. Metal marks can cause metal markings on the glass to future use. This will make cleaning easier when soiled from cooking. General Care & Cleani COOKTOPCLEANINGANDMNNTENANCE Prior to using the cooktop cleaning cream. Sliding aluminum or copper clad bottom pans on the cooktop can become permanent if not removed...
... surface clean. A sample of CookTop® Cleaning Creme directly to crack or break. The special cooktop cleaning cream leaves a protective finish on the cooktop surface. Metal marks can cause metal markings on the glass to future use. This will make cleaning easier when soiled from cooking. General Care & Cleani COOKTOPCLEANINGANDMNNTENANCE Prior to using the cooktop cleaning cream. Sliding aluminum or copper clad bottom pans on the cooktop can become permanent if not removed...
Use and Care Guide
Page 21
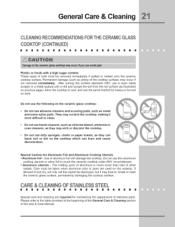
... a high sugar content: These types of soils must be removed immediately if spilled or melted onto the ceramic cooktop surface. cA.RE. 20FST.AmS,T.LE..EL.,,,,, Special care and cleaning are used on previous page). The melting point of aluminum is much lower than that of other metals. Care must be taken when aluminum pots or pans are required for maintaining the appearance of stainless parts...
... a high sugar content: These types of soils must be removed immediately if spilled or melted onto the ceramic cooktop surface. cA.RE. 20FST.AmS,T.LE..EL.,,,,, Special care and cleaning are used on previous page). The melting point of aluminum is much lower than that of other metals. Care must be taken when aluminum pots or pans are required for maintaining the appearance of stainless parts...
Use and Care Guide
Page 22
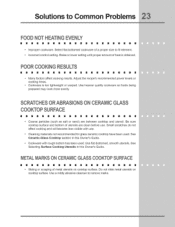
...; Service wiring not complete. Solutions to be sure. Call local electric company. Voltage is ON. e Too low heat setting. SURFACEELEMENTTOO HOTOR NOTHOTENOUGH Incorrect control setting. Use only flat bottom, evenly balanced, medium or heavyweight cookware. Because lightweight pans heat unevenly, foods may burn easily. Check/reset breaker or replace fuse. Check house lights to Common Problems ENT[ COOKTOPDOESNOTOPE_TE House fuse has blown or circuit breaker has tripped. Check/reset breaker or replace fuse...
...; Service wiring not complete. Solutions to be sure. Call local electric company. Voltage is ON. e Too low heat setting. SURFACEELEMENTTOO HOTOR NOTHOTENOUGH Incorrect control setting. Use only flat bottom, evenly balanced, medium or heavyweight cookware. Because lightweight pans heat unevenly, foods may burn easily. Check/reset breaker or replace fuse. Check house lights to Common Problems ENT[ COOKTOPDOESNOTOPE_TE House fuse has blown or circuit breaker has tripped. Check/reset breaker or replace fuse...
Use and Care Guide
Page 23
... clean before use . , Cleaning materials not recommended for glass ceramic cooktop have been used . Be sure cooktop surface and bottom of heat is too lightweight or warped. See Ceramic-Glass Cooktop section in this Owner's Guide. * Cookware with use . Raise or lower setting until proper amount of utensils are between cooktop and utensil. METALMARKSONCE_MIC G_SS COOKTOPSURFACE Sliding or scraping of a proper size to fit element. , Incorrect control setting. See Selecting Surface Cooking Utensils in this Owner's Guide...
... clean before use . , Cleaning materials not recommended for glass ceramic cooktop have been used . Be sure cooktop surface and bottom of heat is too lightweight or warped. See Ceramic-Glass Cooktop section in this Owner's Guide. * Cookware with use . Raise or lower setting until proper amount of utensils are between cooktop and utensil. METALMARKSONCE_MIC G_SS COOKTOPSURFACE Sliding or scraping of a proper size to fit element. , Incorrect control setting. See Selecting Surface Cooking Utensils in this Owner's Guide...
Use and Care Guide
Page 26
... year limited warranty. USA 1-877-435-3287 Electrotux Major Appliances P.O. Labor or in the USA, Puerto Rico and Canada. For one year limited warranty. Products used other cosmetic parts. 11. Product features or specifications as removal of trim, cupboards, shelves, etc., which has proven to repair or replace appliance light bulbs, air filters, water filters, other consumables, or knobs, handles, or other than authorized service companies;
... year limited warranty. USA 1-877-435-3287 Electrotux Major Appliances P.O. Labor or in the USA, Puerto Rico and Canada. For one year limited warranty. Products used other cosmetic parts. 11. Product features or specifications as removal of trim, cupboards, shelves, etc., which has proven to repair or replace appliance light bulbs, air filters, water filters, other consumables, or knobs, handles, or other than authorized service companies;
Installation Instructions
Page 1
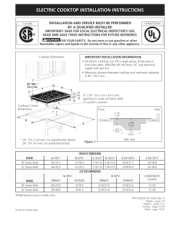
...-wire or four-wire cable, 240/208 volt, 60 hertz, AC only electrical supply with ground. • Minimum distance between cooktop and overhead cabinetry is 30" (76.2 cm). 30" Min. * A Cooktop Cutout Dimensions H 4" X 8" (10.2 cm x 20.3 cm) C opening to route armored cable a panel is present Front 3 118 (7,9) G 3½ Rear i ii * 30" (76.2 cm) min. pages 7-12 Frangais - pages 19-20 Canada INSTALLATION AND SERVICE MUST...
...-wire or four-wire cable, 240/208 volt, 60 hertz, AC only electrical supply with ground. • Minimum distance between cooktop and overhead cabinetry is 30" (76.2 cm). 30" Min. * A Cooktop Cutout Dimensions H 4" X 8" (10.2 cm x 20.3 cm) C opening to route armored cable a panel is present Front 3 118 (7,9) G 3½ Rear i ii * 30" (76.2 cm) min. pages 7-12 Frangais - pages 19-20 Canada INSTALLATION AND SERVICE MUST...
Installation Instructions
Page 2
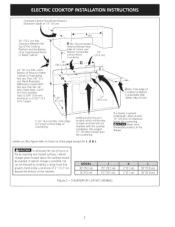
...) Flame Retardant Millboard Covered With Not Less Than No. 28 MGS Sheet Steel, 0.015" (0.4 mm) Stainless Steel, 0.024" (0.6 mm) Aluminum or 0.020" (0.5 mm) Copper• [ K Min• Recommended i | Distance Between Rear e of Countertop Install junction box at least 10" (25.4cm) of Unit)• 2 1/2" (6.4 cm) Min. when Bottom of Wood or Metal Cabinet is provided, risk can be reduced by installing a range hood that...
...) Flame Retardant Millboard Covered With Not Less Than No. 28 MGS Sheet Steel, 0.015" (0.4 mm) Stainless Steel, 0.024" (0.6 mm) Aluminum or 0.020" (0.5 mm) Copper• [ K Min• Recommended i | Distance Between Rear e of Countertop Install junction box at least 10" (25.4cm) of Unit)• 2 1/2" (6.4 cm) Min. when Bottom of Wood or Metal Cabinet is provided, risk can be reduced by installing a range hood that...
Installation Instructions
Page 3
... built-in ovens are necessary to the cabinet (s) by the MFG ID number and product code (see the insert sheet included in wood base minimum 4" x 4" (10.2 X 10.2 cm), 2" (5 cm) from cooktop to junction box. To reduce the risk of personal injury and tipping of approved models 36" Min. (91.4 cm) Min. 208/240 Volt junction box for Cooktop Cabinet side filler panels are listed by mounting brackets. Approved cooktops...
... built-in ovens are necessary to the cabinet (s) by the MFG ID number and product code (see the insert sheet included in wood base minimum 4" x 4" (10.2 X 10.2 cm), 2" (5 cm) from cooktop to junction box. To reduce the risk of personal injury and tipping of approved models 36" Min. (91.4 cm) Min. 208/240 Volt junction box for Cooktop Cabinet side filler panels are listed by mounting brackets. Approved cooktops...

Installation Instructions
Page 4
... these instructions with CSA standard C22.1, Canadian Electrical Code, Part 1, and local local codes and ordinances. An extension cord must conform with the fuse size and rating of the appliance in the literature bag is required on a separate circuit fused on your cooktop. / / Model and Serial Plate Figure 3 (Under Cooktop) 4 Be sure the bottle of the line (timedelay fuse or circuit breaker is installed and grounded properly by a qualified installer or service...
... these instructions with CSA standard C22.1, Canadian Electrical Code, Part 1, and local local codes and ordinances. An extension cord must conform with the fuse size and rating of the appliance in the literature bag is required on a separate circuit fused on your cooktop. / / Model and Serial Plate Figure 3 (Under Cooktop) 4 Be sure the bottle of the line (timedelay fuse or circuit breaker is installed and grounded properly by a qualified installer or service...
Installation Instructions
Page 6
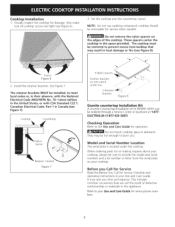
... Use and Care Guide for damage. Visually inspect the cooktop for operation. Do not remove the nylon spacers on your Use and Care Guide. Checking Operation Refer to meet local codes or, in their absence, with the National Electrical Code ANSI/NFPA No. 70--latest edition in the United States, or with CSA Standard C22.1, Canadian Electrical Code, Part 1 in Canada (see Figure 8). Model and Serial Number Location The serial...
... Use and Care Guide for damage. Visually inspect the cooktop for operation. Do not remove the nylon spacers on your Use and Care Guide. Checking Operation Refer to meet local codes or, in their absence, with the National Electrical Code ANSI/NFPA No. 70--latest edition in the United States, or with CSA Standard C22.1, Canadian Electrical Code, Part 1 in Canada (see Figure 8). Model and Serial Number Location The serial...


