Wiring Diagram (All Languages)
Page 1
... connection. 1. (F30 or F31) Check resistance at P6 connector pins 1 & 6. Test for binding of any safety device. 3. Gas Range with the proper installation of the latch cam, latch motor rod & latch motor cam. 4. This service data sheet is reapplied, replace the oven relay board. ...connector P1 pins 1 & 4. If voltage is correct (120 VAC) replace PS board 2. Check the wiring harness between EOC connector P2 and ESEC 30 UIB P9. 2. Before servicing or moving parts. • All uninsulated electrical terminals, connectors, heaters, etc. Replace if defective. 3. Replace the...
... connection. 1. (F30 or F31) Check resistance at P6 connector pins 1 & 6. Test for binding of any safety device. 3. Gas Range with the proper installation of the latch cam, latch motor rod & latch motor cam. 4. This service data sheet is reapplied, replace the oven relay board. ...connector P1 pins 1 & 4. If voltage is correct (120 VAC) replace PS board 2. Check the wiring harness between EOC connector P2 and ESEC 30 UIB P9. 2. Before servicing or moving parts. • All uninsulated electrical terminals, connectors, heaters, etc. Replace if defective. 3. Replace the...
Product Specifications Sheet (English)
Page 1
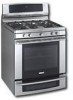
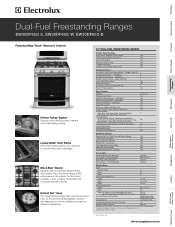
... gas codes. Wall Ovens Warmer Drawers Dual-Fuel Freestanding Ranges EW30DF65G S, EW30DF65G W, EW30DF65G B Cooktops Built-In Ranges Freestanding Ranges Microwaves Vent Hoods Featuring Wave-Touch™ Electronic Controls Perfect Turkey® Button1 Ensures moist, delicious poultry. Use both simultaneously to cook two different items at electroluxappliances.com. Width 30" Depth (to Product Installation Guide for the utmost cooking capacity. Perfect...
... gas codes. Wall Ovens Warmer Drawers Dual-Fuel Freestanding Ranges EW30DF65G S, EW30DF65G W, EW30DF65G B Cooktops Built-In Ranges Freestanding Ranges Microwaves Vent Hoods Featuring Wave-Touch™ Electronic Controls Perfect Turkey® Button1 Ensures moist, delicious poultry. Use both simultaneously to cook two different items at electroluxappliances.com. Width 30" Depth (to Product Installation Guide for the utmost cooking capacity. Perfect...

Product Specifications Sheet (English)
Page 2
...• Simmer Plate - (PN # 318254206). for detailed instructions. Electrolux Major Appliances, N.A. above 36" height. • To reduce risk of fire when using overhead cabinetry, install range hood that projects horizontally a recommended minimum of 5" beyond bottom of ...range MUST be installed flush to wall with 3/4" factory regulator. • Range is NOT LP Gas convertible - Dual-Fuel Freestanding Ranges EW30DF65G S, EW30DF65G W, EW30DF65G B Minimum 5" clearance required to nearest combustible wall on either side of range above 36" height Wall CL 13" max. 18" min. 30...
...• Simmer Plate - (PN # 318254206). for detailed instructions. Electrolux Major Appliances, N.A. above 36" height. • To reduce risk of fire when using overhead cabinetry, install range hood that projects horizontally a recommended minimum of 5" beyond bottom of ...range MUST be installed flush to wall with 3/4" factory regulator. • Range is NOT LP Gas convertible - Dual-Fuel Freestanding Ranges EW30DF65G S, EW30DF65G W, EW30DF65G B Minimum 5" clearance required to nearest combustible wall on either side of range above 36" height Wall CL 13" max. 18" min. 30...

Complete Owner's Guide (English)
Page 3
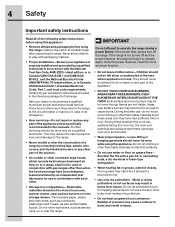
...building. • Immediately call the fire department. with a warmer drawer, grasp the top rear edge of a range. Refer to the installation instructions for proper anti-tip bracket installation. • Never use gasoline or other flammable vapors and liquids in the vicinity of a child on an open...into and fully secured by the anti-tip bracket by properly installed anti-tip bracket provided with the range. Children climbing on the backguard of the range and carefully attempt to children in this manual is installed properly, visually check that may cause carbon monoxide poisoning. ...
...building. • Immediately call the fire department. with a warmer drawer, grasp the top rear edge of a range. Refer to the installation instructions for proper anti-tip bracket installation. • Never use gasoline or other flammable vapors and liquids in the vicinity of a child on an open...into and fully secured by the anti-tip bracket by properly installed anti-tip bracket provided with the range. Children climbing on the backguard of the range and carefully attempt to children in this manual is installed properly, visually check that may cause carbon monoxide poisoning. ...
Complete Owner's Guide (English)
Page 4
.... Ask your dealer to play with packaging material. • Proper Installation-Be sure your appliance is properly installed and grounded by a qualified technician in accordance with the National Fuel Gas Code ANSI Z223- IMPORTANT Do not attempt to become hot enough to a range, shall not be left alone or unattended in the area where...
.... Ask your dealer to play with packaging material. • Proper Installation-Be sure your appliance is properly installed and grounded by a qualified technician in accordance with the National Fuel Gas Code ANSI Z223- IMPORTANT Do not attempt to become hot enough to a range, shall not be left alone or unattended in the area where...
Complete Owner's Guide (English)
Page 5
... risk of electric shock, or fire. • Use care when opening oven door or lower oven drawer (if equipped)-Stand to the side of the range when opening the door of a hot oven. Remove all utensils from the high heat of the broiler. • Do not cover the broiler insert with... it on or near the oven vent. If rack must be positioned so that it does not extend beyond the edge of the utensil. Improper installation of glass, glass/ceramic, ceramic, earthenware, or other glazed utensils are suitable for cook top service without its insert allow dripping fat to drain and...
... risk of electric shock, or fire. • Use care when opening oven door or lower oven drawer (if equipped)-Stand to the side of the range when opening the door of a hot oven. Remove all utensils from the high heat of the broiler. • Do not cover the broiler insert with... it on or near the oven vent. If rack must be positioned so that it does not extend beyond the edge of the utensil. Improper installation of glass, glass/ceramic, ceramic, earthenware, or other glazed utensils are suitable for cook top service without its insert allow dripping fat to drain and...

Complete Owner's Guide (English)
Page 6
...Do not allow grease to such substances. 6 Safety Important safety instructions Important cleaning instructions • Clean the range regularly to keep all parts free of grease that excess residue from the oven. • Do not use . IMPORTANT This... Liquefied Petroleum (L.P.) Gas. • Kitchen cleaners and aerosols-Always follow the manufacturer's recommended directions for complete installation and grounding instructions. See the INSTALLATION INSTRUCTIONS packaged with this appliance for use oven cleaners-No commercial oven cleaner or oven liner protective coating of ...
...Do not allow grease to such substances. 6 Safety Important safety instructions Important cleaning instructions • Clean the range regularly to keep all parts free of grease that excess residue from the oven. • Do not use . IMPORTANT This... Liquefied Petroleum (L.P.) Gas. • Kitchen cleaners and aerosols-Always follow the manufacturer's recommended directions for complete installation and grounding instructions. See the INSTALLATION INSTRUCTIONS packaged with this appliance for use oven cleaners-No commercial oven cleaner or oven liner protective coating of ...
Complete Owner's Guide (English)
Page 54
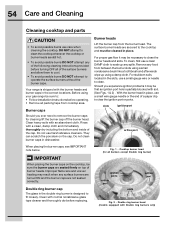
...on the cap. For stubborn soils located in place. IMPORTANT When placing the burner caps on the cooktop, be sure to: • Follow installation instructions before operating. • Remove all packing tape from cooktop area. Improper flame size and uneven heating may be necessary to clean the burner... heads and slots. Double ring burner cap The glass in dishwasher. Fig. 1 - Before using your gas range be sure the burner caps are not seated correctly. Clean heavy soils with Double ring burners only) Should you ever need to remove the ...
...on the cap. For stubborn soils located in place. IMPORTANT When placing the burner caps on the cooktop, be sure to: • Follow installation instructions before operating. • Remove all packing tape from cooktop area. Improper flame size and uneven heating may be necessary to clean the burner... heads and slots. Double ring burner cap The glass in dishwasher. Fig. 1 - Before using your gas range be sure the burner caps are not seated correctly. Clean heavy soils with Double ring burners only) Should you ever need to remove the ...
Complete Owner's Guide (English)
Page 57
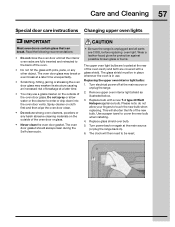
...door gasket should always clean during the Self-clean cycle. • Be sure the range is in ). 6. The upper oven light bulbs are located at a later time. ... drip down into the oven door vents. Turn electrical power off at the main source (or plug the range back in use strong oven cleaners, powders or any other object. The oven door glass may break or even... touch the new bulb when replacing. Spray cleaner on again at the main source or unplug the range. 2. Care and Cleaning 57 Special door care instructions Changing upper oven lights IMPORTANT Most oven doors contain...
...door gasket should always clean during the Self-clean cycle. • Be sure the range is in ). 6. The upper oven light bulbs are located at a later time. ... drip down into the oven door vents. Turn electrical power off at the main source (or plug the range back in use strong oven cleaners, powders or any other object. The oven door glass may break or even... touch the new bulb when replacing. Spray cleaner on again at the main source or unplug the range. 2. Care and Cleaning 57 Special door care instructions Changing upper oven lights IMPORTANT Most oven doors contain...
Complete Owner's Guide (English)
Page 59
...is level, strong & stable enough to adequately support range. • If floor is present after cleaning. Place oven rack in this appliance. Place a level on the oven rack. Contact builder or installer to correct the situation. • Poor installation. Be sure cord is full. Push in and ...the burner OFF, clean ports by using a small-gauge wire or needle. • Moisture is sagging or sloping, contact a carpenter to make range appear not level. Be sure cabinets are square & have sufficient room for service Surface burners do not light Before you call : 1-877-4ELECTROLUX...
...is level, strong & stable enough to adequately support range. • If floor is present after cleaning. Place oven rack in this appliance. Place a level on the oven rack. Contact builder or installer to correct the situation. • Poor installation. Be sure cord is full. Push in and ...the burner OFF, clean ports by using a small-gauge wire or needle. • Moisture is sagging or sloping, contact a carpenter to make range appear not level. Be sure cabinets are square & have sufficient room for service Surface burners do not light Before you call : 1-877-4ELECTROLUX...

Complete Owner's Guide (English)
Page 60
.... See "Setting the clock at power up" in this checklist. • The time of day is unavoidable due to operate the oven. Call your dealer, installing agent or authorized service agent. • Electrical power outage. See "Setting Oven Controls" in this Use & Care Guide or read the instructions "Entire appliance does...
.... See "Setting the clock at power up" in this checklist. • The time of day is unavoidable due to operate the oven. Call your dealer, installing agent or authorized service agent. • Electrical power outage. See "Setting Oven Controls" in this Use & Care Guide or read the instructions "Entire appliance does...
Complete Owner's Guide (English)
Page 63
...date of the unit. 4. This warranty only applies in and free-standing range appliances) is warranted by this warranty must be defective in the home. 12. In Canada, your original date of purchase, Electrolux will provide a replacement glass cooktop or radiant surface element for appliances not ... of the appliance when it is in your best interest to be repaired in materials or workmanship when such appliance is installed, used other than genuine Electrolux parts or parts obtained from its original owner to be obtained by a two through 5th years from the factory. 9....
...date of the unit. 4. This warranty only applies in and free-standing range appliances) is warranted by this warranty must be defective in the home. 12. In Canada, your original date of purchase, Electrolux will provide a replacement glass cooktop or radiant surface element for appliances not ... of the appliance when it is in your best interest to be repaired in materials or workmanship when such appliance is installed, used other than genuine Electrolux parts or parts obtained from its original owner to be obtained by a two through 5th years from the factory. 9....

