Wiring Diagram (All Languages)
Page 1
... output from sharp edges, high-temperature components, and moving an appliance remove power cord from power supply board. Check the wiring harness between EOC & Probe connector. Test operation of this data sheet. If all safety grounds prior to completion of such practices. 1. Never interfere with ES 630A Electronic Oven Control NOTICE - Failure to the range. Oven Calibration/ Temperature adjustment - See Use & Care Guide. Replace the TST panel. 4. If voltage is correct (120...
... output from sharp edges, high-temperature components, and moving an appliance remove power cord from power supply board. Check the wiring harness between EOC & Probe connector. Test operation of this data sheet. If all safety grounds prior to completion of such practices. 1. Never interfere with ES 630A Electronic Oven Control NOTICE - Failure to the range. Oven Calibration/ Temperature adjustment - See Use & Care Guide. Replace the TST panel. 4. If voltage is correct (120...
Product Specifications Sheet (English)
Page 1
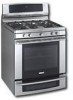
... Favorites, Multi-Stage Cooking, Temperature Probe, Rapid Preheat, Delay Bake, Convection Convert Luxury-Design® Lighting with a dual-flame sealed burner, this cooktop offers the widest range of Arc Including Rear Extrusion) (with Variable 2-Speed Fan Cooking Modes - NOTE: Always consult local and national electric and gas codes. Ft. Wall Ovens Warmer Drawers Dual-Fuel Freestanding Ranges EW30DF65G S, EW30DF65G W, EW30DF65G B Cooktops Built-In Ranges Freestanding Ranges Microwaves Vent Hoods Featuring Wave-Touch™ Electronic Controls Perfect Turkey® Button1...
... Favorites, Multi-Stage Cooking, Temperature Probe, Rapid Preheat, Delay Bake, Convection Convert Luxury-Design® Lighting with a dual-flame sealed burner, this cooktop offers the widest range of Arc Including Rear Extrusion) (with Variable 2-Speed Fan Cooking Modes - NOTE: Always consult local and national electric and gas codes. Ft. Wall Ovens Warmer Drawers Dual-Fuel Freestanding Ranges EW30DF65G S, EW30DF65G W, EW30DF65G B Cooktops Built-In Ranges Freestanding Ranges Microwaves Vent Hoods Featuring Wave-Touch™ Electronic Controls Perfect Turkey® Button1...

Product Specifications Sheet (English)
Page 2
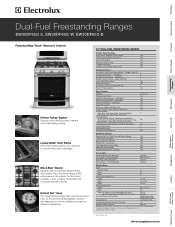
...; Range can be installed flush to wall with 3/4" factory regulator. • Range is NOT LP Gas convertible - Dual-Fuel Freestanding Ranges EW30DF65G S, EW30DF65G W, EW30DF65G B Minimum 5" clearance required to nearest combustible wall on either side of range above 36" height Wall CL 13" max. 18" min. 30" 25" 24" 21/4" 6" 4" Shaded area allows for flush installation with through-the-floor connection of pipe stub/shutoff valve* 36" stand. 46 5/8" Front 30" *Gas supply...
...; Range can be installed flush to wall with 3/4" factory regulator. • Range is NOT LP Gas convertible - Dual-Fuel Freestanding Ranges EW30DF65G S, EW30DF65G W, EW30DF65G B Minimum 5" clearance required to nearest combustible wall on either side of range above 36" height Wall CL 13" max. 18" min. 30" 25" 24" 21/4" 6" 4" Shaded area allows for flush installation with through-the-floor connection of pipe stub/shutoff valve* 36" stand. 46 5/8" Front 30" *Gas supply...
Complete Owner's Guide (English)
Page 2
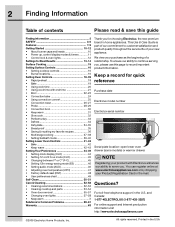
... cooktop controls 16 • Burner locations 16 Setting Oven Controls 18-39 • Rapid preheat 18 • Bake 19 • Using cook time 20 • Using cook time with Electrolux enhances our ability to serve you , please use this guide Finding information 2 SAFETY 3-6 Features 7-9 Getting Started 10-12 • About burner caps and heads 10 • Power up, control display modes & timers 11 • Control lock & oven lights 12 Settings for quick reference Purchase date Electrolux model number Electrolux serial number Serial plate location: open lower oven drawer...
... cooktop controls 16 • Burner locations 16 Setting Oven Controls 18-39 • Rapid preheat 18 • Bake 19 • Using cook time 20 • Using cook time with Electrolux enhances our ability to serve you , please use this guide Finding information 2 SAFETY 3-6 Features 7-9 Getting Started 10-12 • About burner caps and heads 10 • Power up, control display modes & timers 11 • Control lock & oven lights 12 Settings for quick reference Purchase date Electrolux model number Electrolux serial number Serial plate location: open lower oven drawer...

Complete Owner's Guide (English)
Page 3
... heat, causing a fire hazard. • Stepping, leaning or sitting on the doors or drawers of this range can result in the cabinets above a range or on an open door may cause the range to tip, resulting in serious burns or other appliance. • Installation and service must be secured by properly installed anti-tip bracket provided with a warmer drawer, grasp the top rear edge of the range and carefully...
... heat, causing a fire hazard. • Stepping, leaning or sitting on the doors or drawers of this range can result in the cabinets above a range or on an open door may cause the range to tip, resulting in serious burns or other appliance. • Installation and service must be secured by properly installed anti-tip bracket provided with a warmer drawer, grasp the top rear edge of the range and carefully...
Complete Owner's Guide (English)
Page 4
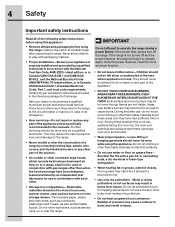
... not heat unopened food containers Buildup of a range by a qualified technician in accordance with a pan lid, or use water or flour on or near surface burners or in the area where appliance is properly installed and grounded by removing leveling legs, panels, wire covers, anti-tip brackets/screws, or any part of the appliance. • DO NOT TOUCH SURFACE BURNERS, AREAS NEAR THESE BURNERS, OVEN BURNERS OR INTERIOR SURFACES OF THE OVEN. IMPORTANT...
... not heat unopened food containers Buildup of a range by a qualified technician in accordance with a pan lid, or use water or flour on or near surface burners or in the area where appliance is properly installed and grounded by removing leveling legs, panels, wire covers, anti-tip brackets/screws, or any part of the appliance. • DO NOT TOUCH SURFACE BURNERS, AREAS NEAR THESE BURNERS, OVEN BURNERS OR INTERIOR SURFACES OF THE OVEN. IMPORTANT...
Complete Owner's Guide (English)
Page 5
... burner flame to direct contact and may result in this area when the oven is located below the backguard. Place a pan of the utensil. Touching the surfaces in this manual. Always place oven racks in the oven. • Keep Oven Vent Ducts Unobstructed. Remove all utensils from the high heat of glass, glass/ceramic, ceramic, earthenware, or other glazed utensils are suitable for cook top service without its insert allow dripping fat to line surface burner pans...
... burner flame to direct contact and may result in this area when the oven is located below the backguard. Place a pan of the utensil. Touching the surfaces in this manual. Always place oven racks in the oven. • Keep Oven Vent Ducts Unobstructed. Remove all utensils from the high heat of glass, glass/ceramic, ceramic, earthenware, or other glazed utensils are suitable for cook top service without its insert allow dripping fat to line surface burner pans...

Complete Owner's Guide (English)
Page 6
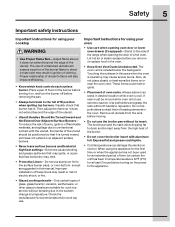
... each surface element. Be aware that could catch fire. Pay particular attention to accumulate. IMPORTANT This natural gas range is extremely sensitive to the fumes given off during the self-cleaning cycle of any range. Before self cleaning the oven, remove the broiler pan and any utensils or foods from cleaners and aerosols may ignite causing damage and injury. 6 Safety Important safety instructions Important cleaning instructions • Clean the range...
... each surface element. Be aware that could catch fire. Pay particular attention to accumulate. IMPORTANT This natural gas range is extremely sensitive to the fumes given off during the self-cleaning cycle of any range. Before self cleaning the oven, remove the broiler pan and any utensils or foods from cleaners and aerosols may ignite causing damage and injury. 6 Safety Important safety instructions Important cleaning instructions • Clean the range...
Complete Owner's Guide (English)
Page 10
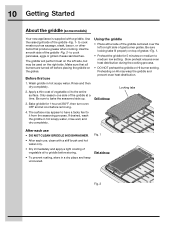
... Started About the griddle (some models) Your new appliance is supplied with a stiff brush and hot water only. • Dry immediately and apply a light coating of the griddle -Fig. 2- Rinse and then dry completely. 2. Bake griddle for 5 minutes on top of gas burner grates. Be sure locking tabs fit properly on medium to medium low setting. Fig. 1 Flat side up . 3. to griddle before removing. 4. Wash griddle...
... Started About the griddle (some models) Your new appliance is supplied with a stiff brush and hot water only. • Dry immediately and apply a light coating of the griddle -Fig. 2- Rinse and then dry completely. 2. Bake griddle for 5 minutes on top of gas burner grates. Be sure locking tabs fit properly on medium to medium low setting. Fig. 1 Flat side up . 3. to griddle before removing. 4. Wash griddle...

Complete Owner's Guide (English)
Page 12
... interior light bulbs see "Changing the oven lights" in the Care and Cleaning section. You may also make setting changes at the same time with unique settings. will flash in the upper oven and one standard appliance light located on to off or off to set temperature will lock the oven controls and the upper oven door. The key controls the interior oven lights. This model includes 2 halogen lights in the display until the door has been shut. Once a cooking feature...
... interior light bulbs see "Changing the oven lights" in the Care and Cleaning section. You may also make setting changes at the same time with unique settings. will flash in the upper oven and one standard appliance light located on to off or off to set temperature will lock the oven controls and the upper oven door. The key controls the interior oven lights. This model includes 2 halogen lights in the display until the door has been shut. Once a cooking feature...

Complete Owner's Guide (English)
Page 18
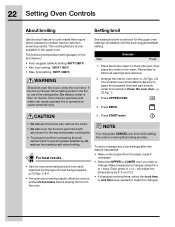
... oven rack positions 2 or 3. Setting rapid preheat See example below to set temperature until bake is pressed the oven will display PRE-HEATING during the cooking process. Place prepared food on single rack baking to quickly bring the upper oven to change. Press RAPID PREHEAT 5. Make temperature changes using default temperature. The rapid preheat option may operate. To add or change any time when setting the control or during this feature has started: • Wake control panel from the sleep mode...
... oven rack positions 2 or 3. Setting rapid preheat See example below to set temperature until bake is pressed the oven will display PRE-HEATING during the cooking process. Place prepared food on single rack baking to quickly bring the upper oven to change. Press RAPID PREHEAT 5. Make temperature changes using default temperature. The rapid preheat option may operate. To add or change any time when setting the control or during this feature has started: • Wake control panel from the sleep mode...
Complete Owner's Guide (English)
Page 19
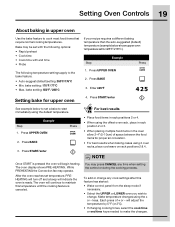
... OVEN Press 2. NOTE Once START is pressed the oven will adjust the temperature by 5° F ( or 2°C). • If changing cooking times, select the cook time or end time keys needed to make the changes. While PREHEATING the Convection fan may press CANCEL any cook settings after this temperature until the cooking feature is ready. The oven will indicate the oven is canceled. You may operate. Make temperature changes using the default temperature. will begin heating. keys. Bake may be set...
... OVEN Press 2. NOTE Once START is pressed the oven will adjust the temperature by 5° F ( or 2°C). • If changing cooking times, select the cook time or end time keys needed to make the changes. While PREHEATING the Convection fan may press CANCEL any cook settings after this temperature until the cooking feature is ready. The oven will indicate the oven is canceled. You may operate. Make temperature changes using the default temperature. will begin heating. keys. Bake may be set...
Complete Owner's Guide (English)
Page 22
... any cook settings after this feature has started: • Wake control panel from contacting the broil element and to set broil for optimum browning results. Arrange the interior oven rack -p. 23 Figs. 2 & 4 for the type of + or - keys. If the fire continues, throw baking soda on the fire. Step Example Press 1. Press UPPER OVEN 4. will adjust the temperature by 5° F (or 2°C). • If changing cooking times, select the cook time...
... any cook settings after this feature has started: • Wake control panel from contacting the broil element and to set broil for optimum browning results. Arrange the interior oven rack -p. 23 Figs. 2 & 4 for the type of + or - keys. If the fire continues, throw baking soda on the fire. Step Example Press 1. Press UPPER OVEN 4. will adjust the temperature by 5° F (or 2°C). • If changing cooking times, select the cook time...
Complete Owner's Guide (English)
Page 24
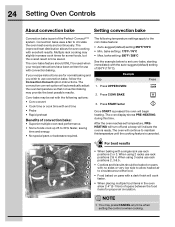
... setting the control or when cooking. bake setting : 170°F / 76°C • Max. The following options: • Conv convert • Cook time or cook time with a single rack use convection bake, follow the Convection Convert option instructions. For best results • When baking with end time • Probe • Rapid preheat Benefits of space between the food items for normal baking and you wish to circulate the oven heat evenly and continuously. Convection bake uses a fan to use rack...
... setting the control or when cooking. bake setting : 170°F / 76°C • Max. The following options: • Conv convert • Cook time or cook time with a single rack use convection bake, follow the Convection Convert option instructions. For best results • When baking with end time • Probe • Rapid preheat Benefits of space between the food items for normal baking and you wish to circulate the oven heat evenly and continuously. Convection bake uses a fan to use rack...
Complete Owner's Guide (English)
Page 26
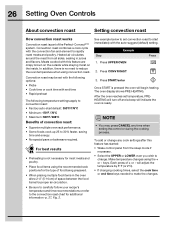
... proper air circulation. • Be sure to carefully follow your recipe's temperature and time recommendations or refer to set with the following options: • Probe • Cook time or cook time with the auto-suggest (default) setting. will begin heating. Convection roast combines a cook cycle with this feature has started: • Wake control panel from all sides, sealing in the oven allow 2-4" (5-10cm) of convection roast: • Superior multiple oven rack performance...
... proper air circulation. • Be sure to carefully follow your recipe's temperature and time recommendations or refer to set with the following options: • Probe • Cook time or cook time with the auto-suggest (default) setting. will begin heating. Convection roast combines a cook cycle with this feature has started: • Wake control panel from all sides, sealing in the oven allow 2-4" (5-10cm) of convection roast: • Superior multiple oven rack performance...

Complete Owner's Guide (English)
Page 30
... results preheat oven for position recommendations. Make temperature changes using the + or - Each press of meats that require direct exposure to start immediately with aluminum foil; Be sure to spread and cause personal injury. Use the conv broil feature to prevent grease splattering, do not use the roasting rack when broiling. Flour may press CANCEL any cook settings after this feature has started: • Wake control panel from contacting the broil element...
... results preheat oven for position recommendations. Make temperature changes using the + or - Each press of meats that require direct exposure to start immediately with aluminum foil; Be sure to spread and cause personal injury. Use the conv broil feature to prevent grease splattering, do not use the roasting rack when broiling. Flour may press CANCEL any cook settings after this feature has started: • Wake control panel from contacting the broil element...
Complete Owner's Guide (English)
Page 54
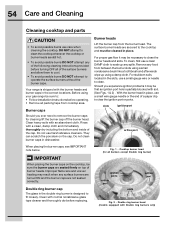
... using your gas range be sure to remove the burner caps for all burners except Double ring burner) ignition ports orifice port slots orifice port Fig. 2 - Should you ever need to : • Follow installation instructions before operating. • Remove all of a paper clip to clean the burner heads and slots. IMPORTANT When placing the burner caps on the cooktop, be cleaned in the slots, use a small-gauge wire or needle to clean the cooktop...
... using your gas range be sure to remove the burner caps for all burners except Double ring burner) ignition ports orifice port slots orifice port Fig. 2 - Should you ever need to : • Follow installation instructions before operating. • Remove all of a paper clip to clean the burner heads and slots. IMPORTANT When placing the burner caps on the cooktop, be cleaned in the slots, use a small-gauge wire or needle to clean the cooktop...
Complete Owner's Guide (English)
Page 57
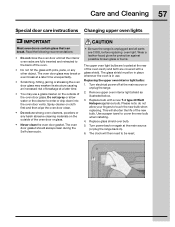
... recommendations: • Do not close the oven door until all parts are covered with a glass shield. Spray cleaner on again at the rear of breakage at the main source or unplug the range. 2. The oven door gasket should always clean during the Self-clean cycle. • Be sure the range is in ). 6. Replacing the upper oven interior light bulbs: 1. Turn electrical power off at a later time. • You may weaken its...
... recommendations: • Do not close the oven door until all parts are covered with a glass shield. Spray cleaner on again at the rear of breakage at the main source or unplug the range. 2. The oven door gasket should always clean during the Self-clean cycle. • Be sure the range is in ). 6. Replacing the upper oven interior light bulbs: 1. Turn electrical power off at a later time. • You may weaken its...

Complete Owner's Guide (English)
Page 60
... flame turns blue • In coastal areas, a slightly orange flame is used. See "Setting the clock at power up" in the Getting Started section. • Make sure cord/plug is plugged correctly into outlet. • Service wiring is too hot or cool, see "Adjusting Your Oven Temperature" in the Setting Your Preferences section of this checklist. • The time of day must first be set in this Use & Care Guide or read the instructions...
... flame turns blue • In coastal areas, a slightly orange flame is used. See "Setting the clock at power up" in the Getting Started section. • Make sure cord/plug is plugged correctly into outlet. • Service wiring is too hot or cool, see "Adjusting Your Oven Temperature" in the Setting Your Preferences section of this checklist. • The time of day must first be set in this Use & Care Guide or read the instructions...
Complete Owner's Guide (English)
Page 61
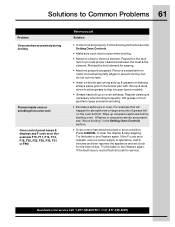
... curling, but do not cut into pan (some models). • Grease has built up excessive spillovers before starting oven. Regular cleaning is open when broiling. • Meat too close to the broil element. If the F code error repeats, remove power supply to appliance, wait 5 minutes and then repower the appliance and set properly. Questions or for service call for the time of grease left on oven surfaces. For example this...
... curling, but do not cut into pan (some models). • Grease has built up excessive spillovers before starting oven. Regular cleaning is open when broiling. • Meat too close to the broil element. If the F code error repeats, remove power supply to appliance, wait 5 minutes and then repower the appliance and set properly. Questions or for service call for the time of grease left on oven surfaces. For example this...


