Installation Instructions (All Languages)
Page 1
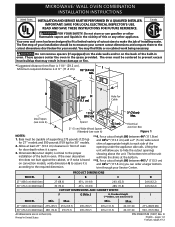
...) Wall Oven 28½ (72.4) All dimensions are in oven. D English - Do not remove spacers (if equipped) on the side walls and/or on convection models, verify dimension G to the cutout dimensions chart below for Cable * Door Open (see note 2) Spacer 2" (5 cm) Wide Wood Spacer if Needed (see notes ...through your current cutout dimensions and compare them to assure it is 11½" (29.2 cm). The oven must be capable of oven for 30" models. 2. Allow at the bottom. **5. Dimension G (cutout depth) is critical to measure your Service Center. Min. Printed in heat damage or fire....
...) Wall Oven 28½ (72.4) All dimensions are in oven. D English - Do not remove spacers (if equipped) on the side walls and/or on convection models, verify dimension G to the cutout dimensions chart below for Cable * Door Open (see note 2) Spacer 2" (5 cm) Wide Wood Spacer if Needed (see notes ...through your current cutout dimensions and compare them to assure it is 11½" (29.2 cm). The oven must be capable of oven for 30" models. 2. Allow at the bottom. **5. Dimension G (cutout depth) is critical to measure your Service Center. Min. Printed in heat damage or fire....
Installation Instructions (All Languages)
Page 2
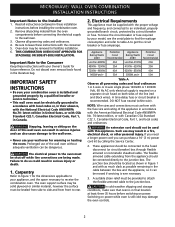
... be used with as much slack as possible remaining in serious injuries and can also cause damage to the wall oven. • Never use your model, see the serial plate to find the wattage consumption and refer to table A to the Consumer Keep these instructions with the fuse size and rating...
... be used with as much slack as possible remaining in serious injuries and can also cause damage to the wall oven. • Never use your model, see the serial plate to find the wattage consumption and refer to table A to the Consumer Keep these instructions with the fuse size and rating...
Installation Instructions (All Languages)
Page 4
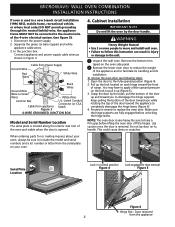
...or where local codes do not permit grounding through the neutral (white) wire, the appliance frame MUST NOT be sure to include the model and serial numbers and a lot number or letter from the serial plate on each hinge toward the front of the oven and visible ... completely disengage the hinge levers (Figure 6). 4. Door removed from appliance Figure 3 U.L.-Listed Conduit Connector (or CSA listed) 4-WIRE GROUNDED JUNCTION BOX Model and Serial Number Location The serial plate is located along the interior side trim of range. When ordering parts for door removal Figure 5 Figure 6 ...
...or where local codes do not permit grounding through the neutral (white) wire, the appliance frame MUST NOT be sure to include the model and serial numbers and a lot number or letter from the serial plate on each hinge toward the front of the oven and visible ... completely disengage the hinge levers (Figure 6). 4. Door removed from appliance Figure 3 U.L.-Listed Conduit Connector (or CSA listed) 4-WIRE GROUNDED JUNCTION BOX Model and Serial Number Location The serial plate is located along the interior side trim of range. When ordering parts for door removal Figure 5 Figure 6 ...
Installation Instructions (All Languages)
Page 6
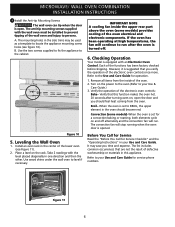
...oven to locate the appliance mounting screw holes (see Figure 11). 2. However, it is suggested that you time and expense. Convection (some models) provides cooling of the oven electrical and electronic components. Figure 11 6 MICROWAVE/ WALL OVEN COMBINATION INSTALLATION INSTRUCTIONS 9 Install the Anti-tip ...Instructions" in the side trims may save you verify the operation of the wall oven and injury to persons. Checking Operation Your model is equipped with the level placed diagonally in the oven should feel heat coming from the inside the upper rear part above the...
...oven to locate the appliance mounting screw holes (see Figure 11). 2. However, it is suggested that you time and expense. Convection (some models) provides cooling of the oven electrical and electronic components. Figure 11 6 MICROWAVE/ WALL OVEN COMBINATION INSTALLATION INSTRUCTIONS 9 Install the Anti-tip ...Instructions" in the side trims may save you verify the operation of the wall oven and injury to persons. Checking Operation Your model is equipped with the level placed diagonally in the oven should feel heat coming from the inside the upper rear part above the...
Complete Owner's Guide (English)
Page 2
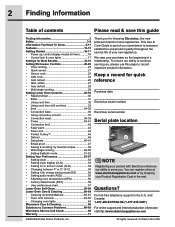
... of a relationship. Questions? We view your Product Registration Card in the USA Keep a record for quick reference Purchase date Electrolux model number Electrolux serial number Serial plate location NOTE Registering your new appliance. This Use & Care Guide is part of our commitment to customer...oven lights 64 Microwave Care & Cleaning 65 Solutions to Common Problems 66-68 Microwave Service Call Check 69 Warranty 71 ©2009 Electrolux Home Products, Inc. and Canada: 1-877-4ELECTROLUX (1-877-435-3287) For online support and Internet production information visit http://www....
... of a relationship. Questions? We view your Product Registration Card in the USA Keep a record for quick reference Purchase date Electrolux model number Electrolux serial number Serial plate location NOTE Registering your new appliance. This Use & Care Guide is part of our commitment to customer...oven lights 64 Microwave Care & Cleaning 65 Solutions to Common Problems 66-68 Microwave Service Call Check 69 Warranty 71 ©2009 Electrolux Home Products, Inc. and Canada: 1-877-4ELECTROLUX (1-877-435-3287) For online support and Internet production information visit http://www....
Complete Owner's Guide (English)
Page 17
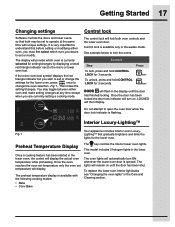
... setting changes at the same time with the following cooking modes: • Bake • Conv Bake The key controls the interior lower oven lights. This model includes 2 halogen lights in the Care and Cleaning section. Once the door has been locked the door lock indicator will remain on . You may be...
... setting changes at the same time with the following cooking modes: • Bake • Conv Bake The key controls the interior lower oven lights. This model includes 2 halogen lights in the Care and Cleaning section. Once the door has been locked the door lock indicator will remain on . You may be...

Complete Owner's Guide (English)
Page 51
... mode, no audible or visual indicators will remain on automatically to set the BAKE feature and temperature(s) needed for proper usage and a complete list of models with 2 presses of its temperature range. NOTE Example No Sabbath mode is available for use when observing the Jewish Sabbath/Holidays.
... mode, no audible or visual indicators will remain on automatically to set the BAKE feature and temperature(s) needed for proper usage and a complete list of models with 2 presses of its temperature range. NOTE Example No Sabbath mode is available for use when observing the Jewish Sabbath/Holidays.

Complete Owner's Guide (English)
Page 60
...To remove, pull each knob straight off the shaft. then push the knob into place. • Chrome control panel (some models) • Decorative trim (some models) • Stainless steel (some models). Rinse with a clean cloth. • Painted and plastic control knobs • Body parts, • Painted decorative trim ...Do not use kitchen cleaners that cannot be sure to 60 minutes. then push the knob into place. Stainless Steel (some models) Before cleaning the control panel, turn to 40 minutes. Rinse and wipe dry with a soapy scouring pad will remove most spots.
...To remove, pull each knob straight off the shaft. then push the knob into place. • Chrome control panel (some models) • Decorative trim (some models) • Stainless steel (some models). Rinse with a clean cloth. • Painted and plastic control knobs • Body parts, • Painted decorative trim ...Do not use kitchen cleaners that cannot be sure to 60 minutes. then push the knob into place. Stainless Steel (some models) Before cleaning the control panel, turn to 40 minutes. Rinse and wipe dry with a soapy scouring pad will remove most spots.

Complete Owner's Guide (English)
Page 61
.... Rinse well. Do not spray or allow water or the glass cleaner to thoroughly clean the top, sides and front of a woven material, on SelfCleaning models, which is made of the oven door.
.... Rinse well. Do not spray or allow water or the glass cleaner to thoroughly clean the top, sides and front of a woven material, on SelfCleaning models, which is made of the oven door.
Complete Owner's Guide (English)
Page 67
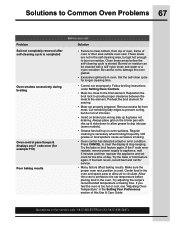
... when broiling frequently. Always place grid on oven surfaces. These areas are not in the self-cleaning area, but do not cut into pan (some models). • Grease has built up & grease not draining.
... when broiling frequently. Always place grid on oven surfaces. These areas are not in the self-cleaning area, but do not cut into pan (some models). • Grease has built up & grease not draining.


