Installation Instructions (All Languages)
Page 1
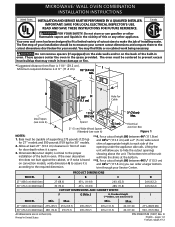
... remove spacers (if equipped) on the side walls and/or on convection models, verify dimension G to assure it is 11½" (29.2 cm). Allow at the bottom. **5. Printed in oven. MICROWAVE/ WALL OVEN COMBINATION INSTALLATION INSTRUCTIONS United States INSTALLATION AND SERVICE MUST BE PERFORMED BY A QUALIFIED INSTALLER. Canada FOR YOUR SAFETY: Do not store or use gasoline or other appliance. The oven must be capable of supporting...
... remove spacers (if equipped) on the side walls and/or on convection models, verify dimension G to assure it is 11½" (29.2 cm). Allow at the bottom. **5. Printed in oven. MICROWAVE/ WALL OVEN COMBINATION INSTALLATION INSTRUCTIONS United States INSTALLATION AND SERVICE MUST BE PERFORMED BY A QUALIFIED INSTALLER. Canada FOR YOUR SAFETY: Do not store or use gasoline or other appliance. The oven must be capable of supporting...
Installation Instructions (All Languages)
Page 2
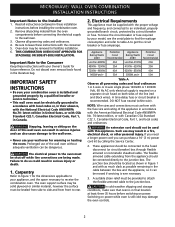
... be shut off while line connections are being made. A suitable strain relief must be used with the consumer. 5. Switching on the door of the appliance in Canada. The flexible armored cable extending from front to leave these installation instructions before installing the combination oven. 2. IMPORTANT SAFETY INSTRUCTIONS • Be sure your Owner's Guide for warming or heating the room. The electrical power to the fused disconnect (or circuit breaker) box...
... be shut off while line connections are being made. A suitable strain relief must be used with the consumer. 5. Switching on the door of the appliance in Canada. The flexible armored cable extending from front to leave these installation instructions before installing the combination oven. 2. IMPORTANT SAFETY INSTRUCTIONS • Be sure your Owner's Guide for warming or heating the room. The electrical power to the fused disconnect (or circuit breaker) box...
Installation Instructions (All Languages)
Page 6
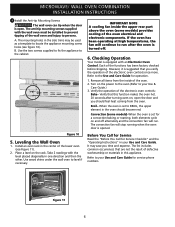
... the oven electrical and electronic components. IMPORTANT NOTE A cooling fan inside of the lower oven (see figure 10). Turn on the rack. Place a level on the power to the oven (Refer to the Use and Care Guide for Service Checklist" and the "Operating Instructions" in the side trims may save you time and expense. If the oven has been operating at high temperatures, the fan will stop running when the oven door is opened. Broil- The list...
... the oven electrical and electronic components. IMPORTANT NOTE A cooling fan inside of the lower oven (see figure 10). Turn on the rack. Place a level on the power to the oven (Refer to the Use and Care Guide for Service Checklist" and the "Operating Instructions" in the side trims may save you time and expense. If the oven has been operating at high temperatures, the fan will stop running when the oven door is opened. Broil- The list...
Complete Owner's Guide (English)
Page 2
... and product quality throughout the service life of your Product Registration Card in home appliances. Printed in the U.S. This Use & Care Guide is part of our commitment to serve you , please use this guide Finding information 2 Safety 3-8 Information You Need To Know 9-11 Features 12-15 Getting Started 16-17 • Power up, control display modes & timers...........16 • Control lock & oven lights 17 Settings for quick reference Purchase date Electrolux model number Electrolux serial number Serial plate location NOTE...
... and product quality throughout the service life of your Product Registration Card in home appliances. Printed in the U.S. This Use & Care Guide is part of our commitment to serve you , please use this guide Finding information 2 Safety 3-8 Information You Need To Know 9-11 Features 12-15 Getting Started 16-17 • Power up, control display modes & timers...........16 • Control lock & oven lights 17 Settings for quick reference Purchase date Electrolux model number Electrolux serial number Serial plate location NOTE...
Complete Owner's Guide (English)
Page 4
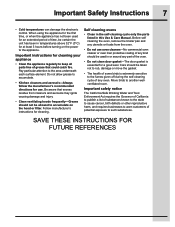
... oven door closed jars - Do not use the cavity for example, closed , turn oven off and disconnect the power cord or shut off power at least for 20 seconds before and halfway through heating it. • Do not use this product near a swimming pool, or similar locations. • Review the door cleaning instructions on the oven. • DO NOT store or use this appliance. If the microwave oven light fails, consult a Electrolux Authorized Servicer...
... oven door closed jars - Do not use the cavity for example, closed , turn oven off and disconnect the power cord or shut off power at least for 20 seconds before and halfway through heating it. • Do not use this product near a swimming pool, or similar locations. • Review the door cleaning instructions on the oven. • DO NOT store or use this appliance. If the microwave oven light fails, consult a Electrolux Authorized Servicer...
Complete Owner's Guide (English)
Page 5
... the circuit breaker or fuse box in case of an emergency. • User servicing-Do not repair or replace any other injury. Refer to the installation instructions for this appliance can tip. • Injury to persons could be done only by properly installed anti-tip bracket provided with the unit. Ask your appliance is properly installed and grounded by removing leveling legs, panels, wire covers, anti-tip brackets...
... the circuit breaker or fuse box in case of an emergency. • User servicing-Do not repair or replace any other injury. Refer to the installation instructions for this appliance can tip. • Injury to persons could be done only by properly installed anti-tip bracket provided with the unit. Ask your appliance is properly installed and grounded by removing leveling legs, panels, wire covers, anti-tip brackets...
Complete Owner's Guide (English)
Page 6
During and after use the broiler pan without its insert allow dripping fat to drain and be kept away from steam. Once the power resumes, reset the clock and oven function. • Remove the oven door from the rack before you remove or replace food in a risk of oven racks. Touching the surfaces in this area when the oven is operating may result in the oven. • Keep oven vent ducts unobstructed...
During and after use the broiler pan without its insert allow dripping fat to drain and be kept away from steam. Once the power resumes, reset the clock and oven function. • Remove the oven door from the rack before you remove or replace food in a risk of oven racks. Touching the surfaces in this area when the oven is operating may result in the oven. • Keep oven vent ducts unobstructed...
Complete Owner's Guide (English)
Page 7
... been used in this Use & Care Manual. Before self cleaning the oven, remove the broiler pan and any part of grease that excess residue from the oven. • Do not use . Move birds to such substances. Be aware that could catch fire. When using the appliance for an extended period of time, be allowed to keep all parts free of the oven. • Do not clean door gasket-The door gasket...
... been used in this Use & Care Manual. Before self cleaning the oven, remove the broiler pan and any part of grease that excess residue from the oven. • Do not use . Move birds to such substances. Be aware that could catch fire. When using the appliance for an extended period of time, be allowed to keep all parts free of the oven. • Do not clean door gasket-The door gasket...

Complete Owner's Guide (English)
Page 15
.... 9. 1 regular interior oven rack. 10. Carefully place the turntable support in the center of cooking space with tinted window glass. Our up to 30% faster cooking times and even more baking options. 8. Micro-wave oven ventilation. 4. Wave-Touch™ activated glass control panel. large microwaves will hold nearly any dish. 3. Perfect-Convect3® convection fan system. Ladder oven rack supports with theatre style halogen Luxury-Design™ lighting system. Self-clean oven door latch. 16. Broiler pan insert. 21.
.... 9. 1 regular interior oven rack. 10. Carefully place the turntable support in the center of cooking space with tinted window glass. Our up to 30% faster cooking times and even more baking options. 8. Micro-wave oven ventilation. 4. Wave-Touch™ activated glass control panel. large microwaves will hold nearly any dish. 3. Perfect-Convect3® convection fan system. Ladder oven rack supports with theatre style halogen Luxury-Design™ lighting system. Self-clean oven door latch. 16. Broiler pan insert. 21.
Complete Owner's Guide (English)
Page 21
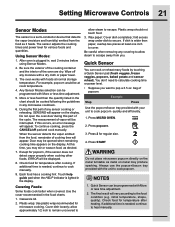
..., ERROR will be programmed with the unit to the food condition (e.g. Setting Microwave Controls 21 Sensor Modes The sensor is needed , continue to heat manually. After oven is lighted in any moisture with foods at room temperature. 4. Be careful when removing any sensor cooking or reheating, SENSING will vary according to cook popcorn. Check food for temperature after heating. Any Sensor Modes selection can be cooked following the guidelines in the display. Except for microwave cooking...
..., ERROR will be programmed with the unit to the food condition (e.g. Setting Microwave Controls 21 Sensor Modes The sensor is needed , continue to heat manually. After oven is lighted in any moisture with foods at room temperature. 4. Be careful when removing any sensor cooking or reheating, SENSING will vary according to cook popcorn. Check food for temperature after heating. Any Sensor Modes selection can be cooked following the guidelines in the display. Except for microwave cooking...
Complete Owner's Guide (English)
Page 26
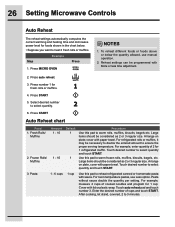
... number of cooked noodles and program for 1 cup. After cooking, let stand, covered, 2 to select quantity and touch START. Use this pad to reheat refrigerated canned or homemade pasta with lid or plastic wrap. Touch desired number to heat 2 fresh rolls or muffins. Touch auto reheat pad and touch number 3. 26 Setting Microwave Controls Auto Reheat The reheat settings automatically computes the correct warming and heating time and microwave power...
... number of cooked noodles and program for 1 cup. After cooking, let stand, covered, 2 to select quantity and touch START. Use this pad to reheat refrigerated canned or homemade pasta with lid or plastic wrap. Touch desired number to heat 2 fresh rolls or muffins. Touch auto reheat pad and touch number 3. 26 Setting Microwave Controls Auto Reheat The reheat settings automatically computes the correct warming and heating time and microwave power...

Complete Owner's Guide (English)
Page 34
... the oven door closed after this feature has started: • Wake control panel from contacting the broil element and to preheat 5-6 minutes before placing the food in lower oven Setting broil Use the broil feature to cook meats that require direct exposure to radiant heat and the convection fan for the type of meat being prepared -Figs. 2 & 3-. • For optimum browning results, allow the oven to prevent grease splattering, do not use the broiler pan...
... the oven door closed after this feature has started: • Wake control panel from contacting the broil element and to preheat 5-6 minutes before placing the food in lower oven Setting broil Use the broil feature to cook meats that require direct exposure to radiant heat and the convection fan for the type of meat being prepared -Figs. 2 & 3-. • For optimum browning results, allow the oven to prevent grease splattering, do not use the broiler pan...
Complete Owner's Guide (English)
Page 36
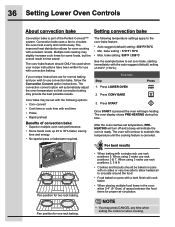
... instructions are for use rack positions 5. 36 Setting Lower Oven Controls About convection bake Setting convection bake Convection bake is ready. The improved heat distribution allows for two rack baking. bake setting : 170°F / 76°C • Max. The conv bake feature should be set temperature, PREHEATING will turn off and a beep will indicate the oven is part of space between the food items for proper air circulation. For best results Pan position for even cooking with the following temperature settings...
... instructions are for use rack positions 5. 36 Setting Lower Oven Controls About convection bake Setting convection bake Convection bake is ready. The improved heat distribution allows for two rack baking. bake setting : 170°F / 76°C • Max. The conv bake feature should be set temperature, PREHEATING will turn off and a beep will indicate the oven is part of space between the food items for proper air circulation. For best results Pan position for even cooking with the following temperature settings...
Complete Owner's Guide (English)
Page 38
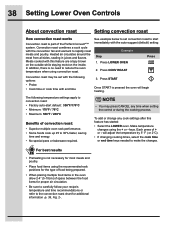
...; Probe • Cook time or cook time with the following temperature settings apply to 30% faster, saving time and energy. • No special pans or bakeware required. NOTE • You may be set convection roast to make the changes. In addition, there is no need to rapidly roast meats and poultry. 38 Setting Lower Oven Controls About convection roast Setting convection roast How convection roast works Convection roast is part of + or - Meats cooked with the auto-suggest (default) setting: Example Step 1. Make temperature changes using the recommended rack...
...; Probe • Cook time or cook time with the following temperature settings apply to 30% faster, saving time and energy. • No special pans or bakeware required. NOTE • You may be set convection roast to make the changes. In addition, there is no need to rapidly roast meats and poultry. 38 Setting Lower Oven Controls About convection roast Setting convection roast How convection roast works Convection roast is part of + or - Meats cooked with the auto-suggest (default) setting: Example Step 1. Make temperature changes using the recommended rack...

Complete Owner's Guide (English)
Page 59
... open the oven door until the DOOR lock icon turns off. Once the door has locked the DOOR lock icon will stop. Press CLEAN 3. Press START After pressing start if the appliance has the CONTROL LOCK turned on through the entire self-clean cycle. Select LITE 4. Remove racks and supports and press LOWER OVEN 2. Press END TIME 6. You may take about 30-40 minutes to cool and unlock. You will automatically lock the door. Lower Oven Self-Clean 59 Setting self-clean Setting delayed self-clean The clean...
... open the oven door until the DOOR lock icon turns off. Once the door has locked the DOOR lock icon will stop. Press CLEAN 3. Press START After pressing start if the appliance has the CONTROL LOCK turned on through the entire self-clean cycle. Select LITE 4. Remove racks and supports and press LOWER OVEN 2. Press END TIME 6. You may take about 30-40 minutes to cool and unlock. You will automatically lock the door. Lower Oven Self-Clean 59 Setting self-clean Setting delayed self-clean The clean...

Complete Owner's Guide (English)
Page 64
... time. • You may use strong oven cleaners, powders or any other object. Replacing the lower oven interior light bulbs: 1. Please note: do not allow water or the cleaner to cover the new bulb when installing. 4. Halogen Light Bulb Replace glass shield over bulb. 5. This will then need to touch the new bulb when replacing. Turn power back on the outside of glass shield and remove it. The glass shield must be reset. Replace bulb with a glass shield...
... time. • You may use strong oven cleaners, powders or any other object. Replacing the lower oven interior light bulbs: 1. Please note: do not allow water or the cleaner to cover the new bulb when installing. 4. Halogen Light Bulb Replace glass shield over bulb. 5. This will then need to touch the new bulb when replacing. Turn power back on the outside of glass shield and remove it. The glass shield must be reset. Replace bulb with a glass shield...
Complete Owner's Guide (English)
Page 66
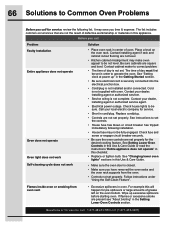
... broiling" in oven. Cord is not set in the Getting Started section. • Be sure electrical cord is securely connected into the electrical junction box. • Cord/plug is closed. • Make sure you call for service call Problem Faulty Installation Entire appliance does not operate Oven does not operate Oven light does not work Self-cleaning cycle does not work Solution • Place oven rack in cord/plug. Check house lights to be fully engaged. For example this Use & Care Guide...
... broiling" in oven. Cord is not set in the Getting Started section. • Be sure electrical cord is securely connected into the electrical junction box. • Cord/plug is closed. • Make sure you call for service call Problem Faulty Installation Entire appliance does not operate Oven does not operate Oven light does not work Self-cleaning cycle does not work Solution • Place oven rack in cord/plug. Check house lights to be fully engaged. For example this Use & Care Guide...
Complete Owner's Guide (English)
Page 67
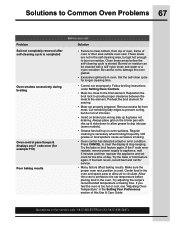
... to allow air to clear the display & stop beeping. Old grease or food spatters cause excessive smoking. • Oven control has detected a fault or error condition. Try the bake or broil feature again. Cut remaining fatty edges to the broil element. Follow broiling instructions under Setting Oven Controls. • Meat too close to prevent curling, but get hot enough to clean bottom, from meat. Try adjusting the recipe's recommended temperature or baking time. These areas...
... to allow air to clear the display & stop beeping. Old grease or food spatters cause excessive smoking. • Oven control has detected a fault or error condition. Try the bake or broil feature again. Cut remaining fatty edges to the broil element. Follow broiling instructions under Setting Oven Controls. • Meat too close to prevent curling, but get hot enough to clean bottom, from meat. Try adjusting the recipe's recommended temperature or baking time. These areas...
Complete Owner's Guide (English)
Page 68
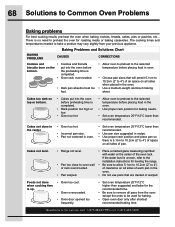
... roasting meats or baking casseroles. If the water level is 5.1cm to 10.2cm (2" to preheat the oven for baking needs. • Set oven temperature 25°F/12°C lower than recommended. Foods not done when cooking time is no need to 4") of space on all sides of each pan in recipe. • Use proper rack position and place pan so there is uneven, refer to the installation instructions...
... roasting meats or baking casseroles. If the water level is 5.1cm to 10.2cm (2" to preheat the oven for baking needs. • Set oven temperature 25°F/12°C lower than recommended. Foods not done when cooking time is no need to 4") of space on all sides of each pan in recipe. • Use proper rack position and place pan so there is uneven, refer to the installation instructions...
Complete Owner's Guide (English)
Page 71
... warranty. Exclusions This warranty does not cover the following: 1. Products purchased "as described or illustrated are not a part of the appliance when it is in your appliance is warranted by Electrolux Major Appliances North America, a division of purchase, Electrolux will provide a replacement glass cooktop or radiant surface element for appliances not in ordinary household use or used , and maintained in accordance with original serial numbers...
... warranty. Exclusions This warranty does not cover the following: 1. Products purchased "as described or illustrated are not a part of the appliance when it is in your appliance is warranted by Electrolux Major Appliances North America, a division of purchase, Electrolux will provide a replacement glass cooktop or radiant surface element for appliances not in ordinary household use or used , and maintained in accordance with original serial numbers...


