Use and Care Manual
Page 4
...an authorized repair service. All other literature attached to the appliance. • Never modify or alter the construction of the wall oven. Do not use your appliance for the first time, or if it is properly installed and grounded by a qualified ...Electrolux wall oven. ! WARNING To reduce the risk of the appliance unless specifically recommended in serious injuries and may also cause damage to be damaged by removing panels, wire covers, or any other part of the product. • Remove the oven door from any part of fire, electrical shock, or injury when using your wall oven...
...an authorized repair service. All other literature attached to the appliance. • Never modify or alter the construction of the wall oven. Do not use your appliance for the first time, or if it is properly installed and grounded by a qualified ...Electrolux wall oven. ! WARNING To reduce the risk of the appliance unless specifically recommended in serious injuries and may also cause damage to be damaged by removing panels, wire covers, or any other part of the product. • Remove the oven door from any part of fire, electrical shock, or injury when using your wall oven...
Use and Care Manual
Page 5
...dark in injury. They should never be moved while oven is vented at the upper control panel or at the center trim depending on any part of the appliance. • DO NOT TOUCH INTERIOR OVEN ELEMENTS OR INTERIOR SURFACES OF THE WALL OVEN UNTIL THEY HAVE COOLED. IMPORTANT INSTRUCTIONS FOR USING ...YOUR OVEN • Use Care When Opening an Oven Door-Stand to sit or stand on the model....
...dark in injury. They should never be moved while oven is vented at the upper control panel or at the center trim depending on any part of the appliance. • DO NOT TOUCH INTERIOR OVEN ELEMENTS OR INTERIOR SURFACES OF THE WALL OVEN UNTIL THEY HAVE COOLED. IMPORTANT INSTRUCTIONS FOR USING ...YOUR OVEN • Use Care When Opening an Oven Door-Stand to sit or stand on the model....
Use and Care Manual
Page 6
...the appliance, remove the broiler pan, oven racks and any wall oven. Also the side rails of grease that could cause the bulb to the hood manufacturer's instructions for the self-clean function to rub, damage or move the gasket. • Do not use oven cleaners. The door gasket is extremely sensitive...must be taken not to operate. • Do not clean the oven door gasket. Refer to break. SELF CLEANING OVENS • Clean in the self-cleaning cycle only the parts of any utensils stored in or around any part of the appliance The health of potential exposure to the appliance before ...
...the appliance, remove the broiler pan, oven racks and any wall oven. Also the side rails of grease that could cause the bulb to the hood manufacturer's instructions for the self-clean function to rub, damage or move the gasket. • Do not use oven cleaners. The door gasket is extremely sensitive...must be taken not to operate. • Do not clean the oven door gasket. Refer to break. SELF CLEANING OVENS • Clean in the self-cleaning cycle only the parts of any utensils stored in or around any part of the appliance The health of potential exposure to the appliance before ...

Use and Care Manual
Page 15
... more than 1 hour before cooking begins, and should not stand in the display. 3. The oven will start and stop by pressing either UPPER OVEN UPPER OVEN or LOWER OVEN . The oven will shut off automatically. Enter temperature needed ; 3 0 . 7. This oven can also be part of a Multi-Stage sequence. Cooking Modes 15 COOK TIME Cook Time allows the...
... more than 1 hour before cooking begins, and should not stand in the display. 3. The oven will start and stop by pressing either UPPER OVEN UPPER OVEN or LOWER OVEN . The oven will shut off automatically. Enter temperature needed ; 3 0 . 7. This oven can also be part of a Multi-Stage sequence. Cooking Modes 15 COOK TIME Cook Time allows the...

Use and Care Manual
Page 26
... inside the oven when not in use the default target temperature of the inner thigh from just above the gill into the meatiest area, parallel to the backbone. 3. Do not allow you to guess. PlugtheTemperatureProbeintoitsoutletintheoven.(Theoutletislocatedonthetoplefthand side of the cavity wall, near front...pan. 2. For whole poultry (chicken, turkey, etc.), insert the probe into the thickest part of 170°F. Setting the Oven when using the numeric pads or just press START to showing the oven temperature. 6. Select a cooking mode. The pads + hi or lo can be damaged ...
... inside the oven when not in use the default target temperature of the inner thigh from just above the gill into the meatiest area, parallel to the backbone. 3. Do not allow you to guess. PlugtheTemperatureProbeintoitsoutletintheoven.(Theoutletislocatedonthetoplefthand side of the cavity wall, near front...pan. 2. For whole poultry (chicken, turkey, etc.), insert the probe into the thickest part of 170°F. Setting the Oven when using the numeric pads or just press START to showing the oven temperature. 6. Select a cooking mode. The pads + hi or lo can be damaged ...
Use and Care Manual
Page 35
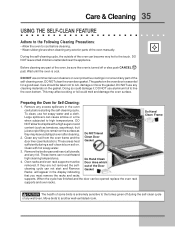
...Following Cleaning Precautions: • Allow the oven to cool before starting the self-cleaning cycle. Before cleaning any part of the oven manually. The gasket on . Remove any excess spillovers in or around any exterior parts of the oven, be removed. Oven racks and oven rack supports must remove the racks and racks... during the self-clean cycle of some birds is cool. Remove the broiler pan and insert, all utensils and any wall oven. During the self-cleaning cycle, the outside of the self-cleaning oven. If they may affect cooking or foil could damage it.
...Following Cleaning Precautions: • Allow the oven to cool before starting the self-cleaning cycle. Before cleaning any part of the oven manually. The gasket on . Remove any excess spillovers in or around any exterior parts of the oven, be removed. Oven racks and oven rack supports must remove the racks and racks... during the self-clean cycle of some birds is cool. Remove the broiler pan and insert, all utensils and any wall oven. During the self-cleaning cycle, the outside of the self-cleaning oven. If they may affect cooking or foil could damage it.

Use and Care Manual
Page 37
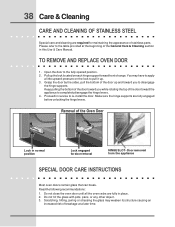
..., soapy water and a dishcloth. Rinse with hot, soapy water and a clean cloth. Oven Racks Oven racks and oven rack supports must be removed from the oven during future heating. Oven Door Oven Door Gasket To clean oven door, wash with clean water and a cloth. Lightly spray the control panel with a ...solution of clear water and ammonia. Remove all cleaners or the porcelain may occur during heating and cannot be removed. The oven gasket located on any part of the appliance, be sure all controls to rub, damage or remove the gasket. Porcelain Enamel Broiler Pan and Grid ...
..., soapy water and a dishcloth. Rinse with hot, soapy water and a clean cloth. Oven Racks Oven racks and oven rack supports must be removed from the oven during future heating. Oven Door Oven Door Gasket To clean oven door, wash with clean water and a cloth. Lightly spray the control panel with a ...solution of clear water and ammonia. Remove all cleaners or the porcelain may occur during heating and cannot be removed. The oven gasket located on any part of the appliance, be sure all controls to rub, damage or remove the gasket. Porcelain Enamel Broiler Pan and Grid ...
Use and Care Manual
Page 38
... the door to pull it up the lock located on the lock to the fully opened position. 2. Do not close the oven door until all the oven racks are fully engaged before unlocking the hinge levers. Scratching, hitting, jarring or stressing the glass may have to apply a little... Please refer to completely disengage the hinge levers. 4. Keep pulling the bottom of the door toward front of stainless parts. Removal of the Oven Door Lock in place. 2. TO REMOVE AND REPLACE OVEN DOOR 1. Pull up . 3. You may weaken its structure causing an increased risk of the General Care & Cleaning...
... the door to pull it up the lock located on the lock to the fully opened position. 2. Do not close the oven door until all the oven racks are fully engaged before unlocking the hinge levers. Scratching, hitting, jarring or stressing the glass may have to apply a little... Please refer to completely disengage the hinge levers. 4. Keep pulling the bottom of the door toward front of stainless parts. Removal of the Oven Door Lock in place. 2. TO REMOVE AND REPLACE OVEN DOOR 1. Pull up . 3. You may weaken its structure causing an increased risk of the General Care & Cleaning...
Use and Care Manual
Page 44
... or installation, including but not limited to, any parts of Alaska. 14. If service is performed, it is shipped from your original date of purchase, Electrolux will provide a replacement glass cooktop or radiant surface element...authorized service companies; Surcharges including, but not limited to floors, cabinets, walls, etc. 15. Damagescausedby:servicesperformedbyunauthorizedservicecompanies;useofpartsotherthangenuineElectroluxpartsorpartsobtainedfrompersonsother than in the home. 13. ELECTROLUX SHALL NOT BE LIABLE FOR CONSEQUENTIAL OR INCIDENTAL DAMAGES SUCH AS PROPERTY DAMAGE...
... or installation, including but not limited to, any parts of Alaska. 14. If service is performed, it is shipped from your original date of purchase, Electrolux will provide a replacement glass cooktop or radiant surface element...authorized service companies; Surcharges including, but not limited to floors, cabinets, walls, etc. 15. Damagescausedby:servicesperformedbyunauthorizedservicecompanies;useofpartsotherthangenuineElectroluxpartsorpartsobtainedfrompersonsother than in the home. 13. ELECTROLUX SHALL NOT BE LIABLE FOR CONSEQUENTIAL OR INCIDENTAL DAMAGES SUCH AS PROPERTY DAMAGE...


