Use and Care Manual
Page 3
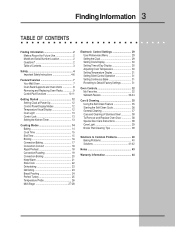
... 3 Safety 4 Important Safety Instructions 4-6 Feature Overview 7 Your Wall Oven 7 Oven Rack Supports and Oven Vents 8 Removing and Replacing Oven Racks 9 Control Pad Functions 10-11 Getting Started 12 Setting Clock at Power Up 12 Control Panel Display Modes 12 Temperature Visual Display 12 Oven Light 13 Control Lock 13 Setting the Kitchen Timer 13 Cooking Modes 14 Baking 14 Cook Time 15 End Time 15 Broiling 16 Convection Baking 17 Convection Convert 18 Rapid Preheat 18 Convection Roasting 19 Convection Broiling 20 Keep Warm 21 Slow Cook 22 Dehydrating 23 Defrosting...
... 3 Safety 4 Important Safety Instructions 4-6 Feature Overview 7 Your Wall Oven 7 Oven Rack Supports and Oven Vents 8 Removing and Replacing Oven Racks 9 Control Pad Functions 10-11 Getting Started 12 Setting Clock at Power Up 12 Control Panel Display Modes 12 Temperature Visual Display 12 Oven Light 13 Control Lock 13 Setting the Kitchen Timer 13 Cooking Modes 14 Baking 14 Cook Time 15 End Time 15 Broiling 16 Convection Baking 17 Convection Convert 18 Rapid Preheat 18 Convection Roasting 19 Convection Broiling 20 Keep Warm 21 Slow Cook 22 Dehydrating 23 Defrosting...
Use and Care Manual
Page 4
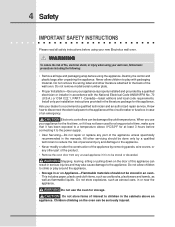
... safety instructions before using your wall oven, follow basic precautions including the following: • Remove all tape and packaging wrap before connecting it to the power supply. • User Servicing-Do not repair or replace any part of the appliance unless specifically recommended in the manuals. All other servicing should not be stored or discarded. WARNING To reduce the risk of the product. • Remove the oven door from...
... safety instructions before using your wall oven, follow basic precautions including the following: • Remove all tape and packaging wrap before connecting it to the power supply. • User Servicing-Do not repair or replace any part of the appliance unless specifically recommended in the manuals. All other servicing should not be stored or discarded. WARNING To reduce the risk of the product. • Remove the oven door from...
Use and Care Manual
Page 5
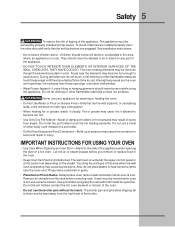
... INSTRUCTIONS FOR USING YOUR OVEN • Use Care When Opening an Oven Door-Stand to cause burns. Do not let the pot holders touch the hot heating elements. The wall oven is hot, use baking soda, a dry chemical or foam-type extinguisher. • When heating fat or grease, watch it closely. Fat or grease may cause severe burns. Let hot air or steam escape before removing rack. Always place oven racks...
... INSTRUCTIONS FOR USING YOUR OVEN • Use Care When Opening an Oven Door-Stand to cause burns. Do not let the pot holders touch the hot heating elements. The wall oven is hot, use baking soda, a dry chemical or foam-type extinguisher. • When heating fat or grease, watch it closely. Fat or grease may cause severe burns. Let hot air or steam escape before removing rack. Always place oven racks...
Use and Care Manual
Page 6
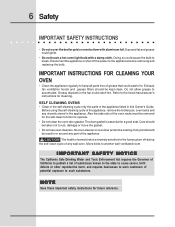
... this Owner's Guide. 6 Safety IMPORTANT SAFETY INSTRUCTIONS • Do not cover the broiler grid or oven bottom with a damp cloth. Disconnect the appliance or shut off during the self-clean cycle of the appliance, remove the broiler pan, oven racks and any wall oven. Do not allow grease to another well ventilated room. SELF CLEANING OVENS • Clean in the self-cleaning cycle only the parts of the oven racks must be used in the fan could...
... this Owner's Guide. 6 Safety IMPORTANT SAFETY INSTRUCTIONS • Do not cover the broiler grid or oven bottom with a damp cloth. Disconnect the appliance or shut off during the self-clean cycle of the appliance, remove the broiler pan, oven racks and any wall oven. Do not allow grease to another well ventilated room. SELF CLEANING OVENS • Clean in the self-cleaning cycle only the parts of the oven racks must be used in the fan could...
Use and Care Manual
Page 10
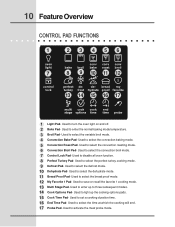
...- Used to enter up the cooking options pads. 15 Cook Time Pad- 10 Feature Overview CONTROL PAD FUNCTIONS 1 23 456 oven light 7 bake 8 broil 9 conv bake 10 conv roast 11 conv broil 12 control lock perfect turkey 13 defrost 14 de- Used to three subsequent modes. 14 Cook Options Pad- Used to select the time at which the cooking will end. 17 Probe Pad- Used to select the convection broil mode. 7 Control Lock Pad- Used to activate the meat probe mode.
...- Used to enter up the cooking options pads. 15 Cook Time Pad- 10 Feature Overview CONTROL PAD FUNCTIONS 1 23 456 oven light 7 bake 8 broil 9 conv bake 10 conv roast 11 conv broil 12 control lock perfect turkey 13 defrost 14 de- Used to three subsequent modes. 14 Cook Options Pad- Used to select the time at which the cooking will end. 17 Probe Pad- Used to select the convection broil mode. 7 Control Lock Pad- Used to activate the meat probe mode.
Use and Care Manual
Page 11
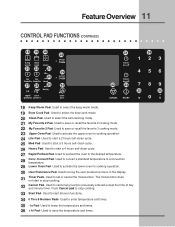
... display. 31 Timer Pads- Used to start a 4 hours self-clean cycle. 27 Rapid Preheat Pad- Feature Overview 11 CONTROL PAD FUNCTIONS (CONTINUED) 18 19 20 keep warm mode. 19 Slow Cook Pad- Used to start a 3 hours self-clean cycle. 26 Heavy Pad- Used to a convection temperature. 29 Lower Oven Pad- Used to activate the upper oven for cooking operation. 30 User Preference Pad- lo Pad- Used to save or recall the favorite 2 cooking mode. 22 My Favorite 3 Pad- Used to set...
... display. 31 Timer Pads- Used to start a 4 hours self-clean cycle. 27 Rapid Preheat Pad- Feature Overview 11 CONTROL PAD FUNCTIONS (CONTINUED) 18 19 20 keep warm mode. 19 Slow Cook Pad- Used to start a 3 hours self-clean cycle. 26 Heavy Pad- Used to a convection temperature. 29 Lower Oven Pad- Used to activate the upper oven for cooking operation. 30 User Preference Pad- lo Pad- Used to save or recall the favorite 2 cooking mode. 22 My Favorite 3 Pad- Used to set...
Use and Care Manual
Page 12
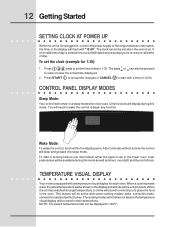
... the display and will display during this mode. When the unit has reached its target temperature, a chime will triple beep to prompt you to 1:30. To set the time of day. If an invalid time of day is equipped with "12:00". The clock cannot be set , the actual temperature will be noted in use. Only the clock will rise as timers, oven light and the control lock.
... the display and will display during this mode. When the unit has reached its target temperature, a chime will triple beep to prompt you to 1:30. To set the time of day. If an invalid time of day is equipped with "12:00". The clock cannot be set , the actual temperature will be noted in use. Only the clock will rise as timers, oven light and the control lock.
Use and Care Manual
Page 14
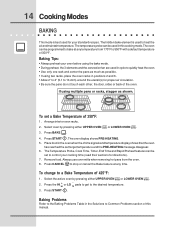
... using the bake mode. • During preheat, the 3 elements and the convection fan are used for proper air circulation. • Be sure the pans do not touch each other, the door, sides or back of 350°F. Press START . Always use oven mitts when removing hot pans from 170°F to a Bake Temperature of 350°F: 1. Press START . The Temperature Probe, Cook Time, Timer, End Time and Rapid Preheat features can be set target temperature and the PRE-HEATING...
... using the bake mode. • During preheat, the 3 elements and the convection fan are used for proper air circulation. • Be sure the pans do not touch each other, the door, sides or back of 350°F. Press START . Always use oven mitts when removing hot pans from 170°F to a Bake Temperature of 350°F: 1. Press START . The Temperature Probe, Cook Time, Timer, End Time and Rapid Preheat features can be set target temperature and the PRE-HEATING...

Use and Care Manual
Page 15
... with Cook Time and End Time to start and stop by itself . The oven will shut off automatically. Enter temperature needed ; 4 5 0 . 4. Press COOK TIME . 6. The cook time will end at a set a delayed timed cooking (example is finished. To set time of time and shut off and will blink in the refrigerator first. Press BAKE . Press COOK OPTIONS to cancel the end time at anytime. Use caution with Bake, Convection Bake, Convection Roast, Slow Cook, Keep Warm, Defrost, Dehydrate, Clean and Bread Proof cooking modes. Eating...
... with Cook Time and End Time to start and stop by itself . The oven will shut off automatically. Enter temperature needed ; 4 5 0 . 4. Press COOK TIME . 6. The cook time will end at a set a delayed timed cooking (example is finished. To set time of time and shut off and will blink in the refrigerator first. Press BAKE . Press COOK OPTIONS to cancel the end time at anytime. Use caution with Bake, Convection Bake, Convection Roast, Slow Cook, Keep Warm, Defrost, Dehydrate, Clean and Bread Proof cooking modes. Eating...
Use and Care Manual
Page 16
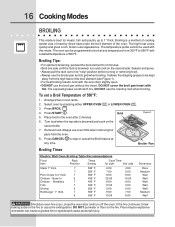
...;F to 1" thick. LOWER OVEN 3. To set a Broil Temperature of meat by pressing either UPPER OVEN UPPER OVEN or LOWER OVEN . Place food in the oven after 2 minutes. DO NOT cover the broil pan insert with the oven door slightly open. • DO NOT use the broiler pan and its grid when broiling. Always use the roasting rack when broiling. Broiling is a method of cooking tender cuts of 550°F: 1. Press START . 5. 16 Cooking Modes BROILING This mode is best for 2 minutes...
...;F to 1" thick. LOWER OVEN 3. To set a Broil Temperature of meat by pressing either UPPER OVEN UPPER OVEN or LOWER OVEN . Place food in the oven after 2 minutes. DO NOT cover the broil pan insert with the oven door slightly open. • DO NOT use the broiler pan and its grid when broiling. Always use the roasting rack when broiling. Broiling is a method of cooking tender cuts of 550°F: 1. Press START . 5. 16 Cooking Modes BROILING This mode is best for 2 minutes...

Use and Care Manual
Page 17
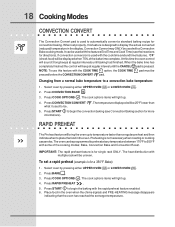
...;F. Convection Bake Air Flow Convection Baking Tips: • Always preheat your oven before using the Convection Bake mode. • If your oven temperature. The Temperature Probe, Cook Time, Timer, End Time and Rapid Preheat features can be set to control your recipe has not had the temperature converted for convection baking you to circulate the oven's heat evenly and continuously within the oven. If your cooking time (read their sections for convection baking when using this cooking mode. Arrange interior oven racks. 2. Remove food. Most foods cooked in the oven when...
...;F. Convection Bake Air Flow Convection Baking Tips: • Always preheat your oven before using the Convection Bake mode. • If your oven temperature. The Temperature Probe, Cook Time, Timer, End Time and Rapid Preheat features can be set to control your recipe has not had the temperature converted for convection baking you to circulate the oven's heat evenly and continuously within the oven. If your cooking time (read their sections for convection baking when using this cooking mode. Arrange interior oven racks. 2. Remove food. Most foods cooked in the oven when...
Use and Care Manual
Page 18
... the control will bring the oven up to temperature faster than 5. LOWER OVEN 2. Press BAKE . 3. 18 Cooking Modes CONVECTION CONVERT The Convection Convert pad is used to automatically convert a standard baking recipe for single rack ONLY. When set properly, this time the oven control will light up . 4. If convection conversion is used with the rapid preheat feature enabled. 6. The cook options items will sound 3 long beeps at regular interval until baking had finished. The temperature displayed will...
... the control will bring the oven up to temperature faster than 5. LOWER OVEN 2. Press BAKE . 3. 18 Cooking Modes CONVECTION CONVERT The Convection Convert pad is used to automatically convert a standard baking recipe for single rack ONLY. When set properly, this time the oven control will light up . 4. If convection conversion is used with the rapid preheat feature enabled. 6. The cook options items will sound 3 long beeps at regular interval until baking had finished. The temperature displayed will...
Use and Care Manual
Page 19
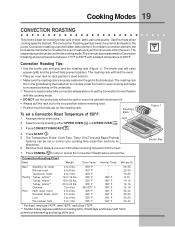
... roasting rack (Figure 1). The roasting rack fits on the grid allowing the heated air to circulate under the food for even cooking and helps to increase browning on the underside. • There is no need to reduce the convection temperature or to use the Convection Convert feature with this cooking mode. • DO NOT use oven mitts when removing hot pans from the oven. 7. Grid 2. The Temperature Probe, Cook Time, Timer, End Time and Rapid Preheat...
... roasting rack (Figure 1). The roasting rack fits on the grid allowing the heated air to circulate under the food for even cooking and helps to increase browning on the underside. • There is no need to reduce the convection temperature or to use the Convection Convert feature with this cooking mode. • DO NOT use oven mitts when removing hot pans from the oven. 7. Grid 2. The Temperature Probe, Cook Time, Timer, End Time and Rapid Preheat...
Use and Care Manual
Page 22
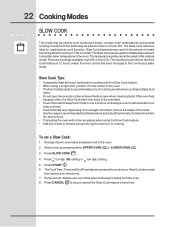
The Slow Cook feature is normal. The temperature probe cannot be used to maintain a low temperature in the exterior of cooking. Arrange interior oven racks and place food in this cooking mode. 22 Cooking Modes SLOW COOK This mode may need to be extended. • Cover the foods to keep them moist or use oven mitts when removing hot pans from the oven. 8. The Slow Cook mode uses the hidden bake element to cook foods more slowly, at any...
The Slow Cook feature is normal. The temperature probe cannot be used to maintain a low temperature in the exterior of cooking. Arrange interior oven racks and place food in this cooking mode. 22 Cooking Modes SLOW COOK This mode may need to be extended. • Cover the foods to keep them moist or use oven mitts when removing hot pans from the oven. 8. The Slow Cook mode uses the hidden bake element to cook foods more slowly, at any...
Use and Care Manual
Page 23
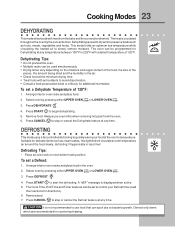
... not preheat the oven. • Multiple racks can be programmed for directions). 6. Press START to dry and/or preserve foods such as cream cakes, this light defrost circulates room temperature air around the food slowly, defrosting it hygienically in less time! Remove food. 7. Dehydrating is not recommended to use oven mitts when removing hot pans from the bake and the convection element. To set a Defrost: 1. LOWER OVEN 3. DEFROSTING This mode uses a fan controlled...
... not preheat the oven. • Multiple racks can be programmed for directions). 6. Press START to dry and/or preserve foods such as cream cakes, this light defrost circulates room temperature air around the food slowly, defrosting it hygienically in less time! Remove food. 7. Dehydrating is not recommended to use oven mitts when removing hot pans from the bake and the convection element. To set a Defrost: 1. LOWER OVEN 3. DEFROSTING This mode uses a fan controlled...

Use and Care Manual
Page 26
... thickest part of the food. The Temperature Probe gets the exact temperature you to showing the oven temperature. 6. Use only the probe supplied with Bake, Convection Bake, Convection Roast and Perfect Turkey cooking modes. Select a cooking mode. Press COOK OPTIONS to bring up the cook options items and press PROBE pad to guess. This feature can be used with your food completely before inserting the Probe to use . 6. Handle the Temperature Probe carefully when inserting and removing it...
... thickest part of the food. The Temperature Probe gets the exact temperature you to showing the oven temperature. 6. Use only the probe supplied with Bake, Convection Bake, Convection Roast and Perfect Turkey cooking modes. Select a cooking mode. Press COOK OPTIONS to bring up the cook options items and press PROBE pad to guess. This feature can be used with your food completely before inserting the Probe to use . 6. Handle the Temperature Probe carefully when inserting and removing it...
Use and Care Manual
Page 36
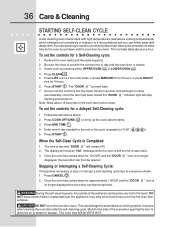
.... Remove the oven racks and the racks supports. 2. Press CLEAN . 5. Follow the instructions above cooking temperatures) which eliminate soil completely or reduce it becomes necessary to stop flashing and remain on. Enter time of day needed for the oven door lock to close . The time of day and "DOOR " will show an "Hot" message while the oven is During the self-cleaning cycle, the outside of the oven when opening the oven door after a self-clean...
.... Remove the oven racks and the racks supports. 2. Press CLEAN . 5. Follow the instructions above cooking temperatures) which eliminate soil completely or reduce it becomes necessary to stop flashing and remain on. Enter time of day needed for the oven door lock to close . The time of day and "DOOR " will show an "Hot" message while the oven is During the self-cleaning cycle, the outside of the oven when opening the oven door after a self-clean...
Use and Care Manual
Page 39
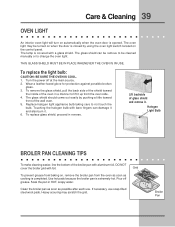
... opened. Lift backside of the wall oven. 5. Care & Cleaning 39 OVEN LIGHT An interior oven light will turn on automatically when the oven door is completed. The oven light may scratch the grid. The lamp is closed by pushing a little toward the inside of the broiler pan with a glass shield. To replace the light bulb: CAUTION: BE SURE THE OVEN IS COOL. 1. Turn the power off grease. The glass shield should come out easily by using the oven light switch located...
... opened. Lift backside of the wall oven. 5. Care & Cleaning 39 OVEN LIGHT An interior oven light will turn on automatically when the oven door is completed. The oven light may scratch the grid. The lamp is closed by pushing a little toward the inside of the broiler pan with a glass shield. To replace the light bulb: CAUTION: BE SURE THE OVEN IS COOL. 1. Turn the power off grease. The glass shield should come out easily by using the oven light switch located...
Use and Care Manual
Page 40
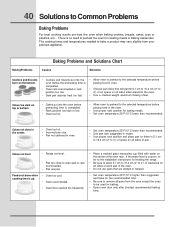
... to remove all sides of pan. Cakes not done in the center. • Oven too hot. • Incorrect pan size. • Pan not centered in recipe. • Use proper rack position and place pan so there is no need to 4") of the oven rack. There is 5.1 cm to 10.2 cm (2" to preheat the oven for baking. • Open oven door only after shortest recommended baking time. The cooking times and temperatures needed to bake a product may...
... to remove all sides of pan. Cakes not done in the center. • Oven too hot. • Incorrect pan size. • Pan not centered in recipe. • Use proper rack position and place pan so there is no need to 4") of the oven rack. There is 5.1 cm to 10.2 cm (2" to preheat the oven for baking. • Open oven door only after shortest recommended baking time. The cooking times and temperatures needed to bake a product may...
Use and Care Manual
Page 44
... to repair or replace appliance light bulbs, air filters, water filters, other consumables, or knobs, handles, or other than authorized service companies; Labor or in the USA, Puerto Rico and Canada. Products purchased "as removal of trim, cupboards, shelves, etc., which do not involve malfunction or defects in materials or workmanship, or for service and parts under this warranty. THIS WRITTEN WARRANTY GIVES YOU SPECIFIC LEGAL RIGHTS. Service...
... to repair or replace appliance light bulbs, air filters, water filters, other consumables, or knobs, handles, or other than authorized service companies; Labor or in the USA, Puerto Rico and Canada. Products purchased "as removal of trim, cupboards, shelves, etc., which do not involve malfunction or defects in materials or workmanship, or for service and parts under this warranty. THIS WRITTEN WARRANTY GIVES YOU SPECIFIC LEGAL RIGHTS. Service...


