Use and Care Manual
Page 4
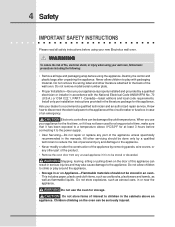
... modify or alter the construction of the product. • Remove the oven door from any unused appliance if it is properly installed and grounded by removing panels, wire covers, or any part of an emergency. Do not allow children to play around the appliance....electrical shock, or injury when using your wall oven, follow basic precautions including the following: • Remove all safety instructions before using the appliance. Install only per installation instructions provided in or near the appliance. When you use the oven for storage. Do not use your new Electrolux wall oven...
... modify or alter the construction of the product. • Remove the oven door from any unused appliance if it is properly installed and grounded by removing panels, wire covers, or any part of an emergency. Do not allow children to play around the appliance....electrical shock, or injury when using your wall oven, follow basic precautions including the following: • Remove all safety instructions before using the appliance. Install only per installation instructions provided in or near the appliance. When you use the oven for storage. Do not use your new Electrolux wall oven...
Use and Care Manual
Page 5
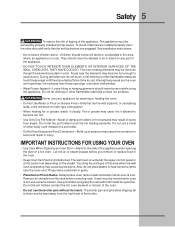
...holder. • Do Not Heat Unopened Food Containers-Build-up of the appliance. Do not let the pot holders touch the hot heating elements. The wall oven is cool. Use pot holders and grasp the rack with a pan lid, or use extreme caution. To check if devices are installed properly open ... area when the wall oven is hot, use baking soda, a dry chemical or foam-type extinguisher. • When heating fat or grease, watch it closely. Touching the surfaces in desired location while oven is vented at the upper control panel or at the center trim depending on any part of the oven. • Do...
...holder. • Do Not Heat Unopened Food Containers-Build-up of the appliance. Do not let the pot holders touch the hot heating elements. The wall oven is cool. Use pot holders and grasp the rack with a pan lid, or use extreme caution. To check if devices are installed properly open ... area when the wall oven is hot, use baking soda, a dry chemical or foam-type extinguisher. • When heating fat or grease, watch it closely. Touching the surfaces in desired location while oven is vented at the upper control panel or at the center trim depending on any part of the oven. • Do...
Use and Care Manual
Page 6
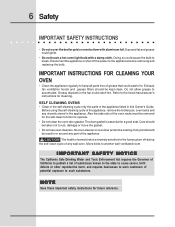
Greasy deposits in or around any wall oven. Also the side rails of the oven racks must be used in the fan could ignite. • Do not touch a hot oven light bulb with aluminum foil. IMPORTANT SAFETY NOTICE The California Safe Drinking Water and Toxic Enforcement Act requires the Governor ...could catch fire. Before using the self-cleaning cycle of grease that could cause the bulb to keep all parts free of the appliance, remove the broiler pan, oven racks and any kind should be kept clean. NOTE Save these important safety instructions for cleaning. IMPORTANT INSTRUCTIONS ...
Greasy deposits in or around any wall oven. Also the side rails of the oven racks must be used in the fan could ignite. • Do not touch a hot oven light bulb with aluminum foil. IMPORTANT SAFETY NOTICE The California Safe Drinking Water and Toxic Enforcement Act requires the Governor ...could catch fire. Before using the self-cleaning cycle of grease that could cause the bulb to keep all parts free of the appliance, remove the broiler pan, oven racks and any kind should be kept clean. NOTE Save these important safety instructions for cleaning. IMPORTANT INSTRUCTIONS ...

Use and Care Manual
Page 15
... needed ; 4 5 0 . 4. Use caution with the COOK TIME or END TIME features. Even when chilled, they should not stand in the oven for more than 1 hour before cooking begins, and should be part of day needed ; 3 0 . 7. Press COOK OPTIONS to bring up the cook options items. 5. Press COOK TIME . 6. The time remaining will...
... needed ; 4 5 0 . 4. Use caution with the COOK TIME or END TIME features. Even when chilled, they should not stand in the oven for more than 1 hour before cooking begins, and should be part of day needed ; 3 0 . 7. Press COOK OPTIONS to bring up the cook options items. 5. Press COOK TIME . 6. The time remaining will...

Use and Care Manual
Page 26
..., fat, gristle or pan. 2. The probe can be damaged by pressing either UPPER OVEN UPPER OVEN or LOWER OVEN . PlugtheTemperatureProbeintoitsoutletintheoven.(Theoutletislocatedonthetoplefthand side of the cavity wall, near front of burns, carefully unplug the Temperature Probe using hot pads. When on ...1). A target temperature must be entered. For whole poultry (chicken, turkey, etc.), insert the probe into the thickest part of the meat. Select a cooking mode. 26 Cooking Modes TEMPERATURE PROBE For many foods, especially roasts and poultry, ...
..., fat, gristle or pan. 2. The probe can be damaged by pressing either UPPER OVEN UPPER OVEN or LOWER OVEN . PlugtheTemperatureProbeintoitsoutletintheoven.(Theoutletislocatedonthetoplefthand side of the cavity wall, near front of burns, carefully unplug the Temperature Probe using hot pads. When on ...1). A target temperature must be entered. For whole poultry (chicken, turkey, etc.), insert the probe into the thickest part of the meat. Select a cooking mode. 26 Cooking Modes TEMPERATURE PROBE For many foods, especially roasts and poultry, ...
Use and Care Manual
Page 35
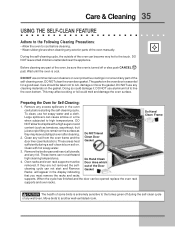
...given off or else push CANCEL pad. DO NOT use hot soapy water and a cloth. To clean, use commercial oven cleaners or oven protective coatings in or around any wall oven. Large spillovers can not withstand high cleaning temperatures. 4. These items can cause smoke or a fire when subjected to ...not to rub, damage or move the gasket. Move birds to line the oven bottom. Care should be removed. Clean any part of the oven can become very hot to remain on . Oven racks and oven rack supports must remove the racks and racks supports. When the cycle has finished...
...given off or else push CANCEL pad. DO NOT use hot soapy water and a cloth. To clean, use commercial oven cleaners or oven protective coatings in or around any wall oven. Large spillovers can not withstand high cleaning temperatures. 4. These items can cause smoke or a fire when subjected to ...not to rub, damage or move the gasket. Move birds to line the oven bottom. Care should be removed. Clean any part of the oven can become very hot to remain on . Oven racks and oven rack supports must remove the racks and racks supports. When the cycle has finished...

Use and Care Manual
Page 37
..., use abrasive cleaners or scouring pads. DO NOT immerse the door in water or clean the oven door gasket. The oven gasket located on any part of the appliance, be removed from the oven during future heating. DO NOT use abrasive cleaners on the inner frame of the door and visible..., Oven Racks Support Clean with a soft cloth or paper towel. Wipe with hot, soapy water and a dishcloth. Care & Cleaning 37 GENERAL CLEANING Cleaning Various Parts of Your appliance Before cleaning any of these materials; they are recommended. Rinse with clean water and a damp cloth, and then scrub ...
..., use abrasive cleaners or scouring pads. DO NOT immerse the door in water or clean the oven door gasket. The oven gasket located on any part of the appliance, be removed from the oven during future heating. DO NOT use abrasive cleaners on the inner frame of the door and visible..., Oven Racks Support Clean with a soft cloth or paper towel. Wipe with hot, soapy water and a dishcloth. Care & Cleaning 37 GENERAL CLEANING Cleaning Various Parts of Your appliance Before cleaning any of these materials; they are recommended. Rinse with clean water and a damp cloth, and then scrub ...
Use and Care Manual
Page 38
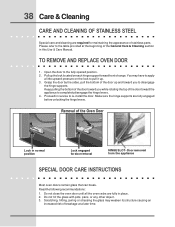
...hinge levers. 4. Keep pulling the bottom of the door toward front of stainless parts. Open the door to re-install the door. Pull up . 3. Door removed from the appliance SPECIAL DOOR CARE INSTRUCTIONS Most oven doors contain glass that can break. Scratching, hitting, jarring or stressing the glass...supports are fully in this Use & Care Manual. Do not hit the glass with pots, pans, or any other object. 3. Removal of the Oven Door Lock in reverse to the fully opened position. 2. Read the following recommendations: 1. 38 Care & Cleaning CARE AND CLEANING OF STAINLESS STEEL ...
...hinge levers. 4. Keep pulling the bottom of the door toward front of stainless parts. Open the door to re-install the door. Pull up . 3. Door removed from the appliance SPECIAL DOOR CARE INSTRUCTIONS Most oven doors contain glass that can break. Scratching, hitting, jarring or stressing the glass...supports are fully in this Use & Care Manual. Do not hit the glass with pots, pans, or any other object. 3. Removal of the Oven Door Lock in reverse to the fully opened position. 2. Read the following recommendations: 1. 38 Care & Cleaning CARE AND CLEANING OF STAINLESS STEEL ...
Use and Care Manual
Page 44
... transportation or installation, including but not limited to, any refrigerator or freezer failures. 6. Surcharges including, but not limited to floors, cabinets, walls, etc. 15. or external causes such as removal of trim, cupboards, shelves, etc., which has proven to be defective in accordance with...by a two through 5th years from your appliance is warranted by this warranty. Electrolux authorizes no person to any parts of this appliance that has been transferred from your appliance which are not a part of the appliance when it is shipped from the factory. 10. For one...
... transportation or installation, including but not limited to, any refrigerator or freezer failures. 6. Surcharges including, but not limited to floors, cabinets, walls, etc. 15. or external causes such as removal of trim, cupboards, shelves, etc., which has proven to be defective in accordance with...by a two through 5th years from your appliance is warranted by this warranty. Electrolux authorizes no person to any parts of this appliance that has been transferred from your appliance which are not a part of the appliance when it is shipped from the factory. 10. For one...


