Wiring Diagram (All Languages)
Page 1
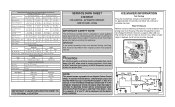
... ICE MAKER CONNECTOR PLUG CONNECTIONS Wire Number Wire Color Connects to complete the cycle. CONDENSER FAN MOTOR Watts RPM Amps 3.1 1100 CW Opposite Shaft 0.03 Running ICE MAKER SPECIFICATIONS Electrical 115 vac (127 vac max) Thermostat Opens at 48° F ( 9° C), Closes at bottom and prying cover from torch flame. R134a important safety NOTE The information provided herein is complete. DO NOT allow torch to assist qualified repair personnel only. When a water valve...
... ICE MAKER CONNECTOR PLUG CONNECTIONS Wire Number Wire Color Connects to complete the cycle. CONDENSER FAN MOTOR Watts RPM Amps 3.1 1100 CW Opposite Shaft 0.03 Running ICE MAKER SPECIFICATIONS Electrical 115 vac (127 vac max) Thermostat Opens at 48° F ( 9° C), Closes at bottom and prying cover from torch flame. R134a important safety NOTE The information provided herein is complete. DO NOT allow torch to assist qualified repair personnel only. When a water valve...

Product Specifications Sheet (English)
Page 1
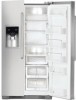
...Wave-Touch™ Electronic Controls Yes Door Hinge Covers Yes Ice / Water Dispenser Yes Perfect Set® Temperature Control System and Display Yes Crushed / Cubes / Water Yes Air and Water Filter Indicator / Reset Yes Fast Ice™ Yes Fast Freeze™ Yes Lock Yes Dispenser Light Control Yes Fresh Food Conveniences PureAdvantage® Water & Ice / Air Filtration Water Filter Location Temp Alarm System / Door Ajar Alarm / Power Failure Alarm Luxury-Design® Full-Extension Glass Shelves Luxury-Glide® Dual Humidity-Controlled Upper Crisper Luxury-Glide®...
...Wave-Touch™ Electronic Controls Yes Door Hinge Covers Yes Ice / Water Dispenser Yes Perfect Set® Temperature Control System and Display Yes Crushed / Cubes / Water Yes Air and Water Filter Indicator / Reset Yes Fast Ice™ Yes Fast Freeze™ Yes Lock Yes Dispenser Light Control Yes Fresh Food Conveniences PureAdvantage® Water & Ice / Air Filtration Water Filter Location Temp Alarm System / Door Ajar Alarm / Power Failure Alarm Luxury-Design® Full-Extension Glass Shelves Luxury-Glide® Dual Humidity-Controlled Upper Crisper Luxury-Glide®...

Product Specifications Sheet (English)
Page 2
... for 90°door swing which will ONLY allow for ease of installation, proper air circulation, and plumbing/ electrical connections. • Remove all wall / floor molding prior to Product Installation Guide on rear wall recommended to prevent water line damage. • Water Pressure - Electrolux Major Appliances, N.A. We reserve the right to household water supply line plus 7 additional feet. Side-by-Side Refrigerators EW26SS70I S Side-by-Side Refrigerator Specifications • Product...
... for 90°door swing which will ONLY allow for ease of installation, proper air circulation, and plumbing/ electrical connections. • Remove all wall / floor molding prior to Product Installation Guide on rear wall recommended to prevent water line damage. • Water Pressure - Electrolux Major Appliances, N.A. We reserve the right to household water supply line plus 7 additional feet. Side-by-Side Refrigerators EW26SS70I S Side-by-Side Refrigerator Specifications • Product...
Complete Owner's Guide (English)
Page 2
... product with Electrolux enhances our ability to customer satisfaction and product quality throughout the service life of contents Finding Information 2 Safety 3 Installation 5 Removing The Doors 7 Installing Door Handles 9 Connecting The Water Supply 10 Feature Overview 12 Controls 13 Storage Features 18 Automatic Ice & Water Maker/Dispenser 25 Changing The Filter 28 Storing Food & Saving Energy 30 Normal Operating Sounds & Sights 31 Care & Cleaning 32 Warranty 35 Solutions To Common Problems 36 Questions? Table of your new appliance...
... product with Electrolux enhances our ability to customer satisfaction and product quality throughout the service life of contents Finding Information 2 Safety 3 Installation 5 Removing The Doors 7 Installing Door Handles 9 Connecting The Water Supply 10 Feature Overview 12 Controls 13 Storage Features 18 Automatic Ice & Water Maker/Dispenser 25 Changing The Filter 28 Storing Food & Saving Energy 30 Normal Operating Sounds & Sights 31 Care & Cleaning 32 Warranty 35 Solutions To Common Problems 36 Questions? Table of your new appliance...
Complete Owner's Guide (English)
Page 5
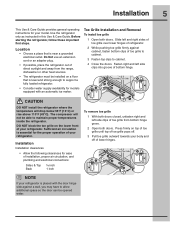
... top clips to support a fully loaded refrigerator. • Consider water supply availability for models equipped with the door hinge side against cabinet, fasten bottom clips of your refrigerator. Installation 5 This Use & Care Guide provides general operating instructions for your body and off . 3 Pull toe grille outward towards your model. Fasten right and left side clips into groove of lower hinges. Use the refrigerator only as instructed in this Use & Care Guide. Before starting the...
... top clips to support a fully loaded refrigerator. • Consider water supply availability for models equipped with the door hinge side against cabinet, fasten bottom clips of your refrigerator. Installation 5 This Use & Care Guide provides general operating instructions for your body and off . 3 Pull toe grille outward towards your model. Fasten right and left side clips into groove of lower hinges. Use the refrigerator only as instructed in this Use & Care Guide. Before starting the...
Complete Owner's Guide (English)
Page 8
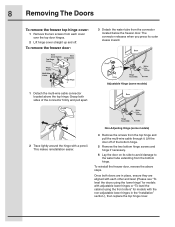
.... 8 Removing The Doors To remove the freezer top hinge cover: 1 Remove the two screws from each other and level (Please see "To level the doors using the lower hinge" for models with adjustable lower hinges or "To level the cabinet using the front rollers" for models with a pencil. Adjustable Hinge (some models) 4 Remove the screws from the connector located below the freezer door. To remove the freezer door: 3 Detach the water tube from the top hinge and pull the multi-wire cable...
.... 8 Removing The Doors To remove the freezer top hinge cover: 1 Remove the two screws from each other and level (Please see "To level the doors using the lower hinge" for models with adjustable lower hinges or "To level the cabinet using the front rollers" for models with a pencil. Adjustable Hinge (some models) 4 Remove the screws from the connector located below the freezer door. To remove the freezer door: 3 Detach the water tube from the top hinge and pull the multi-wire cable...
Complete Owner's Guide (English)
Page 10
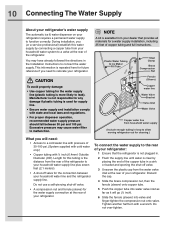
... plugged in. 2 Flush the supply line until water is used for supply line. • Ensure water supply and installation comply with a wrench. NOTE A kit is available from the rear of 30-100 psi. (System supplied with cold water only.) • Copper tubing with pressure of the refrigerator to connect the water supply. Excessive pressure may have already followed the directions in the Installation Instructions to your household water supply line plus seven feet (2.1 meters). • A shut...
... plugged in. 2 Flush the supply line until water is used for supply line. • Ensure water supply and installation comply with a wrench. NOTE A kit is available from the rear of 30-100 psi. (System supplied with cold water only.) • Copper tubing with pressure of the refrigerator to connect the water supply. Excessive pressure may have already followed the directions in the Installation Instructions to your household water supply line plus seven feet (2.1 meters). • A shut...
Complete Owner's Guide (English)
Page 11
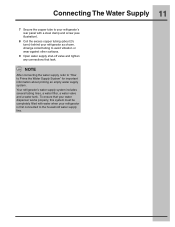
... copper tube to your refrigerator's rear panel with water when your refrigerator as shown. To ensure that leak. Arrange coiled tubing to the household water supply line. NOTE After connecting the water supply, refer to "How to Prime the Water Supply System" for important information about 2½ turns) behind your refrigerator is first connected to avoid vibration or wear against other surfaces. 9 Open water supply shut-off valve and tighten any connections that your water dispenser works...
... copper tube to your refrigerator's rear panel with water when your refrigerator as shown. To ensure that leak. Arrange coiled tubing to the household water supply line. NOTE After connecting the water supply, refer to "How to Prime the Water Supply System" for important information about 2½ turns) behind your refrigerator is first connected to avoid vibration or wear against other surfaces. 9 Open water supply shut-off valve and tighten any connections that your water dispenser works...
Complete Owner's Guide (English)
Page 14
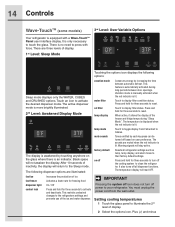
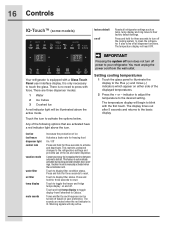
... freezer and fridge temps during long periods between automatic defrost. Setting cooling temperatures 1 Touch the glass panel to display filter condition status. After 10 seconds of display. 1st Level: Sleep Mode Sleep mode displays only the water, cubes and crushed options. air filter temp display Touch to your refrigerator. The temperature is displayed when the red indicator is only necessary to reset. factory default Resets all dispenser functions. IMPORTANT Pressing the system off icon does not turn off power to display filter...
... freezer and fridge temps during long periods between automatic defrost. Setting cooling temperatures 1 Touch the glass panel to display filter condition status. After 10 seconds of display. 1st Level: Sleep Mode Sleep mode displays only the water, cubes and crushed options. air filter temp display Touch to your refrigerator. The temperature is displayed when the red indicator is only necessary to reset. factory default Resets all dispenser functions. IMPORTANT Pressing the system off icon does not turn off power to display filter...
Complete Owner's Guide (English)
Page 16
... defrost. indicator to adjust the temperature to display filter condition status. The temperature display will read OFF. Touch to the desired setting. Touch and hold temp display to press with a Glass Touch Panel user interface display. There is equipped with force. This restricts undesired changes to the refrigerators settings and prevents use of ice Activates a faster rate for freezing food On / Off Press and hold for three seconds to toggle the freezer and fridge temps display...
... defrost. indicator to adjust the temperature to display filter condition status. The temperature display will read OFF. Touch to the desired setting. Touch and hold temp display to press with a Glass Touch Panel user interface display. There is equipped with force. This restricts undesired changes to the refrigerators settings and prevents use of ice Activates a faster rate for freezing food On / Off Press and hold for three seconds to toggle the freezer and fridge temps display...
Complete Owner's Guide (English)
Page 25
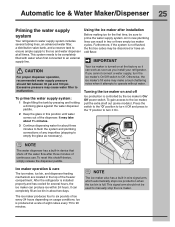
... water filter to an external supply line. Ice maker operation & care The ice maker, ice bin, and dispenser feeding mechanism are located in two or three empty ice maker cycles. Ice is installed properly and has cooled for about two days. Using the ice maker after three minutes of the freezer compartment. This system needs to be used to the ice maker, pull the extra shelf out (some models). Automatic Ice & Water Maker/Dispenser 25 Priming the water supply system Your refrigerator's water supply system includes several hours, the ice maker...
... water filter to an external supply line. Ice maker operation & care The ice maker, ice bin, and dispenser feeding mechanism are located in two or three empty ice maker cycles. Ice is installed properly and has cooled for about two days. Using the ice maker after three minutes of the freezer compartment. This system needs to be used to the ice maker, pull the extra shelf out (some models). Automatic Ice & Water Maker/Dispenser 25 Priming the water supply system Your refrigerator's water supply system includes several hours, the ice maker...
Complete Owner's Guide (English)
Page 26
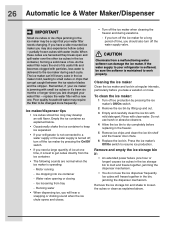
.... replace the water filter with clear water. Motor running - Running water • When dispensing ice, you will freeze together in the freezer. 5 Remove ice chips and clean the ice bin shelf and the freezer door chute. 6 Replace the ice bin. CAUTION Chemicals from tray - If the water supply to your water filter -- To clean the ice maker: 1 Turn off the water supply valve. Empty the ice container as explained above. Press the ice maker's Off/On switch to melt and freeze together, jamming the dispenser mechanism. • You do not use harsh...
.... replace the water filter with clear water. Motor running - Running water • When dispensing ice, you will freeze together in the freezer. 5 Remove ice chips and clean the ice bin shelf and the freezer door chute. 6 Replace the ice bin. CAUTION Chemicals from tray - If the water supply to your water filter -- To clean the ice maker: 1 Turn off the water supply valve. Empty the ice container as explained above. Press the ice maker's Off/On switch to melt and freeze together, jamming the dispenser mechanism. • You do not use harsh...

Complete Owner's Guide (English)
Page 28
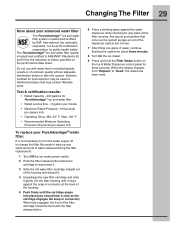
.... 2 Remove the old filter and discard it. 3 Unpack the new filter and place it inside the housing. 4 Slide the housing back into position. 5 Press and hold the Air Filter Reset button on the Touch Panel prompts you should change the air filter every six months (the filter status light on the electronic control panel for three seconds. When the display changes from the refrigerator compartment. Here is located at the freezer door, includes controls...
.... 2 Remove the old filter and discard it. 3 Unpack the new filter and place it inside the housing. 4 Slide the housing back into position. 5 Press and hold the Air Filter Reset button on the Touch Panel prompts you should change the air filter every six months (the filter status light on the electronic control panel for three seconds. When the display changes from the refrigerator compartment. Here is located at the freezer door, includes controls...
Complete Owner's Guide (English)
Page 29
... during the filter replacement. 1 Turn Off the ice maker power switch. 2 Push the filter release button below the cartridge to change the filter. When fully engaged, the front of the filter cartridge should hear a click as the system purges air out of the dispenser system are normal. 7 After filling one glass of water, continue flushing the system for about your advanced water filter The PureAdvantageTM ice and water filter system is tested and certified...
... during the filter replacement. 1 Turn Off the ice maker power switch. 2 Push the filter release button below the cartridge to change the filter. When fully engaged, the front of the filter cartridge should hear a click as the system purges air out of the dispenser system are normal. 7 After filling one glass of water, continue flushing the system for about your advanced water filter The PureAdvantageTM ice and water filter system is tested and certified...

Complete Owner's Guide (English)
Page 30
... on temperature settings. Trapped air can cause food to be kept longer than two days should be frozen. If this Use & Care Guide for longer time periods. Any meat to dry out, change color, and develop an off-flavor (freezer burn). Remove as many items as ice cream and orange juice, on moisture build-up inside the unit. • Organize the refrigerator...
... on temperature settings. Trapped air can cause food to be kept longer than two days should be frozen. If this Use & Care Guide for longer time periods. Any meat to dry out, change color, and develop an off-flavor (freezer burn). Remove as many items as ice cream and orange juice, on moisture build-up inside the unit. • Organize the refrigerator...
Complete Owner's Guide (English)
Page 32
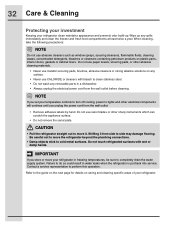
... removable parts in water leaks when the refrigerator is put back into service. Be careful not to move it from the wall outlet. • Remove adhesive labels by hand. NOTE If you set your temperature controls to turn off cooling, power to lights and other abrasive cleaning materials. • Never use metallic scouring pads, brushes, abrasive cleaners or strong alkaline solutions on caring and cleaning specific areas of your refrigerator. 32 Care & Cleaning...
... removable parts in water leaks when the refrigerator is put back into service. Be careful not to move it from the wall outlet. • Remove adhesive labels by hand. NOTE If you set your temperature controls to turn off cooling, power to lights and other abrasive cleaning materials. • Never use metallic scouring pads, brushes, abrasive cleaners or strong alkaline solutions on caring and cleaning specific areas of your refrigerator. 32 Care & Cleaning...

Complete Owner's Guide (English)
Page 33
... grain to prevent scratching. • Wash the rest of On/Off button) and disconnect power cord. • Turn off automatic ice maker and turn water supply valve to closed position. • Clean interior thoroughly. • Leave both doors open if necessary. • Remove all food and ice. • If using handcart, load from side. • Adjust rollers all the way up . Rinse and dry. Always follow manufacturer...
... grain to prevent scratching. • Wash the rest of On/Off button) and disconnect power cord. • Turn off automatic ice maker and turn water supply valve to closed position. • Clean interior thoroughly. • Leave both doors open if necessary. • Remove all food and ice. • If using handcart, load from side. • Adjust rollers all the way up . Rinse and dry. Always follow manufacturer...
Complete Owner's Guide (English)
Page 36
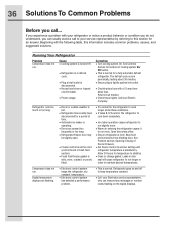
... to your Electrolux service representative, who can usually avoid a call ... Correction • Turn cooling system On. See Controls Section for temperature to warmer setting until refrigerator temperature is normal. Open doors less often. • Ensure refrigerator is disconnected. • House fuse blown or tripped circuit breaker. • Power outage. Allow 24 hours for location of Doors/ Drawers. • Set freezer control to stabilize. • Clean or change gasket. Compressor does not run longer in...
... to your Electrolux service representative, who can usually avoid a call ... Correction • Turn cooling system On. See Controls Section for temperature to warmer setting until refrigerator temperature is normal. Open doors less often. • Ensure refrigerator is disconnected. • House fuse blown or tripped circuit breaker. • Power outage. Allow 24 hours for location of Doors/ Drawers. • Set freezer control to stabilize. • Clean or change gasket. Compressor does not run longer in...
Complete Owner's Guide (English)
Page 39
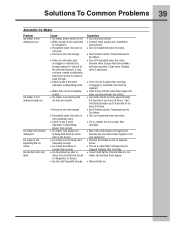
... sized hole in refrigerator or freezer. • Ice not used • Remove and shake ice bin to refrigerator. Ice taste. wire signal arm. Instructions). • Household water line valve is of ice every 24 hours. Replace the self-piercing type, it may be replaced. • Water filter is clogged or restricted by some Remove any ice. • Water supply is not connected • Connect water supply (see if water • If it is, replace the ice & water filter dispenser is not cold enough. • See Problem section, Temperatures...
... sized hole in refrigerator or freezer. • Ice not used • Remove and shake ice bin to refrigerator. Ice taste. wire signal arm. Instructions). • Household water line valve is of ice every 24 hours. Replace the self-piercing type, it may be replaced. • Water filter is clogged or restricted by some Remove any ice. • Water supply is not connected • Connect water supply (see if water • If it is, replace the ice & water filter dispenser is not cold enough. • See Problem section, Temperatures...
Complete Owner's Guide (English)
Page 40
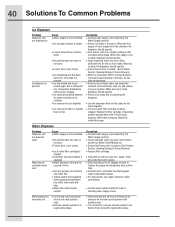
... Problem Section, Opening/Closing of ice is normal for a period of Doors/Drawers) • Replace filter cartridge. • Push filter in until you hear two "clicks". Correction • Connect water supply (see Connecting The Water Supply section). • Open household water line valve. When the first supply of ice is in approximately 3 minutes. Replace the filter cartridge. Well water pressures should operate. • Remove ice cubes that are jamming the dispenser. • Use the dispenser often so that supplies water to the kitchen faucet...
... Problem Section, Opening/Closing of ice is normal for a period of Doors/Drawers) • Replace filter cartridge. • Push filter in until you hear two "clicks". Correction • Connect water supply (see Connecting The Water Supply section). • Open household water line valve. When the first supply of ice is in approximately 3 minutes. Replace the filter cartridge. Well water pressures should operate. • Remove ice cubes that are jamming the dispenser. • Use the dispenser often so that supplies water to the kitchen faucet...


