
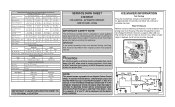
Wiring Diagram (All Languages)
Page 1
...Caution All electrical parts and wiring must be shielded from housing. A "d" and "F" will display when the heater is 102 to 110cc (3.25 to their original position and properly secured. The correct fill is activated. NOTE This product comes equipped with Run/Start Capacitor 65°F ... C 34° to 39° F 1° to 4° C 34° to 39° F 1° to 4° C Low Side Pressure (cut-in the refrigerator temperature window will be checked. PERFORMANCE DATA NO LOAD & NO DOOR OPENINGS AT MID-POINT CONTROL SETTING (2500 ++ V4) Type A with an Adaptive Defrost Control...
...Caution All electrical parts and wiring must be shielded from housing. A "d" and "F" will display when the heater is 102 to 110cc (3.25 to their original position and properly secured. The correct fill is activated. NOTE This product comes equipped with Run/Start Capacitor 65°F ... C 34° to 39° F 1° to 4° C 34° to 39° F 1° to 4° C Low Side Pressure (cut-in the refrigerator temperature window will be checked. PERFORMANCE DATA NO LOAD & NO DOOR OPENINGS AT MID-POINT CONTROL SETTING (2500 ++ V4) Type A with an Adaptive Defrost Control...
Installation Instructions (All Languages)
Page 1
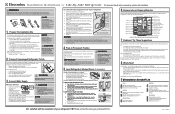
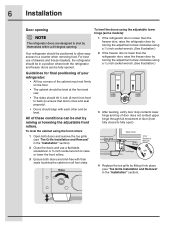
... • You may operate noisily if the household water supply is essential for proper operation. 5 Level Refrigerator & Adjust Doors (if necessary) Guidelines for a water supply installation, including 25 feet of the cabinet must be level at www.electroluxusa.com. To level the cabinet using a hand ... valve may want to start with their seals touching the cabinet on the floor. • The cabinet should align with your refrigerator. Electrolux recommends that doors close spaces or entrances. When using the front rollers: 1 Open both doors are provided only as it through...
... • You may operate noisily if the household water supply is essential for proper operation. 5 Level Refrigerator & Adjust Doors (if necessary) Guidelines for a water supply installation, including 25 feet of the cabinet must be level at www.electroluxusa.com. To level the cabinet using a hand ... valve may want to start with their seals touching the cabinet on the floor. • The cabinet should align with your refrigerator. Electrolux recommends that doors close spaces or entrances. When using the front rollers: 1 Open both doors are provided only as it through...
Complete Owner's Guide (English)
Page 3
...instructions WARNING Please read the safety precautions in this manual. Safety Precautions Do not attempt to install or operate your new refrigerator. Obey all safety instructions before using your unit until you have read all safety messages that follow this symbol to potential...hazardous situation which is the safety alert symbol. Please take the precautions listed below. Read product labels for a few hours), unattended refrigerators and freezers are labeled with any other appliances or furniture. Safety items throughout this or any moving parts of explosive fumes. &#...
...instructions WARNING Please read the safety precautions in this manual. Safety Precautions Do not attempt to install or operate your new refrigerator. Obey all safety instructions before using your unit until you have read all safety messages that follow this symbol to potential...hazardous situation which is the safety alert symbol. Please take the precautions listed below. Read product labels for a few hours), unattended refrigerators and freezers are labeled with any other appliances or furniture. Safety items throughout this or any moving parts of explosive fumes. &#...
Complete Owner's Guide (English)
Page 4
..., 60 Hz., AConly electric outlet. IMPORTANT To turn off accidentally. • Avoid connecting refrigerator to a Ground Fault Interrupter (GFI) circuit. Operating the refrigerator with local codes and ordinances. Consult a qualified electrician. It must be plugged into a properly... grounded threeprong receptacle. Such damage is equipped with a three-prong grounding plug for your refrigerator's safety mechanisms are operating correctly. 4 Safety Electrical information WARNING You must follow these guidelines to ensure that your protection...
..., 60 Hz., AConly electric outlet. IMPORTANT To turn off accidentally. • Avoid connecting refrigerator to a Ground Fault Interrupter (GFI) circuit. Operating the refrigerator with local codes and ordinances. Consult a qualified electrician. It must be plugged into a properly... grounded threeprong receptacle. Such damage is equipped with a three-prong grounding plug for your refrigerator's safety mechanisms are operating correctly. 4 Safety Electrical information WARNING You must follow these guidelines to ensure that your protection...
Complete Owner's Guide (English)
Page 5
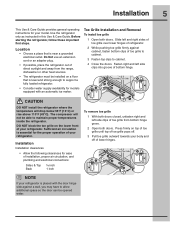
...the toe grille on the lower front of toe grille to cabinet. 3 Fasten top clips to cabinet. 4 Close the doors. Before starting the refrigerator, follow these important first steps. Location • Choose a place that is near a grounded electrical outlet. NOTE If your model. Sufficient air ...availability for the proper operation of direct sunlight and away from bottom hinge grove. 2 Open both doors. CAUTION DO NOT install the refrigerator where the temperature will not be installed on top of toe grille until top of toe grille pops off of lower hinges. Press...
...the toe grille on the lower front of toe grille to cabinet. 3 Fasten top clips to cabinet. 4 Close the doors. Before starting the refrigerator, follow these important first steps. Location • Choose a place that is near a grounded electrical outlet. NOTE If your model. Sufficient air ...availability for the proper operation of direct sunlight and away from bottom hinge grove. 2 Open both doors. CAUTION DO NOT install the refrigerator where the temperature will not be installed on top of toe grille until top of toe grille pops off of lower hinges. Press...
Complete Owner's Guide (English)
Page 6
...of door does not contact upper hinge through full movement of drawers and freezer baskets, the refrigerator should tilt ¼ inch (6 mm) from fully closed to a counter when removing food. Your refrigerator should be fully opened. To level the doors using the adjustable lower hinge (some models):...freezer door by turning the adjustment screw clockwise using the front rollers: 1 Open both the refrigerator and freezer doors can be met by themselves within a 20 degree opening NOTE The refrigerator doors are bind-free with each other and be positioned to allow easy access to fully ...
...of door does not contact upper hinge through full movement of drawers and freezer baskets, the refrigerator should tilt ¼ inch (6 mm) from fully closed to a counter when removing food. Your refrigerator should be fully opened. To level the doors using the adjustable lower hinge (some models):...freezer door by turning the adjustment screw clockwise using the front rollers: 1 Open both the refrigerator and freezer doors can be met by themselves within a 20 degree opening NOTE The refrigerator doors are bind-free with each other and be positioned to allow easy access to fully ...

Complete Owner's Guide (English)
Page 7
...is unplugged from the top hinge. OR Adjustable Wrench 3/8" Fixed Wrench Adjustable Hinge (some models) Non-Adjusting Hinge (some models) To reinstall the refrigerator door, reverse the above steps. This makes reinstallation easier. 2 Remove the two screws from the wall outlet. 2 Open both doors and remove ...hinge if necessary. Removing The Doors 7 Getting through an entrance area, you can reduce its size by measuring the entrance. To remove the refrigerator top hinge cover: 1 Remove the three screws from each cover over the top door hinges. 2 Lift hinge cover straight up and off ...
...is unplugged from the top hinge. OR Adjustable Wrench 3/8" Fixed Wrench Adjustable Hinge (some models) Non-Adjusting Hinge (some models) To reinstall the refrigerator door, reverse the above steps. This makes reinstallation easier. 2 Remove the two screws from the wall outlet. 2 Open both doors and remove ...hinge if necessary. Removing The Doors 7 Getting through an entrance area, you can reduce its size by measuring the entrance. To remove the refrigerator top hinge cover: 1 Remove the three screws from each cover over the top door hinges. 2 Lift hinge cover straight up and off ...
Complete Owner's Guide (English)
Page 9
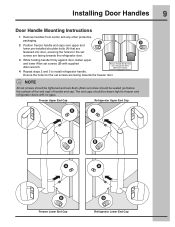
The end caps should be drawn tight to install refrigerator handle. Freezer Upper End Cap Refrigerator Upper End Cap A A B B A A B Freezer Lower End Cap B Refrigerator Lower End Cap Ensure the holes for the set screws are facing towards the refrigerator door. 3 While holding handle firmly against door, fasten ...upper and lower Allen set screws (B) with supplied Allen wrench. 4 Repeat steps 2 and 3 to freezer and refrigerator doors with no gaps. NOTE All set screws should be tightened and sub-flush (Allen set screw should be seated just below the...
The end caps should be drawn tight to install refrigerator handle. Freezer Upper End Cap Refrigerator Upper End Cap A A B B A A B Freezer Lower End Cap B Refrigerator Lower End Cap Ensure the holes for the set screws are facing towards the refrigerator door. 3 While holding handle firmly against door, fasten ...upper and lower Allen set screws (B) with supplied Allen wrench. 4 Repeat steps 2 and 3 to freezer and refrigerator doors with no gaps. NOTE All set screws should be tightened and sub-flush (Allen set screw should be seated just below the...
Complete Owner's Guide (English)
Page 10
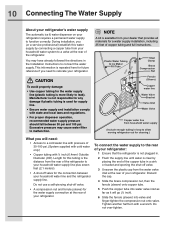
...Do not use a self-piercing shut-off valve. 3 Unscrew the plastic cap from the water valve inlet at the rear of the refrigerator. Tighten another half turn with state and local laws and regulations. • For proper dispenser operation, recommended water supply pressure should .... • A compression nut and ferrule (sleeve) for a water supply installation, including 25 feet of your refrigerator. You may cause water filter to a cold water line with pressure of your refrigerator: 1 Ensure that provides all materials for the water supply connection at the rear of 30...
...Do not use a self-piercing shut-off valve. 3 Unscrew the plastic cap from the water valve inlet at the rear of the refrigerator. Tighten another half turn with state and local laws and regulations. • For proper dispenser operation, recommended water supply pressure should .... • A compression nut and ferrule (sleeve) for a water supply installation, including 25 feet of your refrigerator. You may cause water filter to a cold water line with pressure of your refrigerator: 1 Ensure that provides all materials for the water supply connection at the rear of 30...
Complete Owner's Guide (English)
Page 11
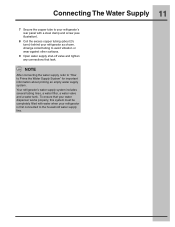
Connecting The Water Supply 11 7 Secure the copper tube to your refrigerator's rear panel with water when your refrigerator as shown. Your refrigerator's water supply system includes several tubing lines, a water filter, a water valve and a water tank. Arrange coiled tubing to ...Prime the Water Supply System" for important information about 2½ turns) behind your refrigerator is first connected to the household water supply line. NOTE After connecting the water supply, refer to "How to avoid vibration or wear against...
Connecting The Water Supply 11 7 Secure the copper tube to your refrigerator's rear panel with water when your refrigerator as shown. Your refrigerator's water supply system includes several tubing lines, a water filter, a water valve and a water tank. Arrange coiled tubing to ...Prime the Water Supply System" for important information about 2½ turns) behind your refrigerator is first connected to the household water supply line. NOTE After connecting the water supply, refer to "How to avoid vibration or wear against...
Complete Owner's Guide (English)
Page 12
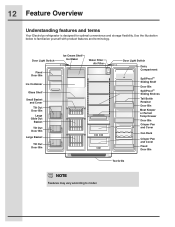
12 Feature Overview Understanding features and terms Your Electrolux refrigerator is designed for optimal convenience and storage flexibility. Use the illustration below to model. Door Light Switch Fixed Door Bin Ice Container Glass Shelf Small ...
12 Feature Overview Understanding features and terms Your Electrolux refrigerator is designed for optimal convenience and storage flexibility. Use the illustration below to model. Door Light Switch Fixed Door Bin Ice Container Glass Shelf Small ...
Complete Owner's Guide (English)
Page 14
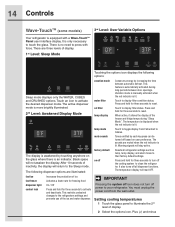
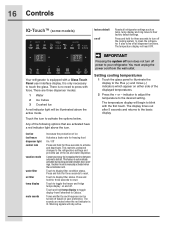
... three seconds to reset. Touch an icon to display filter status. Black space will stay active. This restricts undesired changes to the refrigerators settings and prevents use of display. 2 Select the options icon. The temperature display will return to the Sleep mode. You must ...outlet. Tones emitted by increasing the time between door openings. 14 Controls Wave-TouchTM (some models) 3rd Level: User Variable Options Your refrigerator is only necessary to touch the glass. After 10 seconds of display. 1st Level: Sleep Mode Sleep mode displays only the water, ...
... three seconds to reset. Touch an icon to display filter status. Black space will stay active. This restricts undesired changes to the refrigerators settings and prevents use of display. 2 Select the options icon. The temperature display will return to the Sleep mode. You must ...outlet. Tones emitted by increasing the time between door openings. 14 Controls Wave-TouchTM (some models) 3rd Level: User Variable Options Your refrigerator is only necessary to touch the glass. After 10 seconds of display. 1st Level: Sleep Mode Sleep mode displays only the water, ...
Complete Owner's Guide (English)
Page 15
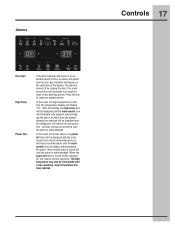
After five seconds of inactivity, the display will beep to display, even if the door is closed , without any violation of the refrigerator and its own and a red high temperature icon will display. The high temp alarm may be turned off by pressing and holding...alarm is acknowledged. All other modes are turned off , the refrigerator will resume normal operation. Other modes may also be displayed and the refrigerator will resume normal operation. The display shows "Sb" while in the middle. The refrigerator will function normally once the door is a feature that disables ...
After five seconds of inactivity, the display will beep to display, even if the door is closed , without any violation of the refrigerator and its own and a red high temperature icon will display. The high temp alarm may be turned off by pressing and holding...alarm is acknowledged. All other modes are turned off , the refrigerator will resume normal operation. Other modes may also be displayed and the refrigerator will resume normal operation. The display shows "Sb" while in the middle. The refrigerator will function normally once the door is a feature that disables ...
Complete Owner's Guide (English)
Page 16
... Warning signals will be turned off power to reset. IMPORTANT Pressing the system off icon does not turn off . Touch the icon to the refrigerators settings and prevents use of the displayed temperatures. 2 Press the + or - The display times out after 5 seconds and returns to display ... deactivate. Any of ice Activates a faster rate for freezing food On / Off Press and hold for three seconds to clean the refrigerator. fast ice fast freeze dispenser light control lock vacation mode water filter air filter temp display mute sounds Increases the production of the ...
... Warning signals will be turned off power to reset. IMPORTANT Pressing the system off icon does not turn off . Touch the icon to the refrigerators settings and prevents use of the displayed temperatures. 2 Press the + or - The display times out after 5 seconds and returns to display ... deactivate. Any of ice Activates a faster rate for freezing food On / Off Press and hold for three seconds to clean the refrigerator. fast ice fast freeze dispenser light control lock vacation mode water filter air filter temp display mute sounds Increases the production of the ...
Complete Owner's Guide (English)
Page 17
The high temp alarm may be illuminated and you will hear an audible alarm until the mute sounds icon is turned off the refrigerator will be turned off until pressed, acknowledging the alarm, at which time the highest temperature reached will resume normal operation. The alarm is pressed, acknowledging ... an extended period of time, an alarm will sound and the door ajar indicator will display "HI". Other modes may also be displayed and the refrigerator will be illuminated until the alarm is turned off by closing the door.
The high temp alarm may be illuminated and you will hear an audible alarm until the mute sounds icon is turned off the refrigerator will be turned off until pressed, acknowledging the alarm, at which time the highest temperature reached will resume normal operation. The alarm is pressed, acknowledging ... an extended period of time, an alarm will sound and the door ajar indicator will display "HI". Other modes may also be displayed and the refrigerator will be illuminated until the alarm is turned off by closing the door.
Complete Owner's Guide (English)
Page 18
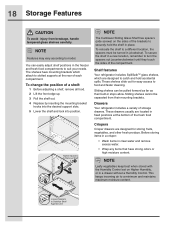
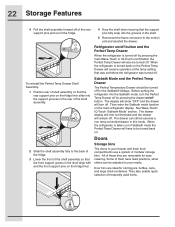
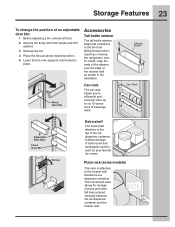
To change the position of the brackets to securely hold accidental spills. Shelf features Your refrigerator includes SpillSafeTM glass shelves, which attach to suit your needs. Sliding shelves cannot be separated from breakage, handle tempered glass shelves ... drawer without a Humidity Control. Tighten Spacers to a different location, the spacers must be pulled forward as far as their mounting brackets. Drawers Your refrigerator includes a variety of the compartment. To secure the shelf in a new location, remember to model. NOTE Leafy vegetables keep best when stored with...
To change the position of the brackets to securely hold accidental spills. Shelf features Your refrigerator includes SpillSafeTM glass shelves, which attach to suit your needs. Sliding shelves cannot be separated from breakage, handle tempered glass shelves ... drawer without a Humidity Control. Tighten Spacers to a different location, the spacers must be pulled forward as far as their mounting brackets. Drawers Your refrigerator includes a variety of the compartment. To secure the shelf in a new location, remember to model. NOTE Leafy vegetables keep best when stored with...
Complete Owner's Guide (English)
Page 20
... chosen by illuminating it. The PTD is pressed. The numeric display will begin controlling to the temperature shown for the item selected. 5 One of the refrigerator. When first turned on or after a power outage the PTD may show a temperature like "32°F" when on by pressing the F/C button. 3 Press either the...
... chosen by illuminating it. The PTD is pressed. The numeric display will begin controlling to the temperature shown for the item selected. 5 One of the refrigerator. When first turned on or after a power outage the PTD may show a temperature like "32°F" when on by pressing the F/C button. 3 Press either the...
Complete Owner's Guide (English)
Page 22
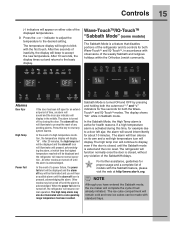
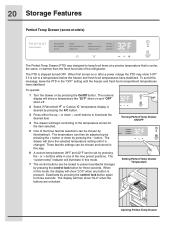
...5 Reconnect the frame connector to your freezer and fresh food compartments use a system of the shelf assembly so that was set before the refrigerator was turned off. Door bins are removable for easy cleaning. Sabbath Mode and the Perfect Temp Drawer The Perfect Temperature Drawer should be turned...turned back on. 2 Slide the shelf assembly fully to your needs. See Wave-Touch/ IQ-Touch "Sabbath Mode" section. When the refrigerator is taken out of Sabbath mode the Perfect Temp Drawer will resume operation at the temp setting that the front support groves in the shelf...
...5 Reconnect the frame connector to your freezer and fresh food compartments use a system of the shelf assembly so that was set before the refrigerator was turned off. Door bins are removable for easy cleaning. Sabbath Mode and the Perfect Temp Drawer The Perfect Temperature Drawer should be turned...turned back on. 2 Slide the shelf assembly fully to your needs. See Wave-Touch/ IQ-Touch "Sabbath Mode" section. When the refrigerator is taken out of Sabbath mode the Perfect Temp Drawer will resume operation at the temp setting that the front support groves in the shelf...
Complete Owner's Guide (English)
Page 23
... food. 2 Grip the bin firmly with both round and rectangular cartons such as shown in the bin from falling forward when opening or closing the refrigerator door. To install, snap the ends of the retainer over the edge of beverage drink. Can rack The can rack allows you to efficiently and...
... food. 2 Grip the bin firmly with both round and rectangular cartons such as shown in the bin from falling forward when opening or closing the refrigerator door. To install, snap the ends of the retainer over the edge of beverage drink. Can rack The can rack allows you to efficiently and...
Complete Owner's Guide (English)
Page 25
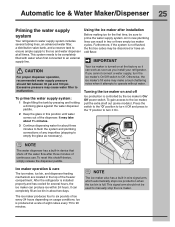
... a built-in device that shuts off Ice production is produced at a rate of ice every 24 hours depending on usage conditions. After the refrigerator is installed properly and has cooled for several tubing lines, an advanced water filter, a distribution valve bank, and a reserve tank to ensure ...supply system: 1 Begin filling the tank by the ice maker's On/ Off power switch. Automatic Ice & Water Maker/Dispenser 25 Priming the water supply system Your refrigerator's water supply system includes several hours, the ice maker can result in two or three empty ice maker cycles. This system ...
... a built-in device that shuts off Ice production is produced at a rate of ice every 24 hours depending on usage conditions. After the refrigerator is installed properly and has cooled for several tubing lines, an advanced water filter, a distribution valve bank, and a reserve tank to ensure ...supply system: 1 Begin filling the tank by the ice maker's On/ Off power switch. Automatic Ice & Water Maker/Dispenser 25 Priming the water supply system Your refrigerator's water supply system includes several hours, the ice maker can result in two or three empty ice maker cycles. This system ...


