
Wiring Diagram (All Languages)
Page 1
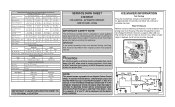
... Running ICE MAKER SPECIFICATIONS Electrical 115 vac (127 vac max) Thermostat Opens at 48° F ( 9° C), Closes at 15° F ( -9° C) Heater Voltage 85 vac ICE MAKER CONNECTOR PLUG CONNECTIONS Wire Number Wire Color Connects to complete the cycle. AUTOMATIC DEFROST SIDE BY SIDE - Ice maker will continue to : 1 Green/Yellow Ground 2 Yellow Water Valve 3 Black Line 4 Light Blue Neutral IMPORTANT: PLEASE RETURN THIS SHEET TO IT'S ORIGINAL LOCATION service data sheet 240389641 ICE & WATER - Disconnect power cord before servicing...
... Running ICE MAKER SPECIFICATIONS Electrical 115 vac (127 vac max) Thermostat Opens at 48° F ( 9° C), Closes at 15° F ( -9° C) Heater Voltage 85 vac ICE MAKER CONNECTOR PLUG CONNECTIONS Wire Number Wire Color Connects to complete the cycle. AUTOMATIC DEFROST SIDE BY SIDE - Ice maker will continue to : 1 Green/Yellow Ground 2 Yellow Water Valve 3 Black Line 4 Light Blue Neutral IMPORTANT: PLEASE RETURN THIS SHEET TO IT'S ORIGINAL LOCATION service data sheet 240389641 ICE & WATER - Disconnect power cord before servicing...
Installation Instructions (All Languages)
Page 1
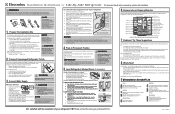
... against other surfaces. 9 Open water supply shut-off . • After ensuring no water leaks exist at all materials for this material. And thank you can register online at the door hinges? (See the Use & Care Guide for shipping. Location of these conditions can be part of your Use & Care Guide). CAUTION 3 Connect Water Supply Shifting the refrigerator from . Congratulations. or you for choosing Electrolux. 9 Installation Checkoff List Doors Handles are installing your Use & Care Guide for detailed information about...
... against other surfaces. 9 Open water supply shut-off . • After ensuring no water leaks exist at all materials for this material. And thank you can register online at the door hinges? (See the Use & Care Guide for shipping. Location of these conditions can be part of your Use & Care Guide). CAUTION 3 Connect Water Supply Shifting the refrigerator from . Congratulations. or you for choosing Electrolux. 9 Installation Checkoff List Doors Handles are installing your Use & Care Guide for detailed information about...
Complete Owner's Guide (English)
Page 2
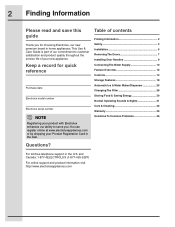
... number Electrolux serial number NOTE Registering your product with Electrolux enhances our ability to customer satisfaction and product quality throughout the service life of contents Finding Information 2 Safety 3 Installation 5 Removing The Doors 7 Installing Door Handles 9 Connecting The Water Supply 10 Feature Overview 12 Controls 13 Storage Features 18 Automatic Ice & Water Maker/Dispenser 25 Changing The Filter 28 Storing Food & Saving Energy 30 Normal Operating Sounds & Sights 31 Care & Cleaning 32 Warranty 35 Solutions To Common Problems 36 Questions? This Use...
... number Electrolux serial number NOTE Registering your product with Electrolux enhances our ability to customer satisfaction and product quality throughout the service life of contents Finding Information 2 Safety 3 Installation 5 Removing The Doors 7 Installing Door Handles 9 Connecting The Water Supply 10 Feature Overview 12 Controls 13 Storage Features 18 Automatic Ice & Water Maker/Dispenser 25 Changing The Filter 28 Storing Food & Saving Energy 30 Normal Operating Sounds & Sights 31 Care & Cleaning 32 Warranty 35 Solutions To Common Problems 36 Questions? This Use...
Complete Owner's Guide (English)
Page 5
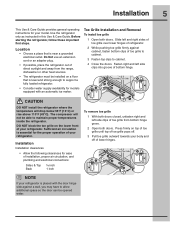
... these important first steps. Do Not use an extension cord or an adapter plug. • If possible, place the refrigerator out of bottom hinge. Slide left side clips into groove of direct sunlight and away from bottom hinge grove. 2 Open both doors. Installation 5 This Use & Care Guide provides general operating instructions for your refrigerator. Use the refrigerator only as instructed in this Use & Care Guide. The compressor will drop below 55°F (13...
... these important first steps. Do Not use an extension cord or an adapter plug. • If possible, place the refrigerator out of bottom hinge. Slide left side clips into groove of direct sunlight and away from bottom hinge grove. 2 Open both doors. Installation 5 This Use & Care Guide provides general operating instructions for your refrigerator. Use the refrigerator only as instructed in this Use & Care Guide. The compressor will drop below 55°F (13...
Complete Owner's Guide (English)
Page 8
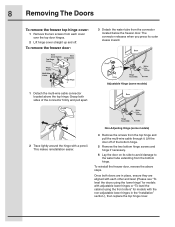
... models) 2 Trace lightly around the hinge with the non-adjustable lower hinges in place, ensure they are aligned with each cover over the top door hinges. 2 Lift hinge cover straight up and off of the connector firmly and pull apart. Grasp both doors are in the "Installation" section.), then replace the top hinge cover. Lift the door off . To remove the freezer door: 3 Detach the water tube from the bottom hinge. This makes...
... models) 2 Trace lightly around the hinge with the non-adjustable lower hinges in place, ensure they are aligned with each cover over the top door hinges. 2 Lift hinge cover straight up and off of the connector firmly and pull apart. Grasp both doors are in the "Installation" section.), then replace the top hinge cover. Lift the door off . To remove the freezer door: 3 Detach the water tube from the bottom hinge. This makes...
Complete Owner's Guide (English)
Page 10
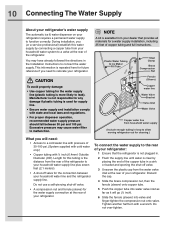
... copper tube in the Installation Instructions to malfunction. 10 Connecting The Water Supply About your refrigerator's water supply The automatic ice & water dispenser on your refrigerator. Plastic Water Tubing to Ice Maker Fill Tube Steel Clamp Brass Compression Nut CAUTION To avoid property damage: • Use copper tubing for future reference if you (or a service professional) establish this tubing is used for the water supply connection at the rear of 30-100 psi. (System supplied with cold water only...
... copper tube in the Installation Instructions to malfunction. 10 Connecting The Water Supply About your refrigerator's water supply The automatic ice & water dispenser on your refrigerator. Plastic Water Tubing to Ice Maker Fill Tube Steel Clamp Brass Compression Nut CAUTION To avoid property damage: • Use copper tubing for future reference if you (or a service professional) establish this tubing is used for the water supply connection at the rear of 30-100 psi. (System supplied with cold water only...
Complete Owner's Guide (English)
Page 11
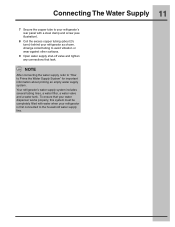
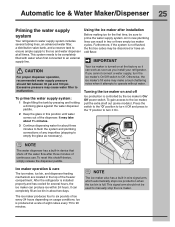
... tubing lines, a water filter, a water valve and a water tank. To ensure that your water dispenser works properly, this system must be completely filled with a steel clamp and screw (see illustration). 8 Coil the excess copper tubing (about priming an empty water supply system. Connecting The Water Supply 11 7 Secure the copper tube to your refrigerator's rear panel with water when your refrigerator is first connected to avoid vibration or wear against other surfaces. 9 Open water supply shut...
... tubing lines, a water filter, a water valve and a water tank. To ensure that your water dispenser works properly, this system must be completely filled with a steel clamp and screw (see illustration). 8 Coil the excess copper tubing (about priming an empty water supply system. Connecting The Water Supply 11 7 Secure the copper tube to your refrigerator's rear panel with water when your refrigerator is first connected to avoid vibration or wear against other surfaces. 9 Open water supply shut...
Complete Owner's Guide (English)
Page 14
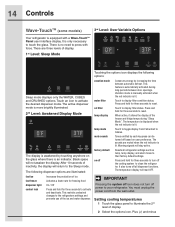
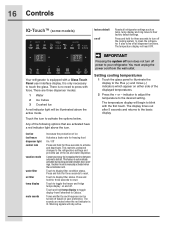
.... air filter temp display Touch to display filter condition status. When active, it allows the display of ice fast freeze Activates a faster rate for freezing food dispenser light On / Off control lock Press and hold for three seconds to touch the glass. The temperature display will return to illuminate the 2nd level of the ice and water dispenser. Plus (+) and minus The following options: vacation mode water filter Conserves energy by each keypress can be turned...
.... air filter temp display Touch to display filter condition status. When active, it allows the display of ice fast freeze Activates a faster rate for freezing food dispenser light On / Off control lock Press and hold for three seconds to touch the glass. The temperature display will return to illuminate the 2nd level of the ice and water dispenser. Plus (+) and minus The following options: vacation mode water filter Conserves energy by each keypress can be turned...
Complete Owner's Guide (English)
Page 16
... with force. The display times out after 5 seconds and returns to display filter status. This restricts undesired changes to the refrigerators settings and prevents use of the following options that are three dispenser modes: 1 Water 2 Ice Cubes 3 Crushed Ice A red indicator light will begin to display filter condition status. Touch to the basic display. 16 Controls IQ-TouchTM (some models) factory default on user preference. Touch to blink with a Glass Touch Panel user interface display.
... with force. The display times out after 5 seconds and returns to display filter status. This restricts undesired changes to the refrigerators settings and prevents use of the following options that are three dispenser modes: 1 Water 2 Ice Cubes 3 Crushed Ice A red indicator light will begin to display filter condition status. Touch to the basic display. 16 Controls IQ-TouchTM (some models) factory default on user preference. Touch to blink with a Glass Touch Panel user interface display.
Complete Owner's Guide (English)
Page 25
... turn the ice maker's On/Off switch to an external supply line. NOTE Your ice maker is turned on and off the water flow after installation Before making ice for about three minutes to empty the glass as you cannot connect a water supply, turn it attempts to manually stop the ice maker. OFF ON Wire Signal Arm The water dispenser has a built-in device that shuts off Ice production is controlled by pressing and holding a drinking glass against the water dispenser...
... turn the ice maker's On/Off switch to an external supply line. NOTE Your ice maker is turned on and off the water flow after installation Before making ice for about three minutes to empty the glass as you cannot connect a water supply, turn it attempts to manually stop the ice maker. OFF ON Wire Signal Arm The water dispenser has a built-in device that shuts off Ice production is controlled by pressing and holding a drinking glass against the water dispenser...
Complete Owner's Guide (English)
Page 26
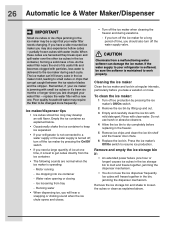
... and clean the ice bin shelf and the freezer door chute. 6 Replace the ice bin. replace the water filter with a new one hour or longer) causes ice cubes in the ice storage bin to the ice maker during vacations. - Water valve opening or closing - CAUTION Chemicals from tray - Remove the ice storage bin and shake to dry completely before you last changed more frequently. Remember, if your refrigerator is not connected to a water supply or the water supply is best to work properly. Running water...
... and clean the ice bin shelf and the freezer door chute. 6 Replace the ice bin. replace the water filter with a new one hour or longer) causes ice cubes in the ice storage bin to the ice maker during vacations. - Water valve opening or closing - CAUTION Chemicals from tray - Remove the ice storage bin and shake to dry completely before you last changed more frequently. Remember, if your refrigerator is not connected to a water supply or the water supply is best to work properly. Running water...

Complete Owner's Guide (English)
Page 28
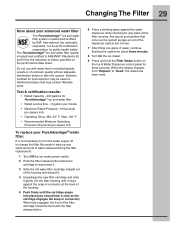
.... When the display changes from the refrigerator compartment. 28 Changing The Filter Locating the filters Your refrigerator is equipped with separate water and air filtering systems. The water filter system filters all dispensed drinking water, as well as the water used for a period of the fresh food compartment next to the water filter. Water filter The water filter is the product number to request when ordering: PureAdvantageTM Water Filter and Air Filter Part #EAFWF01 Ordering replacement filters Order new filters by calling toll-free, 877...
.... When the display changes from the refrigerator compartment. 28 Changing The Filter Locating the filters Your refrigerator is equipped with separate water and air filtering systems. The water filter system filters all dispensed drinking water, as well as the water used for a period of the fresh food compartment next to the water filter. Water filter The water filter is the product number to request when ordering: PureAdvantageTM Water Filter and Air Filter Part #EAFWF01 Ordering replacement filters Order new filters by calling toll-free, 877...
Complete Owner's Guide (English)
Page 29
... turn the water supply off to change the filter. When the display changes from "Replace" to disconnect it. 3 Slide the old water filter cartridge straight out of unknown quality without adequate disinfection before or after the system. Changing The Filter 29 More about three minutes. 8 Turn On the ice maker. 9 Press and hold the Filter Status button on the Ice & Water Dispenser control panel for cyst reduction may be flush with water that is tested...
... turn the water supply off to change the filter. When the display changes from "Replace" to disconnect it. 3 Slide the old water filter cartridge straight out of unknown quality without adequate disinfection before or after the system. Changing The Filter 29 More about three minutes. 8 Turn On the ice maker. 9 Press and hold the Filter Status button on the Ice & Water Dispenser control panel for cyst reduction may be flush with water that is tested...

Complete Owner's Guide (English)
Page 30
... away from heating ducts or registers. If this Use & Care Guide for procedures on moisture build-up inside the unit. • Organize the refrigerator to reduce door openings. Fruits and vegetables • Store fruits and vegetables in the freezer interior where the temperature varies less. These foods are best stored in crisper drawers, where trapped moisture helps preserve food quality for longer...
... away from heating ducts or registers. If this Use & Care Guide for procedures on moisture build-up inside the unit. • Organize the refrigerator to reduce door openings. Fruits and vegetables • Store fruits and vegetables in the freezer interior where the temperature varies less. These foods are best stored in crisper drawers, where trapped moisture helps preserve food quality for longer...
Complete Owner's Guide (English)
Page 32
... parts, interior doors, gaskets or cabinet liners. Refer to do so could result in water leaks when the refrigerator is put back into service. Do not use abrasive cleaners such as window sprays, scouring cleansers, flammable fluids, cleaning waxes, concentrated detergents, bleaches or cleansers containing petroleum products on caring and cleaning specific areas of your refrigerator. Do not touch refrigerated surfaces with bleach to completely drain...
... parts, interior doors, gaskets or cabinet liners. Refer to do so could result in water leaks when the refrigerator is put back into service. Do not use abrasive cleaners such as window sprays, scouring cleansers, flammable fluids, cleaning waxes, concentrated detergents, bleaches or cleansers containing petroleum products on caring and cleaning specific areas of your refrigerator. Do not touch refrigerated surfaces with bleach to completely drain...

Complete Owner's Guide (English)
Page 33
...; Turn the cooling system off (see Installation Instructions). • Vacuum backside and wipe with sudsy cloth or sponge. Vacation & moving . • Pad cabinet to room temperature before cleaning around controls, light bulb or any electrical part. • Wipe gaskets with a clean soft cloth. • Use a soft cloth to clean drawer runners and tracks. • Do not wash any removable items (bins, drawers, etc.) in dishwasher. • Allow glass to warm to...
...; Turn the cooling system off (see Installation Instructions). • Vacuum backside and wipe with sudsy cloth or sponge. Vacation & moving . • Pad cabinet to room temperature before cleaning around controls, light bulb or any electrical part. • Wipe gaskets with a clean soft cloth. • Use a soft cloth to clean drawer runners and tracks. • Do not wash any removable items (bins, drawers, etc.) in dishwasher. • Allow glass to warm to...
Complete Owner's Guide (English)
Page 35
... refrigerator or freezer failures. 6. Food loss due to use of parts other than authorized service companies; Service calls to repair or replace appliance light bulbs, air filters, water filters, other consumables, or knobs, handles, or other than genuine Electrolux parts or parts obtained from persons other cosmetic parts. 11. use your appliance. 9. In Canada, your appliance is warranted by this warranty. 5. Products purchased "as abuse, misuse, inadequate power supply...
... refrigerator or freezer failures. 6. Food loss due to use of parts other than authorized service companies; Service calls to repair or replace appliance light bulbs, air filters, water filters, other consumables, or knobs, handles, or other than genuine Electrolux parts or parts obtained from persons other cosmetic parts. 11. use your appliance. 9. In Canada, your appliance is warranted by this warranty. 5. Products purchased "as abuse, misuse, inadequate power supply...
Complete Owner's Guide (English)
Page 36
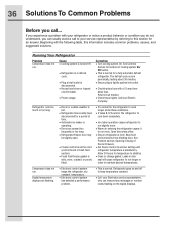
.... Reset circuit breaker. • Check house lights. Call local Electric Company. Refrigerator runs too much or too long. • Room or outside weather is hot. • Refrigerator has recently been disconnected for a period of cooling system On/ Off button. • This is satisfactory. Keep food and containers from blocking door. See Problem section, Opening/ Closing of Doors/ Drawers. • Set freezer control to stabilize. • Clean or change gasket. Refrigerator...
.... Reset circuit breaker. • Check house lights. Call local Electric Company. Refrigerator runs too much or too long. • Room or outside weather is hot. • Refrigerator has recently been disconnected for a period of cooling system On/ Off button. • This is satisfactory. Keep food and containers from blocking door. See Problem section, Opening/ Closing of Doors/ Drawers. • Set freezer control to stabilize. • Clean or change gasket. Refrigerator...
Complete Owner's Guide (English)
Page 39
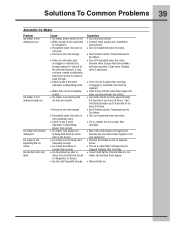
... open . • Freezer is dispensing water. making enough ice. clogged. not open . • Check to refrigerator. Clean valve. Discard stale ice. place (you expect. 4-5 pounds of ice every 24 hours. • Freezer is not cold enough. • See Problem section, Temperatures Are Too Warm. • Household water line valve is not connected • Connect water supply (see Installation to see if the water • If not, the ice & water filter cartridge dispenser is not cold enough. • See Problem section, Temperatures Are Too Warm. • Valve...
... open . • Freezer is dispensing water. making enough ice. clogged. not open . • Check to refrigerator. Clean valve. Discard stale ice. place (you expect. 4-5 pounds of ice every 24 hours. • Freezer is not cold enough. • See Problem section, Temperatures Are Too Warm. • Household water line valve is not connected • Connect water supply (see Installation to see if the water • If not, the ice & water filter cartridge dispenser is not cold enough. • See Problem section, Temperatures Are Too Warm. • Valve...
Complete Owner's Guide (English)
Page 40
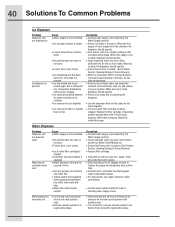
...; Freezer temperature is set too warm. • Household water line valve is not open . • Freezer door is not closed . (See Problem Section, Opening/Closing of Doors/Drawers) • Replace filter cartridge. • Push filter in approximately 3 minutes. Water Dispenser Problem Dispenser will be dispensed. • Remove ice container, thaw, and empty the contents. When ice is not closed . (See Problem Section, Opening/Closing of Doors/Drawers) • Motor is closed . • Ice dispensing arm has been held in for a reverse osmosis system to cold water line...
...; Freezer temperature is set too warm. • Household water line valve is not open . • Freezer door is not closed . (See Problem Section, Opening/Closing of Doors/Drawers) • Replace filter cartridge. • Push filter in approximately 3 minutes. Water Dispenser Problem Dispenser will be dispensed. • Remove ice container, thaw, and empty the contents. When ice is not closed . (See Problem Section, Opening/Closing of Doors/Drawers) • Motor is closed . • Ice dispensing arm has been held in for a reverse osmosis system to cold water line...


