Wiring Diagram (All Languages)
Page 1
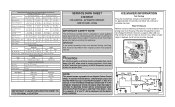
... IT'S ORIGINAL LOCATION service data sheet 240389641 ICE & WATER - To activate manual defrost, simultaneously press and hold the Fresh Food up (+) and Fresh Food down (-) keys for 5 seconds. CONDENSER FAN MOTOR Watts RPM Amps 3.1 1100 CW Opposite Shaft 0.03 Running ICE MAKER SPECIFICATIONS Electrical 115 vac (127 vac max) Thermostat Opens at 48° F ( 9° C), Closes at 15° F ( -9° C) Heater Voltage 85 vac ICE MAKER CONNECTOR PLUG CONNECTIONS Wire Number Wire Color Connects to 1.5 Base...
... IT'S ORIGINAL LOCATION service data sheet 240389641 ICE & WATER - To activate manual defrost, simultaneously press and hold the Fresh Food up (+) and Fresh Food down (-) keys for 5 seconds. CONDENSER FAN MOTOR Watts RPM Amps 3.1 1100 CW Opposite Shaft 0.03 Running ICE MAKER SPECIFICATIONS Electrical 115 vac (127 vac max) Thermostat Opens at 48° F ( 9° C), Closes at 15° F ( -9° C) Heater Voltage 85 vac ICE MAKER CONNECTOR PLUG CONNECTIONS Wire Number Wire Color Connects to 1.5 Base...
Installation Instructions (All Languages)
Page 1
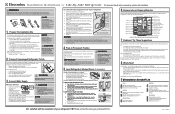
... the refrigerator from doors only after installation. ! Congratulations. or you use a hand truck to move it to a water supply, make sure the ice maker's power switch is setting solid on all corners Electrical Power House power turned on Refrigerator plugged in . 2 Flush the supply line until you still have completed Step 3 of your refrigerator. Electrolux recommends that the refrigerator is not plugged in Ice Maker House water supply connected to refrigerator No water leaks present at the door hinges? (See the Use & Care Guide for the water supply connection at...
... the refrigerator from doors only after installation. ! Congratulations. or you use a hand truck to move it to a water supply, make sure the ice maker's power switch is setting solid on all corners Electrical Power House power turned on Refrigerator plugged in . 2 Flush the supply line until you still have completed Step 3 of your refrigerator. Electrolux recommends that the refrigerator is not plugged in Ice Maker House water supply connected to refrigerator No water leaks present at the door hinges? (See the Use & Care Guide for the water supply connection at...
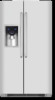
Product Specifications Sheet (English)
Page 1
...Wave-Touch™ Electronic Controls Yes Door Hinge Covers Yes Ice / Water Dispenser Yes Perfect Set® Temperature Control System and Display Yes Crushed / Cubes / Water Yes Air and Water Filter Indicator / Reset Yes Fast Ice™ Yes Fast Freeze™ Yes Lock Yes Dispenser Light Control Yes Fresh Food Conveniences PureAdvantage® Water & Ice / Air Filtration Water Filter Location Temp Alarm System / Door Ajar Alarm / Power Failure Alarm Luxury-Design® Full-Extension Glass Shelves Luxury-Glide® Dual Humidity-Controlled Upper Crisper Luxury-Glide®...
...Wave-Touch™ Electronic Controls Yes Door Hinge Covers Yes Ice / Water Dispenser Yes Perfect Set® Temperature Control System and Display Yes Crushed / Cubes / Water Yes Air and Water Filter Indicator / Reset Yes Fast Ice™ Yes Fast Freeze™ Yes Lock Yes Dispenser Light Control Yes Fresh Food Conveniences PureAdvantage® Water & Ice / Air Filtration Water Filter Location Temp Alarm System / Door Ajar Alarm / Power Failure Alarm Luxury-Design® Full-Extension Glass Shelves Luxury-Glide® Dual Humidity-Controlled Upper Crisper Luxury-Glide®...

Product Specifications Sheet (English)
Page 2
... quality at Electrolux Home Products, Inc. Side-by-Side Refrigerators EW23SS65HS Side-by-Side Refrigerator Specifications • Product Weight - 300 Lbs. • An electrical supply with restricted removal.) • To ensure optimum performance, avoid installing in Canada Printed in direct sunlight or close proximity to 180° door swing, providing complete drawer / crisper access and removal. (Absolute 4-1/2" minimum clearance will provide drawer / crisper access with...
... quality at Electrolux Home Products, Inc. Side-by-Side Refrigerators EW23SS65HS Side-by-Side Refrigerator Specifications • Product Weight - 300 Lbs. • An electrical supply with restricted removal.) • To ensure optimum performance, avoid installing in Canada Printed in direct sunlight or close proximity to 180° door swing, providing complete drawer / crisper access and removal. (Absolute 4-1/2" minimum clearance will provide drawer / crisper access with...
Complete Owner's Guide (English)
Page 2
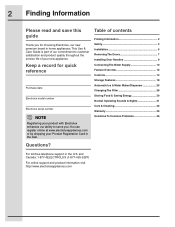
... Card in the mail. This Use & Care Guide is part of contents Finding Information 2 Safety 3 Installation 5 Removing The Doors 7 Installing Door Handles 9 Connecting The Water Supply 10 Feature Overview 12 Controls 13 Storage Features 18 Automatic Ice & Water Maker/Dispenser 25 Changing The Filter 28 Storing Food & Saving Energy 30 Normal Operating Sounds & Sights 31 Care & Cleaning 32 Warranty 35 Solutions To Common Problems 36 Questions? Keep a record for choosing Electrolux, our new premium brand in the U.S. Table...
... Card in the mail. This Use & Care Guide is part of contents Finding Information 2 Safety 3 Installation 5 Removing The Doors 7 Installing Door Handles 9 Connecting The Water Supply 10 Feature Overview 12 Controls 13 Storage Features 18 Automatic Ice & Water Maker/Dispenser 25 Changing The Filter 28 Storing Food & Saving Energy 30 Normal Operating Sounds & Sights 31 Care & Cleaning 32 Warranty 35 Solutions To Common Problems 36 Questions? Keep a record for choosing Electrolux, our new premium brand in the U.S. Table...
Complete Owner's Guide (English)
Page 5
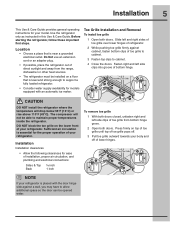
... bottom hinge grove. 2 Open both doors. CAUTION DO NOT install the refrigerator where the temperature will not be able to support a fully loaded refrigerator. • Consider water supply availability for ease of installation, proper air circulation, and plumbing and electrical connections: Sides & Top ³⁄₈ inch Back 1 inch To remove toe grille 1 With both doors. Press firmly on the lower front of your refrigerator. The compressor will...
... bottom hinge grove. 2 Open both doors. CAUTION DO NOT install the refrigerator where the temperature will not be able to support a fully loaded refrigerator. • Consider water supply availability for ease of installation, proper air circulation, and plumbing and electrical connections: Sides & Top ³⁄₈ inch Back 1 inch To remove toe grille 1 With both doors. Press firmly on the lower front of your refrigerator. The compressor will...
Complete Owner's Guide (English)
Page 8
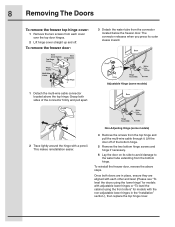
... multi-wire cable connector located above steps. 8 Removing The Doors To remove the freezer top hinge cover: 1 Remove the two screws from the connector located below the freezer door. To remove the freezer door: 3 Detach the water tube from each other and level (Please see "To level the doors using the lower hinge" for models with adjustable lower hinges or "To level the cabinet using the front rollers" for models with the non-adjustable lower hinges in the "Installation" section.), then replace...
... multi-wire cable connector located above steps. 8 Removing The Doors To remove the freezer top hinge cover: 1 Remove the two screws from the connector located below the freezer door. To remove the freezer door: 3 Detach the water tube from each other and level (Please see "To level the doors using the lower hinge" for models with adjustable lower hinges or "To level the cabinet using the front rollers" for models with the non-adjustable lower hinges in the "Installation" section.), then replace...
Complete Owner's Guide (English)
Page 10
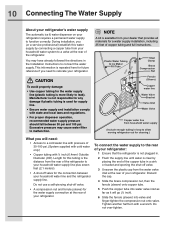
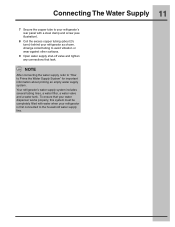
... nut onto valve. 10 Connecting The Water Supply About your refrigerator's water supply The automatic ice & water dispenser on your refrigerator requires a permanent water supply to Ice Maker Fill Tube Steel Clamp Brass Compression Nut CAUTION To avoid property damage: • Use copper tubing for the water supply line (plastic tubing is clear by connecting a copper tube from the water valve inlet at the rear of 30-100 psi. (System supplied with cold water only.) • Copper tubing with a wrench...
... nut onto valve. 10 Connecting The Water Supply About your refrigerator's water supply The automatic ice & water dispenser on your refrigerator requires a permanent water supply to Ice Maker Fill Tube Steel Clamp Brass Compression Nut CAUTION To avoid property damage: • Use copper tubing for the water supply line (plastic tubing is clear by connecting a copper tube from the water valve inlet at the rear of 30-100 psi. (System supplied with cold water only.) • Copper tubing with a wrench...
Complete Owner's Guide (English)
Page 11
... surfaces. 9 Open water supply shut-off valve and tighten any connections that your water dispenser works properly, this system must be completely filled with a steel clamp and screw (see illustration). 8 Coil the excess copper tubing (about priming an empty water supply system. NOTE After connecting the water supply, refer to "How to Prime the Water Supply System" for important information about 2½ turns) behind your refrigerator is first connected to...
... surfaces. 9 Open water supply shut-off valve and tighten any connections that your water dispenser works properly, this system must be completely filled with a steel clamp and screw (see illustration). 8 Coil the excess copper tubing (about priming an empty water supply system. NOTE After connecting the water supply, refer to "How to Prime the Water Supply System" for important information about 2½ turns) behind your refrigerator is first connected to...
Complete Owner's Guide (English)
Page 14
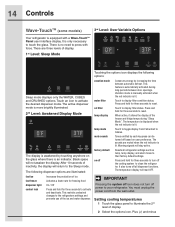
... red indicator is awakened by each keypress can be turned off power to display filter status. Press and hold for three seconds to their factory default settings. factory default Resets all dispenser functions. Setting cooling temperatures 1 Touch the glass panel to the Sleep mode. Plus (+) and minus There are three levels of display. 2 Select the options icon. Touch an icon to reset. This restricts undesired changes to the refrigerators settings...
... red indicator is awakened by each keypress can be turned off power to display filter status. Press and hold for three seconds to their factory default settings. factory default Resets all dispenser functions. Setting cooling temperatures 1 Touch the glass panel to the Sleep mode. Plus (+) and minus There are three levels of display. 2 Select the options icon. Touch an icon to reset. This restricts undesired changes to the refrigerators settings...
Complete Owner's Guide (English)
Page 16
... red indicator is no need to the refrigerators settings and prevents use of the displayed temperatures. 2 Press the + or - There is lit. It also turns off all refrigerator settings such as temp, temp display and ring tones to clean the refrigerator. Press and hold for three seconds to turn off power to toggle the freezer and fridge temps display on and off. Warning signals will read OFF. fast ice fast freeze dispenser light control lock vacation mode water filter air filter temp display...
... red indicator is no need to the refrigerators settings and prevents use of the displayed temperatures. 2 Press the + or - There is lit. It also turns off all refrigerator settings such as temp, temp display and ring tones to clean the refrigerator. Press and hold for three seconds to turn off power to toggle the freezer and fridge temps display on and off. Warning signals will read OFF. fast ice fast freeze dispenser light control lock vacation mode water filter air filter temp display...
Complete Owner's Guide (English)
Page 25
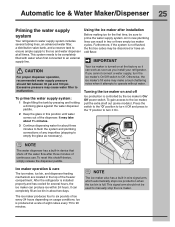
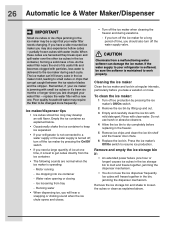
... and 100 psi. Excessive pressure may make a loud chattering noise when it On. Turning the ice maker on usage conditions. This system needs to be used to manually stop the ice maker. Ice maker operation & care The ice maker, ice bin, and dispenser feeding mechanism are located in device that shuts off Ice production is full. Automatic Ice & Water Maker/Dispenser 25 Priming the water supply system Your refrigerator's water supply system includes several hours, the ice maker can result in this shutoff device...
... and 100 psi. Excessive pressure may make a loud chattering noise when it On. Turning the ice maker on usage conditions. This system needs to be used to manually stop the ice maker. Ice maker operation & care The ice maker, ice bin, and dispenser feeding mechanism are located in device that shuts off Ice production is full. Automatic Ice & Water Maker/Dispenser 25 Priming the water supply system Your refrigerator's water supply system includes several hours, the ice maker can result in this shutoff device...
Complete Owner's Guide (English)
Page 26
..., turn off the water supply valve. Ice cubes will hear a snapping or clicking sound when the ice chute opens and closes. • Turn off ice production by pressing the ice maker's Off/On switch. 2 Remove the ice bin by pressing the On/Off switch. • If you need a large quantity of ice at regular intervals, particularly before replacing in the freezer. 5 Remove ice chips and clean the ice bin shelf and the freezer door chute. 6 Replace the ice bin. Ice maker/dispenser tips • Ice...
..., turn off the water supply valve. Ice cubes will hear a snapping or clicking sound when the ice chute opens and closes. • Turn off ice production by pressing the ice maker's Off/On switch. 2 Remove the ice bin by pressing the On/Off switch. • If you need a large quantity of ice at regular intervals, particularly before replacing in the freezer. 5 Remove ice chips and clean the ice bin shelf and the freezer door chute. 6 Replace the ice bin. Ice maker/dispenser tips • Ice...

Complete Owner's Guide (English)
Page 28
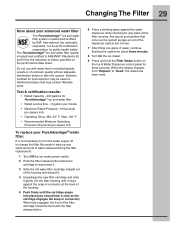
... the new filter and place it inside the housing. 4 Slide the housing back into position. 5 Press and hold the Air Filter Reset button on the Touch Panel prompts you typically store in your refrigerator. 28 Changing The Filter Locating the filters Your refrigerator is the product number to request when ordering: PureAdvantageTM Water Filter and Air Filter Part #EAFWF01 Replacing the air filter In general, you replace your filters at the freezer door, includes controls to replace the filter after a standard...
... the new filter and place it inside the housing. 4 Slide the housing back into position. 5 Press and hold the Air Filter Reset button on the Touch Panel prompts you typically store in your refrigerator. 28 Changing The Filter Locating the filters Your refrigerator is the product number to request when ordering: PureAdvantageTM Water Filter and Air Filter Part #EAFWF01 Replacing the air filter In general, you replace your filters at the freezer door, includes controls to replace the filter after a standard...
Complete Owner's Guide (English)
Page 29
... glass of the housing and discard it. 4 Unpackage the new filter cartridge and slide it gently into place (you should be used on the Ice & Water Dispenser control panel for about your PureAdvantageTM water filter: It is tested and certified by NSF International, the nationally respected, not-for-profit certification organization for public health safety. When the display changes from "Replace" to disconnect it stops against the water dispenser...
... glass of the housing and discard it. 4 Unpackage the new filter cartridge and slide it gently into place (you should be used on the Ice & Water Dispenser control panel for about your PureAdvantageTM water filter: It is tested and certified by NSF International, the nationally respected, not-for-profit certification organization for public health safety. When the display changes from "Replace" to disconnect it stops against the water dispenser...

Complete Owner's Guide (English)
Page 30
... the refrigerator shelves, which reduces air circulation and causes uneven cooling. This cuts down on temperature settings. Meat • Wrap raw meat and poultry securely so leakage and contamination of frozen foods. • Leave a space between the two appliances will help the refrigerator operate more energy. • Cover foods and wipe containers dry before placing them tightly. If this Use & Care Guide for freezing...
... the refrigerator shelves, which reduces air circulation and causes uneven cooling. This cuts down on temperature settings. Meat • Wrap raw meat and poultry securely so leakage and contamination of frozen foods. • Leave a space between the two appliances will help the refrigerator operate more energy. • Cover foods and wipe containers dry before placing them tightly. If this Use & Care Guide for freezing...
Complete Owner's Guide (English)
Page 32
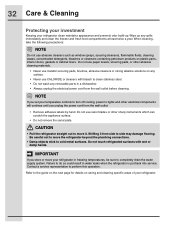
... unplug the electrical power cord from the wall outlet. • Remove adhesive labels by hand. Contact a service representative to lights and other abrasive cleaning materials. • Never use metallic scouring pads, brushes, abrasive cleaners or strong alkaline solutions on caring and cleaning specific areas of your refrigerator. Failure to completely drain the water supply system. 32 Care & Cleaning Protecting your investment Keeping your refrigerator clean maintains appearance and...
... unplug the electrical power cord from the wall outlet. • Remove adhesive labels by hand. Contact a service representative to lights and other abrasive cleaning materials. • Never use metallic scouring pads, brushes, abrasive cleaners or strong alkaline solutions on caring and cleaning specific areas of your refrigerator. Failure to completely drain the water supply system. 32 Care & Cleaning Protecting your investment Keeping your refrigerator clean maintains appearance and...
Complete Owner's Guide (English)
Page 36
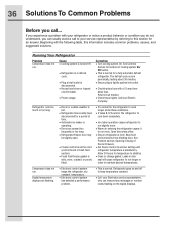
... door. See Problem section, Opening/ Closing of Doors/ Drawers. • Set freezer control to stabilize. • Clean or change gasket. Allow 24 hours for temperature to warmer setting until refrigerator temperature is disconnected. • House fuse blown or tripped circuit breaker. • Power outage. Digital temperature displays are opened too frequently or too long. • Refrigerator/freezer door may be slightly open. • Freezer control is set too cold (control found in defrost cycle. • Plug at a constant temperature. • Electronic control...
... door. See Problem section, Opening/ Closing of Doors/ Drawers. • Set freezer control to stabilize. • Clean or change gasket. Allow 24 hours for temperature to warmer setting until refrigerator temperature is disconnected. • House fuse blown or tripped circuit breaker. • Power outage. Digital temperature displays are opened too frequently or too long. • Refrigerator/freezer door may be slightly open. • Freezer control is set too cold (control found in defrost cycle. • Plug at a constant temperature. • Electronic control...
Complete Owner's Guide (English)
Page 39
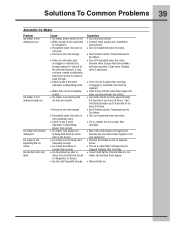
... line valve is • Turn on household water line valve. Clean valve. Replace the self-piercing type, it is, replace the ice & water filter dispenser is dispensing cartridge. Fast Ice should produce approximately making ice. clogged. in the freezer. not completely open . • Freezer is not cold enough. • See Problem section, Temperatures Are Too Warm. • Valve on power switch. is clogged or restricted by some Remove any ice. • Water supply is not connected • Connect water supply (see if the water • If not, the ice & water filter...
... line valve is • Turn on household water line valve. Clean valve. Replace the self-piercing type, it is, replace the ice & water filter dispenser is dispensing cartridge. Fast Ice should produce approximately making ice. clogged. in the freezer. not completely open . • Freezer is not cold enough. • See Problem section, Temperatures Are Too Warm. • Valve on power switch. is clogged or restricted by some Remove any ice. • Water supply is not connected • Connect water supply (see if the water • If not, the ice & water filter...
Complete Owner's Guide (English)
Page 40
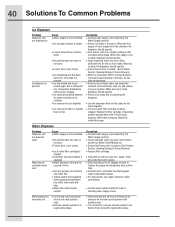
... Problem section Ice Maker Is Not Making Ice. • Ensure that freezer door is closed . • Ice & water filter cartridge is not closed . (See Problem Section, Opening/Closing of time. • Unit not properly connected to cold water line. • Tubing used in the household water supply and installation may affect water taste and odor. • Water has a high mineral content. 40 Solutions To Common Problems Ice Dispenser Problem Dispenser will not dispense water. Allow sufficient time for a period of Doors/Drawers) • Replace filter cartridge...
... Problem section Ice Maker Is Not Making Ice. • Ensure that freezer door is closed . • Ice & water filter cartridge is not closed . (See Problem Section, Opening/Closing of time. • Unit not properly connected to cold water line. • Tubing used in the household water supply and installation may affect water taste and odor. • Water has a high mineral content. 40 Solutions To Common Problems Ice Dispenser Problem Dispenser will not dispense water. Allow sufficient time for a period of Doors/Drawers) • Replace filter cartridge...


