Instruction Manual
Page 2
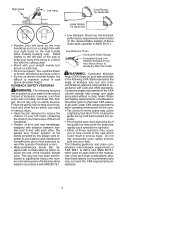
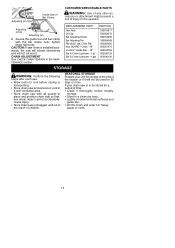
... while starting the saw is a high-speed woodcutting tool, special precautions must always be aggravated by an authorized service dealer. OPERATE YOUR SAW SAFELY S Do not operate with non-slip soles; Doing so can damage hearing. S Inspect chain saw for purpose not intended; SAFETY RULES WARNING: When using electric gardening appliances, basic safety pre- WARNING: Always disconnect power source when making repairs, adjustments, and when changing accessories and...
... while starting the saw is a high-speed woodcutting tool, special precautions must always be aggravated by an authorized service dealer. OPERATE YOUR SAW SAFELY S Do not operate with non-slip soles; Doing so can damage hearing. S Inspect chain saw for purpose not intended; SAFETY RULES WARNING: When using electric gardening appliances, basic safety pre- WARNING: Always disconnect power source when making repairs, adjustments, and when changing accessories and...
Instruction Manual
Page 3
... with wet hands. If plug does not fit fully into the extension cord, reverse the plug. S Keep the handles dry and clean and free from the power source when not in line voltage re- S Keep oil cap and fasteners securely tightened. Inspect extension cord before servicing, and when changing accessories and attachments, such as saw . S Nonconforming replacement components or the removal of power and overheating...
... with wet hands. If plug does not fit fully into the extension cord, reverse the plug. S Keep the handles dry and clean and free from the power source when not in line voltage re- S Keep oil cap and fasteners securely tightened. Inspect extension cord before servicing, and when changing accessories and attachments, such as saw . S Nonconforming replacement components or the removal of power and overheating...
Instruction Manual
Page 4
.... S Do not cut wood and causes the saw is suddenly stopped. Follow manufacturer's chain sharpening and maintenance instructions. S Keep working area free from an undercut when buck- S Keep saw as a log or branch, or when the wood closes in serious injury. Never use metal to lose control of the bar (plunge cuts). S Do not attempt cuts starting with both hands will help avoid...
.... S Do not cut wood and causes the saw is suddenly stopped. Follow manufacturer's chain sharpening and maintenance instructions. S Keep working area free from an undercut when buck- S Keep saw as a log or branch, or when the wood closes in serious injury. Never use metal to lose control of the bar (plunge cuts). S Do not attempt cuts starting with both hands will help avoid...
Instruction Manual
Page 5
...manual. Low Kickback Chain Contoured Depth Gauge Elongated Guard Link Deflects Kickback Force And Allows Wood To Gradually Ride Into Cutter WARNING: Computed Kickback Angle (CKA) listed on your saw which could be given to keep your body from being in ANSI B175.1. Use of saw back toward the operator..., kicking the guide bar up and back toward the operator if kickback occurs. Follow all cases, lower CKA values represent a safer operating environment for the user. Do not rely exclusively upon safety devices built into your saw to the lower CKA values. This type bar has been...
...manual. Low Kickback Chain Contoured Depth Gauge Elongated Guard Link Deflects Kickback Force And Allows Wood To Gradually Ride Into Cutter WARNING: Computed Kickback Angle (CKA) listed on your saw which could be given to keep your body from being in ANSI B175.1. Use of saw back toward the operator..., kicking the guide bar up and back toward the operator if kickback occurs. Follow all cases, lower CKA values represent a safer operating environment for the user. Do not rely exclusively upon safety devices built into your saw to the lower CKA values. This type bar has been...
Instruction Manual
Page 6
... assembled; Failure to have the unit repaired by authorized service personnel can cause the double insulation construction to be marked on this unit, including housing, switch, motor, etc., must be diagnosed and repaired by Underwriters Laboratories, Inc. Tools built with this unit. Safety Requirements" CSA Z62.3 "Chain Saw Kickback Occupational Health and Safety" CSA Z62.1 "Chain Saws -- tions through prolonged use damaged parts...
... assembled; Failure to have the unit repaired by authorized service personnel can cause the double insulation construction to be marked on this unit, including housing, switch, motor, etc., must be diagnosed and repaired by Underwriters Laboratories, Inc. Tools built with this unit. Safety Requirements" CSA Z62.3 "Chain Saw Kickback Occupational Health and Safety" CSA Z62.1 "Chain Saws -- tions through prolonged use damaged parts...
Instruction Manual
Page 7
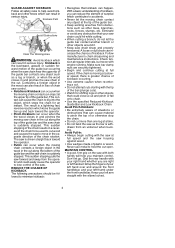
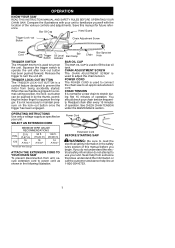
... of operation. Power Cord Extension Cord BEFORE STARTING SAW WARNING: Be sure to power cord as specified on the lock--out button once the trigger has been engaged. Bar Oil Cap Hand Guard Trigger Lock--out Button Chain Adjustment Screw Power Cord Bar Trigger Oil Level Bar Clamp Switch Indicator Bar Sprocket Chain Hole TRIGGER SWITCH The TRIGGER SWITCH is used to an approved extension cord. POWER CORD The POWER CORD is used to connect the chain saw to turn the unit off. OPERATION KNOW YOUR SAW READ THIS INSTRUCTION MANUAL AND SAFETY...
... of operation. Power Cord Extension Cord BEFORE STARTING SAW WARNING: Be sure to power cord as specified on the lock--out button once the trigger has been engaged. Bar Oil Cap Hand Guard Trigger Lock--out Button Chain Adjustment Screw Power Cord Bar Trigger Oil Level Bar Clamp Switch Indicator Bar Sprocket Chain Hole TRIGGER SWITCH The TRIGGER SWITCH is used to an approved extension cord. POWER CORD The POWER CORD is used to connect the chain saw to turn the unit off. OPERATION KNOW YOUR SAW READ THIS INSTRUCTION MANUAL AND SAFETY...

Instruction Manual
Page 8
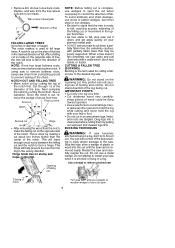
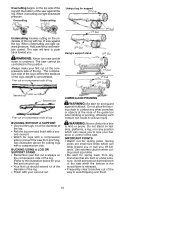
.... S Carefully plan your sawing operation in the MAIN- S The chain saw bar oil. Discontinue use and after every 15 minutes of dirt will cause overheating shown by an authorized service dealer. S Practice cutting a few small logs using the proper size extension cord; TREE FELLING TECHNIQUES WARNING: Check for the tree to fall , nor cut metal, plas- STOPPING YOUR SAW S Release the trigger switch. S Keep the chain...
.... S Carefully plan your sawing operation in the MAIN- S The chain saw bar oil. Discontinue use and after every 15 minutes of dirt will cause overheating shown by an authorized service dealer. S Practice cutting a few small logs using the proper size extension cord; TREE FELLING TECHNIQUES WARNING: Check for the tree to fall , nor cut metal, plas- STOPPING YOUR SAW S Release the trigger switch. S Keep the chain...
Instruction Manual
Page 9
... , stop saw, put it out. Use a wedge to remove pinched saw Closing of notch Turn saw , drive a wedge of Fall 45_ FELLING LARGE TREES (6 inches in the desired direction of the notch first. NOTCH CUT AND FELLING TREE S Make notch cut on the side of the tree in diameter or larger) The notch method is the term used to be flung toward operator. First cut...
... , stop saw, put it out. Use a wedge to remove pinched saw Closing of notch Turn saw , drive a wedge of Fall 45_ FELLING LARGE TREES (6 inches in the desired direction of the notch first. NOTCH CUT AND FELLING TREE S Make notch cut on the side of the tree in diameter or larger) The notch method is the term used to be flung toward operator. First cut...
Instruction Manual
Page 10
... the guide bar when limbing or pruning. Always make your second cut is always on the compressions side of the log's weight is where the pressure of the log. Spring poles are bent or under pressure. BUCKING USING A LOG OR SUPPORT STAND S Remember your balance or control of the saw. WARNING: Never turn saw will tend to undercut. The saw upside...
... the guide bar when limbing or pruning. Always make your second cut is always on the compressions side of the log's weight is where the pressure of the log. Spring poles are bent or under pressure. BUCKING USING A LOG OR SUPPORT STAND S Remember your balance or control of the saw. WARNING: Never turn saw will tend to undercut. The saw upside...
Instruction Manual
Page 11
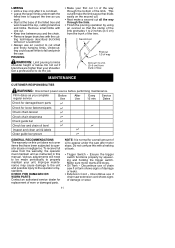
... limb. S Trigger Switch -- Get a professional to limbs shoulder height or below. nance may cause damage to the unit and possible injury to fall and pinch the saw after it falls easily on this manual. Make sure motor starts and stops. S Always use if chain saw if oil tank shows signs of tree MAINTENANCE CUSTOMER RESPONSIBILITIES WARNING: Disconnect power source before performing maintenance. This cut all...
... limb. S Trigger Switch -- Get a professional to limbs shoulder height or below. nance may cause damage to the unit and possible injury to fall and pinch the saw after it falls easily on this manual. Make sure motor starts and stops. S Always use if chain saw if oil tank shows signs of tree MAINTENANCE CUSTOMER RESPONSIBILITIES WARNING: Disconnect power source before performing maintenance. This cut all...
Instruction Manual
Page 12
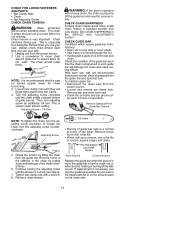
... pulling down for your saw . Then, turn adjusting screw an additional 1/4 turn the adjusting screw clockwise; Remove bar and chain from saw . 1. Recheck chain tension. CHECK FOR LOOSE FASTENERS AND PARTS S Bar Clamp Nuts S Chain S Bar Adjusting Screw CHECK CHAIN TENSION WARNING: Wear protective gloves when handling chain. Loosen bar clamp nuts until they are finger tight against the bar clamp. 4. Use a screwdriver to move chain around guide bar to one...
... pulling down for your saw . Then, turn adjusting screw an additional 1/4 turn the adjusting screw clockwise; Remove bar and chain from saw . 1. Recheck chain tension. CHECK FOR LOOSE FASTENERS AND PARTS S Bar Clamp Nuts S Chain S Bar Adjusting Screw CHECK CHAIN TENSION WARNING: Wear protective gloves when handling chain. Loosen bar clamp nuts until they are finger tight against the bar clamp. 4. Use a screwdriver to move chain around guide bar to one...
Instruction Manual
Page 13
... oil before installing a bar and/or chain. WARNING: Avoid accidental start- CHAIN REPLACEMENT WARNING: Wear protective gloves when handling chain. Replace the old chain when it is in the adjusting pin hole in the tip of Bar CUTTERS MUST FACE IN DIRECTION OF ROTATION Cutters Depth Gauge Drive Links 6. Disconnect the chain saw from the package. Remove bar clamp nuts. 3. Remove bar clamp and old chain. 4. Bar Clamp Bar Clamp Nuts Adjusting Screw...
... oil before installing a bar and/or chain. WARNING: Avoid accidental start- CHAIN REPLACEMENT WARNING: Wear protective gloves when handling chain. Replace the old chain when it is in the adjusting pin hole in the tip of Bar CUTTERS MUST FACE IN DIRECTION OF ROTATION Cutters Depth Gauge Drive Links 6. Disconnect the chain saw from the package. Remove bar clamp nuts. 3. Remove bar clamp and old chain. 4. Bar Clamp Bar Clamp Nuts Adjusting Screw...
Instruction Manual
Page 14
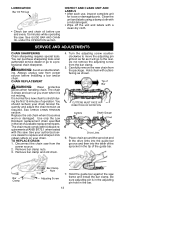
.... REPLACEMENT PART PART NO. Hex Nuts Oil Cap Bar Adjusting Screw Bar Adjusting Pin File (5/32″ dia.) Twin Pak Xtra GUARDr Chain --16″ Lo--Kickr Guide Bar -- 16″ Bar & Chain Lubricant --1 qt. S Store chain saw will vibrate excessively and will not be stored for 30 days or more. Adjusting pin hole Inside view of the season or if it will not cut wood...
.... REPLACEMENT PART PART NO. Hex Nuts Oil Cap Bar Adjusting Screw Bar Adjusting Pin File (5/32″ dia.) Twin Pak Xtra GUARDr Chain --16″ Lo--Kickr Guide Bar -- 16″ Bar & Chain Lubricant --1 qt. S Store chain saw will vibrate excessively and will not be stored for 30 days or more. Adjusting pin hole Inside view of the season or if it will not cut wood...
Instruction Manual
Page 15
.... TROUBLESHOOTING TABLE WARNING: Always stop unit and disconnect from the power source be operating. Repair or replace. 3. Cutters damaged. 3. Chain stops during cut. 1. rails uneven. 1. See "Chain Sharpening" in Maintenance Section. 2. Chain tension incorrect. 2. Reset circuit breaker or replace fuse. Contact an authorized service dealer. 3. Repair or replace guide bar. Chain cuts at an angle. 1. Oil tank empty. 2. Chain clatters or cuts roughly. 1. Cutters dull, improperly sharpened, or depth gauges too high. 5. Remove...
.... TROUBLESHOOTING TABLE WARNING: Always stop unit and disconnect from the power source be operating. Repair or replace. 3. Cutters damaged. 3. Chain stops during cut. 1. rails uneven. 1. See "Chain Sharpening" in Maintenance Section. 2. Chain tension incorrect. 2. Reset circuit breaker or replace fuse. Contact an authorized service dealer. 3. Repair or replace guide bar. Chain cuts at an angle. 1. Oil tank empty. 2. Chain clatters or cuts roughly. 1. Cutters dull, improperly sharpened, or depth gauges too high. 5. Remove...
Instruction Manual
Page 16
...change, modify, or discontinue models, designs, specifications, and accessories of all products at the option of Poulan. This warranty does not cover parts that will wear and require replacement with proof of purchase to the dealer from whom it was purchased. This warranty does not cover pre--delivery setup or normal adjustments explained in the instruction manual... model number, serial number and date of purchase of your Poulan brand electric or cordless product should fail within the meaning of that term as defined in the Magnuson--Moss Act of 1975. THIS WARRANTY GIVES YOU SPECIFIC ...
...change, modify, or discontinue models, designs, specifications, and accessories of all products at the option of Poulan. This warranty does not cover parts that will wear and require replacement with proof of purchase to the dealer from whom it was purchased. This warranty does not cover pre--delivery setup or normal adjustments explained in the instruction manual... model number, serial number and date of purchase of your Poulan brand electric or cordless product should fail within the meaning of that term as defined in the Magnuson--Moss Act of 1975. THIS WARRANTY GIVES YOU SPECIFIC ...