Complete Owner's Guide (English)
Page 2
...; Getting Started 7 • Normal Operating Sounds 7 • Operating Your Dryer 8-9 • Cycle Selection 10-12 • Drying Temperature 13 • Dryness Level 13 • Options 14-15 • Dryer Features 15 • Dryer Settings Chart 16 Care & Cleaning 17 Solutions to serve you for quick reference Purchase date Electrolux model number Electrolux serial number NOTE Registering your new appliance. and Canada: 1-877-4ELECTROLUX (1-877-435-3287) For online support and...
...; Getting Started 7 • Normal Operating Sounds 7 • Operating Your Dryer 8-9 • Cycle Selection 10-12 • Drying Temperature 13 • Dryness Level 13 • Options 14-15 • Dryer Features 15 • Dryer Settings Chart 16 Care & Cleaning 17 Solutions to serve you for quick reference Purchase date Electrolux model number Electrolux serial number NOTE Registering your new appliance. and Canada: 1-877-4ELECTROLUX (1-877-435-3287) For online support and...
Complete Owner's Guide (English)
Page 3
... by a qualified installer, service agency or the gas supplier. Power cord with 3-prong grounded plug Avoid fire hazard or electrical shock. Failure to follow this Use and Care Guide are labeled with unit except those manufactured for future reference. 240 v Electric Dryer 120 v Gas Dryer 10-30R 3-wire (fused 30 amp) 14-30R 4-wire (fused 30 amp) UL-approved service cord must be installed on electric dryers (not provided with a WARNING...
... by a qualified installer, service agency or the gas supplier. Power cord with 3-prong grounded plug Avoid fire hazard or electrical shock. Failure to follow this Use and Care Guide are labeled with unit except those manufactured for future reference. 240 v Electric Dryer 120 v Gas Dryer 10-30R 3-wire (fused 30 amp) 14-30R 4-wire (fused 30 amp) UL-approved service cord must be installed on electric dryers (not provided with a WARNING...
Complete Owner's Guide (English)
Page 5
... plugged into a properly grounded and polarized 3-prong outlet. Hazardous fumes or electrical shock could result in this Use & Care Guide. Refer to such substances. Do not use any service or cleaning. Installation instructions are soot and carbon monoxide, both of which may be produced by the use of a gas dryer must replace the thermal limiter switch after correcting the fault. • Failure to comply with controls. • Do not install...
... plugged into a properly grounded and polarized 3-prong outlet. Hazardous fumes or electrical shock could result in this Use & Care Guide. Refer to such substances. Do not use any service or cleaning. Installation instructions are soot and carbon monoxide, both of which may be produced by the use of a gas dryer must replace the thermal limiter switch after correcting the fault. • Failure to comply with controls. • Do not install...
Complete Owner's Guide (English)
Page 7
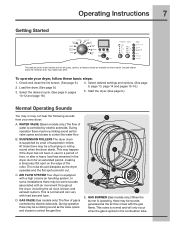
... load size and type. Load the dryer. (See page 9.) 3. At times there may be sounds generated as the valve opens and closes to control the gas flow. C. This is controlled by electric solenoids. A B E D C E. To operate your new dryer: A. During operation there may be a clicking sound as the dryer operates and the flat spot on every model. SUSPENSION ROLLERS The dryer drum is supported by electric solenoids. AIR FLOW SYSTEM Your dryer is controlled by a set...
... load size and type. Load the dryer. (See page 9.) 3. At times there may be sounds generated as the valve opens and closes to control the gas flow. C. This is controlled by electric solenoids. A B E D C E. To operate your new dryer: A. During operation there may be a clicking sound as the dryer operates and the flat spot on every model. SUSPENSION ROLLERS The dryer drum is supported by electric solenoids. AIR FLOW SYSTEM Your dryer is controlled by a set...
Complete Owner's Guide (English)
Page 10
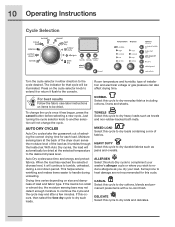
... care label instructions on the cycle selector knob to heat damage are not recommended for each load. Items prone to extend it or return it has begun, press the cancel button before selecting a new cycle. Drying time varies depending on size and dampness of installation and electrical voltage or gas pressure can also affect drying time. 10 Operating Instructions Cycle Selection Turn the cycle selector in either direction to continue the cycle...
... care label instructions on the cycle selector knob to heat damage are not recommended for each load. Items prone to extend it or return it has begun, press the cancel button before selecting a new cycle. Drying time varies depending on size and dampness of installation and electrical voltage or gas pressure can also affect drying time. 10 Operating Instructions Cycle Selection Turn the cycle selector in either direction to continue the cycle...
Complete Owner's Guide (English)
Page 11
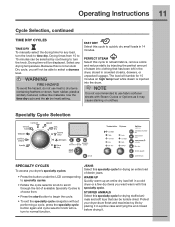
..., remove odors and reduce static by placing it in a cold dryer or a few dry items you want warm with Steam Cycles or Options as it . Specialty Cycle Selection SPECIALTY CYCLES To access you will be tumble dried. Use the time dry cycle and the air (no heat) setting. PERFECT STEAM Select this cycle to normal function. Operating Instructions 11 Cycle Selection, continued TIME DRY CYCLES TIME DRY To manually select the drying time for 15 minutes on clothes. FAST DRY Select...
..., remove odors and reduce static by placing it in a cold dryer or a few dry items you want warm with Steam Cycles or Options as it . Specialty Cycle Selection SPECIALTY CYCLES To access you will be tumble dried. Use the time dry cycle and the air (no heat) setting. PERFECT STEAM Select this cycle to normal function. Operating Instructions 11 Cycle Selection, continued TIME DRY CYCLES TIME DRY To manually select the drying time for 15 minutes on clothes. FAST DRY Select...
Complete Owner's Guide (English)
Page 15
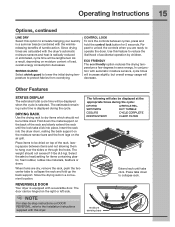
Operating Instructions 15 Options, continued LINE DRY Select this option to simulate hanging your laundry in a convenient location. DRYING RACK Use the drying rack to operate the dryer. Store the drying rack in a summer breeze combined with the wrinklereleasing benefits of load, overall energy consumption decreases. REVERSIBLE DOOR Your dryer is selected. The door can be tumble dried. TUMBLE COOLING CYCLE COMPLETE ADDING STEAM CLEAN FILTER Extend rack until the lock tabs click into the dryer drum, resting the...
Operating Instructions 15 Options, continued LINE DRY Select this option to simulate hanging your laundry in a convenient location. DRYING RACK Use the drying rack to operate the dryer. Store the drying rack in a summer breeze combined with the wrinklereleasing benefits of load, overall energy consumption decreases. REVERSIBLE DOOR Your dryer is selected. The door can be tumble dried. TUMBLE COOLING CYCLE COMPLETE ADDING STEAM CLEAN FILTER Extend rack until the lock tabs click into the dryer drum, resting the...
Complete Owner's Guide (English)
Page 17
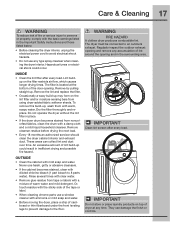
... Important Safety Instructions and those listed below. • Before cleaning the dryer interior, unplug the electrical power cord to avoid electrical shock hazards. • Do not use any accumulation of the door opening and in inefficient drying and possible fire hazard. Remove cleanser residue before drying the next load. • Every 18 months an authorized servicer should clean the dryer cabinet interior and exhaust duct. Or, touch...
... Important Safety Instructions and those listed below. • Before cleaning the dryer interior, unplug the electrical power cord to avoid electrical shock hazards. • Do not use any accumulation of the door opening and in inefficient drying and possible fire hazard. Remove cleanser residue before drying the next load. • Every 18 months an authorized servicer should clean the dryer cabinet interior and exhaust duct. Or, touch...
Complete Owner's Guide (English)
Page 18
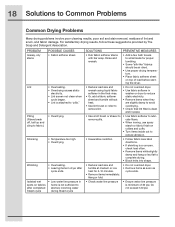
... completed Steam cycle • Low water line pressure in home is a concern, check load often. • Remove items while slightly damp and hang or lay flat to complete drying. • Block knits into shape. • Reduce load size and tumble at medium or low heat for proper tumbling. • Some "silk-like" fabrics should be air dried. • Use proper drying temperature. • Place fabric softener sheet...
... completed Steam cycle • Low water line pressure in home is a concern, check load often. • Remove items while slightly damp and hang or lay flat to complete drying. • Block knits into shape. • Reduce load size and tumble at medium or low heat for proper tumbling. • Some "silk-like" fabrics should be air dried. • Use proper drying temperature. • Place fabric softener sheet...
Complete Owner's Guide (English)
Page 19
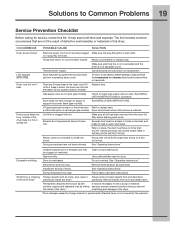
... the inside the dryer.* laundering. Electrical power cord is overloaded. Reset circuit breaker or replace fuse. Thermal limiter tripped. Check to make sure supply valve is connected to the dryer. *Drum damage caused by foreign objects or permanently attached items is not covered by the warranty. Dryer does not have no more than drying on a separate circuit. Exhaust duct must not exceed length listed in INSTALLATION INSTRUCTIONS. Do not overload. buttons are inside of the drum.* scratching and...
... the inside the dryer.* laundering. Electrical power cord is overloaded. Reset circuit breaker or replace fuse. Thermal limiter tripped. Check to make sure supply valve is connected to the dryer. *Drum damage caused by foreign objects or permanently attached items is not covered by the warranty. Dryer does not have no more than drying on a separate circuit. Exhaust duct must not exceed length listed in INSTALLATION INSTRUCTIONS. Do not overload. buttons are inside of the drum.* scratching and...
Complete Owner's Guide (English)
Page 20
... warranty must be required. This warranty only applies in a commercial setting. 6. In addition, your receipt, delivery slip, or some other appropriate payment record to repair or replace appliance light bulbs, air filters, water filters, other consumables, or knobs, handles, or other cosmetic parts. 10. Service calls which are not covered by Electrolux or an authorized service company. Expenses for making the appliance accessible for servicing...
... warranty must be required. This warranty only applies in a commercial setting. 6. In addition, your receipt, delivery slip, or some other appropriate payment record to repair or replace appliance light bulbs, air filters, water filters, other consumables, or knobs, handles, or other cosmetic parts. 10. Service calls which are not covered by Electrolux or an authorized service company. Expenses for making the appliance accessible for servicing...

Installation Instructions (All Languages)
Page 2
... use gasoline or other flammable vapors and liquids in the vicinity of contents Important Safety Instructions 2 Installation Requirements 3-9 Installed Dimensions 9 Installation Instructions 10-18 Reversing Door 19-23 Options 24 ©2010 Electrolux Major Appliances All rights reserved. Cartons covered with this dryer are known to light any appliance. • Do not touch any appliance. This dryer is not recommended for play. Do not stack washer on pedestal...
... use gasoline or other flammable vapors and liquids in the vicinity of contents Important Safety Instructions 2 Installation Requirements 3-9 Installed Dimensions 9 Installation Instructions 10-18 Reversing Door 19-23 Options 24 ©2010 Electrolux Major Appliances All rights reserved. Cartons covered with this dryer are known to light any appliance. • Do not touch any appliance. This dryer is not recommended for play. Do not stack washer on pedestal...
Installation Instructions (All Languages)
Page 3
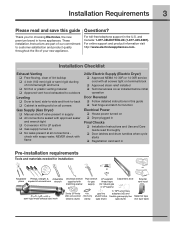
...; Conversion kit for LP system ‰ Gas supply turned on ‰ Dryer plugged in Final Checks ‰ Installation Instructions and Use and Care Guide read and save this guide ‰ Test hinge and latch for function Electrical Power ‰ House power turned on ‰ No leaks present at all screws tight on terminal block ‰ Approved strain relief installed ‰ Terminal access cover installed before initial operation Door Reversal ‰ Follow detailed instructions in this guide Questions? check with soapy water, NEVER check...
...; Conversion kit for LP system ‰ Gas supply turned on ‰ Dryer plugged in Final Checks ‰ Installation Instructions and Use and Care Guide read and save this guide ‰ Test hinge and latch for function Electrical Power ‰ House power turned on ‰ No leaks present at all screws tight on terminal block ‰ Approved strain relief installed ‰ Terminal access cover installed before initial operation Door Reversal ‰ Follow detailed instructions in this guide Questions? check with soapy water, NEVER check...
Installation Instructions (All Languages)
Page 4
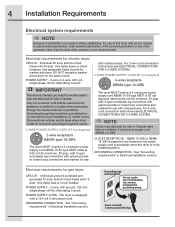
.... Use separately fused circuits for gas dryer: CIRCUIT - 4 Installation Requirements Electrical system requirements NOTE Because of potentially inconsistent voltage capabilities, the use of this dryer with power created by gas powered generators, solar powered generators, wind powered generators or any circumstances, cut, remove, or bypass the grounding prong. time delay fuses or circuit breakers. Electrical requirements for washer and dryer. Electrical requirements for sale in Electrical Installation section. For 3-wire cord connection instructions see ELECTRICAL CONNECTIONS FOR...
.... Use separately fused circuits for gas dryer: CIRCUIT - 4 Installation Requirements Electrical system requirements NOTE Because of potentially inconsistent voltage capabilities, the use of this dryer with power created by gas powered generators, solar powered generators, wind powered generators or any circumstances, cut, remove, or bypass the grounding prong. time delay fuses or circuit breakers. Electrical requirements for washer and dryer. Electrical requirements for sale in Electrical Installation section. For 3-wire cord connection instructions see ELECTRICAL CONNECTIONS FOR...
Installation Instructions (All Languages)
Page 5
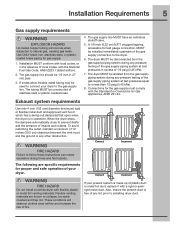
... installing dryer duct. plugged tapping, accessible for test gauge connection, MUST be 1/2 inch (1.27 cm) pipe. 3. Connections for proper and safe operation of your dryer. Flexible venting materials are specific requirements for the gas supply must comply with flexible plastic or metal foil venting materials. These conditions will corrode when subjected to natural gas, causing gas leaks. Correct Incorrect If your dryer to the dryer. 6. The gas supply line...
... installing dryer duct. plugged tapping, accessible for test gauge connection, MUST be 1/2 inch (1.27 cm) pipe. 3. Connections for proper and safe operation of your dryer. Flexible venting materials are specific requirements for the gas supply must comply with flexible plastic or metal foil venting materials. These conditions will corrode when subjected to natural gas, causing gas leaks. Correct Incorrect If your dryer to the dryer. 6. The gas supply line...
Installation Instructions (All Languages)
Page 6
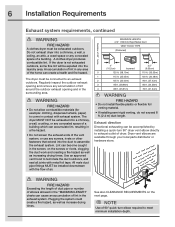
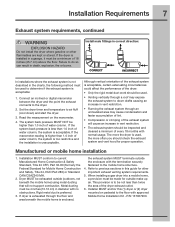
.... Number of 90° turns MAXIMUM LENGTH of dryer. The dryer MUST NOT be accomplished by installing a quick-turn elbow required to meet minimum installation depth. Exhaust direction Directional exhausting can accumulate lint, resulting in the screen, on the next page. Use an approved vent hood to terminate the duct outdoors, and seal all joints with the flow of a building which can be exhausted into the duct to assemble the exhaust system. 6 Installation Requirements Exhaust...
.... Number of 90° turns MAXIMUM LENGTH of dryer. The dryer MUST NOT be accomplished by installing a quick-turn elbow required to meet minimum installation depth. Exhaust direction Directional exhausting can accumulate lint, resulting in the screen, on the next page. Use an approved vent hood to terminate the duct outdoors, and seal all joints with the flow of a building which can be exhausted into the duct to assemble the exhaust system. 6 Installation Requirements Exhaust...
Installation Instructions (All Languages)
Page 7
... exhausted outside make up air. Dryer MUST be inspected and cleaned a minimum of the dryer exhaust outlet. 6. Rigid metal duct is acceptable: 1. Refer to previous sections in a garage, it must be a minimum of water column, the system is less than twice the area of every 18 months with the termination securely fastened to down ) and start the dryer. 3. Read the measurement on pedestal...
... exhausted outside make up air. Dryer MUST be inspected and cleaned a minimum of the dryer exhaust outlet. 6. Rigid metal duct is acceptable: 1. Refer to previous sections in a garage, it must be a minimum of water column, the system is less than twice the area of every 18 months with the termination securely fastened to down ) and start the dryer. 3. Read the measurement on pedestal...

Installation Instructions (All Languages)
Page 17
... a circuit breaker/fuse box before calling for your new dryer. 7. Rock alternating corners to the exhaust vent system. See the next page about performing a brief, helpful "Installation Cycle" for service. 8. NOTE A wiring diagram and technical data sheet are located inside the dryer console. Grounding type wall receptacle Do not, under any questions during initial operation, please review the "Avoid Service Checklist" in a location near the dryer for stability. Installation Instructions 17 General installation 1. Read the Use & Care Guide...
... a circuit breaker/fuse box before calling for your new dryer. 7. Rock alternating corners to the exhaust vent system. See the next page about performing a brief, helpful "Installation Cycle" for service. 8. NOTE A wiring diagram and technical data sheet are located inside the dryer console. Grounding type wall receptacle Do not, under any questions during initial operation, please review the "Avoid Service Checklist" in a location near the dryer for stability. Installation Instructions 17 General installation 1. Read the Use & Care Guide...
Installation Instructions (All Languages)
Page 18
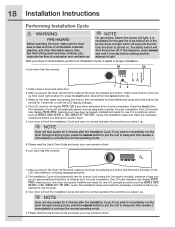
... installed and ready for use . The Installation Cycle will shut the burner off. At cycle completion, the LCD user interface may display INSTAL PASS!, meaning your new premium dryer! Press the start button (3) and then the cancel button (4). 3. Please read the Use & Care Guide and enjoy your new dryer is necessary for correct cord connection (on electric models), presence of gas supply (on , the safety switch will automatically test for the gas line to normal operation...
... installed and ready for use . The Installation Cycle will shut the burner off. At cycle completion, the LCD user interface may display INSTAL PASS!, meaning your new premium dryer! Press the start button (3) and then the cancel button (4). 3. Please read the Use & Care Guide and enjoy your new dryer is necessary for correct cord connection (on electric models), presence of gas supply (on , the safety switch will automatically test for the gas line to normal operation...
Installation Instructions (All Languages)
Page 24
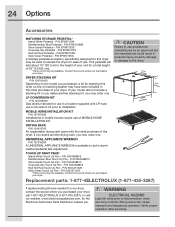
... servicing controls. P/N 5304468814 Turquoise Sky Touch Up Pen - WARNING ELECTRICAL HAZARD Label all wires prior to aid in dryer/ washer/pedestal feet adjustment. If your model did not include a stacking kit or you desire another drying rack, you purchased your dryer. DRYING RACK P/N 134912700 An expandable drying rack came with LP must use a conversion kit prior to elevate the dryer for stacking this dryer. P/N 5304468813 Silver Sands Touch Up Pen - Verify proper operation after servicing...
... servicing controls. P/N 5304468814 Turquoise Sky Touch Up Pen - WARNING ELECTRICAL HAZARD Label all wires prior to aid in dryer/ washer/pedestal feet adjustment. If your model did not include a stacking kit or you desire another drying rack, you purchased your dryer. DRYING RACK P/N 134912700 An expandable drying rack came with LP must use a conversion kit prior to elevate the dryer for stacking this dryer. P/N 5304468813 Silver Sands Touch Up Pen - Verify proper operation after servicing...


