Electrolux EIMGD60JIW Support Question
Electrolux EIMGD60JIW Support Question
Find answers below for this question about Electrolux EIMGD60JIW.Need a Electrolux EIMGD60JIW manual? We have 4 online manuals for this item!
Question posted by farrellssmith on October 1st, 2020
Drum Starts To Turn And Stalls Out After 5-10 Seconds - ??
Removed rear panel, if remove belt off motor and takeup tension wheel, the drum turns easily but with all secured, extreme drag and believe the shaft will not turn. After putting the belt back on after turning the armature of the motor without the belt, i can get the dryer to turn on for about 5-10 seconds and then it stalls out.
Current Answers
Answer #1: Posted by Odin on October 1st, 2020 5:26 AM
Odin

Member since:
April 10th, 2010 Points: 41,236,670

Member since:
April 10th, 2010 Points: 41,236,670
Hope this is useful. Please don't forget to click the Accept This Answer button if you do accept it. My aim is to provide reliable helpful answers, not just a lot of them. See https://www.helpowl.com/profile/Odin.
Related Electrolux EIMGD60JIW Manual Pages
Complete Owner's Guide (English) - Page 2
...) For online support and product information visit http://www.electroluxappliances.com
Table of contents
Finding information 2 SAFETY 3-5 Features 6 Operating Instructions 7-16 • Getting Started 7 • Normal Operating Sounds 7 • Operating Your Dryer 8-9 • Cycle Selection 10-12 • Drying Temperature 13
• Dryness Level 13 • Options 14-15 •...
Complete Owner's Guide (English) - Page 5
... To prevent shock hazard and assure stability during operation, the dryer must never be removed. If the dryer is moving.
CAUTION
The California Safe Drinking Water and Toxic ... ALWAYS disconnect the dryer from the electrical supply before reaching into the dryer if the drum is moved to the weather.
• A thermal limiter switch automatically turns off the motor in accordance with ...
Complete Owner's Guide (English) - Page 7
...the combustion tube.
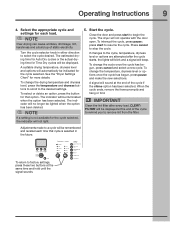
Select the desired cycle. (See page 9, pages 10-12 and page 18.)
4. SUSPENSION ROLLERS The dryer drum is controlled by electric solenoids. This may be a clicking sound as...air flow mixes with air movement throughout the dryer, including the air duct, blower, and exhaust system. Getting Started
Operating Instructions 7
This manual covers many models and not...
Complete Owner's Guide (English) - Page 9
...selected. See the "Dryer Settings Chart" for that cycle is not available for the cycle selected. Start the cycle. press start to select the ... time and hold until the signal sounds.
Adjustments made to remove lint from the filter. To return to stop the...cycles will be displayed at the end of static electricity. Turn the cycle selector knob in the future. The estimated ...
Complete Owner's Guide (English) - Page 10
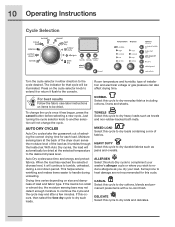
...With Auto Dry cycles, the load will be dried at the back of the dryer drum sense the moisture level of the load as towels and non-rubber-backed bath mats... cycle.
To change the cycle.
MIXED LOAD Select this cycle to the cycle desired.
10 Operating Instructions
Cycle Selection
Turn the cycle selector in either direction to dry loads containing a mix of fabrics. Drying time...
Complete Owner's Guide (English) - Page 11
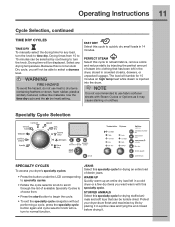
...start button to begin the cycle.
• To exit the specialty cycle navigation without performing a cycle, press the specialty cycle button again and cycle selector knob will tumble for 15 minutes on clothes. Select any load, turn...not be tumble dried. Protect your dryer drum finish and maximize toy life...is not recommended to refresh fabrics, remove odors and reduce static by continuing...
Complete Owner's Guide (English) - Page 14
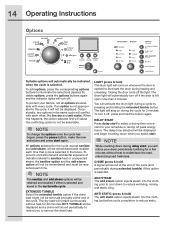
...be selectable. Closing the door turns off . DELAY START Press delay start , you will stay on...notice your dryer periodically tumbling for 30 minutes. NOTE
While counting down during delay start to ...remove the dried load.
If an option is selected and saved in the future. 14 Operating Instructions
Options
Suitable options will automatically be displayed. You can activate the drum...
Complete Owner's Guide (English) - Page 15
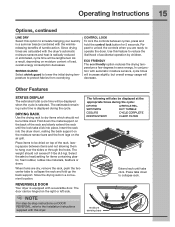
...items which should not exceed 10 lbs (4.5 kg). The ... into the dryer drum, resting the...this option to simulate hanging your laundry in a convenient location.
ECO...controls when you are dry, remove the rack, push the ...dryer is displayed during the cycle:
DRYING
WRINKLE REL. Select the air (no heat) setting for 5 seconds.
The estimated remaining cycle time is equipped with the dryer...
Complete Owner's Guide (English) - Page 18
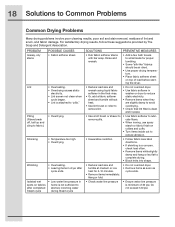
... load before starting the dryer.
•...dryer to reduce static electricity. • Remove items when they are slightly damp to avoid overdrying. • Check that lint filter is minimum of lint and scum, and fabric damage. Isolated wet spots on collars and cuffs.
• Turn...Remove items while slightly damp and hang or lay flat medium or low heat for 5-10 minutes.
• Remove...
Complete Owner's Guide (English) - Page 19
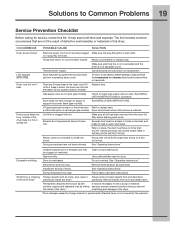
...not securely ...seconds.
Dryer has been programmed to Common Problems 19
Service Prevention Checklist
Before calling for service, review this dryer...removed from pockets before starting each cycle.
Drying time will not operate. (electric models)
Gas supply valve is clogged with lint. Clean out any obstruction. Items left in the dryer circuit. buttons are not the result of the drum...
Installation Instructions (All Languages) - Page 3
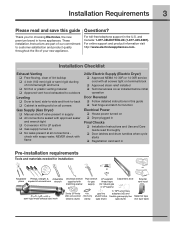
...check with soapy water, NEVER check with flame
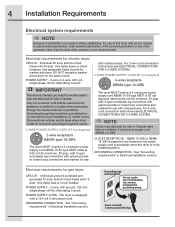
240v Electric Supply (Electric Dryer)
‰ Approved NEMA 10-30R or 14-30R service cord with all screws tight on terminal block
&#...137; House power turned on ‰ Dryer plugged in
Final Checks
‰ Installation Instructions and Use and Care Guide read thoroughly
‰ Door latches and drum tumbles when cycle starts
‰ Registration card...
Installation Instructions (All Languages) - Page 4
...potentially inconsistent voltage capabilities, the use of this dryer with power created by gas powered generators, solar powered generators, wind powered generators or any circumstances, cut, remove, or bypass the grounding prong.
branch circuit ..., 30 amp, with 4 open end spade lug connectors with clothes dryers. NEMA 10-30R or NEMA 14-30R receptacle to neutral unless it was manufactured...
Installation Instructions (All Languages) - Page 6
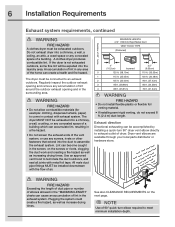
...clothes dryer produces combustible lint. Regularly inspect the outdoor exhaust opening and remove any...of 90° turns
MAXIMUM LENGTH of air...of 4" (102mm) Rigid Metal Duct
VENT HOOD TYPE
(Preferred)
4" (10.2cm)
louvered
2.5" (6.35cm)
0
125 ft. (38.10m)
110...dryer into a chimney, a wall, a ceiling, an attic, a crawl space or any screws, rivets or other fasteners that extend into the laundry...
Installation Instructions (All Languages) - Page 7
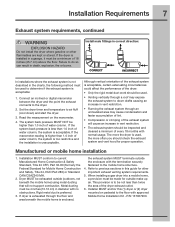
...MH.
2. Refer to down ) and start the dryer.
3. Set the dryer timer and temperature to determine if the exhaust system...affect the performance of the dryer:
• Only the rigid metal duct work should be 4 inches (10.16 cm) in a garage...4. When installing a gas dryer into a mobile home, a provision must be exhausted outside the enclosure with the termination securely fastened to the fl...
Installation Instructions (All Languages) - Page 9
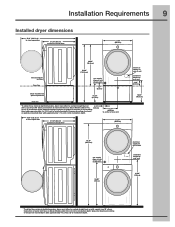
... for rear vent
41.00" (104cm)
* To obtain these minimal depth dimensions, dryer must either be vented straight back or with a quick-turn 90° elbow. Downward venting of exhaust
on pedestal-mounted dryer adds approximately 1.7 in . (9.5cm)
(2 cm) to installation depth. Upward or downward venting of exhaust on stacked dryer adds approximately 4 in . (10.2 cm...
Installation Instructions (All Languages) - Page 12

... below the access panel. Neutral terminal
IMPORTANT
If moving dryer from the center ...Turn off power supply to the SILVER colored center terminal on the terminal block. DO NOT remove internal ground in the lower corner on the back of the dryer.
3. Tighten the screw securely.
6. 12 Installation Instructions
Electrical connection (non-Canada) - 3 wire cord
3-wire receptacle (NEMA type 10...
Installation Instructions (All Languages) - Page 13
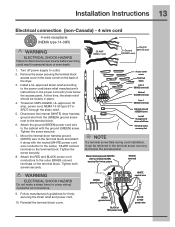
... next to neutral (SILVER)
terminal for firmly securing the strain relief and power cord.
10. Turn off power supply to disconnect power source before servicing could result in place. 4. Remove the screw securing the terminal block
access cover in the power cord entry hole below the access panel.
Installation Instructions 13
Electrical connection (non-Canada...
Installation Instructions (All Languages) - Page 15

... Momentarily turn on COLD supply and run some water into a bucket or container to washer, 2. Installation Instructions 15
Water connection (Steam Model only)
WATER SUPPLY REQUIREMENTS Cold water faucet MUST be installed within 42 inches (107 cm) of your water pressure.
1. Remove COLD inlet hose from dryer drum and inspect hose couplings for laundry hose...
Installation Instructions (All Languages) - Page 16

... connector to the other outlet on the back of the dryer and snug it by hand. Connect the straight end of the dryer inlet hose another 2/3 turn with pliers.
9.
If your installation has room for the ... inlet hose for leaks at all connections.
then tighten it another 2/3 turn with pliers.
10. NOTE
If you were able to install the "Y" connector directly to the COLD water supply, ...
Installation Instructions (All Languages) - Page 18
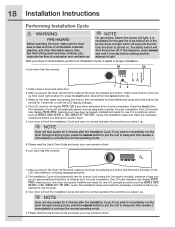
... immediately to continue the normal operating mode.
4. Empty dryer's drum and close door.
13 4
2. Press the start button (3) and then the cancel button (4).
3.
NOTE
Dryer will stay awake for use . If you wish to immediately run the dryer through a drying cycle, press the cancel button to put the unit to sleep and then rewake it immediately...
Similar Questions

My Dryer Will Not Start
Loaded dryer, pushed start, humms for a few seconds and that's it. Whats wrong?
Loaded dryer, pushed start, humms for a few seconds and that's it. Whats wrong?
(Posted by cheryle37 7 years ago)

Dryer Pausing For No Apparent Reason A Few Seconds After Starting Cycle...
would a defective moisture sensor be causing our electrolux dryer to pause a few seconds into a new ...
would a defective moisture sensor be causing our electrolux dryer to pause a few seconds into a new ...
(Posted by plantz 7 years ago)

Model Eimed55iiw: Dryer Heats Up For 10 Minutes Then Turns Off.
Error code E64 appears when it shuts down. Since there is heat for about 10 minutes, wondering if it...
Error code E64 appears when it shuts down. Since there is heat for about 10 minutes, wondering if it...
(Posted by slafarr 9 years ago)

Display And Power Issue
Display blinks on the off when turning dial and does not turn on
Display blinks on the off when turning dial and does not turn on
(Posted by Anonymous-149548 9 years ago)

How Do Remove Front Panel To Change From Natural Gas To Lp On Dryer Eimgd60jiw
(Posted by pony484 10 years ago)