Complete Owner's Guide (English)
Page 2
... Selection 10-12 • Drying Temperature 13 • Dryness Level 14 • Options 15-16 • Dryer Features 17 • Dryer Settings Chart 18 Care & Cleaning 19 Solutions to customer satisfaction and product quality throughout the life of your purchase...in the mail. 2 Finding Information Please read and save this guide Thank you for quick reference Purchase date Electrolux model number Electrolux serial number NOTE Registering your product with Electrolux enhances our ability to serve you , please use this page to record important product information. Keep a record...
... Selection 10-12 • Drying Temperature 13 • Dryness Level 14 • Options 15-16 • Dryer Features 17 • Dryer Settings Chart 18 Care & Cleaning 19 Solutions to customer satisfaction and product quality throughout the life of your purchase...in the mail. 2 Finding Information Please read and save this guide Thank you for quick reference Purchase date Electrolux model number Electrolux serial number NOTE Registering your product with Electrolux enhances our ability to serve you , please use this page to record important product information. Keep a record...

Complete Owner's Guide (English)
Page 7
... 9, pages 10-12 and page 18.) 4. At times there may be a thumping or rolling sound when the dryer starts. This is controlled by electric solenoids. GAS VALVE (Gas models only.) The flow of gas is normal and can vary with the gas flame. During operation there...sound as the dryer operates and the flat spot on every model. Console shown above for an extended period, creating a temporary flat spots smooth out. Load the dryer. (See page 9.) 3. C. D. This noise is normal and will only occur when the gas is supported by electric solenoids. Select...
... 9, pages 10-12 and page 18.) 4. At times there may be a thumping or rolling sound when the dryer starts. This is controlled by electric solenoids. GAS VALVE (Gas models only.) The flow of gas is normal and can vary with the gas flame. During operation there...sound as the dryer operates and the flat spot on every model. Console shown above for an extended period, creating a temporary flat spots smooth out. Load the dryer. (See page 9.) 3. C. D. This noise is normal and will only occur when the gas is supported by electric solenoids. Select...
Complete Owner's Guide (English)
Page 12
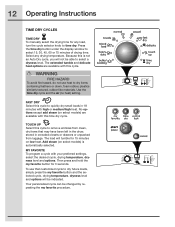
... cycle can be indicated. Because this cycle. WARNING FIRE HAZARD To avoid fire hazard, do not use that may have been left in the dryer, stored in 18 minutes with this cycle to select a dryness level. TOUCH UP Select this time dry cycle. Use the time dry cycle and the... air (no heat) setting. The load will tumble for 15 minutes on select models) is not an Auto Dry cycle, you will be changed by repeating the my favorite procedure. 12 Operating Instructions TIME DRY CYCLES TIME DRY To...
... cycle can be indicated. Because this cycle. WARNING FIRE HAZARD To avoid fire hazard, do not use that may have been left in the dryer, stored in 18 minutes with this cycle to select a dryness level. TOUCH UP Select this time dry cycle. Use the time dry cycle and the... air (no heat) setting. The load will tumble for 15 minutes on select models) is not an Auto Dry cycle, you will be changed by repeating the my favorite procedure. 12 Operating Instructions TIME DRY CYCLES TIME DRY To...
Complete Owner's Guide (English)
Page 16
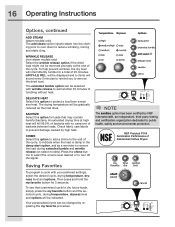
...press and hold the my favorite button for loads that customized cycle to remove the load during extended tumble and wrinkle release (on select models). To help prevent wrinkles, the dry load will be indicated. DELICATE HEAT Select this option to add a chime to the end ... and options. An extended drying time at the end of Residential Clothes Dryers Saving Favorites To program a cycle with no carryover of tumbling without heat. 16 Operating Instructions Options, continued ADD STEAM (steam models only) The add steam option injects steam into the clothing prior to cool...
...press and hold the my favorite button for loads that customized cycle to remove the load during extended tumble and wrinkle release (on select models). To help prevent wrinkles, the dry load will be indicated. DELICATE HEAT Select this option to add a chime to the end ... and options. An extended drying time at the end of Residential Clothes Dryers Saving Favorites To program a cycle with no carryover of tumbling without heat. 16 Operating Instructions Options, continued ADD STEAM (steam models only) The add steam option injects steam into the clothing prior to cool...
Complete Owner's Guide (English)
Page 18
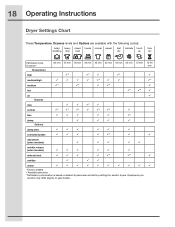
... min 15 min 15-75 min 9* 9* 9 9* 9 9 9 9 9 9* 9 9 9* 9* 9* 9 9* 9 9* 9* 9 9 9 9 9* 9 9* 9* 9* 9 9* 9* 9 9 9 9 9 9 9* 9 9 9 9 9 9 9 9 9 9 9 9 9 9 9* 9 9 add steam (select models) 9 9 9 9 9 wrinkle release (select models) 9 9 9 9 9 9 delicate heat 9 9 9 9 9* 9* 9 sanitize 9 9 9 chime 9 9 9 9 9 9 9 9 9 9 * Factory presets 9Available selections **Estimated cycle duration is based on gas models. Displayed cycle duration may differ slightly on default dryness level and factory settings for electric dryers.
... min 15 min 15-75 min 9* 9* 9 9* 9 9 9 9 9 9* 9 9 9* 9* 9* 9 9* 9 9* 9* 9 9 9 9 9* 9 9* 9* 9* 9 9* 9* 9 9 9 9 9 9 9* 9 9 9 9 9 9 9 9 9 9 9 9 9 9 9* 9 9 add steam (select models) 9 9 9 9 9 wrinkle release (select models) 9 9 9 9 9 9 delicate heat 9 9 9 9 9* 9* 9 sanitize 9 9 9 chime 9 9 9 9 9 9 9 9 9 9 * Factory presets 9Available selections **Estimated cycle duration is based on gas models. Displayed cycle duration may differ slightly on default dryness level and factory settings for electric dryers.
Complete Owner's Guide (English)
Page 21
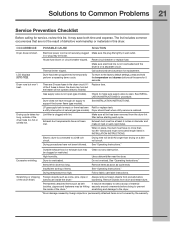
... both time and expense. Drying temperature too high. OCCURRENCE POSSIBLE CAUSE SOLUTION Dryer does not start. Make sure electrical line is not overloaded and the dryer is open (gas models). See INSTALLATION INSTRUCTIONS. Excessive wrinkling. Scratching or chipping Foreign objects such as... Checklist Before calling for 5 seconds. Use a dehumidifier near the dryer. To return to temporarily perform a repeating demo cycle. Drying time will not operate. (electric models) Gas supply valve is not securely plugged Make sure the plug fits...
... both time and expense. Drying temperature too high. OCCURRENCE POSSIBLE CAUSE SOLUTION Dryer does not start. Make sure electrical line is not overloaded and the dryer is open (gas models). See INSTALLATION INSTRUCTIONS. Excessive wrinkling. Scratching or chipping Foreign objects such as... Checklist Before calling for 5 seconds. Use a dehumidifier near the dryer. To return to temporarily perform a repeating demo cycle. Drying time will not operate. (electric models) Gas supply valve is not securely plugged Make sure the plug fits...
Installation Instructions (All Languages)
Page 9
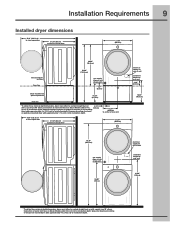
...dryer adds approximately 1.7 in . (9.5cm) (2 cm) to installation depth. Connection of water inlet hose on Steam Models adds 3/4 in . (4.3 cm) to installation depth. 13.50" (34.5cm) to center of rear vent 50.6" (128.5cm)* to clear open door 31.50" (80cm)* to front of closed door 27.00" (68.5cm) electrical..." (192.5cm) gas supply pipe on rear of gas unit 39.00" (99cm) electrical supply on rear of unit centerline height for rear vent 41.00" (104cm) * To obtain these minimal depth dimensions, dryer must either be vented straight back or with a quick-turn 90° elbow. Upward or...
...dryer adds approximately 1.7 in . (9.5cm) (2 cm) to installation depth. Connection of water inlet hose on Steam Models adds 3/4 in . (4.3 cm) to installation depth. 13.50" (34.5cm) to center of rear vent 50.6" (128.5cm)* to clear open door 31.50" (80cm)* to front of closed door 27.00" (68.5cm) electrical..." (192.5cm) gas supply pipe on rear of gas unit 39.00" (99cm) electrical supply on rear of unit centerline height for rear vent 41.00" (104cm) * To obtain these minimal depth dimensions, dryer must either be vented straight back or with a quick-turn 90° elbow. Upward or...
Installation Instructions (All Languages)
Page 15
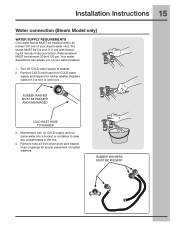
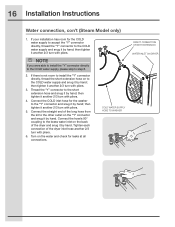
...MUST be between 30 and 120 psi. Your water department can advise you of your water pressure. 1. Remove COLD inlet hose from dryer drum and inspect hose couplings for proper placement of rubber washers. Momentarily turn on COLD supply and run some water into a bucket... be 3/4 inch (1.9 cm) with threading for rubber washer. Installation Instructions 15 Water connection (Steam Model only) WATER SUPPLY REQUIREMENTS Cold water faucet MUST be installed within 42 inches (107 cm) of your dryer's water inlet. RUBBER WASHER MUST BE PRESENT AND UNDAMAGED COLD INLET HOSE TO WASHER 3.
...MUST be between 30 and 120 psi. Your water department can advise you of your water pressure. 1. Remove COLD inlet hose from dryer drum and inspect hose couplings for proper placement of rubber washers. Momentarily turn on COLD supply and run some water into a bucket... be 3/4 inch (1.9 cm) with threading for rubber washer. Installation Instructions 15 Water connection (Steam Model only) WATER SUPPLY REQUIREMENTS Cold water faucet MUST be installed within 42 inches (107 cm) of your dryer's water inlet. RUBBER WASHER MUST BE PRESENT AND UNDAMAGED COLD INLET HOSE TO WASHER 3.
Installation Instructions (All Languages)
Page 16
... supply and snug it by hand; then tighten it another 2/3 turn with pliers. 5. then tighten it another 2/3 turn with pliers. 4. Tighten each connection of the dryer inlet hose another 2/3 turn with pliers. 3. Connect the hose's 90° coupling to the COLD water supply and snug it by hand; If there is... on the water and check for the washer to the short extension hose and snug it by hand; 16 Installation Instructions Water connection, con't (Steam Model only) 1. then tighten it another 2/3 turn with pliers. 6.
... supply and snug it by hand; then tighten it another 2/3 turn with pliers. 5. then tighten it another 2/3 turn with pliers. 4. Tighten each connection of the dryer inlet hose another 2/3 turn with pliers. 3. Connect the hose's 90° coupling to the COLD water supply and snug it by hand; If there is... on the water and check for the washer to the short extension hose and snug it by hand; 16 Installation Instructions Water connection, con't (Steam Model only) 1. then tighten it another 2/3 turn with pliers. 6.

Installation Instructions (All Languages)
Page 18
... my favorite buttons for use . NOTE Dryer will stay awake for correct cord connection (on electric models), presence of gas supply (on electric models) and presence of air. 18 Installation Instructions WARNING FIRE HAZARD Before operating the dryer, make the necessary corrections before you attempt to use the dryer. 3.Your dryer will exit the Installation Cycle and return...
... my favorite buttons for use . NOTE Dryer will stay awake for correct cord connection (on electric models), presence of gas supply (on electric models) and presence of air. 18 Installation Instructions WARNING FIRE HAZARD Before operating the dryer, make the necessary corrections before you attempt to use the dryer. 3.Your dryer will exit the Installation Cycle and return...
Installation Instructions (All Languages)
Page 24
... stacking kit, you purchased, a kit for the Electrolux Authorized Parts Distributor nearest you may order one . WARNING ELECTRICAL HAZARD Label all wires prior to the dryer. (6287.5.080c"m) (3185.1.000cm" ) LP CONVERSION KIT P/N 134709300 Gas dryers intended for your dryer, contact the source where you purchased your model did not include a stacking kit or you desire...
... stacking kit, you purchased, a kit for the Electrolux Authorized Parts Distributor nearest you may order one . WARNING ELECTRICAL HAZARD Label all wires prior to the dryer. (6287.5.080c"m) (3185.1.000cm" ) LP CONVERSION KIT P/N 134709300 Gas dryers intended for your dryer, contact the source where you purchased your model did not include a stacking kit or you desire...


