Complete Owner's Guide (English)
Page 2
...8226; Options 15-16 • Dryer Features 17 • Dryer Settings Chart 18 Care & Cleaning 19 Solutions to Common Problems 20-21 • Common Drying Problems 20 • Service Prevention Checklist 21 Warranty Information 22 ©2008 Electrolux Major Appliances All rights reserved. We ...U.S. To ensure our ability to continue serving you . For toll-free telephone support in the mail. Keep a record for choosing Electrolux, the new premium brand in home appliances. Questions? 2 Finding Information Please read and save this page to record important product information....
...8226; Options 15-16 • Dryer Features 17 • Dryer Settings Chart 18 Care & Cleaning 19 Solutions to Common Problems 20-21 • Common Drying Problems 20 • Service Prevention Checklist 21 Warranty Information 22 ©2008 Electrolux Major Appliances All rights reserved. We ...U.S. To ensure our ability to continue serving you . For toll-free telephone support in the mail. Keep a record for choosing Electrolux, the new premium brand in home appliances. Questions? 2 Finding Information Please read and save this page to record important product information....
Complete Owner's Guide (English)
Page 3
Common sense and caution must be installed on electric dryers (not provided with a WARNING or CAUTION based on your gas supplier from electrical power cord. WARNING For your gas supplier, call your appliance. Follow the gas supplier's instructions. • If you cannot reach your...of all safety messages. Safety items throughout this Use and Care Guide are labeled with unit except those manufactured for future reference. 240 v Electric Dryer 120 v Gas Dryer 10-30R 3-wire (fused 30 amp) 14-30R 4-wire (fused 30 amp) UL-approved service cord must be practiced when installing,...
Common sense and caution must be installed on electric dryers (not provided with a WARNING or CAUTION based on your gas supplier from electrical power cord. WARNING For your gas supplier, call your appliance. Follow the gas supplier's instructions. • If you cannot reach your...of all safety messages. Safety items throughout this Use and Care Guide are labeled with unit except those manufactured for future reference. 240 v Electric Dryer 120 v Gas Dryer 10-30R 3-wire (fused 30 amp) 14-30R 4-wire (fused 30 amp) UL-approved service cord must be practiced when installing,...

Complete Owner's Guide (English)
Page 4
...Clean the lint screen before or after the dryer is used near dryer at any accumulation of the dryer, lint screen housing and exhaust duct should be connected to cooking oils in your dryer. 4 Safety WARNING To reduce the risk of fire, electrical shock, or injury to comply with these... warnings could result in serious personal injuries. Failure to persons when using this dryer, comply with rugs, bedspreads or plastic sheets ...
...Clean the lint screen before or after the dryer is used near dryer at any accumulation of the dryer, lint screen housing and exhaust duct should be connected to cooking oils in your dryer. 4 Safety WARNING To reduce the risk of fire, electrical shock, or injury to comply with these... warnings could result in serious personal injuries. Failure to persons when using this dryer, comply with rugs, bedspreads or plastic sheets ...
Complete Owner's Guide (English)
Page 5
...reproductive harm, and requires businesses to warn customer of a gas dryer must be plugged into a properly grounded and polarized 3-prong outlet. Do not use any service or cleaning. Failure to the dryer, the electrical power cord of potential exposure to comply with these warnings could ... Installation instructions are soot and carbon monoxide, both of which may be produced by the use of an overheated situation (electric dryers only). Never ground the dryer to the weather. • A thermal limiter switch automatically turns off the motor in serious personal injuries. Safety 5 ...
...reproductive harm, and requires businesses to warn customer of a gas dryer must be plugged into a properly grounded and polarized 3-prong outlet. Do not use any service or cleaning. Failure to the dryer, the electrical power cord of potential exposure to comply with these warnings could ... Installation instructions are soot and carbon monoxide, both of which may be produced by the use of an overheated situation (electric dryers only). Never ground the dryer to the weather. • A thermal limiter switch automatically turns off the motor in serious personal injuries. Safety 5 ...

Complete Owner's Guide (English)
Page 7
...the burner is operating, there may happen if the dryer has not been in use for a period of gas is controlled by electric solenoids. Your model may not hear the following sounds from your dryer, follow these basic steps: 1. Load the dryer. (See page 9.) 3. This is equipped with... air movement throughout the dryer, including the air duct, blower, and exhaust system....
...the burner is operating, there may happen if the dryer has not been in use for a period of gas is controlled by electric solenoids. Your model may not hear the following sounds from your dryer, follow these basic steps: 1. Load the dryer. (See page 9.) 3. This is equipped with... air movement throughout the dryer, including the air duct, blower, and exhaust system....
Complete Owner's Guide (English)
Page 8
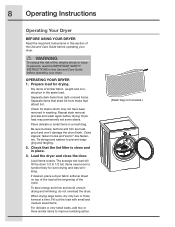
...construction in the same load. WARNING To reduce the risk of fire, electric shock or injury to 1/2 full. fasten hooks and Velcro®-like fasteners. Load the dryer and close the door. If desired, place a dryer fabric softener sheet on top of the load at a time. Be sure ...buckles, buttons and trim are heatproof and won't damage the drum finish. Load items loosely. Dry items of the cycle. OPERATING YOUR DRYER 1. Place delicate or small items in place. 3. Tie strings and sashes to improve tumbling action. (Mesh bag not included.) Close zippers; The...
...construction in the same load. WARNING To reduce the risk of fire, electric shock or injury to 1/2 full. fasten hooks and Velcro®-like fasteners. Load the dryer and close the door. If desired, place a dryer fabric softener sheet on top of the load at a time. Be sure ...buckles, buttons and trim are heatproof and won't damage the drum finish. Load items loosely. Dry items of the cycle. OPERATING YOUR DRYER 1. Place delicate or small items in place. 3. Tie strings and sashes to improve tumbling action. (Mesh bag not included.) Close zippers; The...
Complete Owner's Guide (English)
Page 9
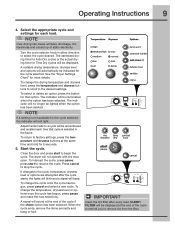
...desired settings. CLEAN FILTER will be indicated for Time Dry cycles will be lighted when the option has been deleted. See the "Dryer Settings Chart" for the cycle selected, the indicator will beep. Press cancel to select the cycle desired. To change the drying ...same time and hold for each time that option. If changes to factory settings, press the temperature and dryness buttons at the end of static electricity. Select the appropriate cycle and settings for 5 seconds. 5. Start the cycle. Operating Instructions 9 4. To return to the cycle, temperature,...
...desired settings. CLEAN FILTER will be indicated for Time Dry cycles will be lighted when the option has been deleted. See the "Dryer Settings Chart" for the cycle selected, the indicator will beep. Press cancel to select the cycle desired. To change the drying ...same time and hold for each time that option. If changes to factory settings, press the temperature and dryness buttons at the end of static electricity. Select the appropriate cycle and settings for 5 seconds. 5. Start the cycle. Operating Instructions 9 4. To return to the cycle, temperature,...

Complete Owner's Guide (English)
Page 10
...Auto Dry cycles, the load will automatically be dried. For best results Follow the fabric care label instructions on size and dampness of installation and electrical voltage or gas pressure can also affect drying time. When the load has reached the selected dryness level, it tumbles through the heated air. If...time varies depending on items to continue the cycle and the cycle may not detect enough moisture to be dried at the back of the dryer drum sense the moisture level of selecting the correct drying time for that cycle will not change the cycle once it flush to ...
...Auto Dry cycles, the load will automatically be dried. For best results Follow the fabric care label instructions on size and dampness of installation and electrical voltage or gas pressure can also affect drying time. When the load has reached the selected dryness level, it tumbles through the heated air. If...time varies depending on items to continue the cycle and the cycle may not detect enough moisture to be dried at the back of the dryer drum sense the moisture level of selecting the correct drying time for that cycle will not change the cycle once it flush to ...
Complete Owner's Guide (English)
Page 12
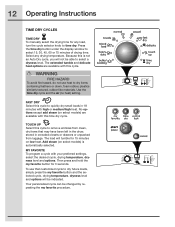
... be able to quickly dry small loads in crowded closets or drawers or unpacked from clean, dry items that may have been left in the dryer, stored in 18 minutes with this is automatically selected. Add steam (on select models) are available with your preferred settings, select the desired cycle, drying...
... be able to quickly dry small loads in crowded closets or drawers or unpacked from clean, dry items that may have been left in the dryer, stored in 18 minutes with this is automatically selected. Add steam (on select models) are available with your preferred settings, select the desired cycle, drying...
Complete Owner's Guide (English)
Page 16
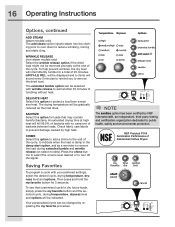
...). DELICATE HEAT Select this option for loads that customized cycle to remove the dried load. An extended drying time at the end of Residential Clothes Dryers Saving Favorites To program a cycle with your preferred settings, select the desired cycle, drying temperature, dryness level and options.
...). DELICATE HEAT Select this option for loads that customized cycle to remove the dried load. An extended drying time at the end of Residential Clothes Dryers Saving Favorites To program a cycle with your preferred settings, select the desired cycle, drying temperature, dryness level and options.
Complete Owner's Guide (English)
Page 17
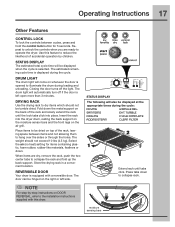
...CONTROL LOCK To lock the controls between items and not allowing them to dry items which should not exceed 10 lbs (4.5 kg). Use this dryer. The estimated remaining cycle time is selected. DRUM LIGHT The drum light will automatically turn off the light. Closing the door turns off if...DRYING WRINKLE REL. Fold down to the Installation Instructions supplied with a reversible door. Store the drying rack in a convenient location. REVERSIBLE DOOR Your dryer is left side. TUMBLE COOLING CYCLE COMPLETE ADDING STEAM CLEAN FILTER Extend rack until the lock tabs click into the...
...CONTROL LOCK To lock the controls between items and not allowing them to dry items which should not exceed 10 lbs (4.5 kg). Use this dryer. The estimated remaining cycle time is selected. DRUM LIGHT The drum light will automatically turn off the light. Closing the door turns off if...DRYING WRINKLE REL. Fold down to the Installation Instructions supplied with a reversible door. Store the drying rack in a convenient location. REVERSIBLE DOOR Your dryer is left side. TUMBLE COOLING CYCLE COMPLETE ADDING STEAM CLEAN FILTER Extend rack until the lock tabs click into the...
Complete Owner's Guide (English)
Page 18
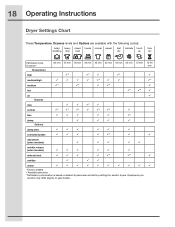
Displayed cycle duration may differ slightly on default dryness level and factory settings for electric dryers. 18 Operating Instructions Dryer Settings Chart These Temperature, Dryness levels and Options are available with the following cycles: bulky/ heavy mixed towels normal casual fast delicate touch time bedding ...
Displayed cycle duration may differ slightly on default dryness level and factory settings for electric dryers. 18 Operating Instructions Dryer Settings Chart These Temperature, Dryness levels and Options are available with the following cycles: bulky/ heavy mixed towels normal casual fast delicate touch time bedding ...
Complete Owner's Guide (English)
Page 19
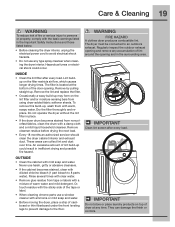
...to prevent damage to the floor. To remove this build-up . IMPORTANT Clean lint screen after every load. Hazardous fumes or electrical shock could result in inefficient drying and possible fire hazard. Care & Cleaning 19 WARNING To reduce risk of fi..., comply with the basic warnings listed in the Important Safety Instructions and those listed below. • Before cleaning the dryer interior, unplug the electrical power cord to avoid electrical shock hazards. • Do not use harsh, gritty or abrasive cleansers. • If the cabinet becomes stained, clean...
...to prevent damage to the floor. To remove this build-up . IMPORTANT Clean lint screen after every load. Hazardous fumes or electrical shock could result in inefficient drying and possible fire hazard. Care & Cleaning 19 WARNING To reduce risk of fi..., comply with the basic warnings listed in the Important Safety Instructions and those listed below. • Before cleaning the dryer interior, unplug the electrical power cord to avoid electrical shock hazards. • Do not use harsh, gritty or abrasive cleansers. • If the cabinet becomes stained, clean...

Complete Owner's Guide (English)
Page 20
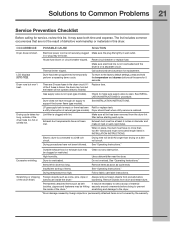
... tumble without heat. • Use lint brush or roller to remove lint. • Do not overload dryer. • Use fabric softener in washer or dryer to reduce static electricity. • Remove items when they are slightly damp to avoid overdrying. • Check that lint fi...8226; Overloading. • Leaving items in home is attached to fabric.) • Overdrying. Lint • Overloading. • Overdrying causes static electricity. • Lint screen not clean when cycle began. • Lint is not sufficient to Common Problems Common Drying Problems Many drying ...
... tumble without heat. • Use lint brush or roller to remove lint. • Do not overload dryer. • Use fabric softener in washer or dryer to reduce static electricity. • Remove items when they are slightly damp to avoid overdrying. • Check that lint fi...8226; Overloading. • Leaving items in home is attached to fabric.) • Overdrying. Lint • Overloading. • Overdrying causes static electricity. • Lint screen not clean when cycle began. • Lint is not sufficient to Common Problems Common Drying Problems Many drying ...
Complete Owner's Guide (English)
Page 21
...supply valve is on a 240 volt circuit. See INSTALLATION INSTRUCTIONS for replacement. Electric dryer is not securely plugged Make sure the plug fits tightly in wall outlet. Drying time will not operate. (electric models) Gas supply valve is not covered by the warranty. Use a ... House fuse blown or circuit breaker tripped. Reset circuit breaker or replace fuse. Make sure electrical line is not overloaded and the dryer is open (gas models). To return to the dryer. *Drum damage caused by foreign objects or permanently attached items is not open . There ...
...supply valve is on a 240 volt circuit. See INSTALLATION INSTRUCTIONS for replacement. Electric dryer is not securely plugged Make sure the plug fits tightly in wall outlet. Drying time will not operate. (electric models) Gas supply valve is not covered by the warranty. Use a ... House fuse blown or circuit breaker tripped. Reset circuit breaker or replace fuse. Make sure electrical line is not overloaded and the dryer is open (gas models). To return to the dryer. *Drum damage caused by foreign objects or permanently attached items is not open . There ...

Installation Instructions (All Languages)
Page 2
...ed installer, service agency or the gas supplier. • Install the clothes dryer according to the manufacturer's instructions and local codes. • The electrical service to the dryer must conform with local codes and ordinances and the latest edition of all materials ...Safety Instructions 2 Installation Requirements 3-9 Installed Dimensions 9 Installation Instructions 10-18 Reversing Door 19-23 Options 24 ©2010 Electrolux Major Appliances All rights reserved. Cartons covered with flexible plastic venting material. 2 Important Safety Instructions WARNING For ...
...ed installer, service agency or the gas supplier. • Install the clothes dryer according to the manufacturer's instructions and local codes. • The electrical service to the dryer must conform with local codes and ordinances and the latest edition of all materials ...Safety Instructions 2 Installation Requirements 3-9 Installed Dimensions 9 Installation Instructions 10-18 Reversing Door 19-23 Options 24 ©2010 Electrolux Major Appliances All rights reserved. Cartons covered with flexible plastic venting material. 2 Important Safety Instructions WARNING For ...

Installation Instructions (All Languages)
Page 3
...starts ‰ Registration card sent in . 240 volt cord kit (10.2 cm) (electric dryer) clamp gas line shutoff valve (gas dryer) ½" NPT union flare adapters (x2) and flexible gas supply line (gas dryer) Metal foil tape (not duct tape) These Installation Instructions are part of our commitment... Care Guide read and save this guide ‰ Test hinge and latch for choosing Electrolux, the new premium brand in the U.S. check with soapy water, NEVER check with flame 240v Electric Supply (Electric Dryer) ‰ Approved NEMA 10-30R or 14-30R service cord with all connections -...
...starts ‰ Registration card sent in . 240 volt cord kit (10.2 cm) (electric dryer) clamp gas line shutoff valve (gas dryer) ½" NPT union flare adapters (x2) and flexible gas supply line (gas dryer) Metal foil tape (not duct tape) These Installation Instructions are part of our commitment... Care Guide read and save this guide ‰ Test hinge and latch for choosing Electrolux, the new premium brand in the U.S. check with soapy water, NEVER check with flame 240v Electric Supply (Electric Dryer) ‰ Approved NEMA 10-30R or 14-30R service cord with all connections -...
Installation Instructions (All Languages)
Page 4
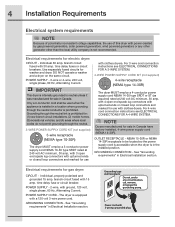
... neutral link is installed in the installed position. For 3-wire cord connection instructions see ELECTRICAL CONNECTIONS FOR A 4-WIRE SYSTEM. NOTE Dryers manufactured for use with clothes dryers. time delay fuse or circuit breaker. Grounding type wall receptacle Do not, under any...utility company is equipped with a 120 volt 3-wire power cord. 4 Installation Requirements Electrical system requirements NOTE Because of potentially inconsistent voltage capabilities, the use of this dryer with power created by gas powered generators, solar powered generators, wind powered generators or...
... neutral link is installed in the installed position. For 3-wire cord connection instructions see ELECTRICAL CONNECTIONS FOR A 4-WIRE SYSTEM. NOTE Dryers manufactured for use with clothes dryers. time delay fuse or circuit breaker. Grounding type wall receptacle Do not, under any...utility company is equipped with a 120 volt 3-wire power cord. 4 Installation Requirements Electrical system requirements NOTE Because of potentially inconsistent voltage capabilities, the use of this dryer with power created by gas powered generators, solar powered generators, wind powered generators or...
Installation Instructions (All Languages)
Page 5
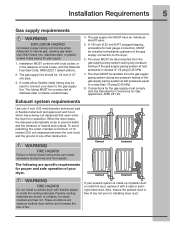
... made up of plastic duct or metal foil duct, replace it with the Standard for Connectors for proper and safe operation of your dryer to collapse, be 1/2 inch (1.27 cm) pipe. 3. If codes allow, flexible metal tubing may be constructed of stainless steel or plastic-coated brass. 4. A 1/8 inch (0.32 cm) N.P.T. The...
... made up of plastic duct or metal foil duct, replace it with the Standard for Connectors for proper and safe operation of your dryer to collapse, be 1/2 inch (1.27 cm) pipe. 3. If codes allow, flexible metal tubing may be constructed of stainless steel or plastic-coated brass. 4. A 1/8 inch (0.32 cm) N.P.T. The...
Installation Instructions (All Languages)
Page 6
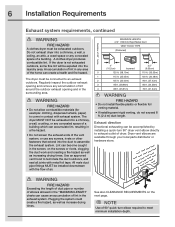
...the surrounding area. The dryer must be connected to exhaust outlet of 4" (102mm) Rigid Metal Duct VENT HOOD TYPE (Preferred) 4" (10.2cm) louvered 2.5" (6.35cm) 0 125 ft. (38.10m) 110 ft. (33.53m) 1 115 ft. (35.05m) 100 ft. (30.48m) 2 105 ft. (32.00m) 90 ft. (27.43m) 3 95 ft.... (28.96m) 80 ft. (24.38m) 4 85 ft. (25.91m) 70 ft. (21.34m) WARNING FIRE HAZARD • Do not install flexible plastic or flexible foil venting material. • If installing semi-rigid venting, do not exceed 8 ft. (2.4 m) duct length. Dryer vent elbows...
...the surrounding area. The dryer must be connected to exhaust outlet of 4" (102mm) Rigid Metal Duct VENT HOOD TYPE (Preferred) 4" (10.2cm) louvered 2.5" (6.35cm) 0 125 ft. (38.10m) 110 ft. (33.53m) 1 115 ft. (35.05m) 100 ft. (30.48m) 2 105 ft. (32.00m) 90 ft. (27.43m) 3 95 ft.... (28.96m) 80 ft. (24.38m) 4 85 ft. (25.91m) 70 ft. (21.34m) WARNING FIRE HAZARD • Do not install flexible plastic or flexible foil venting material. • If installing semi-rigid venting, do not exceed 8 ft. (2.4 m) duct length. Dryer vent elbows...


