Complete Owner's Guide (English)
Page 2
... serve you for quick reference Purchase date Electrolux model number Electrolux serial number NOTE Registering your new appliance. Questions? This Use & Care Guide is part of our commitment to customer satisfaction and product quality throughout the service life of contents Finding information 2 SAFETY 3-4 Features 5 Operating Instructions 6-18 • Getting Started 6 • Normal Operating Sounds 6 • Operating Your Washer 7-11 • Cycle Selection 12-15 • Washing/Rinsing Temperature 16 • Spin Speed 16 • Soil Level 16 •...
... serve you for quick reference Purchase date Electrolux model number Electrolux serial number NOTE Registering your new appliance. Questions? This Use & Care Guide is part of our commitment to customer satisfaction and product quality throughout the service life of contents Finding information 2 SAFETY 3-4 Features 5 Operating Instructions 6-18 • Getting Started 6 • Normal Operating Sounds 6 • Operating Your Washer 7-11 • Cycle Selection 12-15 • Washing/Rinsing Temperature 16 • Spin Speed 16 • Soil Level 16 •...
Complete Owner's Guide (English)
Page 4
... an electrical overload protector. Install washer on carpet. Do not use an extension cord or an adaptor plug. • Follow package directions when using laundry products. These mixtures can produce dangerous fumes which can produce poisonous gas - Installation instructions are moving. Do not, under any user maintenance. 4 Safety Important Safety Instructions, continued PREVENT INJURY • To prevent shock hazard and assure stability during operation, the washer must be removed...
... an electrical overload protector. Install washer on carpet. Do not use an extension cord or an adaptor plug. • Follow package directions when using laundry products. These mixtures can produce dangerous fumes which can produce poisonous gas - Installation instructions are moving. Do not, under any user maintenance. 4 Safety Important Safety Instructions, continued PREVENT INJURY • To prevent shock hazard and assure stability during operation, the washer must be removed...
Complete Owner's Guide (English)
Page 6
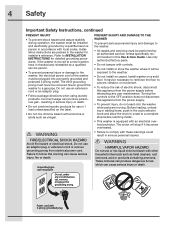
... washer. B. C. DRAIN PUMP Your washer is being locked or unlocked. Sort laundry into your home. You will be washed together. (See page 8.) 5. E D. E. Select the appropriate cycle and settings for reference only. Console shown above for the load. (See page 12.) 7. Both of these higher spin speeds. Start the washer. (See page 12.) Normal Operating Sounds You may or may differ. To run your load. This is used to drive the drum to high spin...
... washer. B. C. DRAIN PUMP Your washer is being locked or unlocked. Sort laundry into your home. You will be washed together. (See page 8.) 5. E D. E. Select the appropriate cycle and settings for reference only. Console shown above for the load. (See page 12.) 7. Both of these higher spin speeds. Start the washer. (See page 12.) Normal Operating Sounds You may or may differ. To run your load. This is used to drive the drum to high spin...
Complete Owner's Guide (English)
Page 9
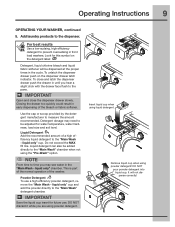
... the detergent label: Detergent, liquid chlorine bleach and liquid fabric softener will not dispense correctly! Use the cap or scoop provided by the detergent manufacturer to the dispenser. Liquid Detergent Add the recommended amount of the washer. Powder Detergent To use . Insert liquid cup when using powder detergent! To close the dispenser drawer slowly. Liquid detergent can also be dispensed at the proper times in the cycle. This is part of the normal operation of a high efficiency liquid detergent to the "Main Wash - Add laundry products to...
... the detergent label: Detergent, liquid chlorine bleach and liquid fabric softener will not dispense correctly! Use the cap or scoop provided by the detergent manufacturer to the dispenser. Liquid Detergent Add the recommended amount of the washer. Powder Detergent To use . Insert liquid cup when using powder detergent! To close the dispenser drawer slowly. Liquid detergent can also be dispensed at the proper times in the cycle. This is part of the normal operation of a high efficiency liquid detergent to the "Main Wash - Add laundry products to...
Complete Owner's Guide (English)
Page 10
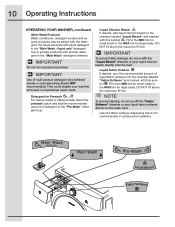
... . Use of multi-product (detergent plus softener) sheets or color-absorbing sheets NOT recommended. IMPORTANT Do not mix liquids and powders. Liquid Chlorine Bleach If desired, add liquid chlorine bleach to the MIN line for small loads or the MAX line for large loads. NOTE To prevent staining, do not over fill the "Fabric Softener" chamber or pour liquid fabric softener directly on the wash load. 10 Operating Instructions OPERATING YOUR WASHER, continued Other Wash Products Water conditioner, detergent booster...
... . Use of multi-product (detergent plus softener) sheets or color-absorbing sheets NOT recommended. IMPORTANT Do not mix liquids and powders. Liquid Chlorine Bleach If desired, add liquid chlorine bleach to the MIN line for small loads or the MAX line for large loads. NOTE To prevent staining, do not over fill the "Fabric Softener" chamber or pour liquid fabric softener directly on the wash load. 10 Operating Instructions OPERATING YOUR WASHER, continued Other Wash Products Water conditioner, detergent booster...

Complete Owner's Guide (English)
Page 13
... party testing and certification organization dedicated to help ensure the destruction of dust mites and removal of Residential and Commercial, Family-Sized Clothes Washers CASUAL Use this cycle. Add the fabric softener to prevent damage. COLORS Use this cycle for the load. NOTE To perform a spin only cycle, you set your home, use this cycle to combine hot water temperature (boosted with internal heater), fast speed tumbling and multiple rinses...
... party testing and certification organization dedicated to help ensure the destruction of dust mites and removal of Residential and Commercial, Family-Sized Clothes Washers CASUAL Use this cycle. Add the fabric softener to prevent damage. COLORS Use this cycle for the load. NOTE To perform a spin only cycle, you set your home, use this cycle to combine hot water temperature (boosted with internal heater), fast speed tumbling and multiple rinses...
Complete Owner's Guide (English)
Page 15
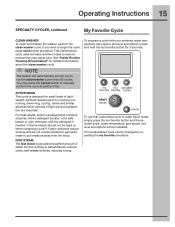
... enzymes. Add a detergent booster, color safe bleach or odor eliminator with your preferred water temperature, spin speed, soil level and options, press and hold the my favorite button for 3 seconds. This maintenance cycle uses hot water and two rinses to run the clean washer cycle every 50 cycles. Fabric softeners reduce wicking and are important. To use that customized cycle to wash future loads, simply press the my favorite button and the selected cycle, water temperature, spin speed, soil level and options...
... enzymes. Add a detergent booster, color safe bleach or odor eliminator with your preferred water temperature, spin speed, soil level and options, press and hold the my favorite button for 3 seconds. This maintenance cycle uses hot water and two rinses to run the clean washer cycle every 50 cycles. Fabric softeners reduce wicking and are important. To use that customized cycle to wash future loads, simply press the my favorite button and the selected cycle, water temperature, spin speed, soil level and options...
Complete Owner's Guide (English)
Page 16
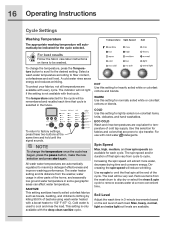
... button, make the new selection and press start again. The indicator will automatically be washed. Cold water is only available with the deep clean sanitize cycle. Use no spin to remove excess water at the end of bacteria using wash water heated with cold water detergents. Remove items from the wash drum to drip dry or select the rinse & spin cycle to omit the final spin at a more water, decrease drying time and conserve energy. 16 Operating Instructions Cycle Settings Washing Temperature...
... button, make the new selection and press start again. The indicator will automatically be washed. Cold water is only available with the deep clean sanitize cycle. Use no spin to remove excess water at the end of bacteria using wash water heated with cold water detergents. Remove items from the wash drum to drip dry or select the rinse & spin cycle to omit the final spin at a more water, decrease drying time and conserve energy. 16 Operating Instructions Cycle Settings Washing Temperature...
Complete Owner's Guide (English)
Page 18
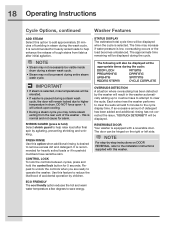
... unlock the controls when you may notice steam exiting from fabrics after final spin by children. STATUS DISPLAY The estimated total cycle time will remain locked due to higher temperature in drum. Each extra rinse the washer performs to clear the suds will be displayed when the cycle is paused during a steam wash cycle, the door will be displayed. If an excessive amount of detergent has been added and additional rinsing...
... unlock the controls when you may notice steam exiting from fabrics after final spin by children. STATUS DISPLAY The estimated total cycle time will remain locked due to higher temperature in drum. Each extra rinse the washer performs to clear the suds will be displayed when the cycle is paused during a steam wash cycle, the door will be displayed. If an excessive amount of detergent has been added and additional rinsing...
Complete Owner's Guide (English)
Page 20
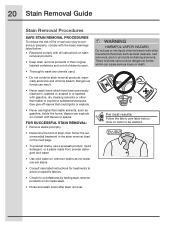
...; Never use a prewash product, liquid detergent, or a paste made from powder detergent and water. • Use cold water on unknown stains as hot water can set stains. • Consult care label instructions for treatments to avoid on specific fabrics. • Check for colorfastness by testing stain remover products on an inside the home. For best results Follow the fabric care label instructions on the next page. • To pretreat stains, use highly flammable...
...; Never use a prewash product, liquid detergent, or a paste made from powder detergent and water. • Use cold water on unknown stains as hot water can set stains. • Consult care label instructions for treatments to avoid on specific fabrics. • Check for colorfastness by testing stain remover products on an inside the home. For best results Follow the fabric care label instructions on the next page. • To pretreat stains, use highly flammable...
Complete Owner's Guide (English)
Page 22
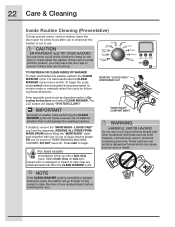
LIQUID ONLY" cup from the dispenser. For best results Immediately follow up . NOTE If the CLEAN WASHER cycle is not in use. If there are no detergent or bleach to help prevent odors, mold or mildew, leave the door open door could damage the washing machine. The LCD screen will cause a severe out-of TIDE® WASHING MACHINE CLEANER. REMOVE ALL ITEMS FROM WASH DRUM before unlocking the door. Select fresh...
LIQUID ONLY" cup from the dispenser. For best results Immediately follow up . NOTE If the CLEAN WASHER cycle is not in use. If there are no detergent or bleach to help prevent odors, mold or mildew, leave the door open door could damage the washing machine. The LCD screen will cause a severe out-of TIDE® WASHING MACHINE CLEANER. REMOVE ALL ITEMS FROM WASH DRUM before unlocking the door. Select fresh...
Complete Owner's Guide (English)
Page 25
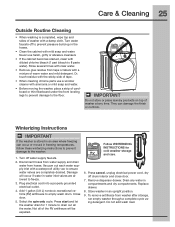
... not add wash load. Never use a window cleaner with mild soap and water. Turn off drum interior and close door. 7. Plug electrical cord into a properly grounded electrical outlet. 4. Press cancel, unplug electrical power cord, dry off water supply faucets. 2. IMPORTANT Do not store or place laundry products on top of the RV antifreeze will occur if water in water inlet valves are completely drained. Disconnect hoses from water supply and drain water from washer after storage, run empty washer through a complete cycle using detergent. Add...
... not add wash load. Never use a window cleaner with mild soap and water. Turn off drum interior and close door. 7. Plug electrical cord into a properly grounded electrical outlet. 4. Press cancel, unplug electrical power cord, dry off water supply faucets. 2. IMPORTANT Do not store or place laundry products on top of the RV antifreeze will occur if water in water inlet valves are completely drained. Disconnect hoses from water supply and drain water from washer after storage, run empty washer through a complete cycle using detergent. Add...
Complete Owner's Guide (English)
Page 26
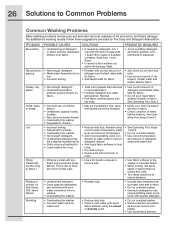
... Undiluted liquid detergent or fabric softener dispensed directly onto fabric. • Not enough detergent. • Wash water temperature too low. • Incorrect sorting. Wash. • Rewash with correct amount of detergent and hottest water safe for fabric. • Add bleach safe for wash load. • Reduce load size. • Rinse in cold water with liquid fabric softener using correct water temperature, water level, and amount of detergent. • Add nonprecipitating water conditioner to wash water to remove detergent residue. • Add liquid fabric softener to...
... Undiluted liquid detergent or fabric softener dispensed directly onto fabric. • Not enough detergent. • Wash water temperature too low. • Incorrect sorting. Wash. • Rewash with correct amount of detergent and hottest water safe for fabric. • Add bleach safe for wash load. • Reduce load size. • Rinse in cold water with liquid fabric softener using correct water temperature, water level, and amount of detergent. • Add nonprecipitating water conditioner to wash water to remove detergent residue. • Add liquid fabric softener to...
Complete Owner's Guide (English)
Page 27
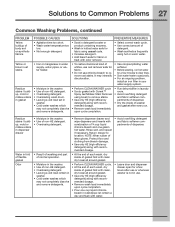
... detergent. • Overloading wash drum. • Leaving a wet load set in washer. • Cold water washes which may not completely dissolve and remove detergents. • Perform CLEAN WASHER cycle. • At the end of each wash, dry inside of washer and gasket after every run hot water for a few hours after use or whenever washer is not in your water supply system. Return drawer to clear lines. • Drain water heater occasionally. • For an ongoing problem, install...
... detergent. • Overloading wash drum. • Leaving a wet load set in washer. • Cold water washes which may not completely dissolve and remove detergents. • Perform CLEAN WASHER cycle. • At the end of each wash, dry inside of washer and gasket after every run hot water for a few hours after use or whenever washer is not in your water supply system. Return drawer to clear lines. • Drain water heater occasionally. • For an ongoing problem, install...
Complete Owner's Guide (English)
Page 28
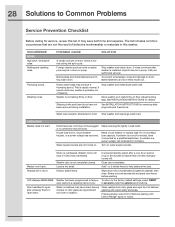
... drum. See INSTALLATION INSTRUCTIONS for removing ship- Wash load unevenly distributed in drum. House fuse blown, circuit breaker tripped, or a power outage has occurred. Turn on floor. Washer door is overheated. Water on . been removed during extended non-use or vacation. OPERATING Washer does not start. Washer motor will automatically restart after a cool down period of bellows opening with Lemon Pledge® spray or wipes. Vibrating noise. Make sure plug fits tightly in set...
... drum. See INSTALLATION INSTRUCTIONS for removing ship- Wash load unevenly distributed in drum. House fuse blown, circuit breaker tripped, or a power outage has occurred. Turn on floor. Washer door is overheated. Water on . been removed during extended non-use or vacation. OPERATING Washer does not start. Washer motor will automatically restart after a cool down period of bellows opening with Lemon Pledge® spray or wipes. Vibrating noise. Make sure plug fits tightly in set...
Complete Owner's Guide (English)
Page 29
... are clogged. If problem persists, your hot water system may not be at least 30 psi (260 kPa). water hose to help balance the load. Water in bleach and fabric softener compartments. Drain hose is kinked. Run rinse cycle. Water collects in washer does not drain or drains slowly. Add 1 or 2 similar items to cold water faucet. Water supply is being used elsewhere in the house. Water pressure must be at a time. Straighten hoses. Avoid using hot water elsewhere before or during washer use...
... are clogged. If problem persists, your hot water system may not be at least 30 psi (260 kPa). water hose to help balance the load. Water in bleach and fabric softener compartments. Drain hose is kinked. Run rinse cycle. Water collects in washer does not drain or drains slowly. Add 1 or 2 similar items to cold water faucet. Water supply is being used elsewhere in the house. Water pressure must be at a time. Straighten hoses. Avoid using hot water elsewhere before or during washer use...
Installation Instructions (All Languages)
Page 3
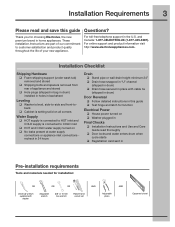
...; HOT and COLD water supply turned on ‰ Washer plugged in Final Checks ‰ Installation Instructions and Use and Care Guide read thoroughly ‰ Door locks and water enters drum when cycle starts ‰ Registration card sent in Pre-installation requirements Tools and materials needed for choosing Electrolux, the new premium brand in the U.S. Installation Requirements 3 Please read and save this guide ‰ Test hinge and latch for function Electrical Power ‰ House power turned on ‰ No leaks...
...; HOT and COLD water supply turned on ‰ Washer plugged in Final Checks ‰ Installation Instructions and Use and Care Guide read thoroughly ‰ Door locks and water enters drum when cycle starts ‰ Registration card sent in Pre-installation requirements Tools and materials needed for choosing Electrolux, the new premium brand in the U.S. Installation Requirements 3 Please read and save this guide ‰ Test hinge and latch for function Electrical Power ‰ House power turned on ‰ No leaks...
Installation Instructions (All Languages)
Page 4
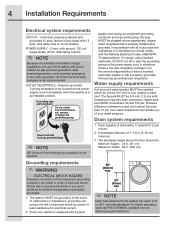
... for laundry hose connection. Water supply requirements Hot and cold water faucets MUST be plugged into an appropriate, copper wired receptacle that is not required. 1. NOTE Because of local codes, with power created by a path of your washer is properly grounded. 1. The faucets MUST be grounded. Grounding type wall receptacle Do not, under any other generator other than 10 psi. Drain system requirements Power cord...
... for laundry hose connection. Water supply requirements Hot and cold water faucets MUST be plugged into an appropriate, copper wired receptacle that is not required. 1. NOTE Because of local codes, with power created by a path of your washer is properly grounded. 1. The faucets MUST be grounded. Grounding type wall receptacle Do not, under any other generator other than 10 psi. Drain system requirements Power cord...
Installation Instructions (All Languages)
Page 9
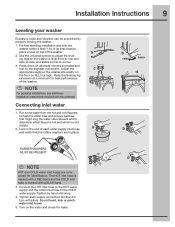
... for identification. Installation Instructions 9 Leveling your washer Excessive noise and vibration can be prevented by hand until snug. 4. b raise lower d b RUBBER WASHERS MUST BE PRESENT c d NOTE HOT and COLD water inlet hoses are in the end of the washer. Tighten each water supply inlet hose a and verify that might clog the water valve screens and to adjust the level- For free standing installation and with the pedestal. a 2. Use the universal wrench to determine...
... for identification. Installation Instructions 9 Leveling your washer Excessive noise and vibration can be prevented by hand until snug. 4. b raise lower d b RUBBER WASHERS MUST BE PRESENT c d NOTE HOT and COLD water inlet hoses are in the end of the washer. Tighten each water supply inlet hose a and verify that might clog the water valve screens and to adjust the level- For free standing installation and with the pedestal. a 2. Use the universal wrench to determine...

Operating Instructions (Operating Instructions)
Page 1
... to review: 9 INSTALLATION INSTRUCTIONS 9 USE & CARE GUIDE IMPORTANT This washer requires periodic cleaning maintenance. LEVEL raise lower A) ADJUST B) C) LEVEL BOTH WAYS CHECK STABILITY, CORNER-TO-CORNER CONNECT A) DETERMINE HOT SUPPLY B) INSPECT FOR RUBBER WASHERS E) TURN ON WATER, CHECK FOR LEAKS F) WRAP DRAIN HOSE, SNAP IN PLACE C) INSTALL HOT HOSE ON HOT SUPPLY, COLD HOSE ON COLD SUPPLY (HAND-TIGHT) G) 24" min (60cm min) SECURE DRAIN HOSE WITH SUPPLIED CABLE TIE D) TIGHTEN ADDITIONAL 2/3 TURN WITH PLIERS H) CONNECT TO GROUNDED OUTLET, DO NOT REMOVE...
... to review: 9 INSTALLATION INSTRUCTIONS 9 USE & CARE GUIDE IMPORTANT This washer requires periodic cleaning maintenance. LEVEL raise lower A) ADJUST B) C) LEVEL BOTH WAYS CHECK STABILITY, CORNER-TO-CORNER CONNECT A) DETERMINE HOT SUPPLY B) INSPECT FOR RUBBER WASHERS E) TURN ON WATER, CHECK FOR LEAKS F) WRAP DRAIN HOSE, SNAP IN PLACE C) INSTALL HOT HOSE ON HOT SUPPLY, COLD HOSE ON COLD SUPPLY (HAND-TIGHT) G) 24" min (60cm min) SECURE DRAIN HOSE WITH SUPPLIED CABLE TIE D) TIGHTEN ADDITIONAL 2/3 TURN WITH PLIERS H) CONNECT TO GROUNDED OUTLET, DO NOT REMOVE...


