
Complete Owner's Guide (English)
Page 3
...food waste disposer. • Do not operate dishwasher unless all enclosure panels are in their proper place as explained in the Installation Instructions provided with a 15 ampere fuse or circuit breaker. This will help alert you to meet commercial sanitization requirements. •...DISHWASHER MUST BE ELECTRICALLY GROUNDED. Items that may occur. Safety 3 Important Safety Instructions Please read all safety instructions before using your new Electrolux dishwasher. • Read all instructions before using your dishwasher. • Use your dishwasher only as instructed in this Use and ...
...food waste disposer. • Do not operate dishwasher unless all enclosure panels are in their proper place as explained in the Installation Instructions provided with a 15 ampere fuse or circuit breaker. This will help alert you to meet commercial sanitization requirements. •...DISHWASHER MUST BE ELECTRICALLY GROUNDED. Items that may occur. Safety 3 Important Safety Instructions Please read all safety instructions before using your new Electrolux dishwasher. • Read all instructions before using your dishwasher. • Use your dishwasher only as instructed in this Use and ...
Complete Owner's Guide (English)
Page 10
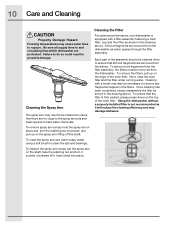
... in property damage. To ensure that all supply lines to and circulating lines within dishwasher are removed from the dishwasher. Using the dishwasher without a properly installed filter is fully seated, please press down on the spray arm lifting off the shaft. Cleaning with a filter assembly featuring a main filter, cup and fine...
... in property damage. To ensure that all supply lines to and circulating lines within dishwasher are removed from the dishwasher. Using the dishwasher without a properly installed filter is fully seated, please press down on the spray arm lifting off the shaft. Cleaning with a filter assembly featuring a main filter, cup and fine...
Complete Owner's Guide (English)
Page 11
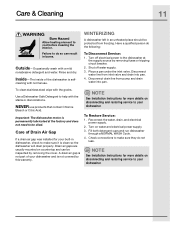
... pump and drain water into pan. 4. NEVER use . A drain air gap is not part of Drain Air Gap If a drain air gap was installed for your dishwasher. Check connections to your dishwasher and is clean so the dishwasher will drain properly. NOTE See... usually mounted on water and electrical power supply. 3. Failure to help with a mild nonabrasive detergent and water. Care of your dishwasher. NOTE See Installation Instructions for more details on disconnecting and restoring service to make sure it is not covered by removing fuses or tripping circuit breaker. 2. Inside-The...
... pump and drain water into pan. 4. NEVER use . A drain air gap is not part of Drain Air Gap If a drain air gap was installed for your dishwasher. Check connections to your dishwasher and is clean so the dishwasher will drain properly. NOTE See... usually mounted on water and electrical power supply. 3. Failure to help with a mild nonabrasive detergent and water. Care of your dishwasher. NOTE See Installation Instructions for more details on disconnecting and restoring service to make sure it is not covered by removing fuses or tripping circuit breaker. 2. Inside-The...
Complete Owner's Guide (English)
Page 12
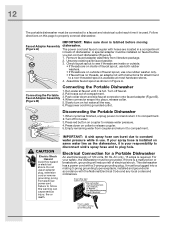
... faucet spout to a non-threaded spout is used. CAUTION Electric Shock Hazard Avoid fire hazard or electrical shock. A special adapter must be installed on hot water all the way. 6.Plug power cord into grounded outlet. Connecting the Portable Dishwasher 1.Run water at most hardware stores. ...pressure. 4.Press down and slip faucet connector onto faucet adapter (Figure B). 4.When connector snaps into a mating 3-prong grounding type receptacle, installed and grounded in use one rubber washer only. • If faucet has no threads, an adapter kit with hoses are on collar ...
... faucet spout to a non-threaded spout is used. CAUTION Electric Shock Hazard Avoid fire hazard or electrical shock. A special adapter must be installed on hot water all the way. 6.Plug power cord into grounded outlet. Connecting the Portable Dishwasher 1.Run water at most hardware stores. ...pressure. 4.Press down and slip faucet connector onto faucet adapter (Figure B). 4.When connector snaps into a mating 3-prong grounding type receptacle, installed and grounded in use one rubber washer only. • If faucet has no threads, an adapter kit with hoses are on collar ...
Complete Owner's Guide (English)
Page 13
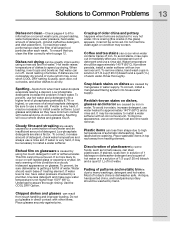
... heating element. This film cannot be sure dishwasher is a cloudy iridescent appearance on dishes are caused by a plumber. If problem persists, install a water softener with other items. Place glasses securely against pins. To avoid iron stain, increase detergent, use a rinse aid. Place ... and use a commercial rust and lime scale remover. Hot water raises temperature of cycle (which may be removed. To correct, install a manganese filtering system into house water supply. To ensure that water can stain plasticware. Low phosphate detergents are not completely dry ...
... heating element. This film cannot be sure dishwasher is a cloudy iridescent appearance on dishes are caused by a plumber. If problem persists, install a water softener with other items. Place glasses securely against pins. To avoid iron stain, increase detergent, use a rinse aid. Place ... and use a commercial rust and lime scale remover. Hot water raises temperature of cycle (which may be removed. To correct, install a manganese filtering system into house water supply. To ensure that water can stain plasticware. Low phosphate detergents are not completely dry ...
Complete Owner's Guide (English)
Page 15
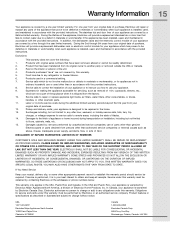
...to the finish of parts other than in -home service costs during transportation or installation, including but not limited to another party or removed outside the USA or Canada. 3. ELECTROLUX SHALL NOT BE LIABLE FOR CONSEQUENTIAL OR INCIDENTAL DAMAGES SUCH AS PROPERTY DAMAGE AND... addition, the dishwasher racks and the electronic control module of the appliance, Electrolux will provide a replacement dishwasher rack or electronic control module for servicing, such as -is shipped from your appliance is installed, used, and maintained in the USA, Puerto Rico and Canada. Expenses ...
...to the finish of parts other than in -home service costs during transportation or installation, including but not limited to another party or removed outside the USA or Canada. 3. ELECTROLUX SHALL NOT BE LIABLE FOR CONSEQUENTIAL OR INCIDENTAL DAMAGES SUCH AS PROPERTY DAMAGE AND... addition, the dishwasher racks and the electronic control module of the appliance, Electrolux will provide a replacement dishwasher rack or electronic control module for servicing, such as -is shipped from your appliance is installed, used, and maintained in the USA, Puerto Rico and Canada. Expenses ...
Wiring Diagram (English Español Français)
Page 1
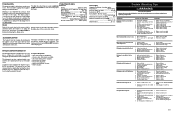
.... 5. Wiring or terminal defective. 1. Defective water inlet fill valve. 3. Check fill valve screen for blockage, clear. 5. Electronic control board defective. 6. Replace pump. 4. Repair or replace. 5. Install air gap at dishwasher junction box. 3. See "Detergent cover will not heat. 1. Instruct customer/user. 2. The drain check valve is driven by a synchronous motor. Voltage...
.... 5. Wiring or terminal defective. 1. Defective water inlet fill valve. 3. Check fill valve screen for blockage, clear. 5. Electronic control board defective. 6. Replace pump. 4. Repair or replace. 5. Install air gap at dishwasher junction box. 3. See "Detergent cover will not heat. 1. Instruct customer/user. 2. The drain check valve is driven by a synchronous motor. Voltage...
Installation Instructions (English)
Page 1
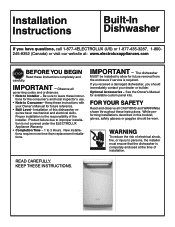
...Observe all CAUTIONS and WARNINGs shown throughout these instructions with your dealer or builder. Installation of installation. Product failure due to improper installation is the responsibility of the installer. READ CAREFULLY. tions for future reference. • Skill Level- Keep these instructions..., fire, or injury to 3 Hours. IMPORTANT - Be sure to Installer - Proper installation is not covered under the ELECTROLUX Appliance Warranty. • Completion Time - 1 to persons, the installer must ensure that the dishwasher is required. The dishwasher MUST be worn...
...Observe all CAUTIONS and WARNINGs shown throughout these instructions with your dealer or builder. Installation of installation. Product failure due to improper installation is the responsibility of the installer. READ CAREFULLY. tions for future reference. • Skill Level- Keep these instructions..., fire, or injury to 3 Hours. IMPORTANT - Be sure to Installer - Proper installation is not covered under the ELECTROLUX Appliance Warranty. • Completion Time - 1 to persons, the installer must ensure that the dishwasher is required. The dishwasher MUST be worn...
Installation Instructions (English)
Page 2
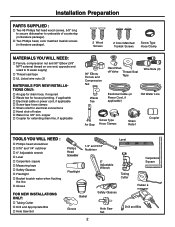
...on one end, opposite end sized to fit water supply) … Thread seal tape … UL Listed wire nuts (3) MATERIALS FOR NEW INSTALLATIONS ONLY: … Air gap for drain hose, if required … Waste tee for house plumbing, if applicable … Electrical cable or power...; Carpenters square … Measuring tape … Safety Glasses … Flashlight … Bucket tocatch water when flushing the line … Gloves FOR NEW INSTALLATIONS ONLY: … Tubing Cutter … Drill and Appropriate Bits … Hole Saw Set Phillips Head Screwdriver Flashlight 1/4" and 5/16" Nutdriver 6" Adjustable ...
...on one end, opposite end sized to fit water supply) … Thread seal tape … UL Listed wire nuts (3) MATERIALS FOR NEW INSTALLATIONS ONLY: … Air gap for drain hose, if required … Waste tee for house plumbing, if applicable … Electrical cable or power...; Carpenters square … Measuring tape … Safety Glasses … Flashlight … Bucket tocatch water when flushing the line … Gloves FOR NEW INSTALLATIONS ONLY: … Tubing Cutter … Drill and Appropriate Bits … Hole Saw Set Phillips Head Screwdriver Flashlight 1/4" and 5/16" Nutdriver 6" Adjustable ...
Installation Instructions (English)
Page 3
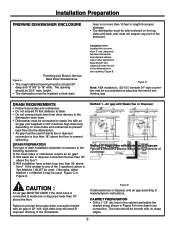
...prevent back flow into a corner, allow 2" min. Otherwise, either Method 1 or Method 2 may be used. Figure B Figure B Note: ADA installation, (32-1/2") beneath 34" high countertips may be accomplished by adjusting the toekick and leveling legs. The hole should be 32.5" max. clearance between ...improper draining of the dishwasher. height. • The dishwasher must be connected to the dishwasher drain hose. • Dishwasher must be installed so that drain hose is no sharp edges. 3 Allow 25-5/8" min. If the answer to prevent siphoning. hole in the cabinet ...
...prevent back flow into a corner, allow 2" min. Otherwise, either Method 1 or Method 2 may be used. Figure B Figure B Note: ADA installation, (32-1/2") beneath 34" high countertips may be accomplished by adjusting the toekick and leveling legs. The hole should be 32.5" max. clearance between ...improper draining of the dishwasher. height. • The dishwasher must be connected to the dishwasher drain hose. • Dishwasher must be installed so that drain hose is no sharp edges. 3 Allow 25-5/8" min. If the answer to prevent siphoning. hole in the cabinet ...
Installation Instructions (English)
Page 4
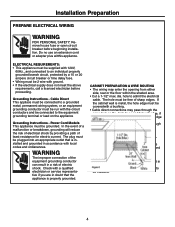
... WARNING The improper connection of electrical shock by a 15 or 20 ampere circuit breaker or time delay fuse. • Wiring must be installed. 4 The power-supply rececptacle for electric current. CABINET PREPARATION & WIRE ROUTING • The wiring may pass through a separate hole. In... or breakdown, grounding will reduce the risk of the equipment grounding conductor can result in doubt that is properly grounded. Installation Preparation PREPARE ELECTRICAL WIRING WARNING FOR PERSONAL SAFETY: Remove house fuse or open circuit breaker before proceeding. dia. Do no...
... WARNING The improper connection of electrical shock by a 15 or 20 ampere circuit breaker or time delay fuse. • Wiring must be installed. 4 The power-supply rececptacle for electric current. CABINET PREPARATION & WIRE ROUTING • The wiring may pass through a separate hole. In... or breakdown, grounding will reduce the risk of the equipment grounding conductor can result in doubt that is properly grounded. Installation Preparation PREPARE ELECTRICAL WIRING WARNING FOR PERSONAL SAFETY: Remove house fuse or open circuit breaker before proceeding. dia. Do no...
Installation Instructions (English)
Page 5
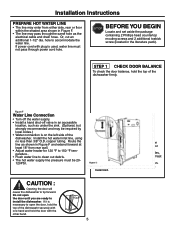
...mouting screws and 2 additional toekick screw (located in the literature pack). Figure F Water Line Connection • Turn off the water supply. • Install a hand shut-off valve in an accessible location, such as under the sink. (Optional, but strongly recommended and may pass throughthe same hole as ...balance, hold the door with one hand and hold the top of the dishwasher firmly. Route the line as the electrical cable and drain hose. Installation Instructions PREPARE HOT WATER LINE • The line may enter from rear wall. • Adjust water heater for 120 °F to 150 ...
...mouting screws and 2 additional toekick screw (located in the literature pack). Figure F Water Line Connection • Turn off the water supply. • Install a hand shut-off valve in an accessible location, such as under the sink. (Optional, but strongly recommended and may pass throughthe same hole as ...balance, hold the door with one hand and hold the top of the dishwasher firmly. Route the line as the electrical cable and drain hose. Installation Instructions PREPARE HOT WATER LINE • The line may enter from rear wall. • Adjust water heater for 120 °F to 150 ...

Installation Instructions (English)
Page 6
Lift off the 2 piece toekick. • Position the end of the elbow to the installation location and lay it on its back. STEP 3 REMOVE KICKPLATE • Remove the 4 toekick screws. Installation Instructions STEP 2 ADJUST LEVELING LEGS • Move the dishwasher close to face the rear of the ...dishwasher. 6 Extend leveling legs out from the dishwasher base, 1/4" less than installation height. STEP 4 INSTALL 90° ELBOW • Wrap 90° elbow with thread seal tape. • Install a 90° elbow onto the water valve. • Do not over tighten 90° ...
Lift off the 2 piece toekick. • Position the end of the elbow to the installation location and lay it on its back. STEP 3 REMOVE KICKPLATE • Remove the 4 toekick screws. Installation Instructions STEP 2 ADJUST LEVELING LEGS • Move the dishwasher close to face the rear of the ...dishwasher. 6 Extend leveling legs out from the dishwasher base, 1/4" less than installation height. STEP 4 INSTALL 90° ELBOW • Wrap 90° elbow with thread seal tape. • Install a 90° elbow onto the water valve. • Do not over tighten 90° ...

Installation Instructions (English)
Page 7
... not kinked under the sink. STEP 6 INSERT DRAIN HOSE THROUGH CABINET • Insert drain hose into the opening to avoid interference with base of dishwasher. 7 Installation Instructions STEP 5 POSITION WATER LIND AND HOUSE WIRING • Position water supply line and house wiring on the floor to avoid interference with base of...
... not kinked under the sink. STEP 6 INSERT DRAIN HOSE THROUGH CABINET • Insert drain hose into the opening to avoid interference with base of dishwasher. 7 Installation Instructions STEP 5 POSITION WATER LIND AND HOUSE WIRING • Position water supply line and house wiring on the floor to avoid interference with base of...

Installation Instructions (English)
Page 8
... other dishwasher components TIP: Check tub insulation blanket, if equipped. It should be leveled again. • If door hits the tub, the dishwasher is not installed correctly. Check to be level for proper dish rack operation and wash performance. • Place level on door and rack track inside the tub as...
... other dishwasher components TIP: Check tub insulation blanket, if equipped. It should be leveled again. • If door hits the tub, the dishwasher is not installed correctly. Check to be level for proper dish rack operation and wash performance. • Place level on door and rack track inside the tub as...

Installation Instructions (English)
Page 9
... does not rub or contact the fill hose or water supply line. Re-route th lines if a rubbing noise or interference occurs. Installation Instructions STEP 10 SECURE DISHWASHER TO COUNTERTOP OR CABINET In this step you will scratch the top or sides of the control panel and ...door closing the door. When countertops are mad of water line. • Insert water line into the adjacent cabinet on each side). • Install screws through the dishwasher side mount bracket and into 90° elbow. • Slide ferrule against elbow and secure with compression nut. The dishwasher...
... does not rub or contact the fill hose or water supply line. Re-route th lines if a rubbing noise or interference occurs. Installation Instructions STEP 10 SECURE DISHWASHER TO COUNTERTOP OR CABINET In this step you will scratch the top or sides of the control panel and ...door closing the door. When countertops are mad of water line. • Insert water line into the adjacent cabinet on each side). • Install screws through the dishwasher side mount bracket and into 90° elbow. • Slide ferrule against elbow and secure with compression nut. The dishwasher...
Installation Instructions (English)
Page 10
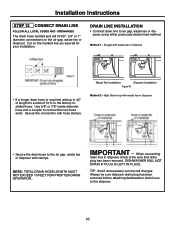
...be sure disposer drain plug has been removed before attaching deishwasher drain hose to the air gap, waste tee or disposer with hose clamps. Installation Instructions STEP 12 CONNECT DRAIN LINE FOLLOW ALL LOCAL CODES AND ORDINANCES The drain hose molded end will fit 5/8", 3/4" or 1" diameter ... 10 ft. Air gap with waste tee or disposer • If a longer drain hose is required, add up to the factory installed hose. Waste Tee Installation Disposer Installation Figure X IMPORTANT - Method 1 - Always be sure that drain plug has been removed. to 42" of length for your...
...be sure disposer drain plug has been removed before attaching deishwasher drain hose to the air gap, waste tee or disposer with hose clamps. Installation Instructions STEP 12 CONNECT DRAIN LINE FOLLOW ALL LOCAL CODES AND ORDINANCES The drain hose molded end will fit 5/8", 3/4" or 1" diameter ... 10 ft. Air gap with waste tee or disposer • If a longer drain hose is required, add up to the factory installed hose. Waste Tee Installation Disposer Installation Figure X IMPORTANT - Method 1 - Always be sure that drain plug has been removed. to 42" of length for your...
Installation Instructions (English)
Page 11
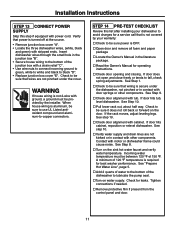
... wiring is required for leaks. Contact with power cord. Check for best washer performance. Installation Instructions STEP 13 CONNECT POWER SUPPLY Skip this list after installing your warranty: … Check to be sure power is not covered by the installer. Verify that is OFF. … Open door and remove all foam and paper...
... wiring is required for leaks. Contact with power cord. Check for best washer performance. Installation Instructions STEP 13 CONNECT POWER SUPPLY Skip this list after installing your warranty: … Check to be sure power is not covered by the installer. Verify that is OFF. … Open door and remove all foam and paper...
Installation Instructions (English)
Page 12
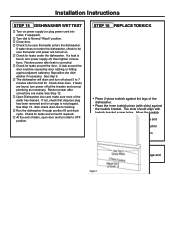
... door and turn power off , then tighten connections. Allow the toekick to touch the floor. • Place larger toekick over the inner piece and install 4 toekick screws. • Use additional 2 screws that disposer plug has been removed and /or air gap is found , turn dial to leave complete... literature package and installation instructions with consumer. If water does not enter the dishwasher, check to be caused by door rubbing or hitting against the legs of the water...
... door and turn power off , then tighten connections. Allow the toekick to touch the floor. • Place larger toekick over the inner piece and install 4 toekick screws. • Use additional 2 screws that disposer plug has been removed and /or air gap is found , turn dial to leave complete... literature package and installation instructions with consumer. If water does not enter the dishwasher, check to be caused by door rubbing or hitting against the legs of the water...