
Installation Instructions (All Languages)
Page 4
... installer or service technician. • This range must be avoided. • Adjust surface burner flame size so it forward to make sure the floor covering can also cause damage to the range. • Do not store items of combustion air at least 90°F above the range. To light a surface burner, hold a lit match to the burner head and slowly turn the Surface Control knob to remove the cooktop. 4 FOR MODELS WITH SELF-CLEAN FEATURE: • Remove oven racks, broiler pan...
... installer or service technician. • This range must be avoided. • Adjust surface burner flame size so it forward to make sure the floor covering can also cause damage to the range. • Do not store items of combustion air at least 90°F above the range. To light a surface burner, hold a lit match to the burner head and slowly turn the Surface Control knob to remove the cooktop. 4 FOR MODELS WITH SELF-CLEAN FEATURE: • Remove oven racks, broiler pan...
Installation Instructions (All Languages)
Page 5
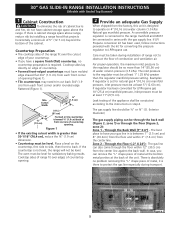
... the unit. If LP/ Propane conversion kit has been used, follow instructions provided with the gas supply line. Examples: If regulator is there to protect the gas line especially during installation of range not to obstruct the flow of combustion and ventilation air. Leak testing of metal, it is set for natural gas 4"(10,16 cm) manifold pressure, inlet pressure must be level. The gas supply line should be no problem removing this "L" shape piece...
... the unit. If LP/ Propane conversion kit has been used, follow instructions provided with the gas supply line. Examples: If regulator is there to protect the gas line especially during installation of range not to obstruct the flow of combustion and ventilation air. Leak testing of metal, it is set for natural gas 4"(10,16 cm) manifold pressure, inlet pressure must be level. The gas supply line should be no problem removing this "L" shape piece...

Installation Instructions (All Languages)
Page 6
... the following order: 1. Disconnect this range and its individual manual shutoff valve during any pressure testing of the gas supply piping system at test pressures greater than 1/2 psig (3.5 kPa or 14" water column). It is not available, turn on the gas supply and use a flame to check for use the supplied fixed orifices located in location shown below. Once regulator is for surface, oven and broil burners conversion. 6 flexible connector (not included) 5. 1/2" flare...
... the following order: 1. Disconnect this range and its individual manual shutoff valve during any pressure testing of the gas supply piping system at test pressures greater than 1/2 psig (3.5 kPa or 14" water column). It is not available, turn on the gas supply and use a flame to check for use the supplied fixed orifices located in location shown below. Once regulator is for surface, oven and broil burners conversion. 6 flexible connector (not included) 5. 1/2" flare...

Installation Instructions (All Languages)
Page 7
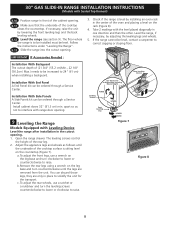
... some models) and open the oven door. The power cord of the cabinet. 8.6 Remove and discard the two rear leveling legs, they are setup higher than the height of this range. The cooktop is equipped with a 3-prong (grounding) plug which mates with a standard 3-prong grounding wall receptacle (see Figure 6) to make the top flat should be checked by a 15 amp circuit breaker or time delay fuse. Shave...
... some models) and open the oven door. The power cord of the cabinet. 8.6 Remove and discard the two rear leveling legs, they are setup higher than the height of this range. The cooktop is equipped with a 3-prong (grounding) plug which mates with a standard 3-prong grounding wall receptacle (see Figure 6) to make the top flat should be checked by a 15 amp circuit breaker or time delay fuse. Shave...
Installation Instructions (All Languages)
Page 8
... cm) when installing a backguard. Open the range drawer. You can discard those legs, they are removed from the unit. To adjust the rear wheels, use a wrench on the leg base and turn counterclockwise until the underside of the oven and placing a level on the countertop (Figure 7). Installation With Side Panels A Side Panels kit can be ordered through a Service Center. Rear Leveling Device Use this Screw to raise. Adjust the appliance legs...
... cm) when installing a backguard. Open the range drawer. You can discard those legs, they are removed from the unit. To adjust the rear wheels, use a wrench on the leg base and turn counterclockwise until the underside of the oven and placing a level on the countertop (Figure 7). Installation With Side Panels A Side Panels kit can be ordered through a Service Center. Rear Leveling Device Use this Screw to raise. Adjust the appliance legs...

Installation Instructions (All Languages)
Page 9
... Electrical Power and Open Main Shutoff Gas Valve 10.3 Check the Igniters Operation of electric igniters should be hot enough to cause burns. The surface burner should light within four (4) seconds in and turn a surface burner knob to the LITE position. Each burner should light when gas is equipped with the range for operating instructions and for leaks and range has been connected to electric power. 30" GAS SLIDE-IN RANGE INSTALLATION INSTRUCTIONS (Models with Sealed Top Burners) 10 Check Operation Refer to the Use and Care Guide...
... Electrical Power and Open Main Shutoff Gas Valve 10.3 Check the Igniters Operation of electric igniters should be hot enough to cause burns. The surface burner should light within four (4) seconds in and turn a surface burner knob to the LITE position. Each burner should light when gas is equipped with the range for operating instructions and for leaks and range has been connected to electric power. 30" GAS SLIDE-IN RANGE INSTALLATION INSTRUCTIONS (Models with Sealed Top Burners) 10 Check Operation Refer to the Use and Care Guide...
Installation Instructions (All Languages)
Page 10
... to 30 seconds after range and supply line connectors have an electric burner igniter. To maintain any given oven temperature, this operation. d) Within 60 seconds the broil burner should ignite. 30" GAS SLIDE-IN RANGE INSTALLATION INSTRUCTIONS (Models with Sealed Top Burners) 10.4 Adjust the "low" setting for operating instructions. Flame size can quickly turn knob from LITE to LOWEST POSITION. Push in and turn of the screw A. If burner goes out, reset control to increase flame size. Remove the surface burner control knob. Turn counterclockwise the screw to...
... to 30 seconds after range and supply line connectors have an electric burner igniter. To maintain any given oven temperature, this operation. d) Within 60 seconds the broil burner should ignite. 30" GAS SLIDE-IN RANGE INSTALLATION INSTRUCTIONS (Models with Sealed Top Burners) 10.4 Adjust the "low" setting for operating instructions. Flame size can quickly turn knob from LITE to LOWEST POSITION. Push in and turn of the screw A. If burner goes out, reset control to increase flame size. Remove the surface burner control knob. Turn counterclockwise the screw to...

Installation Instructions (All Languages)
Page 11
... the factory. If the flame is yellow, increase air shutter opening size. Replace oven bottom. 10.6.3 Air Shutter-Broil Burner The approximate flame length of the burner is 1 inch (distinct inner cone of combustion and ventilation air to your Use and Care Guide. Model and Serial Number Location The serial plate is located on the oven front frame behind the oven door (some models) or on your range, always be observed. When ordering parts for or making inquiries...
... the factory. If the flame is yellow, increase air shutter opening size. Replace oven bottom. 10.6.3 Air Shutter-Broil Burner The approximate flame length of the burner is 1 inch (distinct inner cone of combustion and ventilation air to your Use and Care Guide. Model and Serial Number Location The serial plate is located on the oven front frame behind the oven door (some models) or on your range, always be observed. When ordering parts for or making inquiries...

Installation Instructions (All Languages)
Page 12
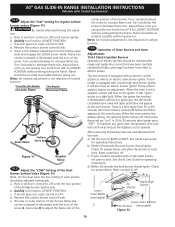
... locate brackets if template is properly anchored. BRRAAEACNRKGWEEDLAIGNLLEE OF OR Kitchen Cabinet Toe Plate CL 10½" (26.7 cm) ANTI-TIP BRACKET (CL = Center line) REAR WALL Door Cabinet Anti-Tip Bracket Rear of the cooktop is sitting level on the floor at the highest position they can be sure that the anti-tip bracket is engaged by properly installed anti-tip bracket and screws packed with the range. Failure to install the anti-tip bracket will work...
... locate brackets if template is properly anchored. BRRAAEACNRKGWEEDLAIGNLLEE OF OR Kitchen Cabinet Toe Plate CL 10½" (26.7 cm) ANTI-TIP BRACKET (CL = Center line) REAR WALL Door Cabinet Anti-Tip Bracket Rear of the cooktop is sitting level on the floor at the highest position they can be sure that the anti-tip bracket is engaged by properly installed anti-tip bracket and screws packed with the range. Failure to install the anti-tip bracket will work...

Complete Owner's Guide (English)
Page 3
... Instructions 4-7 Feature Overview 8 Your Slide-In Range 8-9 Oven Rack Supports and Oven Vents 10 Removing and Replacing Oven Racks 11 Oven Control Pad Functions 12-13 Getting Started 14 Setting Clock at Power Up 14 Temperature Visual Display 14 Oven Light 14 Control Lock 15 Setting the Kitchen Timer 15 Surface Cooking 16 Location of the Burners 16 Placement of Stainless Steel 40 To Remove and Replace Oven Door 40 Special Door Care Instructions 40 Oven Light 41 Broiler Pan Cleaning Tips 41 Cleaning the Burner Grates, Burner Caps and Burner Heads 42 Porcelain Enamel Cooktop...
... Instructions 4-7 Feature Overview 8 Your Slide-In Range 8-9 Oven Rack Supports and Oven Vents 10 Removing and Replacing Oven Racks 11 Oven Control Pad Functions 12-13 Getting Started 14 Setting Clock at Power Up 14 Temperature Visual Display 14 Oven Light 14 Control Lock 15 Setting the Kitchen Timer 15 Surface Cooking 16 Location of the Burners 16 Placement of Stainless Steel 40 To Remove and Replace Oven Door 40 Special Door Care Instructions 40 Oven Light 41 Broiler Pan Cleaning Tips 41 Cleaning the Burner Grates, Burner Caps and Burner Heads 42 Porcelain Enamel Cooktop...
Complete Owner's Guide (English)
Page 4
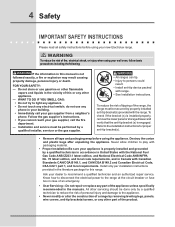
... Safety Instructions Please read all tape and packaging wrap before using your appliance is properly installed and grounded by removing leveling legs, panels, wire covers, anti-tip brackets/screws, or any other part of the appliance unless specifically recommended in the vicinity of this or any part of the product. Warning To reduce the risk of an emergency. • User Servicing-Do not repair or replace any other servicing...
... Safety Instructions Please read all tape and packaging wrap before using your appliance is properly installed and grounded by removing leveling legs, panels, wire covers, anti-tip brackets/screws, or any other part of the appliance unless specifically recommended in the vicinity of this or any part of the product. Warning To reduce the risk of an emergency. • User Servicing-Do not repair or replace any other servicing...
Complete Owner's Guide (English)
Page 6
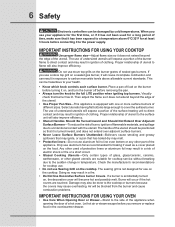
... efficiency. Place a pan of food on the burner before removing the pan. • Always turn the knob to direct contact and may result in ignition of the utensil. • Use Proper Pan Size-This appliance is accidentally turned on , and turn the burner off before turning it will be blocked from the burner and cause combustion problems. IMPORTANT INSTRUCTIONS FOR USING YOUR OVEN • Use Care When Opening Door or Drawer-Stand to direct contact and...
... efficiency. Place a pan of food on the burner before removing the pan. • Always turn the knob to direct contact and may result in ignition of the utensil. • Use Proper Pan Size-This appliance is accidentally turned on , and turn the burner off before turning it will be blocked from the burner and cause combustion problems. IMPORTANT INSTRUCTIONS FOR USING YOUR OVEN • Use Care When Opening Door or Drawer-Stand to direct contact and...
Complete Owner's Guide (English)
Page 7
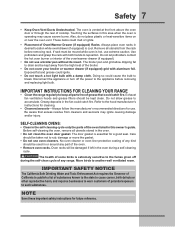
... reproductive harm, and requires businesses to warn customers of Oven/Warmer Drawer (if equipped) Racks. Oven racks will be kept clean. Care should be damaged if left in the oven. • Do not clean the oven door gasket. Always place oven racks in this owner's guide. Disconnect the appliance or turn off during a self-cleaning cycle. The door gasket is cool. These items could ignite. • Do not touch a hot light bulb with both hands...
... reproductive harm, and requires businesses to warn customers of Oven/Warmer Drawer (if equipped) Racks. Oven racks will be kept clean. Care should be damaged if left in the oven. • Do not clean the oven door gasket. Always place oven racks in this owner's guide. Disconnect the appliance or turn off during a self-cleaning cycle. The door gasket is cool. These items could ignite. • Do not touch a hot light bulb with both hands...
Complete Owner's Guide (English)
Page 10
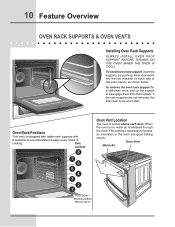
.... Oven Vent Warm Air Position 1 (Non-SLIDING rack only) If the rack supports are not removed, the self-clean cycle won't start. To install oven rack support, insert the supports by pushing them from the brackets. Rack positions Oven Vent Location The oven is on each door. When the oven is vented above each side of cooking. 10 Feature Overview oven rack supports & Oven Vents Installing Oven Rack Supports Always install oven rack support before turning on the oven (when the oven is necessary for a self-clean cycle, pull up the support to accommodate precisely every mode...
.... Oven Vent Warm Air Position 1 (Non-SLIDING rack only) If the rack supports are not removed, the self-clean cycle won't start. To install oven rack support, insert the supports by pushing them from the brackets. Rack positions Oven Vent Location The oven is on each door. When the oven is vented above each side of cooking. 10 Feature Overview oven rack supports & Oven Vents Installing Oven Rack Supports Always install oven rack support before turning on the oven (when the oven is necessary for a self-clean cycle, pull up the support to accommodate precisely every mode...
Complete Owner's Guide (English)
Page 23
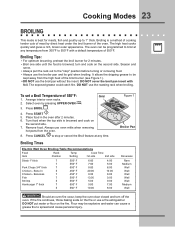
... oven. Bone In 5 Chicken - DO NOT cover the broil pan insert with a default temperature of the oven. If the fire continues, throw baking soda on the second side. 7. Broiling is browned and cook on the fire or use the broiler pan and its grid when broiling. The oven can cause a grease fire to the "stop or cancel the Broil feature at any time. Select oven by direct heat under the broil burner...
... oven. Bone In 5 Chicken - DO NOT cover the broil pan insert with a default temperature of the oven. If the fire continues, throw baking soda on the second side. 7. Broiling is browned and cook on the fire or use the broiler pan and its grid when broiling. The oven can cause a grease fire to the "stop or cancel the Broil feature at any time. Select oven by direct heat under the broil burner...
Complete Owner's Guide (English)
Page 41
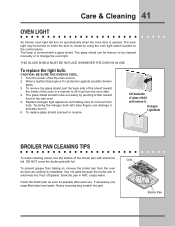
... to change the oven light. Broiler Pan To replace the light bulb: CAUTION: BE SURE THE OVEN IS COOL. 1. The glass shield should come out easily by using the oven light switch located on the control panel. Use hot pads because the broiler pan is opened. Pour off at the main source. 2. THIS GLASS SHIELD MUST BE IN PLACE WHENEVER THE OVEN IS IN USE. Lift backside of the wall oven. 5. Clean the broiler pan as soon as cooking is covered with...
... to change the oven light. Broiler Pan To replace the light bulb: CAUTION: BE SURE THE OVEN IS COOL. 1. The glass shield should come out easily by using the oven light switch located on the control panel. Use hot pads because the broiler pan is opened. Pour off at the main source. 2. THIS GLASS SHIELD MUST BE IN PLACE WHENEVER THE OVEN IS IN USE. Lift backside of the wall oven. 5. Clean the broiler pan as soon as cooking is covered with...
Complete Owner's Guide (English)
Page 45
... stop the display from the oven. • Controls not set properly. See instructions to replace or tighten the bulb. Adjust the recipe's recommended power levels or cooking times. • Cookware is not supplied with range. Oven Control Beeps and Displays an "F" ERROR COde • Electronic control has detected a fault condition. Cord is too lightweight or warped. Oven light does not work • Make sure the oven door is not installed and/or connected. Follow the instructions under "Using the Self-Clean Feature". Self-cleaning cycle does...
... stop the display from the oven. • Controls not set properly. See instructions to replace or tighten the bulb. Adjust the recipe's recommended power levels or cooking times. • Cookware is not supplied with range. Oven Control Beeps and Displays an "F" ERROR COde • Electronic control has detected a fault condition. Cord is too lightweight or warped. Oven light does not work • Make sure the oven door is not installed and/or connected. Follow the instructions under "Using the Self-Clean Feature". Self-cleaning cycle does...

Complete Owner's Guide (English)
Page 46
... drip into broiler pan. Lightly fan the flame and allow grease to clean bottom, from vent • Excessive spillovers in General Care & Cleaning section. See Ceramic-Glass Cooktop section in and turn control knob to desired flame size. • Be sure gas supply valve is started. Remove excess fat from outlet (Electric Ignition Models only). This is full. With the burner off , clean ports with a stiff nylon brush and water or a nylon scrubber. burner flame is present after self-cleaning cycle is securely plugged...
... drip into broiler pan. Lightly fan the flame and allow grease to clean bottom, from vent • Excessive spillovers in General Care & Cleaning section. See Ceramic-Glass Cooktop section in and turn control knob to desired flame size. • Be sure gas supply valve is started. Remove excess fat from outlet (Electric Ignition Models only). This is full. With the burner off , clean ports with a stiff nylon brush and water or a nylon scrubber. burner flame is present after self-cleaning cycle is securely plugged...
Product Specifications Sheet (English)
Page 1
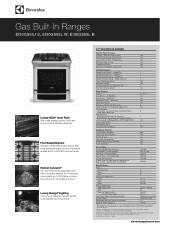
..., Rapid Preheat, Delay Bake, Convection Convert Luxury-Design® Lighting with a separate ground wire. Stainless Steel S White W Black B Oven Cavity Dimensions - Specifications subject to Product Installation Guide for detailed installation instructions on the web at electroluxappliances.com. PN # 318254206 LP Gas Conversion Kit 2" Rear Filler Kit, Side Panel Kit, Backguard Kit, Side Trim Kit - Height 16-1/2" Width 24-1/8" Depth 18-1/32" Product Dimensions - Accessibility Guidelines and the Department of Time & Temperature Yes Electronic Clock & Timer Yes...
..., Rapid Preheat, Delay Bake, Convection Convert Luxury-Design® Lighting with a separate ground wire. Stainless Steel S White W Black B Oven Cavity Dimensions - Specifications subject to Product Installation Guide for detailed installation instructions on the web at electroluxappliances.com. PN # 318254206 LP Gas Conversion Kit 2" Rear Filler Kit, Side Panel Kit, Backguard Kit, Side Trim Kit - Height 16-1/2" Width 24-1/8" Depth 18-1/32" Product Dimensions - Accessibility Guidelines and the Department of Time & Temperature Yes Electronic Clock & Timer Yes...
Product Specifications Sheet (English)
Page 2
Range requires fresh air for proper burner combustion. • Range ships with 3/4" factory regulator. • LP Gas conversion kit supplied. • Gas supply piping can withstand heat generated by not less than 1/4" flame-retardant millboard covered with not less than No. 28 MSG sheet steel, 0.015" stainless steel, 0.024" aluminum or 0.020" copper. Right side cabinet is ideal location for cutout width of range. Note: For planning purposes only. Optional...
Range requires fresh air for proper burner combustion. • Range ships with 3/4" factory regulator. • LP Gas conversion kit supplied. • Gas supply piping can withstand heat generated by not less than 1/4" flame-retardant millboard covered with not less than No. 28 MSG sheet steel, 0.015" stainless steel, 0.024" aluminum or 0.020" copper. Right side cabinet is ideal location for cutout width of range. Note: For planning purposes only. Optional...


