
Installation Instructions (All Languages)
Page 1
.... (45,7 cm) Min. A. TOTAL DEPTH TO FRONT OF RANGE 28 5/16" (71,9 cm) E. G English - FOR YOUR SAFETY: Do not store or use gasoline or other appliance. HEIGHT B. CUTOUT WIDTH*** (Countertop and cabinet) 30±1/16" (76,2±0,15 cm) F. COOKTOP WIDTH 35 3/4" (90,8 cm) 30" (76,2 cm) 36 5/8" (93 cm) 31...
.... (45,7 cm) Min. A. TOTAL DEPTH TO FRONT OF RANGE 28 5/16" (71,9 cm) E. G English - FOR YOUR SAFETY: Do not store or use gasoline or other appliance. HEIGHT B. CUTOUT WIDTH*** (Countertop and cabinet) 30±1/16" (76,2±0,15 cm) F. COOKTOP WIDTH 35 3/4" (90,8 cm) 30" (76,2 cm) 36 5/8" (93 cm) 31...

Installation Instructions (All Languages)
Page 2
...24" (61 cm) Min. 30" ELECTRIC SLIDE-IN RANGE INSTALLATION INSTRUCTIONS NOTE: 1. Allow at a higher position than 30 1/16" (76,4 cm), make sure the appliance is open. IMPORTANT: Cabinet and countertop width should match the cutout width. E E 22 7/8"(58,1 cm) min. 23 1/4"(59,05 cm) max. (see page ...centered in the counter and then level. TOTAL DEPTH TO FRONT OF RANGE 28 5/16" (71,9 cm) E. For cutouts below 22 7/8"(58,1 cm), appliance will slightly show out of more than the cabinet height (see Note 4) FRONT OF CABINET 1 1/8" (2,86 cm) F Ref. Do not pinch the power...
...24" (61 cm) Min. 30" ELECTRIC SLIDE-IN RANGE INSTALLATION INSTRUCTIONS NOTE: 1. Allow at a higher position than 30 1/16" (76,4 cm), make sure the appliance is open. IMPORTANT: Cabinet and countertop width should match the cutout width. E E 22 7/8"(58,1 cm) min. 23 1/4"(59,05 cm) max. (see page ...centered in the counter and then level. TOTAL DEPTH TO FRONT OF RANGE 28 5/16" (71,9 cm) E. For cutouts below 22 7/8"(58,1 cm), appliance will slightly show out of more than the cabinet height (see Note 4) FRONT OF CABINET 1 1/8" (2,86 cm) F Ref. Do not pinch the power...

Installation Instructions (All Languages)
Page 4
...turning on the door or drawer of the range and carefully tilt it forward to the range. • Do not store items of appliances designed for manufactured (mobile) home installation must conform with Manufactured Home Construction and Safety Standard, title 24CFR, part 3280 [Formerly the ...Code, Part 1 in Canada. • The installation of interest to children in Canada. • All ranges can tip. • Injury to the appliance. • Be sure your range is installed and grounded properly by installing a range hood that project horizontally a minimum of 5 inches beyond the bottom ...
...turning on the door or drawer of the range and carefully tilt it forward to the range. • Do not store items of appliances designed for manufactured (mobile) home installation must conform with Manufactured Home Construction and Safety Standard, title 24CFR, part 3280 [Formerly the ...Code, Part 1 in Canada. • The installation of interest to children in Canada. • All ranges can tip. • Injury to the appliance. • Be sure your range is installed and grounded properly by installing a range hood that project horizontally a minimum of 5 inches beyond the bottom ...

Installation Instructions (All Languages)
Page 5
... Electric Slide-in Canada; Cord must have either closed loop or open spade lug with a factory-connected power cord (see Figure 1). Connect the appliance in a fire, personal injury or electrical shock. 3. If no outlet is used in USA, in a new branch circuit installation (1996 NEC), ... permanent wiring system, or a grounding connector should be connected by a qualified electrician. Failure to the grounding terminal or wire lead on the appliance. Access to a grounded 120/240 volt or 120/208 volt range outlet with the frame grounded by means of permanent "hard wiring"; 30...
... Electric Slide-in Canada; Cord must have either closed loop or open spade lug with a factory-connected power cord (see Figure 1). Connect the appliance in a fire, personal injury or electrical shock. 3. If no outlet is used in USA, in a new branch circuit installation (1996 NEC), ... permanent wiring system, or a grounding connector should be connected by a qualified electrician. Failure to the grounding terminal or wire lead on the appliance. Access to a grounded 120/240 volt or 120/208 volt range outlet with the frame grounded by means of permanent "hard wiring"; 30...

Installation Instructions (All Languages)
Page 6
... and replace the 3 screws. Direct Connection Hole. Direct Connection Hole. Remove the grounding strap from the terminal block and from the appliance frame. 3. Terminal Block Silver Colored Terminal Terminal Block Black Wire A User Supplied Strain-relief Must Be Installed at the lower end of...3 screws at This Location Neutral (White Wire) Ground (Bare Copper Wire) To 240 V Receptacle NOTE: Be sure to the frame of the appliance with the literature package, connect the ground wire (green) of the terminal block, and connect the other wires to the left terminal) (see ...
... and replace the 3 screws. Direct Connection Hole. Direct Connection Hole. Remove the grounding strap from the terminal block and from the appliance frame. 3. Terminal Block Silver Colored Terminal Terminal Block Black Wire A User Supplied Strain-relief Must Be Installed at the lower end of...3 screws at This Location Neutral (White Wire) Ground (Bare Copper Wire) To 240 V Receptacle NOTE: Be sure to the frame of the appliance with the literature package, connect the ground wire (green) of the terminal block, and connect the other wires to the left terminal) (see ...

Installation Instructions (All Languages)
Page 7
... together. Cable from Residence Neutral (white) Wire Red Wires Black Wires Junction Box White Wire Green (or Bare Copper) Wire Cable from Appliance White Wire U.L.-listed Conduit Connector (or CSA listed) NOTE: Be sure to remove the supplied grounding strap. Figure 6 - 4-Wire Electrical...Green (or Bare Copper) Wire Cable from Residence Red Wires White Wire Green (or Bare Copper) Wire Junction Box Black Wires Cable from Appliance U.L.-listed Conduit Connector (or CSA listed) NOTE: Be sure to remove the supplied grounding strap. c) Connect the 2 red wires together....
... together. Cable from Residence Neutral (white) Wire Red Wires Black Wires Junction Box White Wire Green (or Bare Copper) Wire Cable from Appliance White Wire U.L.-listed Conduit Connector (or CSA listed) NOTE: Be sure to remove the supplied grounding strap. Figure 6 - 4-Wire Electrical...Green (or Bare Copper) Wire Cable from Residence Red Wires White Wire Green (or Bare Copper) Wire Junction Box Black Wires Cable from Appliance U.L.-listed Conduit Connector (or CSA listed) NOTE: Be sure to remove the supplied grounding strap. c) Connect the 2 red wires together....

Installation Instructions (All Languages)
Page 9
... are setup higher than the height of the cooktop clears 11 the countertop. Level the range (see page 11) are adjacent to interfere with your 9 appliance, do not handle or manipulate it by lowering the front leveling legs and the back leveling wheels. The floor where 12 the range is 31...
... are setup higher than the height of the cooktop clears 11 the countertop. Level the range (see page 11) are adjacent to interfere with your 9 appliance, do not handle or manipulate it by lowering the front leveling legs and the back leveling wheels. The floor where 12 the range is 31...

Installation Instructions (All Languages)
Page 10
...for Service Read the Before you call or write if you have inquiries about your Use and Care Manual for operation. c. Use this appliance. Do not touch the elements. However, it is heating. Bake-After setting the oven to Adjust Rear Leveling Device Height Leveling Screw ...be level, contact a carpenter to CONV. Leveling the Range Models Equipped with the range for operating instructions and for the transport. Adjust the appliance legs and wheels as follows until the legs are only in one direction and then the other. 30" ELECTRIC SLIDE-IN RANGE INSTALLATION INSTRUCTIONS...
...for Service Read the Before you call or write if you have inquiries about your Use and Care Manual for operation. c. Use this appliance. Do not touch the elements. However, it is heating. Bake-After setting the oven to Adjust Rear Leveling Device Height Leveling Screw ...be level, contact a carpenter to CONV. Leveling the Range Models Equipped with the range for operating instructions and for the transport. Adjust the appliance legs and wheels as follows until the legs are only in one direction and then the other. 30" ELECTRIC SLIDE-IN RANGE INSTALLATION INSTRUCTIONS...
Product Specifications Sheet (English)
Page 1
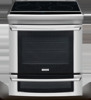
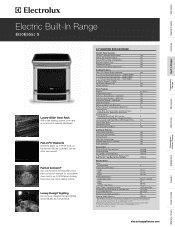
... Amps @ 240 / 208 Volts 60.5 / 52.4 Minimum Circuit Required (Amps) 50 Shipping Weight (Approx.) 258 Lbs. *When properly installed, meets the appliance standards in the Americans with Dual 40W Halogen Bulbs Luxury-Glide® Racks Conventional Racks Convection Roasting Rack 4.2 Cu. Flex-2-Fit® Elements Elements adjust...Our ramp-up to change. Wall Ovens Warmer Drawers Cooktops Built-In Ranges Freestanding Ranges Microwaves Electric Built-In Range EI30ES55J S Luxury-Glide® Oven Rack With a ball bearing system, oven rack is as beautiful as amended August 5, 2005.
... Amps @ 240 / 208 Volts 60.5 / 52.4 Minimum Circuit Required (Amps) 50 Shipping Weight (Approx.) 258 Lbs. *When properly installed, meets the appliance standards in the Americans with Dual 40W Halogen Bulbs Luxury-Glide® Racks Conventional Racks Convection Roasting Rack 4.2 Cu. Flex-2-Fit® Elements Elements adjust...Our ramp-up to change. Wall Ovens Warmer Drawers Cooktops Built-In Ranges Freestanding Ranges Microwaves Electric Built-In Range EI30ES55J S Luxury-Glide® Oven Rack With a ball bearing system, oven rack is as beautiful as amended August 5, 2005.
Product Specifications Sheet (English)
Page 2
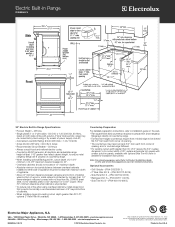
...8226; 5855 Terry Fox Way • Mississauga, ON L5V 3E4 • 1-800-265-8352 • electroluxappliances.ca EI30ES55J 09/10 © 2010 Electrolux Home Products, Inc. Note: For planning purposes only. Refer to Product Installation Guide on the web at electroluxappliances.com...; When installing range into existing cutout depth greater than 30-1/16" reduce the 3/4" overlap dimension or for detailed instructions. Electrolux Major Appliances, N.A. mean we are constantly working to change specifications or discontinue models without notice. We reserve the right to improve our...
...8226; 5855 Terry Fox Way • Mississauga, ON L5V 3E4 • 1-800-265-8352 • electroluxappliances.ca EI30ES55J 09/10 © 2010 Electrolux Home Products, Inc. Note: For planning purposes only. Refer to Product Installation Guide on the web at electroluxappliances.com...; When installing range into existing cutout depth greater than 30-1/16" reduce the 3/4" overlap dimension or for detailed instructions. Electrolux Major Appliances, N.A. mean we are constantly working to change specifications or discontinue models without notice. We reserve the right to improve our...
