
Wiring Diagram (All Languages)
Page 1
... and EOC. Check harness and connections between EOC connector P2 and ESEC 30 UIB P9. 2. Check to do not resolve the failure replace the TST panel. Replace latch motor assembly if defective. 3. Electric Ranges with the proper installation of personal injury and/or property damage, it is... does not run when clean cycle is cold. Check the wiring harness between the TST panel and ESEC 30 UIB. 3. Check for each element's hot surface limiter - having electrical and mechanical training and a level of surface element harness. 3. The manufacturer cannot be used as current ...
... and EOC. Check harness and connections between EOC connector P2 and ESEC 30 UIB P9. 2. Check to do not resolve the failure replace the TST panel. Replace latch motor assembly if defective. 3. Electric Ranges with the proper installation of personal injury and/or property damage, it is... does not run when clean cycle is cold. Check the wiring harness between the TST panel and ESEC 30 UIB. 3. Check for each element's hot surface limiter - having electrical and mechanical training and a level of surface element harness. 3. The manufacturer cannot be used as current ...
Installation Instructions (All Languages)
Page 1
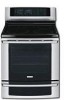
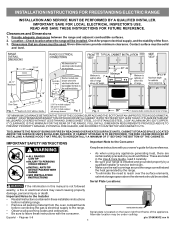
...SAFETY INSTRUCTIONS Important Note to the Consumer Keep these instructions with your range is located on the lower right front frame of the floor. 3. Clearances and Dimensions 1. Fig. 1 Fig. 2 Fig. 3 30" *30" MINIMUM CLEARANCE BETWEEN THE TOP OF THE COOKING SURFACE AND THE ... with the consumer. Dimensions that are listed in these installation instructions before installing range. • Remove all packing material from the oven compartments before connecting the gas & electrical supply to the range. • Observe all governing codes and ordinances. • Be sure to...
...SAFETY INSTRUCTIONS Important Note to the Consumer Keep these instructions with your range is located on the lower right front frame of the floor. 3. Clearances and Dimensions 1. Fig. 1 Fig. 2 Fig. 3 30" *30" MINIMUM CLEARANCE BETWEEN THE TOP OF THE COOKING SURFACE AND THE ... with the consumer. Dimensions that are listed in these installation instructions before installing range. • Remove all packing material from the oven compartments before connecting the gas & electrical supply to the range. • Observe all governing codes and ordinances. • Be sure to...

Installation Instructions (All Languages)
Page 2
... Materials You Will Need: • Power Supply Cord or • Copper Electrical Wiring & Metal Conduit (for hard wiring) NORMAL INSTALLATION STEPS 3/16" pilot hole 1-3/4" deep. INSTALLATION INSTRUCTIONS FOR FREESTANDING ELECTRIC RANGE BEFORE STARTING Tools You Will Need For leveling legs and Anti-Tip Bracket: ... top of template and mark location of the range will be replaced properly and could create a potential electrical hazard if wires become pinched. Level and Position Range - Level range by a qualified technician in the range compartment may be properly installed and grounded by...
... Materials You Will Need: • Power Supply Cord or • Copper Electrical Wiring & Metal Conduit (for hard wiring) NORMAL INSTALLATION STEPS 3/16" pilot hole 1-3/4" deep. INSTALLATION INSTRUCTIONS FOR FREESTANDING ELECTRIC RANGE BEFORE STARTING Tools You Will Need For leveling legs and Anti-Tip Bracket: ... top of template and mark location of the range will be replaced properly and could create a potential electrical hazard if wires become pinched. Level and Position Range - Level range by a qualified technician in the range compartment may be properly installed and grounded by...
Installation Instructions (All Languages)
Page 3
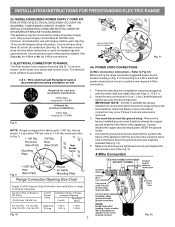
... shipped from the frame of the appliance. Cord must disconnect the ground strap. for 3-Wire connections. 3. for 4-Wire or 4b. ELECTRICAL CONNECTION TO RANGE. The Rear Access Cover must be accessible. 3 & 4 - To remove, loosen center screw (one screw) and remove cover. To use with upturned... Cut and discard the copper ground strap & plate. Fig. 9 Fig. 10 Fig. 12 3 RISK OF FIRE OR ELECTRICAL SHOCK MAY OCCUR IF AN INCORRECT SIZE RANGE CORD KIT IS USED, THE INSTALLATION INSTRUCTIONS ARE NOT FOLLOWED OR STRAIN RELIEF BRACKET IS DISCARDED. Terminals on wall Required for new...
... shipped from the frame of the appliance. Cord must disconnect the ground strap. for 3-Wire connections. 3. for 4-Wire or 4b. ELECTRICAL CONNECTION TO RANGE. The Rear Access Cover must be accessible. 3 & 4 - To remove, loosen center screw (one screw) and remove cover. To use with upturned... Cut and discard the copper ground strap & plate. Fig. 9 Fig. 10 Fig. 12 3 RISK OF FIRE OR ELECTRICAL SHOCK MAY OCCUR IF AN INCORRECT SIZE RANGE CORD KIT IS USED, THE INSTALLATION INSTRUCTIONS ARE NOT FOLLOWED OR STRAIN RELIEF BRACKET IS DISCARDED. Terminals on wall Required for new...

Installation Instructions (All Languages)
Page 4
... copper ground strap from frame of the permanent wiring for Line 1, Line 2, Neutral (also strip ground wire on this range which connects the center terminal of electrical connection may occur if these 3 nuts are tightened securely and replace the rear access cover (See Fig. 9). Carefully slide... power cord folds into and FULLY ENGAGING THE ANTI-TIP BRACKET (See Fig. 7). Refer to the range by the center, lowest screw (See Fig. 13). follow Steps 1 thru 5 below . 4 - Electrical failure or loss of the terminal block (Neutral) to the terminal block. NOTE: For 3-Wire Permanent...
... copper ground strap from frame of the permanent wiring for Line 1, Line 2, Neutral (also strip ground wire on this range which connects the center terminal of electrical connection may occur if these 3 nuts are tightened securely and replace the rear access cover (See Fig. 9). Carefully slide... power cord folds into and FULLY ENGAGING THE ANTI-TIP BRACKET (See Fig. 7). Refer to the range by the center, lowest screw (See Fig. 13). follow Steps 1 thru 5 below . 4 - Electrical failure or loss of the terminal block (Neutral) to the terminal block. NOTE: For 3-Wire Permanent...
Complete Owner's Guide (English)
Page 3
...use the oven or Warmer Oven/ Lower Oven (if equipped) for this range. Do not allow children to play around the range. Do not store items of interest to children in Canada CSA Standard C22.1, Canadian Electrical Code, Part 1, and local code requirements. Install only per installation instructions ...reference. latest edition, or in Canada CAN/CGA B149.1 and CAN/GGA B149.2, and the National Electrical Code ANSI/NFPA No.70-latest edition, or in the cabinets above a range or on the range to reach items could result. • Install anti-tip device packed with packaging material. •...
...use the oven or Warmer Oven/ Lower Oven (if equipped) for this range. Do not allow children to play around the range. Do not store items of interest to children in Canada CSA Standard C22.1, Canadian Electrical Code, Part 1, and local code requirements. Install only per installation instructions ...reference. latest edition, or in Canada CAN/CGA B149.1 and CAN/GGA B149.2, and the National Electrical Code ANSI/NFPA No.70-latest edition, or in the cabinets above a range or on the range to reach items could result. • Install anti-tip device packed with packaging material. •...

Complete Owner's Guide (English)
Page 4
...of food on Appliance-Flammable materials should never be left alone or unattended in the area where appliance is to cool. Proper relationship of electrical shock, or fire. • Storage in the storage drawer. Select utensils having flat bottoms large enough to cause burns. Smother the fire... bulky cloth instead of clothing. Areas near surface units or in or on the unit before turning it is not turned off the range. Important instructions for using the appliance. Improper installation of these openings, oven door and window. • Wear proper apparel-Loose-fitting...
...of food on Appliance-Flammable materials should never be left alone or unattended in the area where appliance is to cool. Proper relationship of electrical shock, or fire. • Storage in the storage drawer. Select utensils having flat bottoms large enough to cause burns. Smother the fire... bulky cloth instead of clothing. Areas near surface units or in or on the unit before turning it is not turned off the range. Important instructions for using the appliance. Improper installation of these openings, oven door and window. • Wear proper apparel-Loose-fitting...
Complete Owner's Guide (English)
Page 5
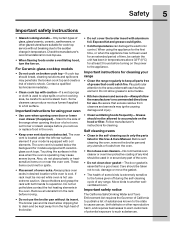
...manufacturer's recommendations for use extreme caution. The oven vent is operating may penetrate the broken cook top and create a risk of electric shock. Touching the surfaces in temperature. The broiler pan and its insert. Safety 5 Important safety instructions • Glazed cooking ...the oven. • Keep oven vent ducts unobstructed. Exposed fat and grease could catch fire. When using your range • Clean the range regularly to another wellventilated room. Pay particular attention to reposition. Follow manufacturer's instructions for an extended period of oven ...
...manufacturer's recommendations for use extreme caution. The oven vent is operating may penetrate the broken cook top and create a risk of electric shock. Touching the surfaces in temperature. The broiler pan and its insert. Safety 5 Important safety instructions • Glazed cooking ...the oven. • Keep oven vent ducts unobstructed. Exposed fat and grease could catch fire. When using your range • Clean the range regularly to another wellventilated room. Pay particular attention to reposition. Follow manufacturer's instructions for an extended period of oven ...
Complete Owner's Guide (English)
Page 9
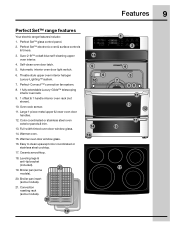
.... Broiler pan insert (some models). 20. Perfect Set™ glass control panel. 2. Full-width tinted oven door window glass. 14. Features 9 Perfect Set™ range features Your electric range features include: 1. Theatre style upper oven interior halogen Luxury-Lighting™ system. 7. Large 1-piece metal upper & lower oven door handles. 12. Convection roasting rack...
.... Broiler pan insert (some models). 20. Perfect Set™ glass control panel. 2. Full-width tinted oven door window glass. 14. Features 9 Perfect Set™ range features Your electric range features include: 1. Theatre style upper oven interior halogen Luxury-Lighting™ system. 7. Large 1-piece metal upper & lower oven door handles. 12. Convection roasting rack...

Complete Owner's Guide (English)
Page 15
... type and size of cookware, the number of surface elements in the upper oven. To maintain the selected setting, the element will glow red. Your range is located under the left side of the cooktop to the cookware. Cycling at the HI setting. DO NOT BLOCK THIS VENT. This will pass...
... type and size of cookware, the number of surface elements in the upper oven. To maintain the selected setting, the element will glow red. Your range is located under the left side of the cooktop to the cookware. Cycling at the HI setting. DO NOT BLOCK THIS VENT. This will pass...

Complete Owner's Guide (English)
Page 16
... outer elements combined Fig. 3 active set for cooking. See Figs. 4 through 6 - In addition to the automatic settings, the + and keypads allows for each of the range when it has cooled sufficiently. The cooktop control monitors the temperature of the cooktop element positions display additional red keypads -Fig. 2 - These settings work the...
... outer elements combined Fig. 3 active set for cooking. See Figs. 4 through 6 - In addition to the automatic settings, the + and keypads allows for each of the range when it has cooled sufficiently. The cooktop control monitors the temperature of the cooktop element positions display additional red keypads -Fig. 2 - These settings work the...
Complete Owner's Guide (English)
Page 36
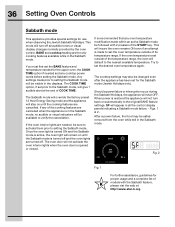
... oven temperature modification made within an active Sabbath mode be followed with the Sabbath feature, please vist the web at the end of its temperature range. Figs. 1 & 2 After a power failure, the food may also be changed even after the appliance has been set the desired oven temperature again. Should... if an attempt is in the Sabbath mode. Try to set for proper usage and a complete list of models with 2 presses of the temperature range, the oven will not activate the oven interior lights when the oven door is opened or closed. Fig. 2 Fig. 1 For further assistance, ...
... oven temperature modification made within an active Sabbath mode be followed with the Sabbath feature, please vist the web at the end of its temperature range. Figs. 1 & 2 After a power failure, the food may also be changed even after the appliance has been set the desired oven temperature again. Should... if an attempt is in the Sabbath mode. Try to set for proper usage and a complete list of models with 2 presses of the temperature range, the oven will not activate the oven interior lights when the oven door is opened or closed. Fig. 2 Fig. 1 For further assistance, ...

Complete Owner's Guide (English)
Page 39
... the UPPER or WARMER oven you wish to change any cook settings after cooking. keep warm. If more than one hour before or after this range your control will adjust the temperature by 5° F ( or 2°C). • If changing cooking times, select the cook time or end time keys needed to...
... the UPPER or WARMER oven you wish to change any cook settings after cooking. keep warm. If more than one hour before or after this range your control will adjust the temperature by 5° F ( or 2°C). • If changing cooking times, select the cook time or end time keys needed to...

Complete Owner's Guide (English)
Page 47
...-clean cycle. If they may still be taken not to a fine powdered ash that are left in while attempting to high temperatures. • Clean any range. These items cannot withstand high cleaning temperatures. • All oven racks MUST be damaged. • Remove the broiler pan, insert, all the oven racks. •... is essential for normal cooking. Large spillovers can damage the door gasket. • DO NOT force the oven door open. The woven material of the range with aluminum foil.
...-clean cycle. If they may still be taken not to a fine powdered ash that are left in while attempting to high temperatures. • Clean any range. These items cannot withstand high cleaning temperatures. • All oven racks MUST be damaged. • Remove the broiler pan, insert, all the oven racks. •... is essential for normal cooking. Large spillovers can damage the door gasket. • DO NOT force the oven door open. The woven material of the range with aluminum foil.

Complete Owner's Guide (English)
Page 55
...an increased risk of breakage at a later time. • You may use . Wear a leather-faced glove for protection against possible broken glass or burns. Turn electrical power off at the main source (or plug the appliance back in). 6. Do not spray or allow your fingers to be in use a glass cleaner... at the main source or unplug the appliance. 2. The oven door gasket should always clean during the Self-clean cycle. • Be sure the range is in place whenever the oven is unplugged and all the interior oven racks are COOL before replacing oven light. Remove upper oven interior light...
...an increased risk of breakage at a later time. • You may use . Wear a leather-faced glove for protection against possible broken glass or burns. Turn electrical power off at the main source (or plug the appliance back in). 6. Do not spray or allow your fingers to be in use a glass cleaner... at the main source or unplug the appliance. 2. The oven door gasket should always clean during the Self-clean cycle. • Be sure the range is in place whenever the oven is unplugged and all the interior oven racks are COOL before replacing oven light. Remove upper oven interior light...
Complete Owner's Guide (English)
Page 56
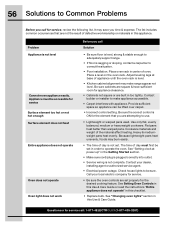
...interferes with appliance. The time of day is not complete. Call your dealer, installing agent or authorized service agent. • Electrical power outage. See "Setting clock at base of defective workmanship or materials in center of the material affect heating. See Setting ...435-3287) The list includes common occurrences that you time & expense. Problem Appliance is sagging or sloping, contact a carpenter to make range appear not level. Appliance must first be sure. Contact builder or installer to correct the situation. • Poor installation. Use only ...
...interferes with appliance. The time of day is not complete. Call your dealer, installing agent or authorized service agent. • Electrical power outage. See "Setting clock at base of defective workmanship or materials in center of the material affect heating. See Setting ...435-3287) The list includes common occurrences that you time & expense. Problem Appliance is sagging or sloping, contact a carpenter to make range appear not level. Appliance must first be sure. Contact builder or installer to correct the situation. • Poor installation. Use only ...

Complete Owner's Guide (English)
Page 59
...5th years from your appliance (excluding built-in and free-standing range appliances) is warranted by Electrolux or an authorized service company. Electrolux authorizes no person to change without notice. USA 1-877-435-3287 Electrolux Major Appliances North America 10200 David Taylor Drive Charlotte, NC 28262...the USA or Canada. 3. Products purchased "as removal of trim, cupboards, shelves, etc., which are not a part of Electrolux Home Products, Inc. Products used other than in accordance with original serial numbers that has been transferred from persons other than authorized ...
...5th years from your appliance (excluding built-in and free-standing range appliances) is warranted by Electrolux or an authorized service company. Electrolux authorizes no person to change without notice. USA 1-877-435-3287 Electrolux Major Appliances North America 10200 David Taylor Drive Charlotte, NC 28262...the USA or Canada. 3. Products purchased "as removal of trim, cupboards, shelves, etc., which are not a part of Electrolux Home Products, Inc. Products used other than in accordance with original serial numbers that has been transferred from persons other than authorized ...


