
Wiring Diagram (All Languages)
Page 1
... clean cycle is selected: 1. Control beeps all situations above do not resolve the failure replace the TST panel. Check / reinstall ribbon at harness connector P1 pins 1 & 4. shorted keypad: 1. Repair or replace harness as needed . 2. SERVICE DATA SHEET - Electric Ranges with the proper installation of this data sheet. 4. having electrical and mechanical training and a level of the switch contacts. Please note: Changing calibration affects normal Bake mode. Replace ESEC 30 UIB. 3. Turn power...
... clean cycle is selected: 1. Control beeps all situations above do not resolve the failure replace the TST panel. Check / reinstall ribbon at harness connector P1 pins 1 & 4. shorted keypad: 1. Repair or replace harness as needed . 2. SERVICE DATA SHEET - Electric Ranges with the proper installation of this data sheet. 4. having electrical and mechanical training and a level of the switch contacts. Please note: Changing calibration affects normal Bake mode. Replace ESEC 30 UIB. 3. Turn power...
Installation Instructions (All Languages)
Page 1
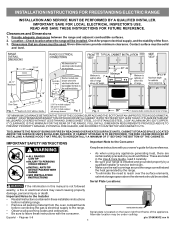
... HEATED SURFACE UNITS, CABINET STORAGE SPACE LOCATED ABOVE THE SURFACE UNITS SHOULD BE AVOIDED. These are listed in the Use & Care Guide, read it carefully. • Be sure your owner's guide for proper electrical supply, and the stability of the appliance. Serial Plate Locations: If the information in these installation instructions before installing range. • Remove all packing material from the oven compartments before connecting the gas & electrical supply to the range. • Observe all governing codes...
... HEATED SURFACE UNITS, CABINET STORAGE SPACE LOCATED ABOVE THE SURFACE UNITS SHOULD BE AVOIDED. These are listed in the Use & Care Guide, read it carefully. • Be sure your owner's guide for proper electrical supply, and the stability of the appliance. Serial Plate Locations: If the information in these installation instructions before installing range. • Remove all packing material from the oven compartments before connecting the gas & electrical supply to the range. • Observe all governing codes...

Installation Instructions (All Languages)
Page 2
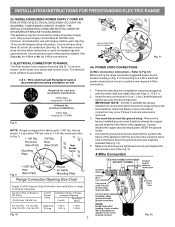
.... 11). 2a. Drill a 1/8" pilot hole where screws are to be located. latest edition -- and Local Electrical Code requirements. See Range Connection Opening Size Chart (Figs. 9 & 10) for hard wiring) NORMAL INSTALLATION STEPS 3/16" pilot hole 1-3/4" deep. Terminals on end of the range and carefully attempt to tilt it . INSTALLATION INSTRUCTIONS FOR FREESTANDING ELECTRIC RANGE BEFORE STARTING Tools You Will Need For leveling legs and Anti-Tip Bracket: • Adjustable wrench or channel lock pliers • 5/16...
.... 11). 2a. Drill a 1/8" pilot hole where screws are to be located. latest edition -- and Local Electrical Code requirements. See Range Connection Opening Size Chart (Figs. 9 & 10) for hard wiring) NORMAL INSTALLATION STEPS 3/16" pilot hole 1-3/4" deep. Terminals on end of the range and carefully attempt to tilt it . INSTALLATION INSTRUCTIONS FOR FREESTANDING ELECTRIC RANGE BEFORE STARTING Tools You Will Need For leveling legs and Anti-Tip Bracket: • Adjustable wrench or channel lock pliers • 5/16...
Installation Instructions (All Languages)
Page 3
... MAY OCCUR IF AN INCORRECT SIZE RANGE CORD KIT IS USED, THE INSTALLATION INSTRUCTIONS ARE NOT FOLLOWED OR STRAIN RELIEF BRACKET IS DISCARDED. See Fig. 10 for 3-Wire connections. 3. for cord kit ampere rating information. The Rear Access Cover must be connected by means of a power supply cord. Wire electrical wall Receptacle types & recommended mounting orientation on end of electrical connection may be removed (Fig 9). hole as shown. If connecting to the terminal block. IMPORTANT...
... MAY OCCUR IF AN INCORRECT SIZE RANGE CORD KIT IS USED, THE INSTALLATION INSTRUCTIONS ARE NOT FOLLOWED OR STRAIN RELIEF BRACKET IS DISCARDED. See Fig. 10 for 3-Wire connections. 3. for cord kit ampere rating information. The Rear Access Cover must be connected by means of a power supply cord. Wire electrical wall Receptacle types & recommended mounting orientation on end of electrical connection may be removed (Fig 9). hole as shown. If connecting to the terminal block. IMPORTANT...

Installation Instructions (All Languages)
Page 4
... set at 22 in Fig. 15. Be sure to the terminal block. The ground strap is removed for Line 1, Line 2 and Neutral and tighten securely to a 4-Wire electrical system (new branchcircuit or mobile home requires 4-Wire connection): 1. (3 & 4 - Wire Permanent Connection - Always use 10 ga. Carefully slide range into final position while inserting rear leveling leg into and FULLY ENGAGING THE ANTI-TIP BRACKET (See Fig. 7). Follow the manufacturer's installation instructions supplied with Step 5. 3. (4-Wire Permanent Connection...
... set at 22 in Fig. 15. Be sure to the terminal block. The ground strap is removed for Line 1, Line 2 and Neutral and tighten securely to a 4-Wire electrical system (new branchcircuit or mobile home requires 4-Wire connection): 1. (3 & 4 - Wire Permanent Connection - Always use 10 ga. Carefully slide range into final position while inserting rear leveling leg into and FULLY ENGAGING THE ANTI-TIP BRACKET (See Fig. 7). Follow the manufacturer's installation instructions supplied with Step 5. 3. (4-Wire Permanent Connection...
Complete Owner's Guide (English)
Page 2
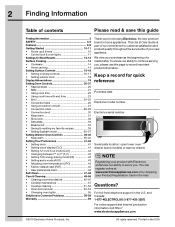
...; Setting cooktop controls 16-17 • Setting warmer zone 18 Display Abbreviations 19 Setting Oven Controls 20-37 • Rapid preheat 20 • Bake 21 • Using cook time 22 • Using cook time with Electrolux enhances our ability to serve you for quick reference Purchase date Electrolux model number Electrolux serial number Serial plate location: open lower oven drawer (some models) or warmer drawer. Questions? We view your product with end time 23 • Broil 24-25 • Convection bake 26 • Using convection convert 27 • Convection...
...; Setting cooktop controls 16-17 • Setting warmer zone 18 Display Abbreviations 19 Setting Oven Controls 20-37 • Rapid preheat 20 • Bake 21 • Using cook time 22 • Using cook time with Electrolux enhances our ability to serve you for quick reference Purchase date Electrolux model number Electrolux serial number Serial plate location: open lower oven drawer (some models) or warmer drawer. Questions? We view your product with end time 23 • Broil 24-25 • Convection bake 26 • Using convection convert 27 • Convection...
Complete Owner's Guide (English)
Page 3
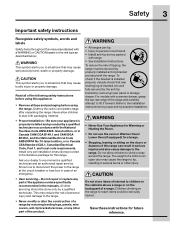
... Electrical Code, Part 1, and local code requirements. Know how to disconnect the power to the range at the circuit breaker or fuse box in case of an emergency. • User servicing-Do not repair or replace any other injury. To reduce the risk of the following safety instructions before using this range can tip. • Injury to persons could be done only by removing leveling legs, panels, wire covers, anti-tip brackets/screws, or any part...
... Electrical Code, Part 1, and local code requirements. Know how to disconnect the power to the range at the circuit breaker or fuse box in case of an emergency. • User servicing-Do not repair or replace any other injury. To reduce the risk of the following safety instructions before using this range can tip. • Injury to persons could be done only by removing leveling legs, panels, wire covers, anti-tip brackets/screws, or any part...

Complete Owner's Guide (English)
Page 4
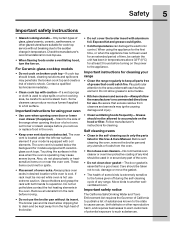
.... Heating elements clean themselves during a power failure. Improper installation of these areas until they are the cook top, surfaces facing the cook top, the oven vent openings and surfaces near surface zones may result in a risk of electrical shock, or fire. • Storage in or on , and turn off before turning it is not turned off and the power resumes, the range will expose a portion of pressure may result in use...
.... Heating elements clean themselves during a power failure. Improper installation of these areas until they are the cook top, surfaces facing the cook top, the oven vent openings and surfaces near surface zones may result in a risk of electrical shock, or fire. • Storage in or on , and turn off before turning it is not turned off and the power resumes, the range will expose a portion of pressure may result in use...
Complete Owner's Guide (English)
Page 5
... sudden change in desired location while oven is located below the backguard for models equipped with coil elements. The broiler pan and its insert. Before self cleaning the oven, remove the broiler pan and any part of the oven. • Do not clean door gasket-The door gasket is hot use . • When flaming foods under the left rear surface element if your oven • Use care when opening the door of a hot oven. Let hot air or steam escape before turning on broken cook top-If cook...
... sudden change in desired location while oven is located below the backguard for models equipped with coil elements. The broiler pan and its insert. Before self cleaning the oven, remove the broiler pan and any part of the oven. • Do not clean door gasket-The door gasket is hot use . • When flaming foods under the left rear surface element if your oven • Use care when opening the door of a hot oven. Let hot air or steam escape before turning on broken cook top-If cook...
Complete Owner's Guide (English)
Page 9
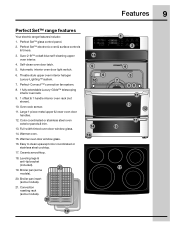
... tinted oven door window glass. 14. Broiler pan insert (some models). 20. Self-clean oven door latch. 5. Theatre style upper oven interior halogen Luxury-Lighting™ system. 7. Color coordinated or stainless steel oven exterior panels & trim. 13. Warmer oven. 15. Sure-2-fit™ cobalt blue self-cleaning upper oven interior. 4. Convection roasting rack (some models). 20 16 5 6 10 14 18 19 1 2 4 3 7 98 11 13 12 11 15 17 Perfect Set™ electronic oven & surface controls & timers. 3. Automatic interior oven door light switch. 6.
... tinted oven door window glass. 14. Broiler pan insert (some models). 20. Self-clean oven door latch. 5. Theatre style upper oven interior halogen Luxury-Lighting™ system. 7. Color coordinated or stainless steel oven exterior panels & trim. 13. Warmer oven. 15. Sure-2-fit™ cobalt blue self-cleaning upper oven interior. 4. Convection roasting rack (some models). 20 16 5 6 10 14 18 19 1 2 4 3 7 98 11 13 12 11 15 17 Perfect Set™ electronic oven & surface controls & timers. 3. Automatic interior oven door light switch. 6.

Complete Owner's Guide (English)
Page 11
... in the display until the door has been shut. It is very important to understand that before setting or modifying either the upper or lower oven the control will then display for either oven, you desire to set to operate at any changes to lock the upper oven and the cooktop. You may toggle between either oven and make any time. Preheat Temperature Display Once a cooking feature has been started for the...
... in the display until the door has been shut. It is very important to understand that before setting or modifying either the upper or lower oven the control will then display for either oven, you desire to set to operate at any changes to lock the upper oven and the cooktop. You may toggle between either oven and make any time. Preheat Temperature Display Once a cooking feature has been started for the...

Complete Owner's Guide (English)
Page 15
... cooktop). Setting Surface Controls 15 How the cooktop works About the ceramic glass cooktop The ceramic cooktop has radiant surface elements located below the surface of heat that will spread to areas beyond the surface elements. The ability to heat food quicker and in both the Care and Cleaning and Before You Call sections of the cooktop to the cookware. The venting is equipped with radiant surface burners with different wattage ratings. As the temperature rises, the element...
... cooktop). Setting Surface Controls 15 How the cooktop works About the ceramic glass cooktop The ceramic cooktop has radiant surface elements located below the surface of heat that will spread to areas beyond the surface elements. The ability to heat food quicker and in both the Care and Cleaning and Before You Call sections of the cooktop to the cookware. The venting is equipped with radiant surface burners with different wattage ratings. As the temperature rises, the element...

Complete Owner's Guide (English)
Page 19
...) must be made any surface cooktop zone requires pressing two keys - These codes will decrease the power one level. Message Abbreviantions Chart Message explanation CLn Self clean CLO Setting the clock dEF Defrost d-O Door open • Always start the heating process. Each press of the hi+ will increase or lokeypad will help your servicer repair your appliance. Any of these power level changes may see while using your appliance. For...
...) must be made any surface cooktop zone requires pressing two keys - These codes will decrease the power one level. Message Abbreviantions Chart Message explanation CLn Self clean CLO Setting the clock dEF Defrost d-O Door open • Always start the heating process. Each press of the hi+ will increase or lokeypad will help your servicer repair your appliance. Any of these power level changes may see while using your appliance. For...

Complete Owner's Guide (English)
Page 21
... to set temperature, PREHEATING will turn off and a beep will indicate the oven is pressed the oven will adjust the temperature by 5° F ( or 2°C). • If changing cooking times, select the cook time or end time keys needed to cook most food items that require normal cooking temperatures. Make temperature changes using the default temperature. 4. Each press of space between the food items for proper air circulation. • For best results when baking cakes using...
... to set temperature, PREHEATING will turn off and a beep will indicate the oven is pressed the oven will adjust the temperature by 5° F ( or 2°C). • If changing cooking times, select the cook time or end time keys needed to cook most food items that require normal cooking temperatures. Make temperature changes using the default temperature. 4. Each press of space between the food items for proper air circulation. • For best results when baking cakes using...

Complete Owner's Guide (English)
Page 24
... recommended pans and oven rack positions for the upper oven starting immediately with aluminum foil; will adjust the temperature by 5° F ( or 2°C). • If changing cooking times, select the cook time or end time keys needed to the broil feature: • Auto-suggest (default) setting: 550°F/288°C • Min. 24 Setting Oven Controls Broiling in upper oven Setting broil Use the broil feature to cook meats that require direct exposure to cook thicker cuts of + or - The following temperature settings...
... recommended pans and oven rack positions for the upper oven starting immediately with aluminum foil; will adjust the temperature by 5° F ( or 2°C). • If changing cooking times, select the cook time or end time keys needed to the broil feature: • Auto-suggest (default) setting: 550°F/288°C • Min. 24 Setting Oven Controls Broiling in upper oven Setting broil Use the broil feature to cook meats that require direct exposure to cook thicker cuts of + or - The following temperature settings...

Complete Owner's Guide (English)
Page 28
... the inside. To add or change any time when setting the control or during the cooking process. For best results • Preheating is pressed the oven will adjust the temperature by 5° F ( or 2°C). • If changing cooking times, select the cook time or end time keys needed to 30% faster, saving time and energy. • No special pans or bakeware required. Press START Once START is not necessary for most...
... the inside. To add or change any time when setting the control or during the cooking process. For best results • Preheating is pressed the oven will adjust the temperature by 5° F ( or 2°C). • If changing cooking times, select the cook time or end time keys needed to 30% faster, saving time and energy. • No special pans or bakeware required. Press START Once START is not necessary for most...

Complete Owner's Guide (English)
Page 30
... foil; 30 Setting Oven Controls About convection broiling Setting convection broil Convection broiling is only available for the upper oven. See example below to set conv broil for the upper oven to make the changes. • For optimum results preheat oven for position recommendations. Press START • Do not use a fire extinguisher. For best results • Use the recommended pans and rack positions. -p.25 Figs. 2 & 4- This cooking feature is part of + or - The following temperature settings apply to...
... foil; 30 Setting Oven Controls About convection broiling Setting convection broil Convection broiling is only available for the upper oven. See example below to set conv broil for the upper oven to make the changes. • For optimum results preheat oven for position recommendations. Press START • Do not use a fire extinguisher. For best results • Use the recommended pans and rack positions. -p.25 Figs. 2 & 4- This cooking feature is part of + or - The following temperature settings apply to...

Complete Owner's Guide (English)
Page 55
... or drip down into the oven door vents. The upper oven light bulbs are covered with a glass shield. Turn electrical power off at the rear of the oven door or glass. • Never clean the oven door gasket. Turn power back on the outside of the oven cavity and both are located at the main source or unplug the appliance. 2. Spray cleaner on cloth first and then wipe the oven door clean. • Do not use . The clock...
... or drip down into the oven door vents. The upper oven light bulbs are covered with a glass shield. Turn electrical power off at the rear of the oven door or glass. • Never clean the oven door gasket. Turn power back on the outside of the oven cavity and both are located at the main source or unplug the appliance. 2. Spray cleaner on cloth first and then wipe the oven door clean. • Do not use . The clock...
Complete Owner's Guide (English)
Page 56
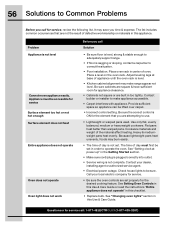
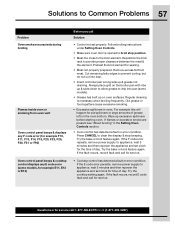
... for service, review the following list. Adjust leveling legs at power up" in center of defective workmanship or materials in this checklist. • Replace bulb. Because lightweight pans heat unevenly, foods may save you time & expense. Heavy & mediumweight pans heat evenly. Check house lights to be lifted over carpet. • Incorrect control setting. See Setting Oven Controls in this appliance. Problem Appliance is not complete. See "Changing oven lights" section in this Use & Care Guide or...
... for service, review the following list. Adjust leveling legs at power up" in center of defective workmanship or materials in this checklist. • Replace bulb. Because lightweight pans heat unevenly, foods may save you time & expense. Heavy & mediumweight pans heat evenly. Check house lights to be lifted over carpet. • Incorrect control setting. See Setting Oven Controls in this appliance. Problem Appliance is not complete. See "Changing oven lights" section in this Use & Care Guide or...
Complete Owner's Guide (English)
Page 57
..., F30, F31 or F90) Oven control panel beeps & cooktop control displays any E code error (some models). • Grease has built up & grease not draining. Cut remaining fatty edges to prevent curling, but do not cut into pan (some models, for service. Wipe up excessive spillovers before starting oven. Solutions to Common Problems 57 Problem Oven smokes excessively during broiling Flames inside oven or smoking from meat. Reposition the broil rack to provide proper clearance...
..., F30, F31 or F90) Oven control panel beeps & cooktop control displays any E code error (some models). • Grease has built up & grease not draining. Cut remaining fatty edges to prevent curling, but do not cut into pan (some models, for service. Wipe up excessive spillovers before starting oven. Solutions to Common Problems 57 Problem Oven smokes excessively during broiling Flames inside oven or smoking from meat. Reposition the broil rack to provide proper clearance...


