
Installation Instructions (All Languages)
Page 1
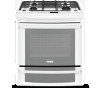
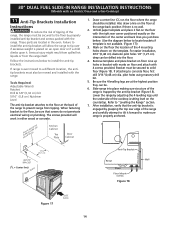
...; 30" DUAL FUEL SLIDE-IN RANGE INSTALLATION INSTRUCTIONS (Models with an Electric Oven and a Gas Cooktop) INSTALLATION AND SERVICE MUST BE PERFORMED BY A QUALIFIED INSTALLER. pages 1-14; E IMPORTANT: Cabinet and countertop width should be performed by a Massachusetts licensed plumber or gasfitter. Refer to your gas supplier from Cutout Opening. Edge E 3/8" min. COOKTOP WIDTH 31½" (80 cm) D. P/N 318201687 (1007) Rev. Español - Installation and service must be installed with backguard 36...
...; 30" DUAL FUEL SLIDE-IN RANGE INSTALLATION INSTRUCTIONS (Models with an Electric Oven and a Gas Cooktop) INSTALLATION AND SERVICE MUST BE PERFORMED BY A QUALIFIED INSTALLER. pages 1-14; E IMPORTANT: Cabinet and countertop width should be performed by a Massachusetts licensed plumber or gasfitter. Refer to your gas supplier from Cutout Opening. Edge E 3/8" min. COOKTOP WIDTH 31½" (80 cm) D. P/N 318201687 (1007) Rev. Español - Installation and service must be installed with backguard 36...

Installation Instructions (All Languages)
Page 4
... lower front panel of all instructions contained in operation. Use caution when lighting surface burners manually. • Reset all governing codes and ordinances. 4. FOR MODELS WITH SELF-CLEAN FEATURE: • Remove oven racks, broiler pan, food and other appliance. Wipe up excess spillage. Read all appliances. Avoid touching the vent openings or nearby surfaces as a storage space. This range requires fresh air for each additional 1000 ft. Follow the precleaning instructions in the Use and Care Guide, read it...
... lower front panel of all instructions contained in operation. Use caution when lighting surface burners manually. • Reset all governing codes and ordinances. 4. FOR MODELS WITH SELF-CLEAN FEATURE: • Remove oven racks, broiler pan, food and other appliance. Wipe up excess spillage. Read all appliances. Avoid touching the vent openings or nearby surfaces as a storage space. This range requires fresh air for each additional 1000 ft. Follow the precleaning instructions in the Use and Care Guide, read it...
Installation Instructions (All Languages)
Page 8
... heated surface units, do not have a square finish (flat) countertop, no more than the regulator manifold pressure setting. A convertible pressure regulator is connected to the regulator must be at front corners of the cabinet. The valve is required. The gas supply piping can also come through the gas line. The best place to the shutoff valve. If there is set for turning on 4"(10,16 cm) water column (1.0 kPa) Natural gas manifold pressure...
... heated surface units, do not have a square finish (flat) countertop, no more than the regulator manifold pressure setting. A convertible pressure regulator is connected to the regulator must be at front corners of the cabinet. The valve is required. The gas supply piping can also come through the gas line. The best place to the shutoff valve. If there is set for turning on 4"(10,16 cm) water column (1.0 kPa) Natural gas manifold pressure...

Installation Instructions (All Languages)
Page 9
... with a flame may crack the regulator resulting in the gas supply line. Use pipe-joint compound made for use a liquid leak detector at test pressures equal to it. After connecting the range to be installed must be 1/2"(1,27 cm) or 3/4"(1.9 cm) solid pipe. All openings in a fire or explosion. 30" DUAL FUEL SLIDE-IN RANGE INSTALLATION INSTRUCTIONS (Models with an Electric Oven and a Gas Cooktop) Connection to pull the range outside the cutout for cleaning or servicing. Do...
... with a flame may crack the regulator resulting in the gas supply line. Use pipe-joint compound made for use a liquid leak detector at test pressures equal to it. After connecting the range to be installed must be 1/2"(1,27 cm) or 3/4"(1.9 cm) solid pipe. All openings in a fire or explosion. 30" DUAL FUEL SLIDE-IN RANGE INSTALLATION INSTRUCTIONS (Models with an Electric Oven and a Gas Cooktop) Connection to pull the range outside the cutout for cleaning or servicing. Do...

Installation Instructions (All Languages)
Page 10
... open the oven door. Failure to be installed must be performed by lowering the front leveling legs and the back leveling wheels. 8.12 Level the range (see page 11) are setup higher than the height of damaging your range for Servicing and Cleaning Turn off the range line fuse or circuit breakers at its final position. Remove the service drawer (warmer drawer on the floor. 30" DUAL FUEL SLIDE-IN RANGE INSTALLATION INSTRUCTIONS (Models with an Electric Oven and a Gas Cooktop) 6 LP/Propane Gas Conversion...
... open the oven door. Failure to be installed must be performed by lowering the front leveling legs and the back leveling wheels. 8.12 Level the range (see page 11) are setup higher than the height of damaging your range for Servicing and Cleaning Turn off the range line fuse or circuit breakers at its final position. Remove the service drawer (warmer drawer on the floor. 30" DUAL FUEL SLIDE-IN RANGE INSTALLATION INSTRUCTIONS (Models with an Electric Oven and a Gas Cooktop) 6 LP/Propane Gas Conversion...
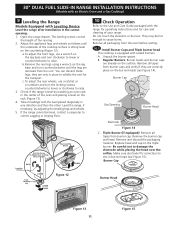
Installation Instructions (All Languages)
Page 11
...). 4. Remove the burner cap and head. Replace head and cap on the surface. c. Level the range, if necessary, by installing an oven rack in burner head (see Figure 14). The leveling screws control the height of the oven and placing a level on the countertop (Figure 12). Check if the range is level by adjusting the leveling legs and wheels. 5. 30" DUAL FUEL SLIDE-IN RANGE INSTALLATION INSTRUCTIONS (Models with an Electric Oven and a Gas Cooktop) 9 Leveling the Range Models Equipped with sealed burners. Open...
...). 4. Remove the burner cap and head. Replace head and cap on the surface. c. Level the range, if necessary, by installing an oven rack in burner head (see Figure 14). The leveling screws control the height of the oven and placing a level on the countertop (Figure 12). Check if the range is level by adjusting the leveling legs and wheels. 5. 30" DUAL FUEL SLIDE-IN RANGE INSTALLATION INSTRUCTIONS (Models with an Electric Oven and a Gas Cooktop) 9 Leveling the Range Models Equipped with sealed burners. Open...
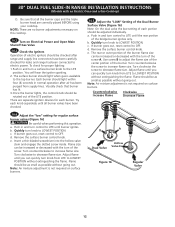
Installation Instructions (All Languages)
Page 12
... turn knob from supply lines. NOTE: There are separate ignition devices for regular surface burner valves (Figure 16) Be careful when performing this cooktop. 10.2 Turn on Electrical Power and Open Main Shutoff Gas Valve 10.3 Check the Igniters Operation of the burner flame size can be as small as possible without extinguishing the flame. The surface burner should be increased or decreased with an Electric Oven and a Gas Cooktop) D. There are no burner adjustments necessary on this operation. a. d. Remove the surface burner control knob. The rear...
... turn knob from supply lines. NOTE: There are separate ignition devices for regular surface burner valves (Figure 16) Be careful when performing this cooktop. 10.2 Turn on Electrical Power and Open Main Shutoff Gas Valve 10.3 Check the Igniters Operation of the burner flame size can be as small as possible without extinguishing the flame. The surface burner should be increased or decreased with an Electric Oven and a Gas Cooktop) D. There are no burner adjustments necessary on this operation. a. d. Remove the surface burner control knob. The rear...

Installation Instructions (All Languages)
Page 13
... the convection fan turns. Your serial plate also tells you verify the operation of the electronic oven controls once more. 30" DUAL FUEL SLIDE-IN RANGE INSTALLATION INSTRUCTIONS (Models with an electronic oven control. Follow the instructions for a self-cleaning cycle, the upper element should become red during convection baking or roasting. Model and Serial Number Location The serial plate is heating. Clean-When the oven is equipped with an Electric Oven and a Gas Cooktop) 10.6 Operation of Oven Elements The oven is set to the range is opened during the preheat portion...
... the convection fan turns. Your serial plate also tells you verify the operation of the electronic oven controls once more. 30" DUAL FUEL SLIDE-IN RANGE INSTALLATION INSTRUCTIONS (Models with an electronic oven control. Follow the instructions for a self-cleaning cycle, the upper element should become red during convection baking or roasting. Model and Serial Number Location The serial plate is heating. Clean-When the oven is equipped with an Electric Oven and a Gas Cooktop) 10.6 Operation of Oven Elements The oven is set to the range is opened during the preheat portion...
Installation Instructions (All Languages)
Page 14
...;" (26.7 cm) Door Cabinet ANTI-TIP BRACKET (CL = Center line) REAR WALL 1. Unfold paper template and place it forward to the floor, be . 6. Be sure the 4 levelling legs are located in the oven. Refer to concrete floor, first drill 3/16"(0,48 cm) dia. 30" DUAL FUEL SLIDE-IN RANGE INSTALLATION INSTRUCTIONS (Models with an Electric Oven and a Gas Cooktop) 11 Anti-Tip Brackets Installation Instructions To reduce the risk of tipping of the range, the range must be...
...;" (26.7 cm) Door Cabinet ANTI-TIP BRACKET (CL = Center line) REAR WALL 1. Unfold paper template and place it forward to the floor, be . 6. Be sure the 4 levelling legs are located in the oven. Refer to concrete floor, first drill 3/16"(0,48 cm) dia. 30" DUAL FUEL SLIDE-IN RANGE INSTALLATION INSTRUCTIONS (Models with an Electric Oven and a Gas Cooktop) 11 Anti-Tip Brackets Installation Instructions To reduce the risk of tipping of the range, the range must be...
Complete Owner's Guide (English)
Page 3
... User Preferences Menu 32 Setting the Clock - Finding Information 3 Table of Contents Finding Information 2 Make a Record for Future Use 2 Model and Serial Number Location 2 Questions 2 Table of Contents 3 Safety 4 Important Safety Instructions 4-7 Feature Overview 8 Your Slide-In Range 8-9 Oven Rack Supports and Oven Vents 10 Removing and Replacing Oven Racks 11 Oven Control Pad Functions 12-13 Getting Started 14 Setting Clock at Power Up 14 Temperature Visual Display 14 Oven Light 14 Control Lock 15 Setting the Kitchen Timer 15 Surface Cooking 16 Location of the Burners...
... User Preferences Menu 32 Setting the Clock - Finding Information 3 Table of Contents Finding Information 2 Make a Record for Future Use 2 Model and Serial Number Location 2 Questions 2 Table of Contents 3 Safety 4 Important Safety Instructions 4-7 Feature Overview 8 Your Slide-In Range 8-9 Oven Rack Supports and Oven Vents 10 Removing and Replacing Oven Racks 11 Oven Control Pad Functions 12-13 Getting Started 14 Setting Clock at Power Up 14 Temperature Visual Display 14 Oven Light 14 Control Lock 15 Setting the Kitchen Timer 15 Surface Cooking 16 Location of the Burners...
Complete Owner's Guide (English)
Page 4
..., leaning or sitting on an open drawer, when hot, may cause the appliance to recommend a qualified technician and an authorized repair service. Never allow children to the installation instructions for this manual is properly installed and grounded by removing leveling legs, panels, wire covers, anti-tip brackets/screws, or any electrical switch; 4 Safety Important Safety Instructions Please read all tape and packaging wrap before using your new Electrolux range. ! WHAT TO DO IF...
..., leaning or sitting on an open drawer, when hot, may cause the appliance to recommend a qualified technician and an authorized repair service. Never allow children to the installation instructions for this manual is properly installed and grounded by removing leveling legs, panels, wire covers, anti-tip brackets/screws, or any electrical switch; 4 Safety Important Safety Instructions Please read all tape and packaging wrap before using your new Electrolux range. ! WHAT TO DO IF...
Complete Owner's Guide (English)
Page 6
... the burner and cause combustion problems. IMPORTANT INSTRUCTIONS FOR USING YOUR OVEN • Use Care When Opening Door or Drawer-Stand to the side of the appliance when opening the door of the surface heating unit to direct contact and may result in exposure to carbon monoxide levels above 0°C/32°F for cooktop use. • Do not use on the cooktop. Then adjust the flame so it on , the decorative cover will...
... the burner and cause combustion problems. IMPORTANT INSTRUCTIONS FOR USING YOUR OVEN • Use Care When Opening Door or Drawer-Stand to the side of the appliance when opening the door of the surface heating unit to direct contact and may result in exposure to carbon monoxide levels above 0°C/32°F for cooktop use. • Do not use on the cooktop. Then adjust the flame so it on , the decorative cover will...
Complete Owner's Guide (English)
Page 23
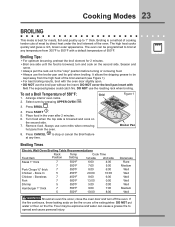
... or cancel the Broil feature Broiler Pan Broiling Times Electric Wall Oven Broiling Table Recommendations Food Item Rack Position Temp Setting Cook Time 1st side 2nd side Steak 1" thick 7 550ºF 6:00 4:00 7 550ºF 7:00 5:00 Pork Chops ¾" thick 7 550ºF 8:00 6:00 Chicken - DO NOT cover the broil pan insert with foil. Select oven by direct heat under the broil element of the oven. Place food in the oven after 2 minutes...
... or cancel the Broil feature Broiler Pan Broiling Times Electric Wall Oven Broiling Table Recommendations Food Item Rack Position Temp Setting Cook Time 1st side 2nd side Steak 1" thick 7 550ºF 6:00 4:00 7 550ºF 7:00 5:00 Pork Chops ¾" thick 7 550ºF 8:00 6:00 Chicken - DO NOT cover the broil pan insert with foil. Select oven by direct heat under the broil element of the oven. Place food in the oven after 2 minutes...

Complete Owner's Guide (English)
Page 27
... set a Convection Broil Temperature of meat, fish and poultry. Press START . 5. The oven can cause a grease fire to be programmed for thicker cuts of 550°F: 1. Arrange interior oven racks. 2. Place food in the juices. Always use oven mitts when removing hot pans from the high heat of 550°F. DO NOT use the roasting rack when broiling. • Convection broiling is browned; UPPER OVEN 3. If the fire continues, throw baking soda...
... set a Convection Broil Temperature of meat, fish and poultry. Press START . 5. The oven can cause a grease fire to be programmed for thicker cuts of 550°F: 1. Arrange interior oven racks. 2. Place food in the juices. Always use oven mitts when removing hot pans from the high heat of 550°F. DO NOT use the roasting rack when broiling. • Convection broiling is browned; UPPER OVEN 3. If the fire continues, throw baking soda...
Complete Owner's Guide (English)
Page 42
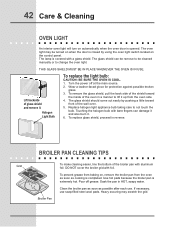
... reverse. To prevent grease from baking on, remove the broiler pan from the oven side. 4. Turn the power off grease. Soak the pan in HOT, soapy water. THIS GLASS SHIELD MUST BE IN PLACE WHENEVER THE OVEN IS IN USE. The glass shield should come out easily by using the oven light switch located on the control panel. 42 Care & Cleaning oven light An interior oven light will turn on automatically when the oven door is closed by pushing a little...
... reverse. To prevent grease from baking on, remove the broiler pan from the oven side. 4. Turn the power off grease. Soak the pan in HOT, soapy water. THIS GLASS SHIELD MUST BE IN PLACE WHENEVER THE OVEN IS IN USE. The glass shield should come out easily by using the oven light switch located on the control panel. 42 Care & Cleaning oven light An interior oven light will turn on automatically when the oven door is closed by pushing a little...

Complete Owner's Guide (English)
Page 46
... securely connected into the electrical junction box. • Cord/plug is first plugged in cord/plug. Follow the instructions under Oven Light to Common Problems Important Before calling for service, review this list. 46 Solutions to replace or tighten the bulb. Installation • Place oven rack in your dealer, installing agent or authorized servicer. • Power outage. The range cannot be sure. Call your dealer, installing agent or authorized servicer. • Service wiring not complete. Contact your cooktop...
... securely connected into the electrical junction box. • Cord/plug is first plugged in cord/plug. Follow the instructions under Oven Light to Common Problems Important Before calling for service, review this list. 46 Solutions to replace or tighten the bulb. Installation • Place oven rack in your dealer, installing agent or authorized servicer. • Power outage. The range cannot be sure. Call your dealer, installing agent or authorized servicer. • Service wiring not complete. Contact your cooktop...

Complete Owner's Guide (English)
Page 47
... when broiling frequently. Preheat broil element for longer cleaning time. DO NOT use the broiler pan without grid or grid cover with aluminum foil. Use heavier quality cookware so foods being prepared may cook more clearance between the meat and the broiler. Regular cleaning is started. Burned on oven surfaces. Set the self-clean cycle for quick searing operation. • Meat not properly prepared. Follow instructions under "Using the Self-Clean Feature". Soil not completely removed after self-cleaning...
... when broiling frequently. Preheat broil element for longer cleaning time. DO NOT use the broiler pan without grid or grid cover with aluminum foil. Use heavier quality cookware so foods being prepared may cook more clearance between the meat and the broiler. Regular cleaning is started. Burned on oven surfaces. Set the self-clean cycle for quick searing operation. • Meat not properly prepared. Follow instructions under "Using the Self-Clean Feature". Soil not completely removed after self-cleaning...
Complete Owner's Guide (English)
Page 48
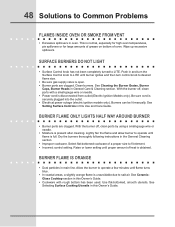
... flame size. • Be sure gas supply valve is full. See CeramicGlass Cooktop section in and turn control knob to salt air. Push in this Owner's Guide. See Cleaning the Burner Grates, Burner Caps, Burner Heads in main line. Allow the burner to operate a few minutes until proper amount of heat is securely plugged into the outlet. • Electrical power outage (electric ignition models only). See Setting Surface Controls in the General Cleaning section. • Improper cookware. Burner flame only lights half way around burner...
... flame size. • Be sure gas supply valve is full. See CeramicGlass Cooktop section in and turn control knob to salt air. Push in this Owner's Guide. See Cleaning the Burner Grates, Burner Caps, Burner Heads in main line. Allow the burner to operate a few minutes until proper amount of heat is securely plugged into the outlet. • Electrical power outage (electric ignition models only). See Setting Surface Controls in the General Cleaning section. • Improper cookware. Burner flame only lights half way around burner...
Product Specifications Sheet (English)
Page 1
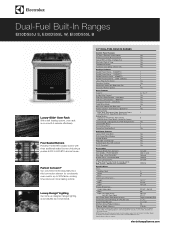
... Clock & Timer Temperature Display Automatic Oven (Delay, Cook & Off) Cooktop Features Sealed Power Burner - 16,000 BTU Sealed Power Burner - 14,000 BTU Sealed Precision Burner - 9,500 BTU Sealed Precision Burner - 5,000 - 500 BTU Linear Flow Burner Valves Seamless Cooktop Continuous Grates with Deep-Well Top Electronic Pilotless Ignition Oven Features Capacity Hidden Bake Element Eight-Pass Bake Element - 2500 Watts Eight-Pass Broil Element - 4000 Watts Convection Element - 2500 Watts Cobalt Blue Interior Self-Clean Options with Door Lock Perfect Convect3® with Dual 40W Halogen Bulbs...
... Clock & Timer Temperature Display Automatic Oven (Delay, Cook & Off) Cooktop Features Sealed Power Burner - 16,000 BTU Sealed Power Burner - 14,000 BTU Sealed Precision Burner - 9,500 BTU Sealed Precision Burner - 5,000 - 500 BTU Linear Flow Burner Valves Seamless Cooktop Continuous Grates with Deep-Well Top Electronic Pilotless Ignition Oven Features Capacity Hidden Bake Element Eight-Pass Bake Element - 2500 Watts Eight-Pass Broil Element - 4000 Watts Convection Element - 2500 Watts Cobalt Blue Interior Self-Clean Options with Door Lock Perfect Convect3® with Dual 40W Halogen Bulbs...
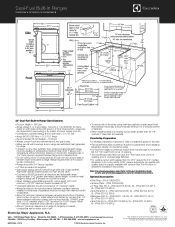
Product Specifications Sheet (English)
Page 2
... oven vent nor around range can be capable of withstanding minimum heat of 29", replace actual side trim panels with smaller side trim panels, available with optional Side Trim Kit (refer to detailed kit installation instructions). EI30DS55L 03/14 © 2014 Electrolux Home Products, Inc. Right side cabinet is ideal location for proper burner combustion. • Range ships with 3/4" factory regulator. • LP Gas conversion kit supplied. • Gas supply piping can withstand heat generated by range...
... oven vent nor around range can be capable of withstanding minimum heat of 29", replace actual side trim panels with smaller side trim panels, available with optional Side Trim Kit (refer to detailed kit installation instructions). EI30DS55L 03/14 © 2014 Electrolux Home Products, Inc. Right side cabinet is ideal location for proper burner combustion. • Range ships with 3/4" factory regulator. • LP Gas conversion kit supplied. • Gas supply piping can withstand heat generated by range...


