Complete Owner's Guide (English)
Page 2
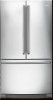
... Finding Information 2 Safety 3 Feature Overview 5 Installation 6 Removing the Doors 10 Purchase date Installing Door Handles 12 Connecting the Water Supply 13 Electrolux model number Controls 14 Automatic Ice Maker 16 Electrolux serial number NOTE Registering your product with filter housing (select models) Final Checks Shipping material removed Fresh food and freezer temperatures set This Use & Care Guide is sitting solid on all sides Freezer door is level across the top Leveling Refrigerator is level, side-to-side and tilted...
... Finding Information 2 Safety 3 Feature Overview 5 Installation 6 Removing the Doors 10 Purchase date Installing Door Handles 12 Connecting the Water Supply 13 Electrolux model number Controls 14 Automatic Ice Maker 16 Electrolux serial number NOTE Registering your product with filter housing (select models) Final Checks Shipping material removed Fresh food and freezer temperatures set This Use & Care Guide is sitting solid on all sides Freezer door is level across the top Leveling Refrigerator is level, side-to-side and tilted...
Complete Owner's Guide (English)
Page 3
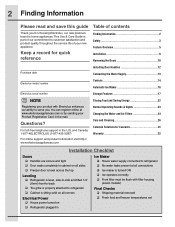
.... IMPORTANT Indicates installation, operation, or maintenance information which , if not avoided, could result in death or serious injury. Read product labels for a few hours), unattended refrigerators and freezers are dangerous. Staples can quickly cause suffocation. • Destroy or recycle the product's carton, plastic bags, and any moving parts of the automatic ice maker. • Remove all safety instructions before using your new refrigerator...
.... IMPORTANT Indicates installation, operation, or maintenance information which , if not avoided, could result in death or serious injury. Read product labels for a few hours), unattended refrigerators and freezers are dangerous. Staples can quickly cause suffocation. • Destroy or recycle the product's carton, plastic bags, and any moving parts of the automatic ice maker. • Remove all safety instructions before using your new refrigerator...
Complete Owner's Guide (English)
Page 6
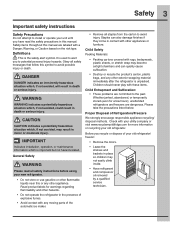
...: This Use & Care Guide provides general installation and operating instructions for your model. 6 Installation Required Tools You will need the following clearances for ease of installation, proper air circulation, and plumbing and electrical connections: Sides & Top Back ³⁄₈ inch (9.5 mm) 1 inch (25.4 mm) NOTE If your refrigerator is level and strong enough to support a fully loaded refrigerator. • Consider water supply availability for models equipped with the door hinge against a wall...
...: This Use & Care Guide provides general installation and operating instructions for your model. 6 Installation Required Tools You will need the following clearances for ease of installation, proper air circulation, and plumbing and electrical connections: Sides & Top Back ³⁄₈ inch (9.5 mm) 1 inch (25.4 mm) NOTE If your refrigerator is level and strong enough to support a fully loaded refrigerator. • Consider water supply availability for models equipped with the door hinge against a wall...
Complete Owner's Guide (English)
Page 13
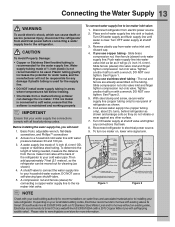
... an existing valve, Electrolux recommends its Smart Choice® water line kit 5305513409 (with all local plumbing codes. DO NOT over tighten. Then add approximately 7 feet (2.1 meters), so the refrigerator can be moved out for water leaks, and the manufacturer will need: 1. Depending on the tubing. Please refer to your water supply line connections comply with a 6 ft. Remove plastic cap from electric power source. 2. Turn ON water supply at shutoff valve and tighten...
... an existing valve, Electrolux recommends its Smart Choice® water line kit 5305513409 (with all local plumbing codes. DO NOT over tighten. Then add approximately 7 feet (2.1 meters), so the refrigerator can be moved out for water leaks, and the manufacturer will need: 1. Depending on the tubing. Please refer to your water supply line connections comply with a 6 ft. Remove plastic cap from electric power source. 2. Turn ON water supply at shutoff valve and tighten...
Complete Owner's Guide (English)
Page 14
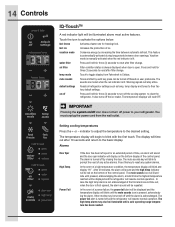
... for freezing food. r The alarm is acknowledged. 14 Controls press & hold on default off settings refrigerator temp freezer temp temp mode hold to reset good water filter order replace hold to reset good air filter order replace door ajar high temp power fail IQ-TouchTM A red indicator light will be displayed and the refrigerator will resume normal operation. Other modes may also be displayed and the temperature display will resume normal operation. fast freeze Activates a faster rate for three (3) seconds to reset after filter change . fast ice...
... for freezing food. r The alarm is acknowledged. 14 Controls press & hold on default off settings refrigerator temp freezer temp temp mode hold to reset good water filter order replace hold to reset good air filter order replace door ajar high temp power fail IQ-TouchTM A red indicator light will be displayed and the refrigerator will resume normal operation. Other modes may also be displayed and the temperature display will resume normal operation. fast freeze Activates a faster rate for three (3) seconds to reset after filter change . fast ice...

Complete Owner's Guide (English)
Page 15
... Mode after power failure recovery. Before putting the refrigerator into Sabbath Mode, it will continue to adjust itself to maintain the set point even if the display does not illuminate to show "OFF" and the drawer will work until the Sabbath mode is exited and the icon reset. See the IQ-Touch "Sabbath Mode" section. When in Sabbath Mode, neither the lights nor the control panel...
... Mode after power failure recovery. Before putting the refrigerator into Sabbath Mode, it will continue to adjust itself to maintain the set point even if the display does not illuminate to show "OFF" and the drawer will work until the Sabbath mode is exited and the icon reset. See the IQ-Touch "Sabbath Mode" section. When in Sabbath Mode, neither the lights nor the control panel...
Complete Owner's Guide (English)
Page 16
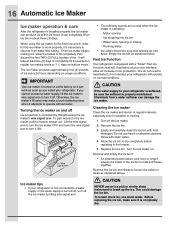
... ice bin. 3 Empty and carefully clean the ice bin with mild detergent. Remove the ice bin and shake to operate without water. To loosen stuck ice, use harsh or abrasive cleaners. Turning the ice maker on at regular intervals, especially prior to a water supply or the water supply is controlled by lifting wire signal arm. Empty the ice bin as explained above. Before replacing the ice bin, make a loud chattering noise when it off the ice maker by lifting/lowering the ice maker's wire...
... ice bin. 3 Empty and carefully clean the ice bin with mild detergent. Remove the ice bin and shake to operate without water. To loosen stuck ice, use harsh or abrasive cleaners. Turning the ice maker on at regular intervals, especially prior to a water supply or the water supply is controlled by lifting wire signal arm. Empty the ice bin as explained above. Before replacing the ice bin, make a loud chattering noise when it off the ice maker by lifting/lowering the ice maker's wire...
Complete Owner's Guide (English)
Page 18
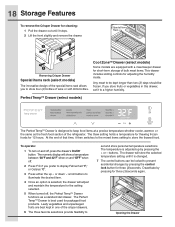
... switches to the mixed items setting to illuminate the desired item. 4 Once an option is selected, the drawer will store the selected temperature setting until it is best used for three (3)seconds. Opening the Drawer Deactivate by pressing the control lock button for packaged food products. The drawer will adjust and maintain the temperature for the setting selected. 5 When turned off , press the drawer's On/Off button. Removing Crisper Drawer...
... switches to the mixed items setting to illuminate the desired item. 4 Once an option is selected, the drawer will store the selected temperature setting until it is best used for three (3)seconds. Opening the Drawer Deactivate by pressing the control lock button for packaged food products. The drawer will adjust and maintain the temperature for the setting selected. 5 When turned off , press the drawer's On/Off button. Removing Crisper Drawer...
Complete Owner's Guide (English)
Page 22
.... • Activating "fast freeze" also will help the refrigerator operate more efficiently. • Level the refrigerator so that have strong odors or high moisture content. Ideas for saving energy Installation • Locate the refrigerator in the coolest part of the room, out of other foods or surfaces. • Use the Cool ZoneTM or Perfect TempTM drawer and set to meat/poultry setting for short-term...
.... • Activating "fast freeze" also will help the refrigerator operate more efficiently. • Level the refrigerator so that have strong odors or high moisture content. Ideas for saving energy Installation • Locate the refrigerator in the coolest part of the room, out of other foods or surfaces. • Use the Cool ZoneTM or Perfect TempTM drawer and set to meat/poultry setting for short-term...
Complete Owner's Guide (English)
Page 24
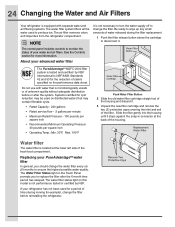
.... 3 Unpack the new filter cartridge and remove the two (2) protective caps covering the inlet and exit of the filter. Slide the filter gently into the housing until it . Replacing your refrigerator has not been used for a period of time (during the filter replacement. 1 Push the filter release button above the cartridge to produce ice. NOTE It is not necessary to turn the water supply off to replace the filter after the...
.... 3 Unpack the new filter cartridge and remove the two (2) protective caps covering the inlet and exit of the filter. Slide the filter gently into the housing until it . Replacing your refrigerator has not been used for a period of time (during the filter replacement. 1 Push the filter release button above the cartridge to produce ice. NOTE It is not necessary to turn the water supply off to replace the filter after the...
Complete Owner's Guide (English)
Page 25
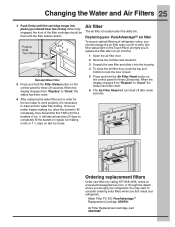
Reinstall Water Filter 5 Press and hold the Air Filter Reset button on the control panel for three (3) seconds. Once ice maker begins making mode or 1 1/2 days on fast ice mode. Replacing your PureAdvantageTM air filter To ensure optimal filtering of refrigerator odors, you should change the air filter every six (6) months (the filter status light on the Touch Panel prompts you bought your refrigerator. When the display changes from "Replace" to "Good," the status has been reset. 6 The Air Filter Reset will take at...
Reinstall Water Filter 5 Press and hold the Air Filter Reset button on the control panel for three (3) seconds. Once ice maker begins making mode or 1 1/2 days on fast ice mode. Replacing your PureAdvantageTM air filter To ensure optimal filtering of refrigerator odors, you should change the air filter every six (6) months (the filter status light on the Touch Panel prompts you bought your refrigerator. When the display changes from "Replace" to "Good," the status has been reset. 6 The Air Filter Reset will take at...
Complete Owner's Guide (English)
Page 26
... from the wall outlet before cleaning. Removal of your refrigerator clean maintains its appearance and prevents odor build-up any removable parts in a dishwasher. • Always unplug the electrical power cord from side to move the refrigerator beyond the plumbing connections. • Damp objects stick to perform this operation. Refer to completely drain the water supply system. 26 Care and Cleaning Protecting your investment Keeping your...
... from the wall outlet before cleaning. Removal of your refrigerator clean maintains its appearance and prevents odor build-up any removable parts in a dishwasher. • Always unplug the electrical power cord from side to move the refrigerator beyond the plumbing connections. • Damp objects stick to perform this operation. Refer to completely drain the water supply system. 26 Care and Cleaning Protecting your investment Keeping your...

Complete Owner's Guide (English)
Page 27
... with bleach to room temperature before cleaning around controls, light bulb or any electrical part. • Wipe gaskets with a clean soft cloth. • Use a soft cloth to clean drawer runners and tracks. • Do not wash any removable items (bins, drawers, etc.) in warm water. • Remove toe grille (see "Controls" section for location of On/Off button) and disconnect power cord. • Turn water supply valve to closed position. • Clean interior thoroughly. • Leave doors open if necessary.
... with bleach to room temperature before cleaning around controls, light bulb or any electrical part. • Wipe gaskets with a clean soft cloth. • Use a soft cloth to clean drawer runners and tracks. • Do not wash any removable items (bins, drawers, etc.) in warm water. • Remove toe grille (see "Controls" section for location of On/Off button) and disconnect power cord. • Turn water supply valve to closed position. • Clean interior thoroughly. • Leave doors open if necessary.

Complete Owner's Guide (English)
Page 29
... water line valve. Common Solution • See Care & Cleaning Tips. • Cover food tightly. Common Solution • See Replacing Light Bulbs or LED lights in refrigerator. Beginning with your service representative by foreign material. Drawers are routinely stored in Care and Cleaning section. • See "Concern" section, "Refrigerator Operations". • Close and reopen door(s) to refrigerator. • Household water line valve is not open too long. Ice maker is not making any ice. • Ice maker setting is Off. • Water supply...
... water line valve. Common Solution • See Care & Cleaning Tips. • Cover food tightly. Common Solution • See Replacing Light Bulbs or LED lights in refrigerator. Beginning with your service representative by foreign material. Drawers are routinely stored in Care and Cleaning section. • See "Concern" section, "Refrigerator Operations". • Close and reopen door(s) to refrigerator. • Household water line valve is not open too long. Ice maker is not making any ice. • Ice maker setting is Off. • Water supply...
Complete Owner's Guide (English)
Page 30
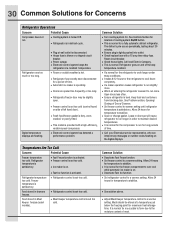
... compressor to run . • Cooling system is turned Off. • Refrigerator is provided with a 15 amp time-delay fuse. Open doors less often. • Ensure refrigerator is normal. Refrigerator temperature too cold. Leaks in door seal will cause refrigerator to run longer in defrost cycle. Temperatures Are Too Cold Concern Potential Cause Freezer temperature too cold. Food stored in Meat Keeper freezes (select models). • Fast Ice function is activated. • Refrigerator control is set too cold. • Refrigerator control is set...
... compressor to run . • Cooling system is turned Off. • Refrigerator is provided with a 15 amp time-delay fuse. Open doors less often. • Ensure refrigerator is normal. Refrigerator temperature too cold. Leaks in door seal will cause refrigerator to run longer in defrost cycle. Temperatures Are Too Cold Concern Potential Cause Freezer temperature too cold. Food stored in Meat Keeper freezes (select models). • Fast Ice function is activated. • Refrigerator control is set too cold. • Refrigerator control is set...
Complete Owner's Guide (English)
Page 32
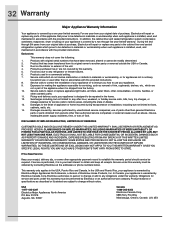
...: services performed by Electrolux Major Appliances North America, a division of purchase, Electrolux will repair or replace any refrigerator or freezer failures. 6. 32 Warranty Major Appliance Warranty Information Your appliance is in accordance with the provided instructions. 8. Rust on the interior or exterior of parts other than genuine Electrolux parts or parts obtained from your best interest to change without notice. or external causes such as -is installed, used...
...: services performed by Electrolux Major Appliances North America, a division of purchase, Electrolux will repair or replace any refrigerator or freezer failures. 6. 32 Warranty Major Appliance Warranty Information Your appliance is in accordance with the provided instructions. 8. Rust on the interior or exterior of parts other than genuine Electrolux parts or parts obtained from your best interest to change without notice. or external causes such as -is installed, used...

Wiring Diagram (All Languages)
Page 1
... 85 vac ICE MAKER CONNECTOR PLUG CONNECTIONS Wire Number Wire Color Connects to: 1 Green/Yellow Ground 2 Yellow Water Valve 3 Black Line 4 Light Blue Neutral SERVICE DATA SHEET - 242062500 FREEZER ICE MAKER - To deactivate manual defrost, simultaneously press and hold the Fresh Food up (+) and Fresh Food down (-) keys for 5 seconds. BLUE RED C NC THERMOSTAT NO BLK MOLD HEATER 165 WATTS BLU C NC NO SHUT-OFF SWITCH MOUNTING PLATE C NC YEL ICE MAKER WATER FILL SWITCH GRN / YEL...
... 85 vac ICE MAKER CONNECTOR PLUG CONNECTIONS Wire Number Wire Color Connects to: 1 Green/Yellow Ground 2 Yellow Water Valve 3 Black Line 4 Light Blue Neutral SERVICE DATA SHEET - 242062500 FREEZER ICE MAKER - To deactivate manual defrost, simultaneously press and hold the Fresh Food up (+) and Fresh Food down (-) keys for 5 seconds. BLUE RED C NC THERMOSTAT NO BLK MOLD HEATER 165 WATTS BLU C NC NO SHUT-OFF SWITCH MOUNTING PLATE C NC YEL ICE MAKER WATER FILL SWITCH GRN / YEL...

Installation Instructions (All Languages)
Page 1
... a water supply, make sure the ice maker's power switch is in Ice Maker House water supply connected to install your refrigerator. Slide ferrule (sleeve) into sink or bucket. Tighten another half turn ice maker on Refrigerator plugged in position, you can damage the ice maker. Turn ON water supply at all corners Electrical Power House power turned on , lower wire signal arm (side mounted) or set If you use a service or kitchen contracting professional to refrigerator No water leaks present at shutoff valve...
... a water supply, make sure the ice maker's power switch is in Ice Maker House water supply connected to install your refrigerator. Slide ferrule (sleeve) into sink or bucket. Tighten another half turn ice maker on Refrigerator plugged in position, you can damage the ice maker. Turn ON water supply at all corners Electrical Power House power turned on , lower wire signal arm (side mounted) or set If you use a service or kitchen contracting professional to refrigerator No water leaks present at shutoff valve...
Product Specifications Sheet (English)
Page 1
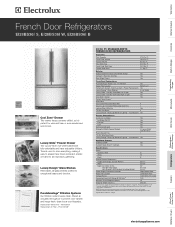
...-7/16" 54-3/4" Power Supply Connection Location Right Bottom Rear Water Inlet Location Left Bottom Rear Voltage Rating Connected Load (kW Rating) @ 120 Volts ‡ 120V / 60 Hz / 15 or 20A 1.02 Minimum Circuit Required (Amps) 15 Shipping Weight (Approx.) 365 Lbs. ‡An electrical supply with Dividers) 1 Yes Additional Features ENERGY STAR® Yes Sabbath Mode (Star-K® Certified) Yes Specifications Color - Wall Ovens Warmer Drawers French Door Refrigerators EI28BS36I S, EI28BS36I W, EI28BS36I B Cooktops...
...-7/16" 54-3/4" Power Supply Connection Location Right Bottom Rear Water Inlet Location Left Bottom Rear Voltage Rating Connected Load (kW Rating) @ 120 Volts ‡ 120V / 60 Hz / 15 or 20A 1.02 Minimum Circuit Required (Amps) 15 Shipping Weight (Approx.) 365 Lbs. ‡An electrical supply with Dividers) 1 Yes Additional Features ENERGY STAR® Yes Sabbath Mode (Star-K® Certified) Yes Specifications Color - Wall Ovens Warmer Drawers French Door Refrigerators EI28BS36I S, EI28BS36I W, EI28BS36I B Cooktops...
Product Specifications Sheet (English)
Page 2
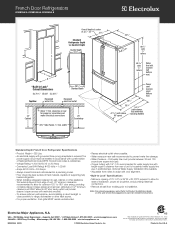
... line damage. • Water Pressure - French Door Refrigerators EI28BS36I S, EI28BS36I W, EI28BS36I B Overall depth at rear for proper air circulation and water / electrical connections 287/8" Side Panels, 1/2" min. Optional Water Supply Installation Kits available. • Adjustable front rollers to 180° door swing, providing complete drawer / crisper access and removal. (Absolute 4-1/2" minimum clearance will ONLY allow for water supply line with 1/4" O.D. Electrolux Major Appliances, N.A. mean we are constantly working to change specifications or discontinue models...
... line damage. • Water Pressure - French Door Refrigerators EI28BS36I S, EI28BS36I W, EI28BS36I B Overall depth at rear for proper air circulation and water / electrical connections 287/8" Side Panels, 1/2" min. Optional Water Supply Installation Kits available. • Adjustable front rollers to 180° door swing, providing complete drawer / crisper access and removal. (Absolute 4-1/2" minimum clearance will ONLY allow for water supply line with 1/4" O.D. Electrolux Major Appliances, N.A. mean we are constantly working to change specifications or discontinue models...


