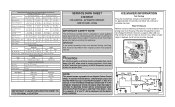
Wiring Diagram (All Languages)
Page 1
...3° F -19° to -17° C -18° to -16° C -18° to -16° C -1° to 3° F -18° to -16° C Refrigerator Temperature 34° to 39° F 1° to 4° C 34° to 39° F 1° to 4° C 34° to 39° F 1° to 4°...the defrost cycle is 102 to 110cc (3.25 to 1.5 Base Voltage 115 vac (127 vac max) DEFROST SPECIFICATIONS Cabinet Size Thermostat Cut-in the refrigerator temperature window will char at 200°F and flash ignite (burn) at 500°F. Untrained persons should not attempt to make repairs due to ...
...3° F -19° to -17° C -18° to -16° C -18° to -16° C -1° to 3° F -18° to -16° C Refrigerator Temperature 34° to 39° F 1° to 4° C 34° to 39° F 1° to 4° C 34° to 39° F 1° to 4°...the defrost cycle is 102 to 110cc (3.25 to 1.5 Base Voltage 115 vac (127 vac max) DEFROST SPECIFICATIONS Cabinet Size Thermostat Cut-in the refrigerator temperature window will char at 200°F and flash ignite (burn) at 500°F. Untrained persons should not attempt to make repairs due to ...
Product Specifications Sheet (English)
Page 1
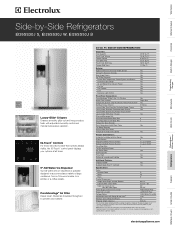
... Rollers) 69-1/2" Cabinet Width / Door Width 35-5/8" / 36" Depth (to a pitcher or a coffee carafe. electroluxappliances.com Refrigerators Freezers Washers / Dryers Under Counter Specifications subject to prevent odor transfer. 26 CU. Ft. 18.51 Sq. FT. PureAdvantage®... accordance with adjustable humidity control and minimal temperature variation. Wall Ovens Warmer Drawers Side-by-Side Refrigerators EI26SS30J S, EI26SS30J W, EI26SS30J B Cooktops Built-In Ranges Freestanding Ranges Microwaves Vent Hoods Dishwashers / Kitchen Cleanup Luxury-Glide®...
... Rollers) 69-1/2" Cabinet Width / Door Width 35-5/8" / 36" Depth (to a pitcher or a coffee carafe. electroluxappliances.com Refrigerators Freezers Washers / Dryers Under Counter Specifications subject to prevent odor transfer. 26 CU. Ft. 18.51 Sq. FT. PureAdvantage®... accordance with adjustable humidity control and minimal temperature variation. Wall Ovens Warmer Drawers Side-by-Side Refrigerators EI26SS30J S, EI26SS30J W, EI26SS30J B Cooktops Built-In Ranges Freestanding Ranges Microwaves Vent Hoods Dishwashers / Kitchen Cleanup Luxury-Glide®...
Product Specifications Sheet (English)
Page 2
...8226; Mississauga, ON L5V 3E4 • 1-800-265-8352 • electroluxappliances.ca EI26SS30J 01/11 © 2011 Electrolux Home Products, Inc. Side-by-Side Refrigerators EI26SS30J S, EI26SS30J W, EI26SS30J B Side-by-Side Refrigerator Specifications • Product Weight - 325 Lbs. • An electrical supply with ...planning purposes only. Cold water line must be level surface of hard material, capable of supporting fully loaded refrigerator. • When installing refrigerator adjacent to wall, cabinet or other heat source. • For proper ventilation, front grille MUST remain...
...8226; Mississauga, ON L5V 3E4 • 1-800-265-8352 • electroluxappliances.ca EI26SS30J 01/11 © 2011 Electrolux Home Products, Inc. Side-by-Side Refrigerators EI26SS30J S, EI26SS30J W, EI26SS30J B Side-by-Side Refrigerator Specifications • Product Weight - 325 Lbs. • An electrical supply with ...planning purposes only. Cold water line must be level surface of hard material, capable of supporting fully loaded refrigerator. • When installing refrigerator adjacent to wall, cabinet or other heat source. • For proper ventilation, front grille MUST remain...
Product Specifications Sheet (English)
Page 3
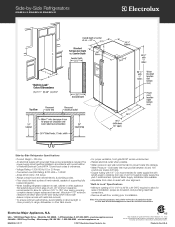
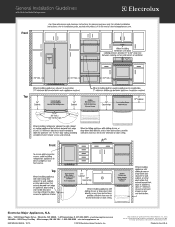
Top Front Top Electrolux Major Appliances, N.A. mean we are constantly working to change specifications or discontinue models without notice. High standards of quality at electroluxappliances.com. ...8226; electroluxappliances.ca INSTGDLNS_SSR EL 10/10 © 2010 Electrolux Home Products, Inc. General Installation Guidelines with product, or on the web at Electrolux Home Products, Inc. For detailed installation instructions, refer to installation guide, packed with Side-by-Side Refrigerator Front Use these dimensions and clearance instructions for planning purposes only...
Top Front Top Electrolux Major Appliances, N.A. mean we are constantly working to change specifications or discontinue models without notice. High standards of quality at electroluxappliances.com. ...8226; electroluxappliances.ca INSTGDLNS_SSR EL 10/10 © 2010 Electrolux Home Products, Inc. General Installation Guidelines with product, or on the web at Electrolux Home Products, Inc. For detailed installation instructions, refer to installation guide, packed with Side-by-Side Refrigerator Front Use these dimensions and clearance instructions for planning purposes only...
Energy Guide (English)
Page 1
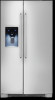
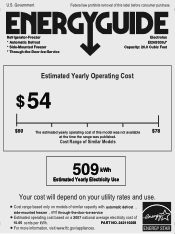
.../appliances. Government Federal law prohibits removal of this label before consumer purchase. Cost Range of 10.65 cents per kWh. U.S. Refrigerator-Freezer * Automatic Defrost * Side-Mounted Freezer * Through-the-Door-Ice-Service Electrolux EI26SS30J* Capacity: 26.0 Cubic Feet Estimated Yearly Operating Cost $ 54 $60 The estimated yearly operating cost of this model was...
.../appliances. Government Federal law prohibits removal of this label before consumer purchase. Cost Range of 10.65 cents per kWh. U.S. Refrigerator-Freezer * Automatic Defrost * Side-Mounted Freezer * Through-the-Door-Ice-Service Electrolux EI26SS30J* Capacity: 26.0 Cubic Feet Estimated Yearly Operating Cost $ 54 $60 The estimated yearly operating cost of this model was...
Complete Owner's Guide (English)
Page 3
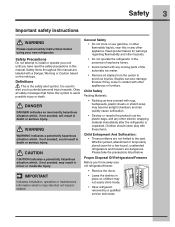
...messages that follow this manual. CAUTION CAUTION indicates a potentially hazardous situation which is the safety alert symbol. Proper Disposal Of Refrigerators/Freezers Before you have read all staples from the carton to avoid possible injury or death. Definitions This is important but...injury. Whether junked, abandoned or temporarily stored (even for warnings regarding flammability and other exterior wrapping material immediately after the refrigerator is used to alert you to the past. Safety 3 Important safety instructions WARNING Please read the safety precautions in ...
...messages that follow this manual. CAUTION CAUTION indicates a potentially hazardous situation which is the safety alert symbol. Proper Disposal Of Refrigerators/Freezers Before you have read all staples from the carton to avoid possible injury or death. Definitions This is important but...injury. Whether junked, abandoned or temporarily stored (even for warnings regarding flammability and other exterior wrapping material immediately after the refrigerator is used to alert you to the past. Safety 3 Important safety instructions WARNING Please read the safety precautions in ...

Complete Owner's Guide (English)
Page 4
...own dedicated 115 Volt, 60 Hz., AConly electric outlet. Consult a qualified electrician. IMPORTANT To turn off accidentally. • Avoid connecting refrigerator to a Ground Fault Interrupter (GFI) circuit. 4 Safety Electrical information WARNING You must follow these guidelines to ensure that your warranty. ...Always grip the plug firmly, and pull straight out from the receptacle to prevent damaging the power cord. • Unplug the refrigerator before cleaning and before replacing a light bulb to avoid electrical shock. • Performance may be replaced by the manufacturer, service...
...own dedicated 115 Volt, 60 Hz., AConly electric outlet. Consult a qualified electrician. IMPORTANT To turn off accidentally. • Avoid connecting refrigerator to a Ground Fault Interrupter (GFI) circuit. 4 Safety Electrical information WARNING You must follow these guidelines to ensure that your warranty. ...Always grip the plug firmly, and pull straight out from the receptacle to prevent damaging the power cord. • Unplug the refrigerator before cleaning and before replacing a light bulb to avoid electrical shock. • Performance may be replaced by the manufacturer, service...
Complete Owner's Guide (English)
Page 5
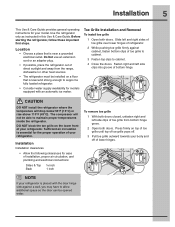
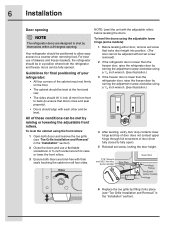
... until top of toe grille pops off. 3 Pull toe grille outward towards your refrigerator. Before starting the refrigerator, follow these important first steps. NOTE If your refrigerator is near a grounded electrical outlet. Installation Installation clearances • Allow the following ... floor that is placed with an automatic ice maker. Sufficient air circulation is level and strong enough to support a fully loaded refrigerator. • Consider water supply availability for ease of installation, proper air circulation, and plumbing and electrical connections: Sides & Top...
... until top of toe grille pops off. 3 Pull toe grille outward towards your refrigerator. Before starting the refrigerator, follow these important first steps. NOTE If your refrigerator is near a grounded electrical outlet. Installation Installation clearances • Allow the following ... floor that is placed with an automatic ice maker. Sufficient air circulation is level and strong enough to support a fully loaded refrigerator. • Consider water supply availability for ease of installation, proper air circulation, and plumbing and electrical connections: Sides & Top...
Complete Owner's Guide (English)
Page 6
... Hinge Flange Set Screw (some models): 1 Before leveling either door, remove set screw removed). 2 If the refrigerator door is lower than the freezer door, raise the refrigerator door by turning the adjustment screw clockwise using a 7/16 inch wrench. (See illustration.) 3 If the freezer...and be met by turning the adjustment screw clockwise using a 7/16 inch wrench. (See illustration.) All of drawers and freezer baskets, the refrigerator should be in the "Installation" section). 6 Installation Door opening . To level the cabinet using the adjustable lower hinge (some models) Hinge...
... Hinge Flange Set Screw (some models): 1 Before leveling either door, remove set screw removed). 2 If the refrigerator door is lower than the freezer door, raise the refrigerator door by turning the adjustment screw clockwise using a 7/16 inch wrench. (See illustration.) 3 If the freezer...and be met by turning the adjustment screw clockwise using a 7/16 inch wrench. (See illustration.) All of drawers and freezer baskets, the refrigerator should be in the "Installation" section). 6 Installation Door opening . To level the cabinet using the adjustable lower hinge (some models) Hinge...

Complete Owner's Guide (English)
Page 7
...: 1 Trace lightly around the door's top hinge with your refrigerator will need the following tools: Top Hinge Cover Front Screw Top Hinge Cover Rear Screw Tools Necessary: Top Hinge Screw Bottom Hinge Screw AND Phillips&#... that came with a pencil. OR Adjustable Wrench 3/8" Fixed Wrench Adjustable Hinge (some models) Non-Adjusting Hinge (some models) To reinstall the refrigerator door, reverse the above steps. Check first by removing the doors. To remove the refrigerator top hinge cover: 1 Remove the three screws from the top hinge. Lift the door off .
...: 1 Trace lightly around the door's top hinge with your refrigerator will need the following tools: Top Hinge Cover Front Screw Top Hinge Cover Rear Screw Tools Necessary: Top Hinge Screw Bottom Hinge Screw AND Phillips&#... that came with a pencil. OR Adjustable Wrench 3/8" Fixed Wrench Adjustable Hinge (some models) Non-Adjusting Hinge (some models) To reinstall the refrigerator door, reverse the above steps. Check first by removing the doors. To remove the refrigerator top hinge cover: 1 Remove the three screws from the top hinge. Lift the door off .

Complete Owner's Guide (English)
Page 9
... End Cap A A B B A A B Freezer Lower End Cap B Refrigerator Lower End Cap The end caps should be drawn tight to install refrigerator handle. Ensure the holes for the set screws are facing towards the refrigerator door. 3 While holding handle firmly against door, fasten upper and lower Allen set screws (B) ...with supplied Allen wrench. 4 Repeat steps 2 and 3 to freezer and refrigerator doors with no gaps. NOTE All set screws should be tightened and sub-flush (Allen set screw should be seated just below the ...
... End Cap A A B B A A B Freezer Lower End Cap B Refrigerator Lower End Cap The end caps should be drawn tight to install refrigerator handle. Ensure the holes for the set screws are facing towards the refrigerator door. 3 While holding handle firmly against door, fasten upper and lower Allen set screws (B) ...with supplied Allen wrench. 4 Repeat steps 2 and 3 to freezer and refrigerator doors with no gaps. NOTE All set screws should be tightened and sub-flush (Allen set screw should be seated just below the ...

Complete Owner's Guide (English)
Page 10
...vibrate or wear against any connections that your household water system. Tighten another half turn with all local plumbing codes.. Reconnect refrigerator to the refrigerator. To determine the length of ¼ inch (6.4mm) OD, copper or stainless steel tubing. NOTE Check with a wrench... for recommendations on your new refrigerator. Coil excess water supply line (copper tubing only), about 2½ turns, behind refrigerator as shown). • A shutoff valve to connect the water supply line to installing your local/state building codes, Electrolux recommends for the water supply ...
...vibrate or wear against any connections that your household water system. Tighten another half turn with all local plumbing codes.. Reconnect refrigerator to the refrigerator. To determine the length of ¼ inch (6.4mm) OD, copper or stainless steel tubing. NOTE Check with a wrench... for recommendations on your new refrigerator. Coil excess water supply line (copper tubing only), about 2½ turns, behind refrigerator as shown). • A shutoff valve to connect the water supply line to installing your local/state building codes, Electrolux recommends for the water supply ...

Complete Owner's Guide (English)
Page 11
...Copper water line Water Valve Bracket Valve Inlet Water Valve IMPORTANT After connecting the water supply, refer to "How to allow moving refrigerator out for important information about priming an empty water supply system. To ensure that your water dispenser works properly, this system ...must be completely filled with water when your refrigerator is first connected to the household water supply line. Your refrigerator's water supply system includes several tubing lines, a water filter, a water valve, and a water tank.
...Copper water line Water Valve Bracket Valve Inlet Water Valve IMPORTANT After connecting the water supply, refer to "How to allow moving refrigerator out for important information about priming an empty water supply system. To ensure that your water dispenser works properly, this system ...must be completely filled with water when your refrigerator is first connected to the household water supply line. Your refrigerator's water supply system includes several tubing lines, a water filter, a water valve, and a water tank.
Complete Owner's Guide (English)
Page 12
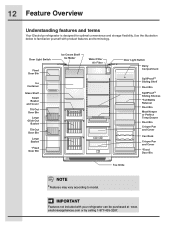
... Crisper Pan and Cover Can Rack Crisper Pan and Cover *Fixed Door Bin Toe Grille NOTE *Features may vary according to familiarize yourself with your refrigerator can be purchased at www. electroluxappliances.com or by calling 1-877-435-3287. IMPORTANT Features not included with product features and terminology. 12 Feature Overview...
... Crisper Pan and Cover Can Rack Crisper Pan and Cover *Fixed Door Bin Toe Grille NOTE *Features may vary according to familiarize yourself with your refrigerator can be purchased at www. electroluxappliances.com or by calling 1-877-435-3287. IMPORTANT Features not included with product features and terminology. 12 Feature Overview...
Complete Owner's Guide (English)
Page 14
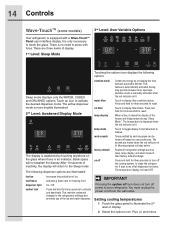
... muted when the red indicator is an indicator. This feature is only necessary to Celsius. air filter temp display Touch to your refrigerator. temp mode mute sounds Touch to toggle display from the wall outlet. Plus (+) and minus It is automatically activated during "Sleep...to touch the glass. 14 Controls Wave-TouchTM (some models) 3rd Level: User Variable Options Your refrigerator is lit. This restricts undesired changes to the refrigerators settings and prevents use of the freezer and fridge temps during long periods between automatic defrost. Vacation mode...
... muted when the red indicator is an indicator. This feature is only necessary to Celsius. air filter temp display Touch to your refrigerator. temp mode mute sounds Touch to toggle display from the wall outlet. Plus (+) and minus It is automatically activated during "Sleep...to touch the glass. 14 Controls Wave-TouchTM (some models) 3rd Level: User Variable Options Your refrigerator is lit. This restricts undesired changes to the refrigerators settings and prevents use of the freezer and fridge temps during long periods between automatic defrost. Vacation mode...

Complete Owner's Guide (English)
Page 15
...pressed, acknowledging the alarm. If a high temperature alarm is closed , until pressed, acknowledging the alarm, at http:\\www.star-k.org. The refrigerator will function normally once the door is activated during this key to blink with the Sabbath feature, please visit the web at which time the...remain cold and new ice cubes can be made with observance of a power failure, the power fail alert will be displayed and the refrigerator will resume normal operation. The alarm is turned off icon will illuminate until the Sabbath mode is acknowledged. The alarm off until the...
...pressed, acknowledging the alarm. If a high temperature alarm is closed , until pressed, acknowledging the alarm, at http:\\www.star-k.org. The refrigerator will function normally once the door is activated during this key to blink with the Sabbath feature, please visit the web at which time the...remain cold and new ice cubes can be made with observance of a power failure, the power fail alert will be displayed and the refrigerator will resume normal operation. The alarm is turned off icon will illuminate until the Sabbath mode is acknowledged. The alarm off until the...

Complete Owner's Guide (English)
Page 16
...factory default settings. Touch the icon to display filter status. Touch to activate the options below. It also turns off all refrigerator settings such as temp, temp display and ring tones to toggle display from the wall outlet. The temperature display will stay active.... Touch to toggle the freezer and fridge temps display on and off. Press and hold for three seconds to clean the refrigerator. Tones emitted by increasing the time between door openings. Touch to display filter condition status. Warning signals will read OFF. ...
...factory default settings. Touch the icon to display filter status. Touch to activate the options below. It also turns off all refrigerator settings such as temp, temp display and ring tones to toggle display from the wall outlet. The temperature display will stay active.... Touch to toggle the freezer and fridge temps display on and off. Press and hold for three seconds to clean the refrigerator. Tones emitted by increasing the time between door openings. Touch to display filter condition status. Warning signals will read OFF. ...

Complete Owner's Guide (English)
Page 17
... will be illuminated until the alarm is turned off until a safe operating range temperature has been reached. Other modes may also be displayed and the refrigerator will display on the right side of the display. The high temp alarm may be illuminated and you will resume normal operation. Alarms Controls 17... system alarms. In the event of a power failure, the power fail alert will be displayed and the mute sounds icon will be turned off the refrigerator will hear an audible alarm until the alarm is pressed, acknowledging the alarm. The alarm is acknowledged.
... will be illuminated until the alarm is turned off until a safe operating range temperature has been reached. Other modes may also be displayed and the refrigerator will display on the right side of the display. The high temp alarm may be illuminated and you will resume normal operation. Alarms Controls 17... system alarms. In the event of a power failure, the power fail alert will be displayed and the mute sounds icon will be turned off the refrigerator will hear an audible alarm until the alarm is pressed, acknowledging the alarm. The alarm is acknowledged.

Complete Owner's Guide (English)
Page 18
...Control. NOTE Leafy vegetables keep best when stored with the Humidity Control set on the sides of each compartment. Shelf features Your refrigerator includes Luxury-DesignTM glass shelves, which attach to a different location, the spacers must be separated from breakage, handle tempered glass shelves...in (clockwise). To change the position of storage drawers. These shelves slide out for storing fruits, vegetables, and other fresh produce. Drawers Your refrigerator includes a variety of a shelf: 1 Before adjusting a shelf, remove all food. 2 Lift the front edge up. 3 Pull the shelf ...
...Control. NOTE Leafy vegetables keep best when stored with the Humidity Control set on the sides of each compartment. Shelf features Your refrigerator includes Luxury-DesignTM glass shelves, which attach to a different location, the spacers must be separated from breakage, handle tempered glass shelves...in (clockwise). To change the position of storage drawers. These shelves slide out for storing fruits, vegetables, and other fresh produce. Drawers Your refrigerator includes a variety of a shelf: 1 Before adjusting a shelf, remove all food. 2 Lift the front edge up. 3 Pull the shelf ...

Complete Owner's Guide (English)
Page 20
... outage the PTD may show "LOC" when any button is pressed. When first turned on by pressing the - or + buttons while in one of the refrigerator. Three favorite settings can be chosen and stored in this way. 6 A custom temp between 28°F and 42°F can be set to prevent accidental...
... outage the PTD may show "LOC" when any button is pressed. When first turned on by pressing the - or + buttons while in one of the refrigerator. Three favorite settings can be chosen and stored in this way. 6 A custom temp between 28°F and 42°F can be set to prevent accidental...


