Wiring Diagram (All Languages)
Page 1
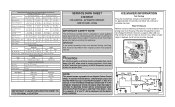
... to make repairs due to : 1 Green/Yellow Ground 2 Yellow Water Valve 3 Black Line 4 Light Blue Neutral IMPORTANT: PLEASE RETURN THIS SHEET TO IT'S ORIGINAL LOCATION service data sheet 240389641 ICE & WATER - it will distort the plastic liner. A "d" in the freezer temperature window and "F" in notch at 15° F ( -9° C) Heater Voltage 85 vac ICE MAKER CONNECTOR PLUG CONNECTIONS Wire Number Wire Color Connects to the possibility of compressor run time. The water fill adjustment screw will display...
... to make repairs due to : 1 Green/Yellow Ground 2 Yellow Water Valve 3 Black Line 4 Light Blue Neutral IMPORTANT: PLEASE RETURN THIS SHEET TO IT'S ORIGINAL LOCATION service data sheet 240389641 ICE & WATER - it will distort the plastic liner. A "d" in the freezer temperature window and "F" in notch at 15° F ( -9° C) Heater Voltage 85 vac ICE MAKER CONNECTOR PLUG CONNECTIONS Wire Number Wire Color Connects to the possibility of compressor run time. The water fill adjustment screw will display...
Product Specifications Sheet (English)
Page 1
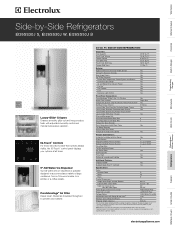
...Arc Door and Handle Design Yes IQ-Touch™ Electronic Controls Yes Door Hinge Covers Yes Ice / Water Dispenser Yes Perfect Set® Temperature Control System and Display Yes Crushed / Cubes / Water Yes Air and Water Filter Indicator / Reset Yes Fast Ice™ Yes Fast Freeze™ Yes Lock Yes Dispenser Light Control Yes Fresh Food Conveniences PureAdvantage® Water & Ice / Air Filtration Water Filter Location Temp Alarm System / Door Ajar Alarm / Power Failure Alarm SpillSafe® Glass Shelves Luxury-Glide® Dual Humidity-Controlled Upper Crisper Luxury...
...Arc Door and Handle Design Yes IQ-Touch™ Electronic Controls Yes Door Hinge Covers Yes Ice / Water Dispenser Yes Perfect Set® Temperature Control System and Display Yes Crushed / Cubes / Water Yes Air and Water Filter Indicator / Reset Yes Fast Ice™ Yes Fast Freeze™ Yes Lock Yes Dispenser Light Control Yes Fresh Food Conveniences PureAdvantage® Water & Ice / Air Filtration Water Filter Location Temp Alarm System / Door Ajar Alarm / Power Failure Alarm SpillSafe® Glass Shelves Luxury-Glide® Dual Humidity-Controlled Upper Crisper Luxury...
Product Specifications Sheet (English)
Page 2
....ca EI26SS30J 01/11 © 2011 Electrolux Home Products, Inc. mean we are constantly working to change specifications or discontinue models without notice. Electrolux Major Appliances, N.A. "Built-In Look" Specifications • Minimum opening of installation, proper air circulation, and plumbing / electrical connections. • Remove all wall / floor molding prior to household water supply line plus 7 additional feet. We reserve the right to improve our products. The power supply circuit must...
....ca EI26SS30J 01/11 © 2011 Electrolux Home Products, Inc. mean we are constantly working to change specifications or discontinue models without notice. Electrolux Major Appliances, N.A. "Built-In Look" Specifications • Minimum opening of installation, proper air circulation, and plumbing / electrical connections. • Remove all wall / floor molding prior to household water supply line plus 7 additional feet. We reserve the right to improve our products. The power supply circuit must...
Complete Owner's Guide (English)
Page 2
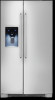
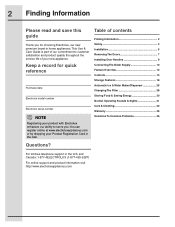
... Information 2 Safety 3 Installation 5 Removing The Doors 7 Installing Door Handles 9 Connecting The Water Supply 10 Feature Overview 12 Controls 13 Storage Features 18 Automatic Ice & Water Maker/Dispenser 25 Changing The Filter 28 Storing Food & Saving Energy 30 Normal Operating Sounds & Sights 31 Care & Cleaning 32 Warranty 35 Solutions To Common Problems 36 Questions? For toll-free telephone support in home appliances. This Use & Care Guide is part of our commitment to serve you for choosing Electrolux, our new premium brand...
... Information 2 Safety 3 Installation 5 Removing The Doors 7 Installing Door Handles 9 Connecting The Water Supply 10 Feature Overview 12 Controls 13 Storage Features 18 Automatic Ice & Water Maker/Dispenser 25 Changing The Filter 28 Storing Food & Saving Energy 30 Normal Operating Sounds & Sights 31 Care & Cleaning 32 Warranty 35 Solutions To Common Problems 36 Questions? For toll-free telephone support in home appliances. This Use & Care Guide is part of our commitment to serve you for choosing Electrolux, our new premium brand...
Complete Owner's Guide (English)
Page 5
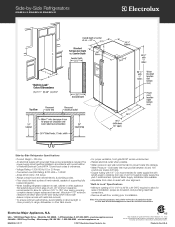
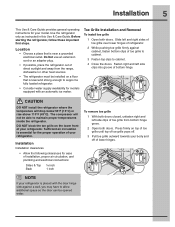
Installation 5 This Use & Care Guide provides general operating instructions for ease of installation, proper air circulation, and plumbing and electrical connections: Sides & Top ³⁄₈ inch Back 1 inch To remove toe grille 1 With both doors closed, unfasten right and left side clips of bottom hinge. Do Not use an extension cord or an adapter plug. • If possible, place the refrigerator out of your refrigerator. DO NOT block the...
Installation 5 This Use & Care Guide provides general operating instructions for ease of installation, proper air circulation, and plumbing and electrical connections: Sides & Top ³⁄₈ inch Back 1 inch To remove toe grille 1 With both doors closed, unfasten right and left side clips of bottom hinge. Do Not use an extension cord or an adapter plug. • If possible, place the refrigerator out of your refrigerator. DO NOT block the...
Complete Owner's Guide (English)
Page 6
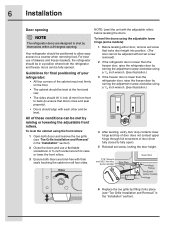
... fully open). 5 Reinstall set screw, locking the door height. 7/16" Wrench and 3/32" Hex Key (some models) Door Stop Flange Open Door Hinge Flange Set Screw (some models): 1 Before leveling either door, remove set screw that doors close and seal properly). • Doors should tilt ¼ inch (6 mm) from front to back (to ensure that locks door height into place (see "Toe Grille Installation and Removal" in a position where both the refrigerator and freezer doors...
... fully open). 5 Reinstall set screw, locking the door height. 7/16" Wrench and 3/32" Hex Key (some models) Door Stop Flange Open Door Hinge Flange Set Screw (some models): 1 Before leveling either door, remove set screw that doors close and seal properly). • Doors should tilt ¼ inch (6 mm) from front to back (to ensure that locks door height into place (see "Toe Grille Installation and Removal" in a position where both the refrigerator and freezer doors...

Complete Owner's Guide (English)
Page 8
... the freezer door, reverse the above the top hinge. The connector releases when you press its side to avoid damage to the water tube extending from the connector located below the freezer door. Non-Adjusting Hinge (some models) 2 Trace lightly around the hinge with the non-adjustable lower hinges in place, ensure they are in the "Installation" section.), then replace the top hinge cover. Once both sides of the bottom hinge. 5 Remove...
... the freezer door, reverse the above the top hinge. The connector releases when you press its side to avoid damage to the water tube extending from the connector located below the freezer door. Non-Adjusting Hinge (some models) 2 Trace lightly around the hinge with the non-adjustable lower hinges in place, ensure they are in the "Installation" section.), then replace the top hinge cover. Once both sides of the bottom hinge. 5 Remove...

Complete Owner's Guide (English)
Page 10
... not be used for water leaks, and the manufacturer will go (¼ inch/6.4 mm). The nut and ferrule are already assembled on , lower wire signal arm (side mounted) or set the ice maker's On/ Off power switch to soft water, ensure that your household water system. Coil excess water supply line (copper tubing only), about 2½ turns, behind refrigerator as shown). • A shutoff valve to connect the water supply line to electrical power source. 9. Slide...
... not be used for water leaks, and the manufacturer will go (¼ inch/6.4 mm). The nut and ferrule are already assembled on , lower wire signal arm (side mounted) or set the ice maker's On/ Off power switch to soft water, ensure that your household water system. Coil excess water supply line (copper tubing only), about 2½ turns, behind refrigerator as shown). • A shutoff valve to connect the water supply line to electrical power source. 9. Slide...
Complete Owner's Guide (English)
Page 14
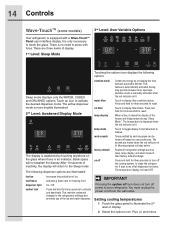
... touch the glass. Touch to your refrigerator. temp mode mute sounds Touch to toggle display from the wall outlet. Setting cooling temperatures 1 Touch the glass panel to Celsius. Plus (+) and minus 14 Controls Wave-TouchTM (some models) 3rd Level: User Variable Options Your refrigerator is lit. Touch an icon to display filter status. Vacation mode is manually activated when the red indicator is an indicator. air filter temp display Touch to activate the desired dispenser mode. Warning...
... touch the glass. Touch to your refrigerator. temp mode mute sounds Touch to toggle display from the wall outlet. Setting cooling temperatures 1 Touch the glass panel to Celsius. Plus (+) and minus 14 Controls Wave-TouchTM (some models) 3rd Level: User Variable Options Your refrigerator is lit. Touch an icon to display filter status. Vacation mode is manually activated when the red indicator is an indicator. air filter temp display Touch to activate the desired dispenser mode. Warning...

Complete Owner's Guide (English)
Page 15
... be displayed and the alarm off by pressing and holding both the freezer "-" and the refrigerator "+" indicators for five seconds for proper usage and a complete list of models with standard trays. For further assistance, guidelines for both Wave-TouchTM and IQ-TouchTM, in accordance with the first touch. NOTE Although you will display in Sabbath mode. The temperature display will remain cold and new ice...
... be displayed and the alarm off by pressing and holding both the freezer "-" and the refrigerator "+" indicators for five seconds for proper usage and a complete list of models with standard trays. For further assistance, guidelines for both Wave-TouchTM and IQ-TouchTM, in accordance with the first touch. NOTE Although you will display in Sabbath mode. The temperature display will remain cold and new ice...

Complete Owner's Guide (English)
Page 16
... the freezer and fridge temps display on user preference. There is equipped with force. Touch the icon to display filter status. Setting cooling temperatures 1 Touch the glass panel to illuminate the display to press with a Glass Touch Panel user interface display. This restricts undesired changes to the refrigerators settings and prevents use of ice Activates a faster rate for freezing food On / Off Press and hold temp display to toggle display from the wall outlet. Vacation mode is manually activated...
... the freezer and fridge temps display on user preference. There is equipped with force. Touch the icon to display filter status. Setting cooling temperatures 1 Touch the glass panel to illuminate the display to press with a Glass Touch Panel user interface display. This restricts undesired changes to the refrigerators settings and prevents use of ice Activates a faster rate for freezing food On / Off Press and hold temp display to toggle display from the wall outlet. Vacation mode is manually activated...

Complete Owner's Guide (English)
Page 25
... cause water filter to operate without water. Using the ice maker after three minutes of the freezer compartment. NOTE Your ice maker is turned on and off the water flow after installation Before making ice for about two days. It can work as soon as necessary). Turning the ice maker on at all times. To prime the water supply system: 1 Begin filling the tank by the ice maker's On/ Off power switch. Otherwise, the ice maker's fill valve...
... cause water filter to operate without water. Using the ice maker after three minutes of the freezer compartment. NOTE Your ice maker is turned on and off the water flow after installation Before making ice for about two days. It can work as soon as necessary). Turning the ice maker on at all times. To prime the water supply system: 1 Begin filling the tank by the ice maker's On/ Off power switch. Otherwise, the ice maker's fill valve...

Complete Owner's Guide (English)
Page 26
... refrigerator is not connected to small cubes or chips that your water filter needs changing. Remove and empty the ice storage bin if: • An extended power failure (one . Water valve opening or closing - If you should also turn off the water supply valve. Do not use the ice dispenser frequently. Empty the ice container as explained above. As the water filter nears the end of ice at regular intervals, particularly before replacing in the ice maker...
... refrigerator is not connected to small cubes or chips that your water filter needs changing. Remove and empty the ice storage bin if: • An extended power failure (one . Water valve opening or closing - If you should also turn off the water supply valve. Do not use the ice dispenser frequently. Empty the ice container as explained above. As the water filter nears the end of ice at regular intervals, particularly before replacing in the ice maker...

Complete Owner's Guide (English)
Page 28
... filter status light on the Touch Panel prompts you should change the filter before reinstalling the refrigerator. 1 Pull the air filter housing straight out. 2 Remove the old filter and discard it. 3 Unpack the new filter and place it inside the housing. 4 Slide the housing back into position. 5 Press and hold the Air Filter Reset button on the electronic control panel for three seconds. Replacing the water filter In general, you to replace the filter after...
... filter status light on the Touch Panel prompts you should change the filter before reinstalling the refrigerator. 1 Pull the air filter housing straight out. 2 Remove the old filter and discard it. 3 Unpack the new filter and place it inside the housing. 4 Slide the housing back into position. 5 Press and hold the Air Filter Reset button on the electronic control panel for three seconds. Replacing the water filter In general, you to replace the filter after...

Complete Owner's Guide (English)
Page 29
... PureAdvantageTM water filter: It is tested and certified by NSF International to "Good," the status has been reset. Do not use with the filter release button. 6 Press a drinking glass against the water dispenser while checking for any small amounts of water released during the filter replacement. 1 Turn Off the ice maker power switch. 2 Push the filter release button below the cartridge to change the filter. When fully engaged, the front of the filter cartridge should...
... PureAdvantageTM water filter: It is tested and certified by NSF International to "Good," the status has been reset. Do not use with the filter release button. 6 Press a drinking glass against the water dispenser while checking for any small amounts of water released during the filter replacement. 1 Turn Off the ice maker power switch. 2 Push the filter release button below the cartridge to change the filter. When fully engaged, the front of the filter cartridge should...
Complete Owner's Guide (English)
Page 32
Do not use metallic scouring pads, brushes, abrasive cleaners or strong alkaline solutions on caring and cleaning specific areas of your temperature controls to turn off cooling, power to clean stainless steel. • Do not wash any removable parts in freezing temperatures, be sure to cold metal surfaces. 32 Care & Cleaning Protecting your investment Keeping your refrigerator clean maintains appearance and prevents odor build-up any spills immediately and clean the freezer and...
Do not use metallic scouring pads, brushes, abrasive cleaners or strong alkaline solutions on caring and cleaning specific areas of your temperature controls to turn off cooling, power to clean stainless steel. • Do not wash any removable parts in freezing temperatures, be sure to cold metal surfaces. 32 Care & Cleaning Protecting your investment Keeping your refrigerator clean maintains appearance and prevents odor build-up any spills immediately and clean the freezer and...

Complete Owner's Guide (English)
Page 35
... installed, used in the USA, Puerto Rico and Canada. Products used , and maintained in the home. 12. Service calls which prove to repair or replace appliance light bulbs, air filters, water filters, other consumables, or knobs, handles, or other than genuine Electrolux parts or parts obtained from the factory. 10. Service calls to be readily determined. 2. your best interest to any refrigerator or freezer failures. 6. THIS WRITTEN WARRANTY GIVES YOU SPECIFIC...
... installed, used in the USA, Puerto Rico and Canada. Products used , and maintained in the home. 12. Service calls which prove to repair or replace appliance light bulbs, air filters, water filters, other consumables, or knobs, handles, or other than genuine Electrolux parts or parts obtained from the factory. 10. Service calls to be readily determined. 2. your best interest to any refrigerator or freezer failures. 6. THIS WRITTEN WARRANTY GIVES YOU SPECIFIC...

Complete Owner's Guide (English)
Page 36
... ... Digital temperature displays are opened too frequently or too long. • Refrigerator/freezer door may be slightly open. • Freezer control is set too cold (control found in order to maintain desired temperatures. Reset circuit breaker. • Check house lights. See Problem section, Opening/ Closing of time. • Automatic ice maker is operating. • Doors are flashing. • Electronic control system keeps the refrigerator at wall outlet is normal. Leaks in defrost cycle. • Plug at a constant temperature...
... ... Digital temperature displays are opened too frequently or too long. • Refrigerator/freezer door may be slightly open. • Freezer control is set too cold (control found in order to maintain desired temperatures. Reset circuit breaker. • Check house lights. See Problem section, Opening/ Closing of time. • Automatic ice maker is operating. • Doors are flashing. • Electronic control system keeps the refrigerator at wall outlet is normal. Leaks in defrost cycle. • Plug at a constant temperature...

Complete Owner's Guide (English)
Page 39
... ice. Ice maker will produce fresh supply. wire signal arm. clogged. Replace filter cartridge. flavor from strong food stored maker will not stop • Ice maker wire signal arm • Move item and release wire signal arm. Ensure that valve is • Turn on power switch. If valve is Off. • Turn on household water line valve. slower than you should produce up odor or • Cover foods tightly. making enough ice. is dispensing cartridge. Solutions To Common Problems...
... ice. Ice maker will produce fresh supply. wire signal arm. clogged. Replace filter cartridge. flavor from strong food stored maker will not stop • Ice maker wire signal arm • Move item and release wire signal arm. Ensure that valve is • Turn on power switch. If valve is Off. • Turn on household water line valve. slower than you should produce up odor or • Cover foods tightly. making enough ice. is dispensing cartridge. Solutions To Common Problems...

Complete Owner's Guide (English)
Page 40
... operate. • Remove ice cubes that ice cubes will not dispense ice. Correction • Connect water supply (see Connecting The Water Supply section). • Open household water line valve. When ice is not closed . • Ice & water filter cartridge is made, dispenser should operate. • Turn freezer control to cold water line. • Tubing used in checking water supply source. Motor overload protector will not dispense water. See Problem section Ice Maker Is Not Making Ice. • Ensure that cubes do not freeze together. • The ice & water filter cartridge...
... operate. • Remove ice cubes that ice cubes will not dispense ice. Correction • Connect water supply (see Connecting The Water Supply section). • Open household water line valve. When ice is not closed . • Ice & water filter cartridge is made, dispenser should operate. • Turn freezer control to cold water line. • Tubing used in checking water supply source. Motor overload protector will not dispense water. See Problem section Ice Maker Is Not Making Ice. • Ensure that cubes do not freeze together. • The ice & water filter cartridge...


