
Installation Instructions (All Languages)
Page 1
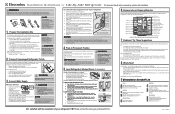
... guidelines in a sink or bucket and opening the shut-off valve for choosing Electrolux. 9 Installation Checkoff List Doors Handles are ready to begin enjoying your new Electrolux refrigerator. • To become aware of the Guide to learn more about 2½...of these materials may damage flooring. P/N: 241868801 If the refrigerator is essential for proper operation. 5 Level Refrigerator & Adjust Doors (if necessary) Guidelines for final positioning of the copper tube in your refrigerator. NOTE Electrolux Kit #53039117950, available from side of cabinet only. •...
... guidelines in a sink or bucket and opening the shut-off valve for choosing Electrolux. 9 Installation Checkoff List Doors Handles are ready to begin enjoying your new Electrolux refrigerator. • To become aware of the Guide to learn more about 2½...of these materials may damage flooring. P/N: 241868801 If the refrigerator is essential for proper operation. 5 Level Refrigerator & Adjust Doors (if necessary) Guidelines for final positioning of the copper tube in your refrigerator. NOTE Electrolux Kit #53039117950, available from side of cabinet only. •...
Use and Care Guide
Page 2
...22 Normal Operating Sounds & Sights 23 Understanding the sounds you . For toll-free telephone support in home appliances. and Canada: 1-877-4ELECTROLUX (1-877-435-3287) For online support and product information visit http://www.electroluxappliances.com Table of contents Finding Information 2 Please read and save this guide Thank you for choosing Electrolux... 4 Installation clearances 4 Door opening 4 Guidelines for final positioning of your refrigerator 4 Removing The Doors 6 Getting through narrow spaces 6 Installing Door Handles 8 Door Handle Mounting Instructions 8 Connecting ...
...22 Normal Operating Sounds & Sights 23 Understanding the sounds you . For toll-free telephone support in home appliances. and Canada: 1-877-4ELECTROLUX (1-877-435-3287) For online support and product information visit http://www.electroluxappliances.com Table of contents Finding Information 2 Please read and save this guide Thank you for choosing Electrolux... 4 Installation clearances 4 Door opening 4 Guidelines for final positioning of your refrigerator 4 Removing The Doors 6 Getting through narrow spaces 6 Installing Door Handles 8 Door Handle Mounting Instructions 8 Connecting ...

Use and Care Guide
Page 3
...or recycle the product's carton, plastic bags, and any risk. • Never unplug the refrigerator by a qualified service technician. Proper Disposal Of Refrigerators/Freezers Before you throw away your old refrigerator/freezer: • Remove the doors. • Leave the shelves in the presence of the... of the appliance is unpacked. Read product labels for warnings regarding flammability and other exterior wrapping material immediately after the refrigerator is equipped with insufficient power can also damage finishes if they come in contact with these guidelines to ensure that your...
...or recycle the product's carton, plastic bags, and any risk. • Never unplug the refrigerator by a qualified service technician. Proper Disposal Of Refrigerators/Freezers Before you throw away your old refrigerator/freezer: • Remove the doors. • Leave the shelves in the presence of the... of the appliance is unpacked. Read product labels for warnings regarding flammability and other exterior wrapping material immediately after the refrigerator is equipped with insufficient power can also damage finishes if they come in contact with these guidelines to ensure that your...
Use and Care Guide
Page 4
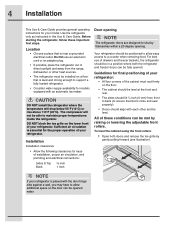
...wall, you may have to allow easy access to a counter when removing food. Guidelines for the proper operation of your refrigerator is essential for final positioning of your refrigerator: • All four corners of installation, proper air circulation, and plumbing and electrical connections: Sides & Top ³⁄... within a 20 degree opening. Do Not use of direct sunlight and away from the range, dishwasher or other heat sources. • The refrigerator must rest firmly on the floor. • The cabinet should be level at the front and rear. • The sides should tilt &#...
...wall, you may have to allow easy access to a counter when removing food. Guidelines for the proper operation of your refrigerator is essential for final positioning of your refrigerator: • All four corners of installation, proper air circulation, and plumbing and electrical connections: Sides & Top ³⁄... within a 20 degree opening. Do Not use of direct sunlight and away from the range, dishwasher or other heat sources. • The refrigerator must rest firmly on the floor. • The cabinet should be level at the front and rear. • The sides should tilt &#...
Use and Care Guide
Page 5
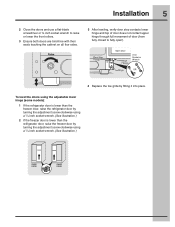
To level the doors using the adjustable lower hinge (some models): 1 If the refrigerator door is lower than the freezer door, raise the refrigerator door by turning the adjustment screw clockwise using a ⁷/16 inch socket wrench. (See illustration.) Installation 5 2 Close the doors and use a flat-blade screwdriver or &#... the toe grille by turning the adjustment screw clockwise using a ⁷/16 inch socket wrench. (See illustration.) 2 If the freezer door is lower than the refrigerator door, raise the freezer door by fitting it into place.
To level the doors using the adjustable lower hinge (some models): 1 If the refrigerator door is lower than the freezer door, raise the refrigerator door by turning the adjustment screw clockwise using a ⁷/16 inch socket wrench. (See illustration.) Installation 5 2 Close the doors and use a flat-blade screwdriver or &#... the toe grille by turning the adjustment screw clockwise using a ⁷/16 inch socket wrench. (See illustration.) 2 If the freezer door is lower than the refrigerator door, raise the freezer door by fitting it into place.
Use and Care Guide
Page 6
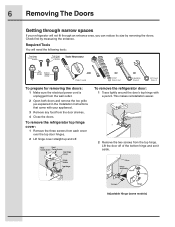
...: 1 Trace lightly around the door's top hinge with your refrigerator will need the following tools: Top Hinge Cover Front Screw Top Hinge Cover Rear Screw Tools Necessary: Top Hinge Screw Bottom Hinge Screw AND Phillips&#... aside. 6 Removing The Doors Getting through an entrance area, you can reduce its size by measuring the entrance. Lift the door off . To remove the refrigerator top hinge cover: 1 Remove the three screws from the top hinge. Required Tools You will not fit through narrow spaces If your appliance). 3 Remove any...
...: 1 Trace lightly around the door's top hinge with your refrigerator will need the following tools: Top Hinge Cover Front Screw Top Hinge Cover Rear Screw Tools Necessary: Top Hinge Screw Bottom Hinge Screw AND Phillips&#... aside. 6 Removing The Doors Getting through an entrance area, you can reduce its size by measuring the entrance. Lift the door off . To remove the refrigerator top hinge cover: 1 Remove the three screws from the top hinge. Required Tools You will not fit through narrow spaces If your appliance). 3 Remove any...

Use and Care Guide
Page 7
To reinstall the refrigerator door, reverse the above steps. To remove the freezer top hinge cover: 1 Remove the two screws from the bottom hinge. This makes reinstallation easier. 3 Detach ...
To reinstall the refrigerator door, reverse the above steps. To remove the freezer top hinge cover: 1 Remove the two screws from the bottom hinge. This makes reinstallation easier. 3 Detach ...

Use and Care Guide
Page 8
... be seated just below the surface of the end cap) of handle end cap. Freezer Upper End Cap Refrigerator Upper End Cap A A B B A A B Freezer Lower End Cap B Refrigerator Lower End Cap 8 Installing Door Handles Door Handle Mounting Instructions 1 Remove handles from carton and any other .... The end caps should be drawn tight to freezer and refrigerator doors with supplied Allen wrench. 4 Repeat steps 2 and 3 to install refrigerator handle. Ensure the holes for the set screws are facing towards the refrigerator door. 3 While holding handle firmly against door, fasten upper...
... be seated just below the surface of the end cap) of handle end cap. Freezer Upper End Cap Refrigerator Upper End Cap A A B B A A B Freezer Lower End Cap B Refrigerator Lower End Cap 8 Installing Door Handles Door Handle Mounting Instructions 1 Remove handles from carton and any other .... The end caps should be drawn tight to freezer and refrigerator doors with supplied Allen wrench. 4 Repeat steps 2 and 3 to install refrigerator handle. Ensure the holes for the set screws are facing towards the refrigerator door. 3 While holding handle firmly against door, fasten upper...
Use and Care Guide
Page 9
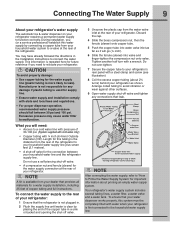
... the household water supply line. CAUTION To avoid property damage: • Use copper tubing for important information about 2½ turns) behind your refrigerator. What you will go (¼ inch). 6 Slide the ferrule (sleeve) into water valve inlet as far as shown. To connect the...another half turn with a steel clamp and screw (see illustration). 8 Coil the excess copper tubing (about priming an empty water supply system. Your refrigerator's water supply system includes several tubing lines, a water filter, a water valve and a water tank. Length for the connection between 30 psi ...
... the household water supply line. CAUTION To avoid property damage: • Use copper tubing for important information about 2½ turns) behind your refrigerator. What you will go (¼ inch). 6 Slide the ferrule (sleeve) into water valve inlet as far as shown. To connect the...another half turn with a steel clamp and screw (see illustration). 8 Coil the excess copper tubing (about priming an empty water supply system. Your refrigerator's water supply system includes several tubing lines, a water filter, a water valve and a water tank. Length for the connection between 30 psi ...
Use and Care Guide
Page 10
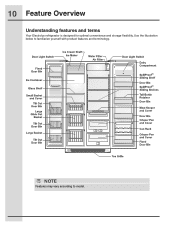
10 Feature Overview Understanding features and terms Your Electrolux refrigerator is designed for optimal convenience and storage flexibility. Use the illustration below to model. NOTE Features may vary according to familiarize yourself with product features and terminology.
10 Feature Overview Understanding features and terms Your Electrolux refrigerator is designed for optimal convenience and storage flexibility. Use the illustration below to model. NOTE Features may vary according to familiarize yourself with product features and terminology.

Use and Care Guide
Page 12
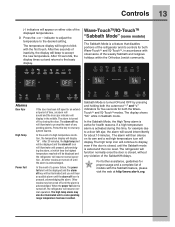
... is awakened by touching anywhere on user preference. This restricts undesired changes to display filter condition status. Touch to the refrigerators settings and prevents use of the freezer and fridge temps during long periods between automatic defrost. When active, it allows the... Plus (+) and minus Warning signals will read OFF. 12 Controls Wave-TouchTM (some models) 3rd Level: User Variable Options Your refrigerator is lit. It is an indicator. There are illuminated: fast ice Increases the production of inactivity, the display will not awaken the...
... is awakened by touching anywhere on user preference. This restricts undesired changes to display filter condition status. Touch to the refrigerators settings and prevents use of the freezer and fridge temps during long periods between automatic defrost. When active, it allows the... Plus (+) and minus Warning signals will read OFF. 12 Controls Wave-TouchTM (some models) 3rd Level: User Variable Options Your refrigerator is lit. It is an indicator. There are illuminated: fast ice Increases the production of inactivity, the display will not awaken the...
Use and Care Guide
Page 13
...will resume normal operation. When the power fail alert is turned off icon is acknowledged. The display shows "Sb" while in the middle. The refrigerator will display. The high temp alarm may be illuminated until the alarm is pressed, acknowledging the alarm. Wave-TouchTM/IQ-TouchTM "Sabbath Mode" (.... The alarm is turned ON and OFF by closing the door. After 20 minutes, the high temp alert will be displayed and the refrigerator will appear on its controls for health reasons. All other modes are turned off key will illuminate to prompt the reset of time, an...
...will resume normal operation. When the power fail alert is turned off icon is acknowledged. The display shows "Sb" while in the middle. The refrigerator will display. The high temp alarm may be illuminated until the alarm is pressed, acknowledging the alarm. Wave-TouchTM/IQ-TouchTM "Sabbath Mode" (.... The alarm is turned ON and OFF by closing the door. After 20 minutes, the high temp alert will be displayed and the refrigerator will appear on its controls for health reasons. All other modes are turned off key will illuminate to prompt the reset of time, an...

Use and Care Guide
Page 14
.... 14 Controls IQ-TouchTM (some models) IMPORTANT Pressing the system off icon does not turn off the cooling system to clean the refrigerator. Your refrigerator is lit. fast ice Increases the production of the ice and water dispenser. water filter Touch to press with the first touch.... temperatures 1 Touch the glass panel to illuminate the display to blink with force. The mute sounds key will be displayed and the refrigerator will display "HI". In the event of the following options that are muted when the red indicator is automatically activated during long periods...
.... 14 Controls IQ-TouchTM (some models) IMPORTANT Pressing the system off icon does not turn off the cooling system to clean the refrigerator. Your refrigerator is lit. fast ice Increases the production of the ice and water dispenser. water filter Touch to press with the first touch.... temperatures 1 Touch the glass panel to illuminate the display to blink with force. The mute sounds key will be displayed and the refrigerator will display "HI". In the event of the following options that are muted when the red indicator is automatically activated during long periods...
Use and Care Guide
Page 15
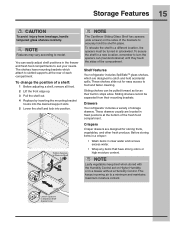
...compartment. Loosen Spacers to model. To relocate the shelf to slotted supports at the bottom of each compartment. Shelf features Your refrigerator includes SpillSafeTM glass shelves, which attach to a different location, the spacers must be separated from breakage, handle tempered glass shelves... carefully. These shelves slide out for storing fruits, vegetables, and other fresh produce. Drawers Your refrigerator includes a variety of the brackets to food and faster cleaning. These drawers usually are designed for easy access to securely hold...
...compartment. Loosen Spacers to model. To relocate the shelf to slotted supports at the bottom of each compartment. Shelf features Your refrigerator includes SpillSafeTM glass shelves, which attach to a different location, the spacers must be separated from breakage, handle tempered glass shelves... carefully. These shelves slide out for storing fruits, vegetables, and other fresh produce. Drawers Your refrigerator includes a variety of the brackets to food and faster cleaning. These drawers usually are designed for easy access to securely hold...
Use and Care Guide
Page 17
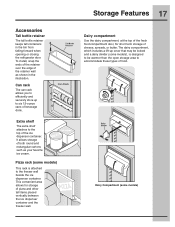
... to six 12-ounce cans of both round and rectangular cartons such as shown in the bin from falling forward when opening or closing the refrigerator door. It allows storage of beverage drink. Can rack The can rack allows you to efficiently and securely store up cover that may be warmer...
... to six 12-ounce cans of both round and rectangular cartons such as shown in the bin from falling forward when opening or closing the refrigerator door. It allows storage of beverage drink. Can rack The can rack allows you to efficiently and securely store up cover that may be warmer...

Use and Care Guide
Page 18
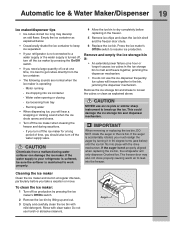
... (stopping to 90 minutes. partially frozen cubes with a new one. 18 Automatic Ice & Water Maker/Dispenser Priming the water supply system Your refrigerator's water supply system includes several hours, the ice maker can result in the top of the dispenser. NOTE The ice maker also has a... are harvested they break open and spill water over the other ice cubes in this shutoff device, simply release the dispenser paddle. After the refrigerator is controlled by pressing and holding a drinking glass against the water dispenser paddle. 2 Keep the glass in the ice container, forming a...
... (stopping to 90 minutes. partially frozen cubes with a new one. 18 Automatic Ice & Water Maker/Dispenser Priming the water supply system Your refrigerator's water supply system includes several hours, the ice maker can result in the top of the dispenser. NOTE The ice maker also has a... are harvested they break open and spill water over the other ice cubes in this shutoff device, simply release the dispenser paddle. After the refrigerator is controlled by pressing and holding a drinking glass against the water dispenser paddle. 2 Keep the glass in the ice container, forming a...
Use and Care Guide
Page 19
...need a large quantity of ice at regular intervals, particularly before replacing in the bin, jamming the dispenser mechanism. If the water supply to your refrigerator is not connected to a water supply or the water supply is maintained to work properly. 4 Allow the ice bin to dry completely before ... cleaners. The freezer door may develop an odd flavor. Press the ice maker's Off/On switch to keep ice separated. • If your refrigerator is softened, be sure the softener is turned off, turn off the ice maker when cleaning the freezer and during vacations. - Remove and empty...
...need a large quantity of ice at regular intervals, particularly before replacing in the bin, jamming the dispenser mechanism. If the water supply to your refrigerator is not connected to a water supply or the water supply is maintained to work properly. 4 Allow the ice bin to dry completely before ... cleaners. The freezer door may develop an odd flavor. Press the ice maker's Off/On switch to keep ice separated. • If your refrigerator is softened, be sure the softener is turned off, turn off the ice maker when cleaning the freezer and during vacations. - Remove and empty...
Use and Care Guide
Page 20
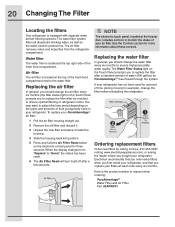
...the Touch Panel prompts you to the water filter. Electrolux recommends that you order extra filters when you first install your refrigerator, and that you bought your refrigerator. Here is the product number to ensure optimal filtering of refrigerator odors. Replacing the air filter In general, you... of water (400 gallons for PureAdvantageTM) has flowed through the system. To replace your air filter. When the display changes from the refrigerator compartment. Air filter The air filter is located at the freezer door, includes controls to "Good," the status has been reset. 6...
...the Touch Panel prompts you to the water filter. Electrolux recommends that you order extra filters when you first install your refrigerator, and that you bought your refrigerator. Here is the product number to ensure optimal filtering of refrigerator odors. Replacing the air filter In general, you... of water (400 gallons for PureAdvantageTM) has flowed through the system. To replace your air filter. When the display changes from the refrigerator compartment. Air filter The air filter is located at the freezer door, includes controls to "Good," the status has been reset. 6...
Use and Care Guide
Page 22
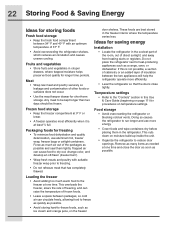
...stored in crisper drawers, where trapped moisture helps preserve food quality for longer time periods. Ideas for saving energy Installation • Locate the refrigerator in this is at one time and close tightly. Temperature settings • Refer to the "Controls" section in the coolest part of ... of cabinetry or an added layer of other foods or surfaces does not occur. • Use the meat keeper drawer for short-term storage. 22 Storing Food & Saving Energy Ideas for storing foods Fresh food storage • Keep the fresh food compartment between 34° F and 40°...
...stored in crisper drawers, where trapped moisture helps preserve food quality for longer time periods. Ideas for saving energy Installation • Locate the refrigerator in this is at one time and close tightly. Temperature settings • Refer to the "Controls" section in the coolest part of ... of cabinetry or an added layer of other foods or surfaces does not occur. • Use the meat keeper drawer for short-term storage. 22 Storing Food & Saving Energy Ideas for storing foods Fresh food storage • Keep the fresh food compartment between 34° F and 40°...
Use and Care Guide
Page 23
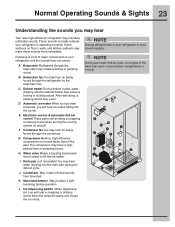
...been produced, you will hear ice cubes falling into the drain pan during operation. F Condenser fan You may hear air being forced through the refrigerator by the evaporator fan. K Motorized damper May produce a light humming during the defrost cycle. NOTE During automatic defrost cycle, a red glow... ice, you will hear a snapping or clicking sound when the solenoid opens and closes the ice chute. These sounds normally indicate your refrigerator and the sounds they can produce a snapping or clicking sound when turning the cooling system on floors, walls, and kitchen cabinets may...
...been produced, you will hear ice cubes falling into the drain pan during operation. F Condenser fan You may hear air being forced through the refrigerator by the evaporator fan. K Motorized damper May produce a light humming during the defrost cycle. NOTE During automatic defrost cycle, a red glow... ice, you will hear a snapping or clicking sound when the solenoid opens and closes the ice chute. These sounds normally indicate your refrigerator and the sounds they can produce a snapping or clicking sound when turning the cooling system on floors, walls, and kitchen cabinets may...


