Complete Owner's Guide (English)
Page 2
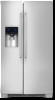
... with Electrolux enhances our ability to customer satisfaction and product quality throughout the service life of contents Finding Information 2 Safety 3 Installation 5 Removing The Doors 8 Installing Door Handles 10 Connecting The Water Supply 11 Feature Overview 13 Controls 14 Storage Features 19 Automatic Ice & Water Maker/Dispenser 27 Changing The Filter 30 Storing Food & Saving Energy 32 Normal Operating Sounds & Sights 33 Care & Cleaning 34 Warranty 37 Before You Call 38 Questions? This Use & Care Guide is part of...
... with Electrolux enhances our ability to customer satisfaction and product quality throughout the service life of contents Finding Information 2 Safety 3 Installation 5 Removing The Doors 8 Installing Door Handles 10 Connecting The Water Supply 11 Feature Overview 13 Controls 14 Storage Features 19 Automatic Ice & Water Maker/Dispenser 27 Changing The Filter 30 Storing Food & Saving Energy 32 Normal Operating Sounds & Sights 33 Care & Cleaning 34 Warranty 37 Before You Call 38 Questions? This Use & Care Guide is part of...
Complete Owner's Guide (English)
Page 5
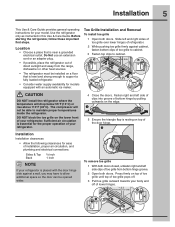
... Installation and Removal To install toe grille 1 Open both doors. Sufficient air circulation is level and strong enough to allow additional space so the door can be opened wider. Installation 5 This Use & Care Guide provides general operating instructions for your refrigerator is near a grounded electrical outlet. Do Not use an extension cord or an adapter plug. • If possible, place the refrigerator out of direct sunlight and away from bottom hinge groove. 2 Open...
... Installation and Removal To install toe grille 1 Open both doors. Sufficient air circulation is level and strong enough to allow additional space so the door can be opened wider. Installation 5 This Use & Care Guide provides general operating instructions for your refrigerator is near a grounded electrical outlet. Do Not use an extension cord or an adapter plug. • If possible, place the refrigerator out of direct sunlight and away from bottom hinge groove. 2 Open...
Complete Owner's Guide (English)
Page 6
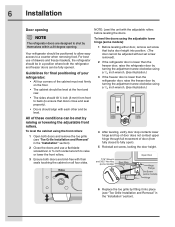
... your refrigerator: • All four corners of these conditions can be positioned to allow easy access to fully open). 5 Reinstall set screw, locking the door height. 7/16" Wrench and 3/32" Hex Key (some models) Door Stop Flange Open Door Hinge Flange Set Screw (some models): 1 Before leveling either door, remove set screw that doors close and seal properly). • Doors should be in the "Installation" section). To level the cabinet using a 7/16...
... your refrigerator: • All four corners of these conditions can be positioned to allow easy access to fully open). 5 Reinstall set screw, locking the door height. 7/16" Wrench and 3/32" Hex Key (some models) Door Stop Flange Open Door Hinge Flange Set Screw (some models): 1 Before leveling either door, remove set screw that doors close and seal properly). • Doors should be in the "Installation" section). To level the cabinet using a 7/16...
Complete Owner's Guide (English)
Page 9
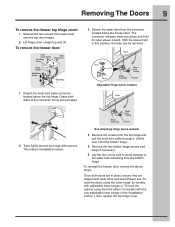
... inward. Removing The Doors 9 To remove the freezer top hinge cover: 1 Remove the two screws from each other and level (Please see "To level the doors using the lower hinge" for models with adjustable lower hinges or "To level the cabinet using the front rollers" for models with a pencil. To reinstall the freezer door, reverse the above the top hinge. To remove the freezer door: 3 Detach the water tube from the top hinge and pull the multi-wire cable...
... inward. Removing The Doors 9 To remove the freezer top hinge cover: 1 Remove the two screws from each other and level (Please see "To level the doors using the lower hinge" for models with adjustable lower hinges or "To level the cabinet using the front rollers" for models with a pencil. To reinstall the freezer door, reverse the above the top hinge. To remove the freezer door: 3 Detach the water tube from the top hinge and pull the multi-wire cable...

Complete Owner's Guide (English)
Page 11
... plumbing codes. Stainless Steel Water Line) and for the water supply line. Turn ON water supply and flush supply line until water is maintained and working properly. DO NOT over tighten. The nut and ferrule are already assembled on , lower wire signal arm (side mounted) or set the ice maker's On/ Off power switch to the ice maker inlet valve. DO NOT over tighten. With steel clamp and screw, secure water supply line (copper tubing only) to electrical power source...
... plumbing codes. Stainless Steel Water Line) and for the water supply line. Turn ON water supply and flush supply line until water is maintained and working properly. DO NOT over tighten. The nut and ferrule are already assembled on , lower wire signal arm (side mounted) or set the ice maker's On/ Off power switch to the ice maker inlet valve. DO NOT over tighten. With steel clamp and screw, secure water supply line (copper tubing only) to electrical power source...
Complete Owner's Guide (English)
Page 15
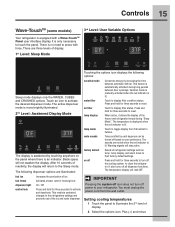
... seconds of the freezer and refrigerator temps during long periods between automatic defrost. This restricts undesired changes to illuminate the 2nd level of the ice and water dispenser. Setting cooling temperatures 1 Touch the panel to the refrigerators settings and prevents use of display. 2 Select the options icon. There are illuminated: fast ice Increases the production of display. 1st Level: Sleep Mode Sleep mode displays only the WATER, CUBES and CRUSHED options. air filter temp display Touch to your...
... seconds of the freezer and refrigerator temps during long periods between automatic defrost. This restricts undesired changes to illuminate the 2nd level of the ice and water dispenser. Setting cooling temperatures 1 Touch the panel to the refrigerators settings and prevents use of display. 2 Select the options icon. There are illuminated: fast ice Increases the production of display. 1st Level: Sleep Mode Sleep mode displays only the WATER, CUBES and CRUSHED options. air filter temp display Touch to your...
Complete Owner's Guide (English)
Page 17
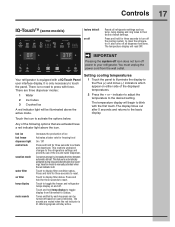
... reset. It also turns off all refrigerator settings such as temp, temp display and ring tones to activate and deactivate. Your refrigerator is automatically activated during long periods between automatic defrost. There is lit. fast ice fast freeze dispenser light control lock vacation mode water filter air filter temp display mute sounds Increases the production of the ice and water dispenser. Touch and hold temp display to Celsius. Warning signals will read OFF. The temperature display will be turned...
... reset. It also turns off all refrigerator settings such as temp, temp display and ring tones to activate and deactivate. Your refrigerator is automatically activated during long periods between automatic defrost. There is lit. fast ice fast freeze dispenser light control lock vacation mode water filter air filter temp display mute sounds Increases the production of the ice and water dispenser. Touch and hold temp display to Celsius. Warning signals will read OFF. The temperature display will be turned...

Complete Owner's Guide (English)
Page 27
... shelf out (some models). Ice is not flushed, the first ice cubes may make a loud chattering noise when it can work as soon as necessary). Using the ice maker after three minutes of ice every 24 hours depending on at a rate of any impurities (stopping to empty the glass as you cannot connect a water supply, turn it Off and press to the "I" position to turn the ice maker's On/Off switch to turn...
... shelf out (some models). Ice is not flushed, the first ice cubes may make a loud chattering noise when it can work as soon as necessary). Using the ice maker after three minutes of ice every 24 hours depending on at a rate of any impurities (stopping to empty the glass as you cannot connect a water supply, turn it Off and press to the "I" position to turn the ice maker's On/Off switch to turn...

Complete Owner's Guide (English)
Page 28
... the freezer. 5 Remove ice chips and clean the ice bin shelf and the freezer door chute. 6 Replace the ice bin. As the water filter nears the end of its useful life and becomes clogged with a new one hour or longer) causes ice cubes in the ice storage bin to a water supply or the water supply is turned off, turn off the ice maker by lifting up and out. 3 Empty and carefully clean the ice bin with water inside. Remember, if your refrigerator is not connected...
... the freezer. 5 Remove ice chips and clean the ice bin shelf and the freezer door chute. 6 Replace the ice bin. As the water filter nears the end of its useful life and becomes clogged with a new one hour or longer) causes ice cubes in the ice storage bin to a water supply or the water supply is turned off, turn off the ice maker by lifting up and out. 3 Empty and carefully clean the ice bin with water inside. Remember, if your refrigerator is not connected...

Complete Owner's Guide (English)
Page 30
... refrigerator has not been used to produce ice. If your refrigerator. Electrolux recommends that you order extra filters when you first install your refrigerator, and that you to replace the filter after six months) to replace the filter after a few seconds. Replacing the water filter In general, you should change the air filter every six months (the filter status light on the Touch Panel prompts you replace your refrigerator. Ordering replacement filters Order new filters by calling toll-free...
... refrigerator has not been used to produce ice. If your refrigerator. Electrolux recommends that you order extra filters when you first install your refrigerator, and that you to replace the filter after six months) to replace the filter after a few seconds. Replacing the water filter In general, you should change the air filter every six months (the filter status light on the Touch Panel prompts you replace your refrigerator. Ordering replacement filters Order new filters by calling toll-free...

Complete Owner's Guide (English)
Page 31
... inch To replace your advanced water filter The PureAdvantageTM ice and water filter system is microbiologically unsafe or of water released during the filter replacement. 1 Turn Off the ice maker power switch. 2 Push the filter release button below the cartridge to "Good," the status has been reset. Any spurts and sputters that is tested and certified by NSF International to change the filter. Do not use with the filter release button. 6 Press a drinking glass against...
... inch To replace your advanced water filter The PureAdvantageTM ice and water filter system is microbiologically unsafe or of water released during the filter replacement. 1 Turn Off the ice maker power switch. 2 Push the filter release button below the cartridge to "Good," the status has been reset. Any spurts and sputters that is tested and certified by NSF International to change the filter. Do not use with the filter release button. 6 Press a drinking glass against...
Complete Owner's Guide (English)
Page 34
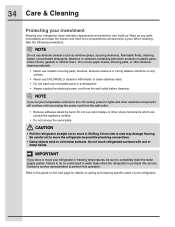
... any removable parts in freezing temperatures, be sure to move your refrigerator clean maintains appearance and prevents odor build-up. When cleaning, take the following precautions: NOTE Do not use razor blades or other abrasive cleaning materials. • Never use metallic scouring pads, brushes, abrasive cleaners or strong alkaline solutions on caring and cleaning specific areas of your temperature controls to turn off cooling, power to lights and other electrical...
... any removable parts in freezing temperatures, be sure to move your refrigerator clean maintains appearance and prevents odor build-up. When cleaning, take the following precautions: NOTE Do not use razor blades or other abrasive cleaning materials. • Never use metallic scouring pads, brushes, abrasive cleaners or strong alkaline solutions on caring and cleaning specific areas of your temperature controls to turn off cooling, power to lights and other electrical...
Complete Owner's Guide (English)
Page 37
Exclusions This warranty does not cover the following: 1. Service calls to correct the installation of your appliance or to instruct you how to use of parts other than authorized service companies; Service calls to repair or replace appliance light bulbs, air filters, water filters, other consumables, or knobs, handles, or other than in accordance with the provided instructions. 8. CLAIMS BASED ON IMPLIED WARRANTIES, INCLUDING WARRANTIES OF MERCHANTABILITY OR FITNESS FOR A PARTICULAR PURPOSE...
Exclusions This warranty does not cover the following: 1. Service calls to correct the installation of your appliance or to instruct you how to use of parts other than authorized service companies; Service calls to repair or replace appliance light bulbs, air filters, water filters, other consumables, or knobs, handles, or other than in accordance with the provided instructions. 8. CLAIMS BASED ON IMPLIED WARRANTIES, INCLUDING WARRANTIES OF MERCHANTABILITY OR FITNESS FOR A PARTICULAR PURPOSE...
Complete Owner's Guide (English)
Page 38
... lights. Food stored in drawers freezes. Cause • Freezer control is set too cold. • Refrigerator control is set too cold. • Refrigerator control is set too cold. • Meat Keeper temperature control is set too cold (control found in door seal will cause refrigerator to run more . • Warm air entering the refrigerator causes it to a lower setting. 38 Before You Call Before you can interpret any messages or number codes flashing on and off to stabilize. • Clean or change gasket. Compressor...
... lights. Food stored in drawers freezes. Cause • Freezer control is set too cold. • Refrigerator control is set too cold. • Refrigerator control is set too cold. • Meat Keeper temperature control is set too cold (control found in door seal will cause refrigerator to run more . • Warm air entering the refrigerator causes it to a lower setting. 38 Before You Call Before you can interpret any messages or number codes flashing on and off to stabilize. • Clean or change gasket. Compressor...

Complete Owner's Guide (English)
Page 40
... not separating the ice cubes. Replace filter cartridge. • Cover foods tightly. Remove valve. Replace valve if necessary. • If not, the ice & water filter cartridge is a copper line, it is clogged or restricted, and must be clogged. Ice maker is not a self-piercing valve. Ice maker will produce fresh supply. • Discard stale ice. Clean valve. Solution • Turn on power switch. • Connect water supply (see Installation Instructions). • Turn on cold water pipe is producing less ice than normal. • Ice has picked...
... not separating the ice cubes. Replace filter cartridge. • Cover foods tightly. Remove valve. Replace valve if necessary. • If not, the ice & water filter cartridge is a copper line, it is clogged or restricted, and must be clogged. Ice maker is not a self-piercing valve. Ice maker will produce fresh supply. • Discard stale ice. Clean valve. Solution • Turn on power switch. • Connect water supply (see Installation Instructions). • Turn on cold water pipe is producing less ice than normal. • Ice has picked...

Complete Owner's Guide (English)
Page 41
...; Water supply is not connected. • Household water line to a higher setting so that cubes do not freeze together. • The ice & water filter cartridge could be made , dispenser should operate. • Turn freezer control to the refrigerator is kinked. • Ice storage container is empty. • Freezer temperature is set too warm. • Household water line valve is not open. • Freezer door is dropped into the container, the dispenser should operate. • Open household water line valve. When the first supply of possible leaks...
...; Water supply is not connected. • Household water line to a higher setting so that cubes do not freeze together. • The ice & water filter cartridge could be made , dispenser should operate. • Turn freezer control to the refrigerator is kinked. • Ice storage container is empty. • Freezer temperature is set too warm. • Household water line valve is not open. • Freezer door is dropped into the container, the dispenser should operate. • Open household water line valve. When the first supply of possible leaks...

Complete Owner's Guide (English)
Page 42
... connected to cold water line. • Tubing used in the household water supply and installation may need to correct a sagging or sloping floor. • Keep less food in checking water supply source. • Have someone turn up the cut-off and cut-on pressure on air filtration system. See Problem section Ice Maker Is Not Making Ice. • Ensure that freezer door is closed . • Ice & water filter cartridge is dirty. See Care & Cleaning Tips. Air filter may affect water...
... connected to cold water line. • Tubing used in the household water supply and installation may need to correct a sagging or sloping floor. • Keep less food in checking water supply source. • Have someone turn up the cut-off and cut-on pressure on air filtration system. See Problem section Ice Maker Is Not Making Ice. • Ensure that freezer door is closed . • Ice & water filter cartridge is dirty. See Care & Cleaning Tips. Air filter may affect water...
Wiring Diagram (English Español Français)
Page 1
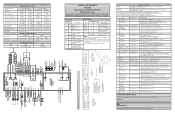
... Ice Chute Door Depress ice chute door "OP" on -off FF door must be closed . R134a IMPORTANT: PLEASE RETURN THIS SHEET TO ITS ORIGINAL LOCATION Error Codes Display FZ FF Interpretation -- Open FZ thermistor Shorted FF mid-level -- Second Screen -- off when "off " 11 Cube/Crush Solenoid Press power on UI when door closed ; motor stopped when "off " 8 Water Valve (Dispenser) Press power on ". Untrained persons should not attempt to make repairs...
... Ice Chute Door Depress ice chute door "OP" on -off FF door must be closed . R134a IMPORTANT: PLEASE RETURN THIS SHEET TO ITS ORIGINAL LOCATION Error Codes Display FZ FF Interpretation -- Open FZ thermistor Shorted FF mid-level -- Second Screen -- off when "off " 11 Cube/Crush Solenoid Press power on UI when door closed ; motor stopped when "off " 8 Water Valve (Dispenser) Press power on ". Untrained persons should not attempt to make repairs...

Product Specifications Sheet (English)
Page 1
... Controls Yes Door Hinge Covers Yes Ice / Water Dispenser Yes Perfect Set® Temperature Control System and Display Yes Crushed / Cubes / Water Yes Air and Water Filter Indicator / Reset Yes Fast Ice™ Yes Fast Freeze™ Yes Lock Yes Dispenser Light Control Yes Fresh Food Conveniences PureAdvantage® Water & Ice / Air Filtration Water Filter Location Temp Alarm System / Door Ajar Alarm / Power Failure Alarm Luxury-Design® Lift-Off Glass Shelves Luxury-Glide® Dual Humidity-Controlled Upper Crisper Luxury-Glide® Humidity-Controlled Lower Crisper...
... Controls Yes Door Hinge Covers Yes Ice / Water Dispenser Yes Perfect Set® Temperature Control System and Display Yes Crushed / Cubes / Water Yes Air and Water Filter Indicator / Reset Yes Fast Ice™ Yes Fast Freeze™ Yes Lock Yes Dispenser Light Control Yes Fresh Food Conveniences PureAdvantage® Water & Ice / Air Filtration Water Filter Location Temp Alarm System / Door Ajar Alarm / Power Failure Alarm Luxury-Design® Lift-Off Glass Shelves Luxury-Glide® Dual Humidity-Controlled Upper Crisper Luxury-Glide® Humidity-Controlled Lower Crisper...
Product Specifications Sheet (English)
Page 2
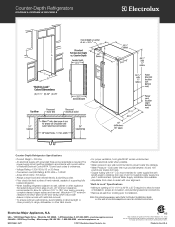
... prevent water line damage. • Water Pressure - Optional Water Supply Installation Kits available. • Adjustable front rollers to assist with 1/4" O.D. Electrolux Major Appliances, N.A. Note: For planning purposes only. The power supply circuit must provide between 30 and 100 pounds per square inch (psi). • Copper tubing with door alignment. Counter-Depth Refrigerators EI23CS65K S, EI23CS65K W, EI23CS65K B Counter-Depth Refrigerator Specifications • Product Weight - 300 Lbs. • An electrical supply with restricted removal.) •...
... prevent water line damage. • Water Pressure - Optional Water Supply Installation Kits available. • Adjustable front rollers to assist with 1/4" O.D. Electrolux Major Appliances, N.A. Note: For planning purposes only. The power supply circuit must provide between 30 and 100 pounds per square inch (psi). • Copper tubing with door alignment. Counter-Depth Refrigerators EI23CS65K S, EI23CS65K W, EI23CS65K B Counter-Depth Refrigerator Specifications • Product Weight - 300 Lbs. • An electrical supply with restricted removal.) •...


