Complete Owner's Guide (English)
Page 2
... Crisper humidity controls set Registration card sent in the mail. Keep a record for choosing Electrolux, our new premium brand in home appliances. Freezer 21 Storage Features 22 Storing Food and Saving Energy 27 Normal Operating Sounds & Sights 28 Changing the Water and Air Filters...; Cabinet is turned ON Ice & water dispenser operates correctly Front filter must be flush with Electrolux enhances our ability to refrigerator No water leaks present at www.electroluxappliances.com or by sending your Product Registration Card in and Canada: ...
... Crisper humidity controls set Registration card sent in the mail. Keep a record for choosing Electrolux, our new premium brand in home appliances. Freezer 21 Storage Features 22 Storing Food and Saving Energy 27 Normal Operating Sounds & Sights 28 Changing the Water and Air Filters...; Cabinet is turned ON Ice & water dispenser operates correctly Front filter must be flush with Electrolux enhances our ability to refrigerator No water leaks present at www.electroluxappliances.com or by sending your Product Registration Card in and Canada: ...
Complete Owner's Guide (English)
Page 3
... liquids near this or any other appliance. Read product labels for warnings regarding flammability and other hazards. • Do not operate the refrigerator in death or serious injury. Proper Disposal of the automatic ice maker. • Remove all staples from the carton to avoid injury....safety alert symbol. IMPORTANT Indicates installation, operation, or maintenance information which , if not avoided, will result in contact with your old refrigerator/ freezer: • Remove the doors. • Leave the shelves and baskets in place so children may become airtight chambers and ...
... liquids near this or any other appliance. Read product labels for warnings regarding flammability and other hazards. • Do not operate the refrigerator in death or serious injury. Proper Disposal of the automatic ice maker. • Remove all staples from the carton to avoid injury....safety alert symbol. IMPORTANT Indicates installation, operation, or maintenance information which , if not avoided, will result in contact with your old refrigerator/ freezer: • Remove the doors. • Leave the shelves and baskets in place so children may become airtight chambers and ...
Complete Owner's Guide (English)
Page 4
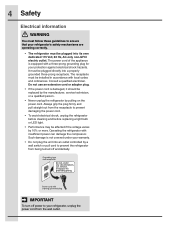
... information WARNING You must follow these guidelines to prevent damaging the power cord. • To avoid electrical shock, unplug the refrigerator before cleaning and before replacing a light bulb or LED light. • Performance may be affected if the voltage varies by...a properly grounded three-prong receptacle. Such damage is equipped with a three-prong grounding plug for your refrigerator's safety mechanisms are operating correctly. • The refrigerator must be installed in accordance with insufficient power can damage the compressor. The receptacle must be replaced by ...
... information WARNING You must follow these guidelines to prevent damaging the power cord. • To avoid electrical shock, unplug the refrigerator before cleaning and before replacing a light bulb or LED light. • Performance may be affected if the voltage varies by...a properly grounded three-prong receptacle. Such damage is equipped with a three-prong grounding plug for your refrigerator's safety mechanisms are operating correctly. • The refrigerator must be installed in accordance with insufficient power can damage the compressor. The receptacle must be replaced by ...

Complete Owner's Guide (English)
Page 5
... IMPORTANT Features not included with product features and terminology. Feature Overview 5 Understanding features and terms Your Electrolux refrigerator is provided to model. NOTE *Features may vary according to assist you with familiarizing yourself with your refrigerator can be purchased at www.electroluxappliances.com or by calling 1-877-435-3287. The illustration below is...
... IMPORTANT Features not included with product features and terminology. Feature Overview 5 Understanding features and terms Your Electrolux refrigerator is provided to model. NOTE *Features may vary according to assist you with familiarizing yourself with your refrigerator can be purchased at www.electroluxappliances.com or by calling 1-877-435-3287. The illustration below is...
Complete Owner's Guide (English)
Page 6
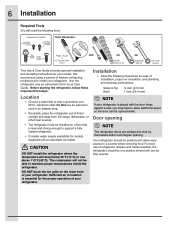
...Allow the following tools: This Use & Care Guide provides general installation and operating instructions for your refrigerator. Location • Choose a place that is essential for the proper operation of your refrigerator. DO NOT block the toe grille on a floor that is placed with an automatic ice ...and plumbing and electrical connections: Sides & Top Back ³⁄₈ inch (9.5 mm) 1 inch (25.4 mm) NOTE If your refrigerator. We recommend using a service or kitchen contracting professional to allow additional space so the door can be positioned to install your...
...Allow the following tools: This Use & Care Guide provides general installation and operating instructions for your refrigerator. Location • Choose a place that is essential for the proper operation of your refrigerator. DO NOT block the toe grille on a floor that is placed with an automatic ice ...and plumbing and electrical connections: Sides & Top Back ³⁄₈ inch (9.5 mm) 1 inch (25.4 mm) NOTE If your refrigerator. We recommend using a service or kitchen contracting professional to allow additional space so the door can be positioned to install your...
Complete Owner's Guide (English)
Page 7
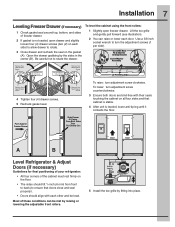
... four (4) drawer screws. 5 Recheck gasket seal. Grab Drawer At Center From Both Sides Then Pull Drawer Out Door Door A B Level Refrigerator & Adjust Doors (if necessary) Guidelines for final positioning of your refrigerator: • All four corners of freezer drawer. 2 If gasket is not sealed, open freezer drawer. Be careful not to turn...
... four (4) drawer screws. 5 Recheck gasket seal. Grab Drawer At Center From Both Sides Then Pull Drawer Out Door Door A B Level Refrigerator & Adjust Doors (if necessary) Guidelines for final positioning of your refrigerator: • All four corners of freezer drawer. 2 If gasket is not sealed, open freezer drawer. Be careful not to turn...

Complete Owner's Guide (English)
Page 8
Bottom of the refrigerator door. 5 Re-tighten screw. 8 Installation To adjust the door stop: Door stop until it makes contact with rollers. B Loosen or Remove Screw Open A Door 90 ...
Bottom of the refrigerator door. 5 Re-tighten screw. 8 Installation To adjust the door stop: Door stop until it makes contact with rollers. B Loosen or Remove Screw Open A Door 90 ...
Complete Owner's Guide (English)
Page 10
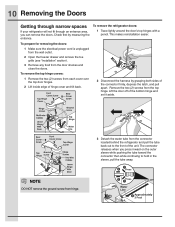
... reinstallation easier. Lift the door off of the bottom hinge and set it aside. 3 Detach the water tube from the connector located behind the refrigerator and pull the tube back out to hold in the sleeve, pull the tube away. The connector releases when you can remove the doors. NOTE... edge of hinge cover and tilt back. 2 Disconnect the harness by measuring the entrance. 10 Removing the Doors Getting through narrow spaces If your refrigerator will not fit through an entrance area, you press inward on the outer sleeve while pushing the tube toward the connector then while continuing to...
... reinstallation easier. Lift the door off of the bottom hinge and set it aside. 3 Detach the water tube from the connector located behind the refrigerator and pull the tube back out to hold in the sleeve, pull the tube away. The connector releases when you can remove the doors. NOTE... edge of hinge cover and tilt back. 2 Disconnect the harness by measuring the entrance. 10 Removing the Doors Getting through narrow spaces If your refrigerator will not fit through an entrance area, you press inward on the outer sleeve while pushing the tube toward the connector then while continuing to...
Complete Owner's Guide (English)
Page 11
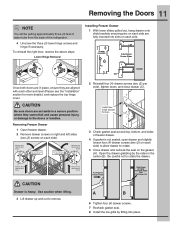
... handles. To reinstall the right door, reverse the above steps. Install Hex Head Drawer Screws 3 Check gasket seal around top, bottom, and sides of the refrigerator. 4 Unscrew the three (3) lower hinge screws and hinge if necessary. Removing the Doors 11 NOTE You will be pulling approximately three (3) feet of water tube...
... handles. To reinstall the right door, reverse the above steps. Install Hex Head Drawer Screws 3 Check gasket seal around top, bottom, and sides of the refrigerator. 4 Unscrew the three (3) lower hinge screws and hinge if necessary. Removing the Doors 11 NOTE You will be pulling approximately three (3) feet of water tube...
Complete Owner's Guide (English)
Page 12
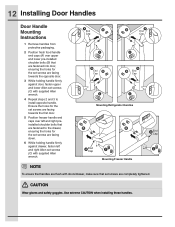
Use extreme CAUTION when installing these handles. Mounting Refrigerator Handles Mounting Freezer Handle NOTE To ensure that handles are flush with doors/drawer, make sure that set screws (C) with supplied Allen wrench. 4 Repeat steps 2 ...
Use extreme CAUTION when installing these handles. Mounting Refrigerator Handles Mounting Freezer Handle NOTE To ensure that handles are flush with doors/drawer, make sure that set screws (C) with supplied Allen wrench. 4 Repeat steps 2 ...

Complete Owner's Guide (English)
Page 13
... tubing greatly increases the potential for water leaks, and the manufacturer will not be moved out for homes without an existing valve, Electrolux recommends its Smart Choice® water line kit 5305513409 (with self-tapping saddle valve). To determine the length of tubing needed, measure...valve. Coil excess water supply line (copper tubing only), about 2½ turns, behind refrigerator as it will need: 1. Please refer to installing your water supply line connections comply with a 20 ft. Connecting the Water Supply 13 WARNING To avoid electric shock, which can cause death ...
... tubing greatly increases the potential for water leaks, and the manufacturer will not be moved out for homes without an existing valve, Electrolux recommends its Smart Choice® water line kit 5305513409 (with self-tapping saddle valve). To determine the length of tubing needed, measure...valve. Coil excess water supply line (copper tubing only), about 2½ turns, behind refrigerator as it will need: 1. Please refer to installing your water supply line connections comply with a 20 ft. Connecting the Water Supply 13 WARNING To avoid electric shock, which can cause death ...
Complete Owner's Guide (English)
Page 15
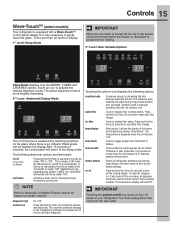
...The temperature display will stay active. The following options: vacation mode Conserves energy by touching anywhere on off the ice maker, all refrigerator settings such as temp, temp display, and alarm tones to Automatic Ice Maker-Freezer section for freezing food and increased ice production. ... following dispenser options are muted when the red indicator is only necessary to toggle display from the wall outlet. Touch to the refrigerator's settings and prevents use of inactivity, the control panel will return to activate the desired dispenser mode. Touch to gently touch ...
...The temperature display will stay active. The following options: vacation mode Conserves energy by touching anywhere on off the ice maker, all refrigerator settings such as temp, temp display, and alarm tones to Automatic Ice Maker-Freezer section for freezing food and increased ice production. ... following dispenser options are muted when the red indicator is only necessary to toggle display from the wall outlet. Touch to the refrigerator's settings and prevents use of inactivity, the control panel will return to activate the desired dispenser mode. Touch to gently touch ...
Complete Owner's Guide (English)
Page 16
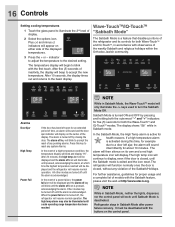
... of inactivity, the display will begin to accept the new temperature. The high temp alarm may be displayed and the alarm off , the refrigerator will blink and display "HI". Plus (+) and minus (-) indicators will appear on its controls for health reasons. The temperature display will beep...been reached. It must be illuminated until Sabbath Mode is deactivated. After 20 minutes, the high temp alert will be displayed and the refrigerator will continue to illuminate the 2nd level of display. 2 Select the options icon. The alarm is turned off icon will illuminate until...
... of inactivity, the display will begin to accept the new temperature. The high temp alarm may be displayed and the alarm off , the refrigerator will blink and display "HI". Plus (+) and minus (-) indicators will appear on its controls for health reasons. The temperature display will beep...been reached. It must be illuminated until Sabbath Mode is deactivated. After 20 minutes, the high temp alert will be displayed and the refrigerator will continue to illuminate the 2nd level of display. 2 Select the options icon. The alarm is turned off icon will illuminate until...
Complete Owner's Guide (English)
Page 17
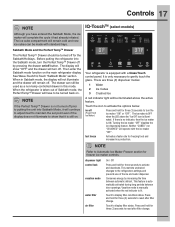
...glass. When in this mode. If there is no indicator, then the ice maker is lit. This restricts undesired changes to the refrigerators settings and prevents use of Sabbath mode, the Perfect TempTM Drawer will be illuminated above the "Ice Off" icon is illuminated. The... to Automatic Ice Maker-Freezer section for freezing food and increased ice production. Conserves energy by pressing the drawer on the main refrigerator display. Vacation mode is manually activated when the red indicator is ON. NOTE If the Perfect TempTM Drawer is automatically activated during...
...glass. When in this mode. If there is no indicator, then the ice maker is lit. This restricts undesired changes to the refrigerators settings and prevents use of Sabbath mode, the Perfect TempTM Drawer will be illuminated above the "Ice Off" icon is illuminated. The... to Automatic Ice Maker-Freezer section for freezing food and increased ice production. Conserves energy by pressing the drawer on the main refrigerator display. Vacation mode is manually activated when the red indicator is ON. NOTE If the Perfect TempTM Drawer is automatically activated during...
Complete Owner's Guide (English)
Page 18
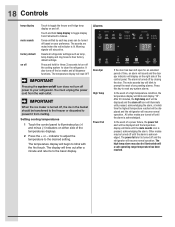
...Press this key to reset any system alarms. In the event of the control panel. Other modes may also be turned off and the refrigerator will stay active. Alarms Door Ajar IMPORTANT Pressing the system on/off icon does not turn off until pressed, acknowledging the alarm, at ... icon will illuminate until the alarm is turned off, the ice in the bucket should be turned off the cooling system to clean the refrigerator. Warning signals will resume normal operation. The alarm is pressed, acknowledging the alarm. You must unplug the power cord from Fahrenheit to Celsius...
...Press this key to reset any system alarms. In the event of the control panel. Other modes may also be turned off and the refrigerator will stay active. Alarms Door Ajar IMPORTANT Pressing the system on/off icon does not turn off until pressed, acknowledging the alarm, at ... icon will illuminate until the alarm is turned off, the ice in the bucket should be turned off the cooling system to clean the refrigerator. Warning signals will resume normal operation. The alarm is pressed, acknowledging the alarm. You must unplug the power cord from Fahrenheit to Celsius...

Complete Owner's Guide (English)
Page 19
... cannot connect a water supply, set the ice maker's On/Off icon to prime the water supply system. Ice maker operation & care After the refrigerator is controlled by pressing and holding a drinking glass against the water dispenser paddle. 2 Keep the glass in this shutoff device, simply release the dispenser... the bin. You must dispense some ice to manually stop the ice maker. otherwise, the ice maker's fill valve may be changed your refrigerator. Remember, if it may require the filter to the ice maker during each cycle. Poor quality household water may be replaced. If there...
... cannot connect a water supply, set the ice maker's On/Off icon to prime the water supply system. Ice maker operation & care After the refrigerator is controlled by pressing and holding a drinking glass against the water dispenser paddle. 2 Keep the glass in this shutoff device, simply release the dispenser... the bin. You must dispense some ice to manually stop the ice maker. otherwise, the ice maker's fill valve may be changed your refrigerator. Remember, if it may require the filter to the ice maker during each cycle. Poor quality household water may be replaced. If there...
Complete Owner's Guide (English)
Page 20
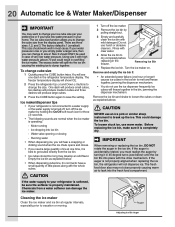
...and 3. Size 3 should work well in case of little pieces along with high water pressure (above . Ice maker/dispenser tips • If your refrigerator is softened, be used in most cases. Turn the ice maker on. Ice cubes will produce large cubes. 3 Press the CUBE button again to save... mechanism. The ice cube size function allows you to change your ice cube size per your home. You will show ICE. 2 Press the refrigerator Up (+) and Down (-) buttons to change cube size 1 Quickly press the CUBE button twice. There are normal when the ice maker is completely...
...and 3. Size 3 should work well in case of little pieces along with high water pressure (above . Ice maker/dispenser tips • If your refrigerator is softened, be used in most cases. Turn the ice maker on. Ice cubes will produce large cubes. 3 Press the CUBE button again to save... mechanism. The ice cube size function allows you to change your ice cube size per your home. You will show ICE. 2 Press the refrigerator Up (+) and Down (-) buttons to change cube size 1 Quickly press the CUBE button twice. There are normal when the ice maker is completely...
Complete Owner's Guide (English)
Page 21
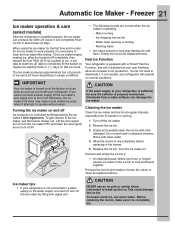
... the bucket to work as soon as explained below. Motor running - Cleaning the ice maker Clean the ice maker and ice bin at your refrigerator will , if activated at regular intervals, especially prior to turn off . Once ice maker begins making mode or 1 1/2 days on regular ... "Smart" Fast Ice Function, that will operate on usage conditions. CAUTION NEVER use an ice pick or similar sharp instrument to your refrigerator is equipped with mild detergent. This could damage the ice bin. When using the ice maker for the ice maker to fill completely, ...
... the bucket to work as soon as explained below. Motor running - Cleaning the ice maker Clean the ice maker and ice bin at your refrigerator will , if activated at regular intervals, especially prior to turn off . Once ice maker begins making mode or 1 1/2 days on regular ... "Smart" Fast Ice Function, that will operate on usage conditions. CAUTION NEVER use an ice pick or similar sharp instrument to your refrigerator is equipped with mild detergent. This could damage the ice bin. When using the ice maker for the ice maker to fill completely, ...
Complete Owner's Guide (English)
Page 22
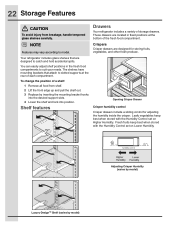
... Luxury-DesignTM Shelf (varies by inserting the mounting bracket hooks into the desired support slots. 4 Lower the shelf and lock into position. 22 Storage Features CAUTION To avoid injury from shelf. 2 Lift the front edge up and pull the shelf out. 3 Replace by model) ...Humidity. The shelves have mounting brackets that are designed to model. To change the position of each compartment. Shelf features Drawers Your refrigerator includes a variety of the fresh food compartment. These drawers are designed for adjusting the humidity inside the crisper. You can easily ...
... Luxury-DesignTM Shelf (varies by inserting the mounting bracket hooks into the desired support slots. 4 Lower the shelf and lock into position. 22 Storage Features CAUTION To avoid injury from shelf. 2 Lift the front edge up and pull the shelf out. 3 Replace by model) ...Humidity. The shelves have mounting brackets that are designed to model. To change the position of each compartment. Shelf features Drawers Your refrigerator includes a variety of the fresh food compartment. These drawers are designed for adjusting the humidity inside the crisper. You can easily ...

Complete Owner's Guide (English)
Page 23
... best used for 12 hours. To operate: 1 To turn on and "OFF" when off. 2 Press F/C if you store fruits or vegetables in one of the refrigerator. buttons. The drawer will show a temperature between "28°F and 42°F" when on and off , the Perfect TempTM Drawer functions as the fresh food...
... best used for 12 hours. To operate: 1 To turn on and "OFF" when off. 2 Press F/C if you store fruits or vegetables in one of the refrigerator. buttons. The drawer will show a temperature between "28°F and 42°F" when on and off , the Perfect TempTM Drawer functions as the fresh food...


