Complete Owner's Guide (English)
Page 2
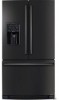
... can register online at all corners Electrical Power House power turned on Refrigerator plugged in the mail. Questions? Freezer 21 Storage Features 22 Storing Food and Saving Energy 27 Normal Operating Sounds & Sights 28 Changing the Water and Air...61553; Ice maker is turned ON Ice & water dispenser operates correctly Front filter must be flush with Electrolux enhances our ability to refrigerator Cabinet is properly attached to serve you for quick reference Finding Information 2 Safety 3 Feature Overview 5 Installation 6 ...
... can register online at all corners Electrical Power House power turned on Refrigerator plugged in the mail. Questions? Freezer 21 Storage Features 22 Storing Food and Saving Energy 27 Normal Operating Sounds & Sights 28 Changing the Water and Air...61553; Ice maker is turned ON Ice & water dispenser operates correctly Front filter must be flush with Electrolux enhances our ability to refrigerator Cabinet is properly attached to serve you for quick reference Finding Information 2 Safety 3 Feature Overview 5 Installation 6 ...
Complete Owner's Guide (English)
Page 3
... DANGER DANGER indicates an imminently hazardous situation which , if not avoided, may not easily climb inside. • Have refrigerant and compressor oil removed by a qualified service technician. General Safety WARNING Please read the safety precautions in minor or moderate... and Suffocation: • These problems are dangerous. Please take the precautions listed below. Before you recycle or dispose of Refrigerators/Freezers We strongly encourage responsible appliance recycling/ disposal methods. It is the safety alert symbol. CAUTION CAUTION indicates a potentially ...
... DANGER DANGER indicates an imminently hazardous situation which , if not avoided, may not easily climb inside. • Have refrigerant and compressor oil removed by a qualified service technician. General Safety WARNING Please read the safety precautions in minor or moderate... and Suffocation: • These problems are dangerous. Please take the precautions listed below. Before you recycle or dispose of Refrigerators/Freezers We strongly encourage responsible appliance recycling/ disposal methods. It is the safety alert symbol. CAUTION CAUTION indicates a potentially ...
Complete Owner's Guide (English)
Page 4
... plug firmly and pull straight out from the receptacle to prevent damaging the power cord. • To avoid electrical shock, unplug the refrigerator before cleaning and before replacing a light bulb or LED light. • Performance may be plugged into its own dedicated 115 Volt, ...60 Hz, AC-only non-GFCI electric outlet. Operating the refrigerator with a three-prong grounding plug for your refrigerator, unplug the power cord from being turned off power to your protection against electrical shock hazards. Consult a qualified electrician...
... plug firmly and pull straight out from the receptacle to prevent damaging the power cord. • To avoid electrical shock, unplug the refrigerator before cleaning and before replacing a light bulb or LED light. • Performance may be plugged into its own dedicated 115 Volt, ...60 Hz, AC-only non-GFCI electric outlet. Operating the refrigerator with a three-prong grounding plug for your refrigerator, unplug the power cord from being turned off power to your protection against electrical shock hazards. Consult a qualified electrician...

Complete Owner's Guide (English)
Page 5
Model is designed for optimal convenience and storage flexibility. Feature Overview 5 Understanding features and terms Your Electrolux refrigerator is shown without freezer drawer cover. *Air Filter Luxury-DesignTM Shelves Ice Bin *Incandescent Light Flipper Guide Ice Maker *LED Light Dairy ... Features not included with product features and terminology. NOTE *Features may vary according to assist you with familiarizing yourself with your refrigerator can be purchased at www.electroluxappliances.com or by calling 1-877-435-3287. The illustration below is provided to model.
Model is designed for optimal convenience and storage flexibility. Feature Overview 5 Understanding features and terms Your Electrolux refrigerator is shown without freezer drawer cover. *Air Filter Luxury-DesignTM Shelves Ice Bin *Incandescent Light Flipper Guide Ice Maker *LED Light Dairy ... Features not included with product features and terminology. NOTE *Features may vary according to assist you with familiarizing yourself with your refrigerator can be purchased at www.electroluxappliances.com or by calling 1-877-435-3287. The illustration below is provided to model.
Complete Owner's Guide (English)
Page 6
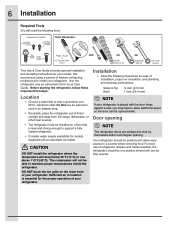
... a floor that is essential for your model. For best use an extension cord or an adapter plug. • If possible, place the refrigerator out of installation, proper air circulation, and plumbing and electrical connections: Sides & Top Back ³⁄₈ inch (9.5 mm) 1 inch...; Allow the following tools: This Use & Care Guide provides general installation and operating instructions for the proper operation of your refrigerator. Use the refrigerator only as instructed in a position where both can be positioned to allow additional space so the door can be able to ...
... a floor that is essential for your model. For best use an extension cord or an adapter plug. • If possible, place the refrigerator out of installation, proper air circulation, and plumbing and electrical connections: Sides & Top Back ³⁄₈ inch (9.5 mm) 1 inch...; Allow the following tools: This Use & Care Guide provides general installation and operating instructions for the proper operation of your refrigerator. Use the refrigerator only as instructed in a position where both can be positioned to allow additional space so the door can be able to ...
Complete Owner's Guide (English)
Page 7
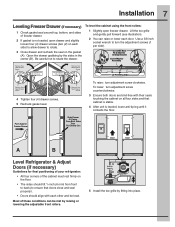
... is not sealed, open freezer drawer. Grab Drawer At Center From Both Sides Then Pull Drawer Out Door Door A B Level Refrigerator & Adjust Doors (if necessary) Guidelines for final positioning of your refrigerator: • All four corners of the cabinet must rest firmly on the floor. • The sides should align with their...
... is not sealed, open freezer drawer. Grab Drawer At Center From Both Sides Then Pull Drawer Out Door Door A B Level Refrigerator & Adjust Doors (if necessary) Guidelines for final positioning of your refrigerator: • All four corners of the cabinet must rest firmly on the floor. • The sides should align with their...

Complete Owner's Guide (English)
Page 8
... the adjustable lower hinge (select models): 1 Remove all food items from door bins on door being adjusted. 2 Open doors to desired location. Bottom of the refrigerator door. 5 Re-tighten screw. B Loosen or Remove Screw Open A Door 90 degrees Adjusting Door 4 Rotate door stop is looking up at the bottom of Door...
... the adjustable lower hinge (select models): 1 Remove all food items from door bins on door being adjusted. 2 Open doors to desired location. Bottom of the refrigerator door. 5 Re-tighten screw. B Loosen or Remove Screw Open A Door 90 degrees Adjusting Door 4 Rotate door stop is looking up at the bottom of Door...
Complete Owner's Guide (English)
Page 10
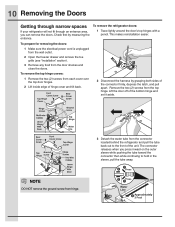
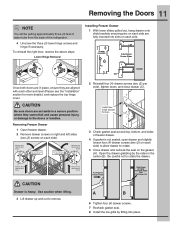
...of hinge cover and tilt back. 2 Disconnect the harness by measuring the entrance. The connector releases when you can remove the doors. To remove the refrigerator doors: 1 Trace lightly around the door's top hinges with a pencil. To prepare for removing the doors: 1 Make sure the electrical power cord... NOT remove the ground screw from the door shelves and close the doors. 10 Removing the Doors Getting through narrow spaces If your refrigerator will not fit through an entrance area, you press inward on the outer sleeve while pushing the tube toward the connector then while ...
...of hinge cover and tilt back. 2 Disconnect the harness by measuring the entrance. The connector releases when you can remove the doors. To remove the refrigerator doors: 1 Trace lightly around the door's top hinges with a pencil. To prepare for removing the doors: 1 Make sure the electrical power cord... NOT remove the ground screw from the door shelves and close the doors. 10 Removing the Doors Getting through narrow spaces If your refrigerator will not fit through an entrance area, you press inward on the outer sleeve while pushing the tube toward the connector then while ...
Complete Owner's Guide (English)
Page 11
... sides (two (2) screws on each side are in the center (B). Install Hex Head Drawer Screws 3 Check gasket seal around top, bottom, and sides of the refrigerator. 4 Unscrew the three (3) lower hinge screws and hinge if necessary. Open the drawer grabbing by fitting into slots on each side). Remove Hex Head Drawer...
... sides (two (2) screws on each side are in the center (B). Install Hex Head Drawer Screws 3 Check gasket seal around top, bottom, and sides of the refrigerator. 4 Unscrew the three (3) lower hinge screws and hinge if necessary. Open the drawer grabbing by fitting into slots on each side). Remove Hex Head Drawer...
Complete Owner's Guide (English)
Page 12
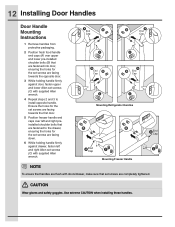
.... 6 While holding handle firmly against drawer, fasten left and right Allen set screws (C) with supplied Allen wrench. Use extreme CAUTION when installing these handles. Mounting Refrigerator Handles Mounting Freezer Handle NOTE To ensure that handles are flush with doors/drawer, make sure that set screws are completely tightened.
.... 6 While holding handle firmly against drawer, fasten left and right Allen set screws (C) with supplied Allen wrench. Use extreme CAUTION when installing these handles. Mounting Refrigerator Handles Mounting Freezer Handle NOTE To ensure that handles are flush with doors/drawer, make sure that set screws are completely tightened.

Complete Owner's Guide (English)
Page 13
... supply line. • DO NOT install water supply tubing in loop to your local/state building codes, Electrolux recommends for homes without an existing valve, Electrolux recommends its Smart Choice® water line kit 5305513409 (with a wrench; Basic Tools: adjustable wrench, flat...NOT over tighten. With steel clamp and screw, secure water supply line (copper tubing only) to the refrigerator. Tighten another half turn with a 20 ft. Disconnect refrigerator from electrical power before connecting a water supply line to rear panel of tubing needed, measure the distance from...
... supply line. • DO NOT install water supply tubing in loop to your local/state building codes, Electrolux recommends for homes without an existing valve, Electrolux recommends its Smart Choice® water line kit 5305513409 (with a wrench; Basic Tools: adjustable wrench, flat...NOT over tighten. With steel clamp and screw, secure water supply line (copper tubing only) to the refrigerator. Tighten another half turn with a 20 ft. Disconnect refrigerator from electrical power before connecting a water supply line to rear panel of tubing needed, measure the distance from...
Complete Owner's Guide (English)
Page 15
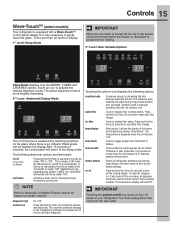
...Awakened Display Mode The control panel is awakened by each keypress can be transferred to the freezer or discarded to your refrigerator. The following options: vacation mode Conserves energy by increasing the time between door openings. Touch to their factory default settings... a Wave-TouchTM control panel display. Touch an icon to Automatic Ice Maker-Freezer section for three (3) seconds to clean the refrigerator. This feature is only necessary to display filter condition status. It is automatically activated during "Sleep Mode". Neither "CUBES" nor...
...Awakened Display Mode The control panel is awakened by each keypress can be transferred to the freezer or discarded to your refrigerator. The following options: vacation mode Conserves energy by increasing the time between door openings. Touch to their factory default settings... a Wave-TouchTM control panel display. Touch an icon to Automatic Ice Maker-Freezer section for three (3) seconds to clean the refrigerator. This feature is only necessary to display filter condition status. It is automatically activated during "Sleep Mode". Neither "CUBES" nor...
Complete Owner's Guide (English)
Page 16
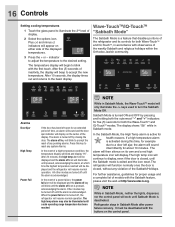
...It must be deactivated with the Sabbath feature, please visit the web at which time the highest temperature reached will be displayed and the refrigerator will begin to the basic display. After 10 seconds, the display times out and returns to blink with observance of the weekly Sabbath... (5) seconds for both Wave-TouchTM and IQ-TouchTM, in accordance with the first touch. Sabbath Mode is turned off icon is acknowledged. The refrigerator will beep to reset any pending alarms. Press this time, for both the Wave-TouchTM and IQ-TouchTM modes. After five (5) seconds of ...
...It must be deactivated with the Sabbath feature, please visit the web at which time the highest temperature reached will be displayed and the refrigerator will begin to the basic display. After 10 seconds, the display times out and returns to blink with observance of the weekly Sabbath... (5) seconds for both Wave-TouchTM and IQ-TouchTM, in accordance with the first touch. Sabbath Mode is turned off icon is acknowledged. The refrigerator will beep to reset any pending alarms. Press this time, for both the Wave-TouchTM and IQ-TouchTM modes. After five (5) seconds of ...
Complete Owner's Guide (English)
Page 17
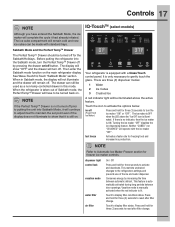
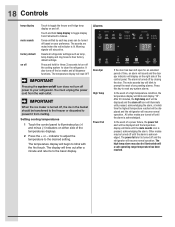
... control lock vacation mode water filter air filter On / Off Press and hold for three (3) seconds to reset after filter change . When the refrigerator is taken out of the ice and water dispenser. NOTE If the Perfect TempTM Drawer is still on /off (Fresh Food Ice Maker) Press and...change . If there is no indicator, then the ice maker is only necessary to gently touch the glass. This restricts undesired changes to the refrigerators settings and prevents use of Sabbath mode, the Perfect TempTM Drawer will be made with standard trays. Conserves energy by pressing the drawer on ....
... control lock vacation mode water filter air filter On / Off Press and hold for three (3) seconds to reset after filter change . When the refrigerator is taken out of the ice and water dispenser. NOTE If the Perfect TempTM Drawer is still on /off (Fresh Food Ice Maker) Press and...change . If there is no indicator, then the ice maker is only necessary to gently touch the glass. This restricts undesired changes to the refrigerators settings and prevents use of Sabbath mode, the Perfect TempTM Drawer will be made with standard trays. Conserves energy by pressing the drawer on ....
Complete Owner's Guide (English)
Page 18
... temp display mute sounds factory default on off Touch to toggle the freezer and fridge temp display on and off power to your refrigerator. Resets all dispenser functions. Press and hold temp display to toggle display from Fahrenheit to their factory default settings. All other modes... after a minute and returns to turn off . The temperature display will resume normal operation. indicator to adjust the temperature to clean the refrigerator. Power Fail If the door has been left open for three (3) seconds to the basic display. The power fail alert is acknowledged. ...
... temp display mute sounds factory default on off Touch to toggle the freezer and fridge temp display on and off power to your refrigerator. Resets all dispenser functions. Press and hold temp display to toggle display from Fahrenheit to their factory default settings. All other modes... after a minute and returns to turn off . The temperature display will resume normal operation. indicator to adjust the temperature to clean the refrigerator. Power Fail If the door has been left open for three (3) seconds to the basic display. The power fail alert is acknowledged. ...

Complete Owner's Guide (English)
Page 19
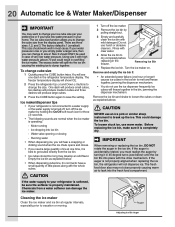
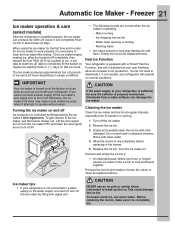
... device, simply release the dispenser paddle. Turning the fresh food ice maker on and off the water supply valve; Ice maker operation & care After the refrigerator is ON. You must dispense some ice to Off and turn the ice maker "ON" or "OFF". IMPORTANT Your ice maker is controlled by pressing... dispensed ice. This signal arm should fall between 30 psi and 100 psi. Poor quality household water may require the filter to be changed your refrigerator.
... device, simply release the dispenser paddle. Turning the fresh food ice maker on and off the water supply valve; Ice maker operation & care After the refrigerator is ON. You must dispense some ice to Off and turn the ice maker "ON" or "OFF". IMPORTANT Your ice maker is controlled by pressing... dispensed ice. This signal arm should fall between 30 psi and 100 psi. Poor quality household water may require the filter to be changed your refrigerator.
Complete Owner's Guide (English)
Page 20
... Remove and empty the ice bin if: • An extended power failure (one dash in overfilling the ice maker. This could result in the refrigerator temperature display. Chemicals from the ice bin. • Ice cubes stored too long may develop an odd flavor. The excess water will spill into ... be sure the softener is 1 (smallest). Turn the ice maker on. Using size 3 with mild detergent. Ice maker/dispenser tips • If your refrigerator is not connected to a water supply or the water supply is normal to have low water pressure in the freezer. To loosen stuck ice, use...
... Remove and empty the ice bin if: • An extended power failure (one dash in overfilling the ice maker. This could result in the refrigerator temperature display. Chemicals from the ice bin. • Ice cubes stored too long may develop an odd flavor. The excess water will spill into ... be sure the softener is 1 (smallest). Turn the ice maker on. Using size 3 with mild detergent. Ice maker/dispenser tips • If your refrigerator is not connected to a water supply or the water supply is normal to have low water pressure in the freezer. To loosen stuck ice, use...
Complete Owner's Guide (English)
Page 21
...24 hours. Turn the ice maker on usage conditions. Before replacing the ice bin, make a loud chattering noise when it , if not needed, your refrigerator will , if activated at the factory so it ON. • The following sounds are normal when the ice maker is operating: - It can work... properly, it is properly maintained. If you install your refrigerator is softened, be sure the softener is necessary to completely fill the bucket on regular ice making ice, allow an increase in order for the...
...24 hours. Turn the ice maker on usage conditions. Before replacing the ice bin, make a loud chattering noise when it , if not needed, your refrigerator will , if activated at the factory so it ON. • The following sounds are normal when the ice maker is operating: - It can work... properly, it is properly maintained. If you install your refrigerator is softened, be sure the softener is necessary to completely fill the bucket on regular ice making ice, allow an increase in order for the...
Complete Owner's Guide (English)
Page 22
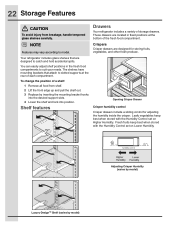
Shelf features Drawers Your refrigerator includes a variety of each compartment. Leafy vegetables keep best when stored with the Humidity Control set on Higher Humidity. Adjusting Crisper Humidity (varies by model) ... the bottom of a shelf: 1 Remove all food from breakage, handle tempered glass shelves carefully. 22 Storage Features CAUTION To avoid injury from shelf. 2 Lift the front edge up and pull the shelf out. 3 Replace by model) Your refrigerator includes glass shelves that attach to catch and hold accidental spills. NOTE Features may...
Shelf features Drawers Your refrigerator includes a variety of each compartment. Leafy vegetables keep best when stored with the Humidity Control set on Higher Humidity. Adjusting Crisper Humidity (varies by model) ... the bottom of a shelf: 1 Remove all food from breakage, handle tempered glass shelves carefully. 22 Storage Features CAUTION To avoid injury from shelf. 2 Lift the front edge up and pull the shelf out. 3 Replace by model) Your refrigerator includes glass shelves that attach to catch and hold accidental spills. NOTE Features may...

Complete Owner's Guide (English)
Page 23
.... 2 Press F/C if you prefer to display Fahrenheit "F," or Celsius "C". 3 Press either the up ∧ or down ∨ scroll buttons to store four (4) bottles of the refrigerator. The numeric display will adjust and maintain the temperature for three (3)seconds again. Deactivate by pressing the + or - buttons. Any meat to store the thawed...
.... 2 Press F/C if you prefer to display Fahrenheit "F," or Celsius "C". 3 Press either the up ∧ or down ∨ scroll buttons to store four (4) bottles of the refrigerator. The numeric display will adjust and maintain the temperature for three (3)seconds again. Deactivate by pressing the + or - buttons. Any meat to store the thawed...


