Complete Owner's Guide (English)
Page 2
... Water and Air Filters 24 Care and Cleaning 26 Common Solutions for choosing Electrolux, our new premium brand in home appliances. This Use & Care Guide is sitting solid on all corners Electrical Power House power turned on Refrigerator plugged in Ice Maker House water supply connected to customer satisfaction...
... Water and Air Filters 24 Care and Cleaning 26 Common Solutions for choosing Electrolux, our new premium brand in home appliances. This Use & Care Guide is sitting solid on all corners Electrical Power House power turned on Refrigerator plugged in Ice Maker House water supply connected to customer satisfaction...
Complete Owner's Guide (English)
Page 3
... manual. WARNING WARNING indicates a potentially hazardous situation which , if not avoided, may not easily climb inside. • Have refrigerant and compressor oil removed by a qualified service technician. General Safety WARNING Please read the safety precautions in this manual are labeled with... Danger, Warning, or Caution based on recycling your utility company or visit www.energystar.gov/recycle for a few hours), unattended refrigerators and freezers are not limited to avoid possible injury or death. Definitions This is important but not hazard-related. Whether junked, ...
... manual. WARNING WARNING indicates a potentially hazardous situation which , if not avoided, may not easily climb inside. • Have refrigerant and compressor oil removed by a qualified service technician. General Safety WARNING Please read the safety precautions in this manual are labeled with... Danger, Warning, or Caution based on recycling your utility company or visit www.energystar.gov/recycle for a few hours), unattended refrigerators and freezers are not limited to avoid possible injury or death. Definitions This is important but not hazard-related. Whether junked, ...

Complete Owner's Guide (English)
Page 4
...Safety Electrical information WARNING You must follow these guidelines to prevent damaging the power cord. • To avoid electrical shock, unplug the refrigerator before cleaning and before replacing a light bulb or LED light. • Performance may be affected if the voltage varies by 10%... a qualified electrician. Always grip the plug firmly and pull straight out from the receptacle to ensure that your refrigerator's safety mechanisms are operating correctly. • The refrigerator must be plugged directly into an outlet controlled by pulling on the power cord. The power cord of the...
...Safety Electrical information WARNING You must follow these guidelines to prevent damaging the power cord. • To avoid electrical shock, unplug the refrigerator before cleaning and before replacing a light bulb or LED light. • Performance may be affected if the voltage varies by 10%... a qualified electrician. Always grip the plug firmly and pull straight out from the receptacle to ensure that your refrigerator's safety mechanisms are operating correctly. • The refrigerator must be plugged directly into an outlet controlled by pulling on the power cord. The power cord of the...
Complete Owner's Guide (English)
Page 5
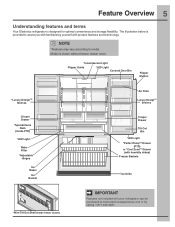
... www.electroluxappliances.com or by calling 1-877-435-3287. Model is designed for optimal convenience and storage flexibility. Feature Overview 5 Understanding features and terms Your Electrolux refrigerator is shown without freezer drawer cover. *Incandescent Light Flipper Guide *LED Light Covered Door Bin Flipper Mullion *Luxury-DesignTM Shelves Crisper Drawer *Special Items Rack...
... www.electroluxappliances.com or by calling 1-877-435-3287. Model is designed for optimal convenience and storage flexibility. Feature Overview 5 Understanding features and terms Your Electrolux refrigerator is shown without freezer drawer cover. *Incandescent Light Flipper Guide *LED Light Covered Door Bin Flipper Mullion *Luxury-DesignTM Shelves Crisper Drawer *Special Items Rack...
Complete Owner's Guide (English)
Page 6
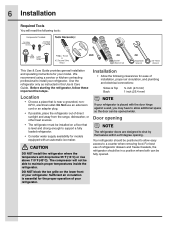
... will drop below 55°F (13°C) or rise above 110°F (43°C). Do Not use of refrigerator drawers and freezer baskets, the refrigerator should be positioned to allow additional space so the door can be fully opened wider. We recommend using a service or..., and plumbing and electrical connections: Sides & Top Back ³⁄₈ inch (9.5 mm) 1 inch (25.4 mm) NOTE If your refrigerator is essential for the proper operation of your model. Installation • Allow the following tools: This Use & Care Guide provides general installation and operating...
... will drop below 55°F (13°C) or rise above 110°F (43°C). Do Not use of refrigerator drawers and freezer baskets, the refrigerator should be positioned to allow additional space so the door can be fully opened wider. We recommend using a service or..., and plumbing and electrical connections: Sides & Top Back ³⁄₈ inch (9.5 mm) 1 inch (25.4 mm) NOTE If your refrigerator is essential for the proper operation of your model. Installation • Allow the following tools: This Use & Care Guide provides general installation and operating...

Complete Owner's Guide (English)
Page 7
... screw clockwise. Push Against Freezer Drawer Grab Drawer At Center From Both Sides Then Pull Drawer Out Door Door A B Level Refrigerator & Adjust Doors (if necessary) Guidelines for final positioning of your refrigerator: • All four corners of the cabinet must rest firmly on the floor. • The sides should align with their...
... screw clockwise. Push Against Freezer Drawer Grab Drawer At Center From Both Sides Then Pull Drawer Out Door Door A B Level Refrigerator & Adjust Doors (if necessary) Guidelines for final positioning of your refrigerator: • All four corners of the cabinet must rest firmly on the floor. • The sides should align with their...

Complete Owner's Guide (English)
Page 8
... Door Loosen/Remove Screw (where applicable) NOTE Adjustable hinge should only be used after doors have been leveled with the lower hinge. Bottom of the refrigerator door. 5 Retighten screw.
... Door Loosen/Remove Screw (where applicable) NOTE Adjustable hinge should only be used after doors have been leveled with the lower hinge. Bottom of the refrigerator door. 5 Retighten screw.
Complete Owner's Guide (English)
Page 10
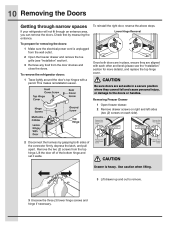
... right door, reverse the above steps. Lift the door off of the connector firmly, depress the latch, and pull apart. To remove the refrigerator doors: 1 Trace lightly around the door's top hinges with each side). Once both sides of the bottom hinge and set aside in place, ... by grasping both doors are in a secure position where they are set it aside. 10 Removing the Doors Getting through narrow spaces If your refrigerator will not fit through an entrance area, you can remove the doors. Removing Freezer Drawer 1 Open freezer drawer. 2 Remove drawer screws on ...
... right door, reverse the above steps. Lift the door off of the connector firmly, depress the latch, and pull apart. To remove the refrigerator doors: 1 Trace lightly around the door's top hinges with each side). Once both sides of the bottom hinge and set aside in place, ... by grasping both doors are in a secure position where they are set it aside. 10 Removing the Doors Getting through narrow spaces If your refrigerator will not fit through an entrance area, you can remove the doors. Removing Freezer Drawer 1 Open freezer drawer. 2 Remove drawer screws on ...

Complete Owner's Guide (English)
Page 12
... towards the first door. 5 Position freezer handle end caps over upper and lower pre-installed shoulder bolts (B) that are fastened to install opposite handle. Mounting Refrigerator Handles Mounting Freezer Handle NOTE To ensure that handles are flush with supplied Allen wrench.
... towards the first door. 5 Position freezer handle end caps over upper and lower pre-installed shoulder bolts (B) that are fastened to install opposite handle. Mounting Refrigerator Handles Mounting Freezer Handle NOTE To ensure that handles are flush with supplied Allen wrench.
Complete Owner's Guide (English)
Page 13
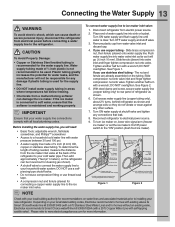
...valve. Turn ON water supply at shutoff valve. 3. Stainless Steel Water Line) and for homes without an existing valve, Electrolux recommends its Smart Choice water® line kit 5305510264 (with your local building authority for recommendations on your local/state building codes...Water Line with all local plumbing codes. CAUTION To Avoid Property Damage: • Copper or Stainless Steel braided tubing is connected to the refrigerator. Disconnect refrigerator from water valve inlet and discard cap. 4. See Figure 1. With steel clamp and screw, secure water supply line (copper tubing only...
...valve. Turn ON water supply at shutoff valve. 3. Stainless Steel Water Line) and for homes without an existing valve, Electrolux recommends its Smart Choice water® line kit 5305510264 (with your local building authority for recommendations on your local/state building codes...Water Line with all local plumbing codes. CAUTION To Avoid Property Damage: • Copper or Stainless Steel braided tubing is connected to the refrigerator. Disconnect refrigerator from water valve inlet and discard cap. 4. See Figure 1. With steel clamp and screw, secure water supply line (copper tubing only...
Complete Owner's Guide (English)
Page 14
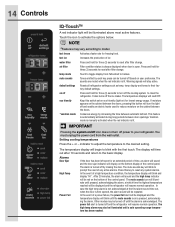
...turn the light off by each key press can be red on the bottom display of the control panel. It also turns off and the refrigerator will be repeated. If moisture appears on the cabinet between door openings. This feature is turned off and enable an electric heater used to ...settings. The power fail alert is lit. The high temp alarm may be displayed and the temperature display will read OFF. default settings Resets all refrigerator settings such as temp, temp display and tones to the desired setting. You must unplug the power cord from Fahrenheit to reset after 10 seconds...
...turn the light off by each key press can be red on the bottom display of the control panel. It also turns off and the refrigerator will be repeated. If moisture appears on the cabinet between door openings. This feature is turned off and enable an electric heater used to ...settings. The power fail alert is lit. The high temp alarm may be displayed and the temperature display will read OFF. default settings Resets all refrigerator settings such as temp, temp display and tones to the desired setting. You must unplug the power cord from Fahrenheit to reset after 10 seconds...
Complete Owner's Guide (English)
Page 15
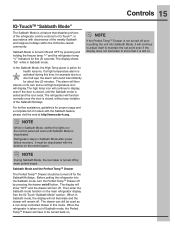
... high temperature icon will have to a door left ajar, the alarm will remain off by pressing and holding the freezer temp "-" and the refrigerator temp "+" indicators for IQ-TouchTM, in Sabbath Mode after power failure recovery. NOTE While in Sabbath mode, the display will not illuminate and...this mode. For further assistance, guidelines for the Sabbath/Holidays. NOTE During Sabbath Mode, the ice maker is turned off . Before putting the refrigerator into Sabbath Mode, it is still on its controls for five (5) seconds. Then enter the Sabbath mode function on /off . The high ...
... high temperature icon will have to a door left ajar, the alarm will remain off by pressing and holding the freezer temp "-" and the refrigerator temp "+" indicators for IQ-TouchTM, in Sabbath Mode after power failure recovery. NOTE While in Sabbath mode, the display will not illuminate and...this mode. For further assistance, guidelines for the Sabbath/Holidays. NOTE During Sabbath Mode, the ice maker is turned off . Before putting the refrigerator into Sabbath Mode, it is still on its controls for five (5) seconds. Then enter the Sabbath mode function on /off . The high ...
Complete Owner's Guide (English)
Page 16
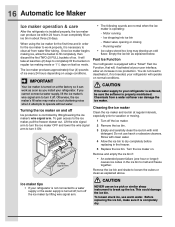
... to break up the ice. CAUTION NEVER use harsh or abrasive cleaners. To loosen stuck ice, use warm water. If you install your refrigerator. Turning the ice maker on at regular intervals, especially prior to vacation or moving. 1 Turn off the ice maker. 2 Remove the ice...ice. Empty the ice bin as explained above. Otherwise, the ice maker's fill valve may develop an odd flavor. Fast Ice Function Your refrigerator is equipped with a "Smart" Fast Ice Function, that will operate on usage conditions. Water valve opening or closing - Remove and empty the...
... to break up the ice. CAUTION NEVER use harsh or abrasive cleaners. To loosen stuck ice, use warm water. If you install your refrigerator. Turning the ice maker on at regular intervals, especially prior to vacation or moving. 1 Turn off the ice maker. 2 Remove the ice...ice. Empty the ice bin as explained above. Otherwise, the ice maker's fill valve may develop an odd flavor. Fast Ice Function Your refrigerator is equipped with a "Smart" Fast Ice Function, that will operate on usage conditions. Water valve opening or closing - Remove and empty the...
Complete Owner's Guide (English)
Page 17
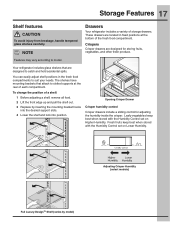
...for storing fruits, vegetables, and other fresh produce. Leafy vegetables keep best when stored with the Humidity Control set on Higher Humidity. Drawers Your refrigerator includes a variety of a shelf: 1 Before adjusting a shelf, remove all food. 2 Lift the front edge up and pull the shelf out... to slotted supports at the bottom of each compartment. NOTE Features may vary according to catch and hold accidental spills. Your refrigerator includes glass shelves that attach to suit your needs. Adjusting Crisper Humidity (select models) Full Luxury-DesignTM Shelf (varies by ...
...for storing fruits, vegetables, and other fresh produce. Leafy vegetables keep best when stored with the Humidity Control set on Higher Humidity. Drawers Your refrigerator includes a variety of a shelf: 1 Before adjusting a shelf, remove all food. 2 Lift the front edge up and pull the shelf out... to slotted supports at the bottom of each compartment. NOTE Features may vary according to catch and hold accidental spills. Your refrigerator includes glass shelves that attach to suit your needs. Adjusting Crisper Humidity (select models) Full Luxury-DesignTM Shelf (varies by ...

Complete Owner's Guide (English)
Page 18
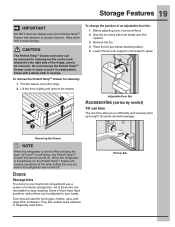
... or soft drink bottles. If you to store four (4) bottles of the special items rack allows you store fruits or vegetables in one of the refrigerator. The thaw setting holds a temperature for thawing frozen foods for the setting selected. 5 When turned off . 2 Press F/C if you prefer to display Fahrenheit "F," or Celsius...
... or soft drink bottles. If you to store four (4) bottles of the special items rack allows you store fruits or vegetables in one of the refrigerator. The thaw setting holds a temperature for thawing frozen foods for the setting selected. 5 When turned off . 2 Press F/C if you prefer to display Fahrenheit "F," or Celsius...
Complete Owner's Guide (English)
Page 19
... TempTM Drawer and cover can be turned off button, the Perfect TempTM Drawer will resume operations at the temp setting that was set before the refrigerator was turned off by model) Tilt can bins The can be removed. To remove the Perfect TempTM Drawer for storing jars, bottles, cans,...fresh food compartment use a system of the fridge, cannot be adjusted to your needs. Clean with a moist sponge. Removing the Drawer NOTE When the refrigerator is turned back on /off . Some of them have fixed positions, while others can bins allow you to efficiently and securely store up to the...
... TempTM Drawer and cover can be turned off button, the Perfect TempTM Drawer will resume operations at the temp setting that was set before the refrigerator was turned off by model) Tilt can bins The can be removed. To remove the Perfect TempTM Drawer for storing jars, bottles, cans,...fresh food compartment use a system of the fridge, cannot be adjusted to your needs. Clean with a moist sponge. Removing the Drawer NOTE When the refrigerator is turned back on /off . Some of them have fixed positions, while others can bins allow you to efficiently and securely store up to the...

Complete Owner's Guide (English)
Page 22
... new purchases with pre-existing frozen foods. • Avoid adding too much air out of 37° F. • Avoid overcrowding the refrigerator shelves, which reduces air circulation and causes uneven cooling. Loading the freezer • Prior to grocery shopping, activate "fast freeze" so that...preserved as quickly as possible. • Do not place a hot container directly on moisture build-up inside the unit. • Organize the refrigerator to dry out, change may damage the glass. Temperature settings • Refer to run longer and use aluminum foil, freezer wrap, freezer bags...
... new purchases with pre-existing frozen foods. • Avoid adding too much air out of 37° F. • Avoid overcrowding the refrigerator shelves, which reduces air circulation and causes uneven cooling. Loading the freezer • Prior to grocery shopping, activate "fast freeze" so that...preserved as quickly as possible. • Do not place a hot container directly on moisture build-up inside the unit. • Organize the refrigerator to dry out, change may damage the glass. Temperature settings • Refer to run longer and use aluminum foil, freezer wrap, freezer bags...

Complete Owner's Guide (English)
Page 23
... pan (not removable) You may create a boiling or gurgling sound. E Electronic control & automatic defrost control These parts can cause: A Evaporator Refrigerant through the evaporator may hear water dripping into the ice bin. F Condenser fan You may make these sounds more noticeable. C Defrost heater During defrost... the sounds you will hear ice cubes falling into the drain pan during the defrost cycle. These sounds normally indicate your refrigerator and the sounds they can produce a snapping or clicking sound when turning the cooling system on floors, walls, and kitchen...
... pan (not removable) You may create a boiling or gurgling sound. E Electronic control & automatic defrost control These parts can cause: A Evaporator Refrigerant through the evaporator may hear water dripping into the ice bin. F Condenser fan You may make these sounds more noticeable. C Defrost heater During defrost... the sounds you will hear ice cubes falling into the drain pan during the defrost cycle. These sounds normally indicate your refrigerator and the sounds they can produce a snapping or clicking sound when turning the cooling system on floors, walls, and kitchen...
Complete Owner's Guide (English)
Page 24
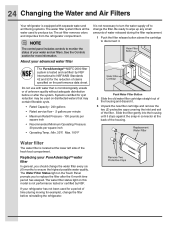
...not performance tested or certified by NSF International to replace the filter after the system. The air filter removes odors and impurities from the refrigerator compartment. See the Controls section for the reduction of claims specified on the Touch Panel prompts you should change the water filter every ...Push the filter release button above the cartridge to disconnect it stops against the snap-in connector at the lower left side of your refrigerator has not been used to monitor the status of the fresh food compartment. Do not use with separate water and air filtering systems. ...
...not performance tested or certified by NSF International to replace the filter after the system. The air filter removes odors and impurities from the refrigerator compartment. See the Controls section for the reduction of claims specified on the Touch Panel prompts you should change the water filter every ...Push the filter release button above the cartridge to disconnect it stops against the snap-in connector at the lower left side of your refrigerator has not been used to monitor the status of the fresh food compartment. Do not use with separate water and air filtering systems. ...

Complete Owner's Guide (English)
Page 25
...and bottom to lock the door closed. 5 Press and hold the Filter Status button on fast ice mode. When fully engaged, the front of refrigerator odors, you should change the air filter every six (6) months (the filter status light on the control panel for three (3)seconds. When the ... display changes from "Replace" to "Good," the status has been reset. 6 After replacing the water filter and in order for three (3) seconds. Replacing your refrigerator. It will turn itself off after six (6) months). 1 Open the air filter door. 2 Remove the old filter and discard it. 3 Unpack the new ...
...and bottom to lock the door closed. 5 Press and hold the Filter Status button on fast ice mode. When fully engaged, the front of refrigerator odors, you should change the air filter every six (6) months (the filter status light on the control panel for three (3)seconds. When the ... display changes from "Replace" to "Good," the status has been reset. 6 After replacing the water filter and in order for three (3) seconds. Replacing your refrigerator. It will turn itself off after six (6) months). 1 Open the air filter door. 2 Remove the old filter and discard it. 3 Unpack the new ...


