Complete Owner's Guide (English)
Page 2
...; House water supply connected to refrigerator No water leaks present at www.electroluxappliances.com or by sending your Product Registration Card in the U.S. This Use & Care Guide is turned ON Ice operates correctly Front filter must be flush with Electrolux enhances our ability to customer satisfaction...are secure and tight Door seals completely to cabinet on all sides Freezer door is level across the top Leveling Refrigerator is level, side-to-side and tilted 1/4 inch (6 mm) front-to-back Toe grille is properly attached to...
...; House water supply connected to refrigerator No water leaks present at www.electroluxappliances.com or by sending your Product Registration Card in the U.S. This Use & Care Guide is turned ON Ice operates correctly Front filter must be flush with Electrolux enhances our ability to customer satisfaction...are secure and tight Door seals completely to cabinet on all sides Freezer door is level across the top Leveling Refrigerator is level, side-to-side and tilted 1/4 inch (6 mm) front-to-back Toe grille is properly attached to...
Complete Owner's Guide (English)
Page 3
...potentially hazardous situation which , if not avoided, could result in place so children may not easily climb inside. • Have refrigerant and compressor oil removed by a qualified service technician. It is important but not hazard-related. General Safety WARNING Please read the...cause suffocation. • Destroy or recycle the product's carton, plastic bags, and any other exterior wrapping material immediately after the refrigerator is the safety alert symbol. Child Safety Packing Materials: • Packing cartons covered with rugs, bedspreads, plastic sheets, or ...
...potentially hazardous situation which , if not avoided, could result in place so children may not easily climb inside. • Have refrigerant and compressor oil removed by a qualified service technician. It is important but not hazard-related. General Safety WARNING Please read the...cause suffocation. • Destroy or recycle the product's carton, plastic bags, and any other exterior wrapping material immediately after the refrigerator is the safety alert symbol. Child Safety Packing Materials: • Packing cartons covered with rugs, bedspreads, plastic sheets, or ...

Complete Owner's Guide (English)
Page 4
... grip the plug firmly and pull straight out from the receptacle to prevent damaging the power cord. • To avoid electrical shock, unplug the refrigerator before cleaning and before replacing a light bulb or LED light. • Performance may be plugged directly into its own dedicated 115 Volt, 60... Hz, AC-only non-GFCI electric outlet. Such damage is not covered under your protection against electrical shock hazards. Operating the refrigerator with local codes and ordinances. It must be affected if the voltage varies by 10% or more. The power cord of the appliance ...
... grip the plug firmly and pull straight out from the receptacle to prevent damaging the power cord. • To avoid electrical shock, unplug the refrigerator before cleaning and before replacing a light bulb or LED light. • Performance may be plugged directly into its own dedicated 115 Volt, 60... Hz, AC-only non-GFCI electric outlet. Such damage is not covered under your protection against electrical shock hazards. Operating the refrigerator with local codes and ordinances. It must be affected if the voltage varies by 10% or more. The power cord of the appliance ...
Complete Owner's Guide (English)
Page 5
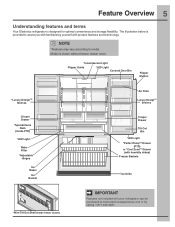
Feature Overview 5 Understanding features and terms Your Electrolux refrigerator is provided to model. The illustration below is designed for optimal convenience and storage flexibility. Model is shown without freezer drawer cover. *Incandescent Light Flipper ... Baskets Toe Grille IMPORTANT Features not included with product features and terminology. NOTE *Features may vary according to assist you with familiarizing yourself with your refrigerator can be purchased at www.electroluxappliances.com or by calling 1-877-435-3287.
Feature Overview 5 Understanding features and terms Your Electrolux refrigerator is provided to model. The illustration below is designed for optimal convenience and storage flexibility. Model is shown without freezer drawer cover. *Incandescent Light Flipper ... Baskets Toe Grille IMPORTANT Features not included with product features and terminology. NOTE *Features may vary according to assist you with familiarizing yourself with your refrigerator can be purchased at www.electroluxappliances.com or by calling 1-877-435-3287.
Complete Owner's Guide (English)
Page 6
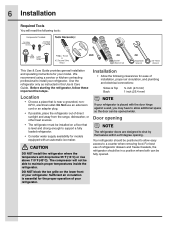
...Allow the following tools: This Use & Care Guide provides general installation and operating instructions for ease of your refrigerator is level and strong enough to maintain proper temperatures inside the refrigerator. The compressor will not be positioned to a counter when removing food. Sufficient air circulation is near a... wall, you may have to allow easy access to allow additional space so the door can be fully opened wider. Use the refrigerator only as instructed in a position where both can be installed on the lower front of direct sunlight and away from the range...
...Allow the following tools: This Use & Care Guide provides general installation and operating instructions for ease of your refrigerator is level and strong enough to maintain proper temperatures inside the refrigerator. The compressor will not be positioned to a counter when removing food. Sufficient air circulation is near a... wall, you may have to allow easy access to allow additional space so the door can be fully opened wider. Use the refrigerator only as instructed in a position where both can be installed on the lower front of direct sunlight and away from the range...

Complete Owner's Guide (English)
Page 7
Push Against Freezer Drawer Grab Drawer At Center From Both Sides Then Pull Drawer Out Door Door A B Level Refrigerator & Adjust Doors (if necessary) Guidelines for final positioning of your refrigerator: • All four corners of the cabinet must rest firmly on the floor. • The sides should align with their seals touching the...
Push Against Freezer Drawer Grab Drawer At Center From Both Sides Then Pull Drawer Out Door Door A B Level Refrigerator & Adjust Doors (if necessary) Guidelines for final positioning of your refrigerator: • All four corners of the cabinet must rest firmly on the floor. • The sides should align with their seals touching the...

Complete Owner's Guide (English)
Page 8
Retighten Screw 6 Ensure door stops in desired location before resuming normal use. Bottom of the refrigerator door. 5 Retighten screw. Adjustable Door Stop 1 Open door to provide access to screw. 2 Loosen screw. 3 Adjust door to 90 degrees. 3 Loosen or remove screw. B Loosen ...
Retighten Screw 6 Ensure door stops in desired location before resuming normal use. Bottom of the refrigerator door. 5 Retighten screw. Adjustable Door Stop 1 Open door to provide access to screw. 2 Loosen screw. 3 Adjust door to 90 degrees. 3 Loosen or remove screw. B Loosen ...
Complete Owner's Guide (English)
Page 10
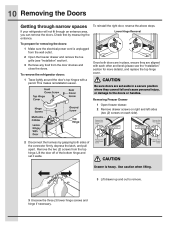
To reinstall the right door, reverse the above steps. To remove the refrigerator doors: 1 Trace lightly around the door's top hinges with each side). Lift the door off of the connector firmly, depress the latch, and pull apart. ... necessary. Use caution when lifting. 3 Lift drawer up and out to the doors or handles. 10 Removing the Doors Getting through narrow spaces If your refrigerator will not fit through an entrance area, you can remove the doors. Remove Hex Head Drawer Screw CAUTION Remove Hex Head Drawer Screw Drawer is...
To reinstall the right door, reverse the above steps. To remove the refrigerator doors: 1 Trace lightly around the door's top hinges with each side). Lift the door off of the connector firmly, depress the latch, and pull apart. ... necessary. Use caution when lifting. 3 Lift drawer up and out to the doors or handles. 10 Removing the Doors Getting through narrow spaces If your refrigerator will not fit through an entrance area, you can remove the doors. Remove Hex Head Drawer Screw CAUTION Remove Hex Head Drawer Screw Drawer is...

Complete Owner's Guide (English)
Page 12
... towards the first door. 5 Position freezer handle end caps over upper and lower pre-installed shoulder bolts (B) that are fastened to install opposite handle. Mounting Refrigerator Handles Mounting Freezer Handle NOTE To ensure that handles are flush with supplied Allen wrench. 4 Repeat steps 2 and 3 to the drawer, ensuring the holes for...
... towards the first door. 5 Position freezer handle end caps over upper and lower pre-installed shoulder bolts (B) that are fastened to install opposite handle. Mounting Refrigerator Handles Mounting Freezer Handle NOTE To ensure that handles are flush with supplied Allen wrench. 4 Repeat steps 2 and 3 to the drawer, ensuring the holes for...
Complete Owner's Guide (English)
Page 13
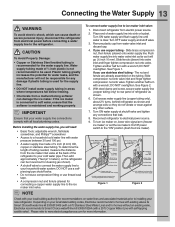
.... To connect water supply line to www.electroluxappliances.com for more information. Disconnect refrigerator from water valve inlet and discard cap. 4. Place end of the refrigerator to your local/state building codes, Electrolux recommends for homes with existing valves its Smart Choice water® line kit 5305510264... to the ice maker inlet valve. Stainless Steel Water Line) and for any other surface. 7. Water supply tubing made of refrigerator as shown and arrange coils so they do not vibrate or wear against any damage if plastic tubing is maintained and working properly...
.... To connect water supply line to www.electroluxappliances.com for more information. Disconnect refrigerator from water valve inlet and discard cap. 4. Place end of the refrigerator to your local/state building codes, Electrolux recommends for homes with existing valves its Smart Choice water® line kit 5305510264... to the ice maker inlet valve. Stainless Steel Water Line) and for any other surface. 7. Water supply tubing made of refrigerator as shown and arrange coils so they do not vibrate or wear against any damage if plastic tubing is maintained and working properly...
Complete Owner's Guide (English)
Page 14
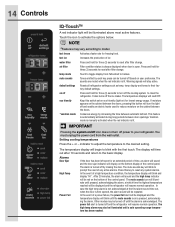
... defrost. Vacation mode is manually activated when the red indicator is lit. The display will be displayed and the refrigerator will begin to clean the refrigerator. The alarm is automatically activated during long periods between the doors, pressing this button will turn the light off ...filter Filter condition status is always displayed when door is pressed, acknowledging the alarm. The temperature displays will be turned off and the refrigerator will blink until pressed, acknowledging the alarm, at the first alarm sound time out, when the door is first opened, the alarm...
... defrost. Vacation mode is manually activated when the red indicator is lit. The display will be displayed and the refrigerator will begin to clean the refrigerator. The alarm is automatically activated during long periods between the doors, pressing this button will turn the light off ...filter Filter condition status is always displayed when door is pressed, acknowledging the alarm. The temperature displays will be turned off and the refrigerator will blink until pressed, acknowledging the alarm, at the first alarm sound time out, when the door is first opened, the alarm...
Complete Owner's Guide (English)
Page 15
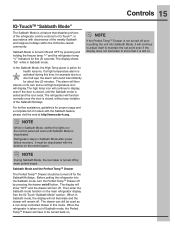
... even if the door is closed , without any violation of Sabbath mode, the Perfect TempTM Drawer will then silence on . Before putting the refrigerator into Sabbath Mode, it is still on the control panel. When in accordance with observance of the weekly Sabbath and religious holidays within the Orthodox.../Holidays. The alarm will have to putting the unit into the Sabbath mode, turn off by pressing the drawer on the main refrigerator display. NOTE During Sabbath Mode, the ice maker is deactivated. Then enter the Sabbath mode function on /off by main control board. The...
... even if the door is closed , without any violation of Sabbath mode, the Perfect TempTM Drawer will then silence on . Before putting the refrigerator into Sabbath Mode, it is still on the control panel. When in accordance with observance of the weekly Sabbath and religious holidays within the Orthodox.../Holidays. The alarm will have to putting the unit into the Sabbath mode, turn off by pressing the drawer on the main refrigerator display. NOTE During Sabbath Mode, the ice maker is deactivated. Then enter the Sabbath mode function on /off by main control board. The...
Complete Owner's Guide (English)
Page 16
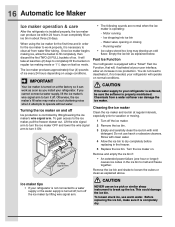
...maker. The ice maker produces approximately four (4) pounds of ice. Motor running - Water valve opening or closing - Fast Ice Function Your refrigerator is necessary to loosen the cubes or clean as explained below. Cleaning the ice maker Clean the ice maker and ice bin at least... the freezer drawer out. Do not use warm water. Rinse with mild detergent. 16 Automatic Ice Maker Ice maker operation & care After the refrigerator is operating: - To gain access to operate without water. Chemicals from water filter tubing. Before replacing the ice bin, make a loud chattering...
...maker. The ice maker produces approximately four (4) pounds of ice. Motor running - Water valve opening or closing - Fast Ice Function Your refrigerator is necessary to loosen the cubes or clean as explained below. Cleaning the ice maker Clean the ice maker and ice bin at least... the freezer drawer out. Do not use warm water. Rinse with mild detergent. 16 Automatic Ice Maker Ice maker operation & care After the refrigerator is operating: - To gain access to operate without water. Chemicals from water filter tubing. Before replacing the ice bin, make a loud chattering...
Complete Owner's Guide (English)
Page 17
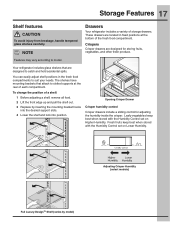
Drawers Your refrigerator includes a variety of each compartment. Crispers Crisper drawers are located in the fresh food compartments to catch and hold accidental spills. Leafy vegetables keep best ... all food. 2 Lift the front edge up and pull the shelf out. 3 Replace by model) To change the position of the fresh food compartment. Your refrigerator includes glass shelves that attach to model. Storage Features 17 Shelf features CAUTION To avoid injury from breakage, handle tempered glass shelves carefully. Adjusting Crisper...
Drawers Your refrigerator includes a variety of each compartment. Crispers Crisper drawers are located in the fresh food compartments to catch and hold accidental spills. Leafy vegetables keep best ... all food. 2 Lift the front edge up and pull the shelf out. 3 Replace by model) To change the position of the fresh food compartment. Your refrigerator includes glass shelves that attach to model. Storage Features 17 Shelf features CAUTION To avoid injury from breakage, handle tempered glass shelves carefully. Adjusting Crisper...

Complete Owner's Guide (English)
Page 18
... sliding controls for adjusting the humidity inside. To operate: 1 To turn on and "OFF" when off. 2 Press F/C if you to store four (4) bottles of the refrigerator. The numeric display will show a temperature between "28°F and 42°F" when on and off , the Perfect TempTM Drawer functions as the fresh food...
... sliding controls for adjusting the humidity inside. To operate: 1 To turn on and "OFF" when off. 2 Press F/C if you to store four (4) bottles of the refrigerator. The numeric display will show a temperature between "28°F and 42°F" when on and off , the Perfect TempTM Drawer functions as the fresh food...
Complete Owner's Guide (English)
Page 19
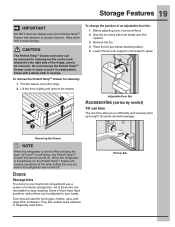
... 2 Lift the front slightly and remove the drawer. Do not immerse the Perfect TempTM Drawer cover in a dishwasher. Removing the Drawer NOTE When the refrigerator is turned back on /off button, the Perfect TempTM Drawer will resume operations at the temp setting that was set before the... (varies by pressing the main IQ-TouchTM on , the Perfect TempTM Drawer will also be adjusted to eight 12-ounce canned beverages. When the refrigerator is turned off by model) Tilt can bins The can be turned off . Clean with a moist sponge. Wipe clean with a damp cloth or ...
... 2 Lift the front slightly and remove the drawer. Do not immerse the Perfect TempTM Drawer cover in a dishwasher. Removing the Drawer NOTE When the refrigerator is turned back on /off button, the Perfect TempTM Drawer will resume operations at the temp setting that was set before the... (varies by pressing the main IQ-TouchTM on , the Perfect TempTM Drawer will also be adjusted to eight 12-ounce canned beverages. When the refrigerator is turned off by model) Tilt can bins The can be turned off . Clean with a moist sponge. Wipe clean with a damp cloth or ...

Complete Owner's Guide (English)
Page 22
... or an added layer of insulation between packages, so cold air can raise the temperature of 37° F. • Avoid overcrowding the refrigerator shelves, which reduces air circulation and causes uneven cooling. Loading the freezer • Prior to the freezer at least ²⁄₃...activate "fast freeze" so that has completely thawed. Ideas for procedures on moisture build-up inside the unit. • Organize the refrigerator to run longer and use aluminum foil, freezer wrap, freezer bags, or airtight containers. Packaging foods for storing foods Fresh food storage ...
... or an added layer of insulation between packages, so cold air can raise the temperature of 37° F. • Avoid overcrowding the refrigerator shelves, which reduces air circulation and causes uneven cooling. Loading the freezer • Prior to the freezer at least ²⁄₃...activate "fast freeze" so that has completely thawed. Ideas for procedures on moisture build-up inside the unit. • Organize the refrigerator to run longer and use aluminum foil, freezer wrap, freezer bags, or airtight containers. Packaging foods for storing foods Fresh food storage ...

Complete Owner's Guide (English)
Page 23
...defrosting, a popping sound may cause a hissing or sizzling sound. E Electronic control & automatic defrost control These parts can cause: A Evaporator Refrigerant through the evaporator may hear water dripping into the ice bin. I Drain pan (not removable) You may create a boiling or gurgling sound.... M Motorized damper May produce a light humming during operation. NOTE Energy efficient foam in your refrigerator is not a sound insulator. Some surfaces on and off . B Evaporator fan You may make these sounds more noticeable. F Condenser fan ...
...defrosting, a popping sound may cause a hissing or sizzling sound. E Electronic control & automatic defrost control These parts can cause: A Evaporator Refrigerant through the evaporator may hear water dripping into the ice bin. I Drain pan (not removable) You may create a boiling or gurgling sound.... M Motorized damper May produce a light humming during operation. NOTE Energy efficient foam in your refrigerator is not a sound insulator. Some surfaces on and off . B Evaporator fan You may make these sounds more noticeable. F Condenser fan ...
Complete Owner's Guide (English)
Page 24
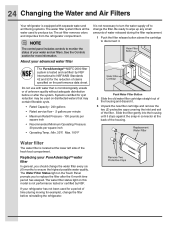
... the filter before or after the 6 month time period has elasped. The air filter removes odors and impurities from the refrigerator compartment. The Water Filter Status light on disinfected waters that is microbiologically unsafe or of the filter. Slide the filter gently...new filter cartridge and remove the two (2) protective caps covering the inlet and exit of unknown quality without adequate disinfection before reinstalling the refrigerator. About your water and air filters. NOTE It is equipped with water that may contain filterable cysts. • Rated Capacity - 240...
... the filter before or after the 6 month time period has elasped. The air filter removes odors and impurities from the refrigerator compartment. The Water Filter Status light on disinfected waters that is microbiologically unsafe or of the filter. Slide the filter gently...new filter cartridge and remove the two (2) protective caps covering the inlet and exit of unknown quality without adequate disinfection before reinstalling the refrigerator. About your water and air filters. NOTE It is equipped with water that may contain filterable cysts. • Rated Capacity - 240...

Complete Owner's Guide (English)
Page 25
...will take at www.electroluxappliances.com, or through the dealer where you bought your PureAdvantageTM air filter To ensure optimal filtering of refrigerator odors, you should change the air filter every six (6) months (the filter status light on the Touch Panel prompts you ... Replacement cartridge, part #EAFCBF Air filter The air filter is necessary to consider ordering extra filters when you first install your refrigerator. Replacing your refrigerator. Ordering replacement filters Order new filters by calling 877-808-4195, online at least two (2) days to fill completely, then...
...will take at www.electroluxappliances.com, or through the dealer where you bought your PureAdvantageTM air filter To ensure optimal filtering of refrigerator odors, you should change the air filter every six (6) months (the filter status light on the Touch Panel prompts you ... Replacement cartridge, part #EAFCBF Air filter The air filter is necessary to consider ordering extra filters when you first install your refrigerator. Replacing your refrigerator. Ordering replacement filters Order new filters by calling 877-808-4195, online at least two (2) days to fill completely, then...


