
Specification sheet
Page 1
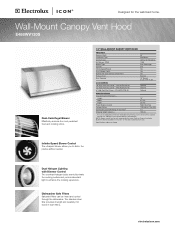
... must be rinsed and cycled through the dishwasher. Designed for safe operation. Wall-Mount Canopy Vent Hood E488WV120S Dual-Centrifugal Blower Effectively removes the most persistent food and cooking odors. 18" WALL-MOUNT CANOPY VENT HOOD FEATURES Nominal Width Installation Type Air Discharge Air Delivery (CFM) Blower Type Controls Infinite-Speed Blower Dual...
... must be rinsed and cycled through the dishwasher. Designed for safe operation. Wall-Mount Canopy Vent Hood E488WV120S Dual-Centrifugal Blower Effectively removes the most persistent food and cooking odors. 18" WALL-MOUNT CANOPY VENT HOOD FEATURES Nominal Width Installation Type Air Discharge Air Delivery (CFM) Blower Type Controls Infinite-Speed Blower Dual...
Specification sheet
Page 2
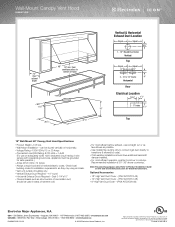
... planning purposes only. Refer to bottom of building only. • Vertical Exhaust Duct Required - 10" round • Horizontal Exhaust Ducts Required - Electrolux Major Appliances, N.A. We reserve the right to improve our products. Printed in areas of quality at electroluxicon.com for installation requirements, as possible. &#... electroluxicon.com CANADA • 5855 Terry Fox Way • Mississauga, ON L5V 3E4 • 1-800-265-8352 • electroluxicon.ca E488WV120S 01/09 © 2009 Electrolux Home Products, Inc. Wall-Mount Canopy Vent Hood E488WV120S 13" max.
... planning purposes only. Refer to bottom of building only. • Vertical Exhaust Duct Required - 10" round • Horizontal Exhaust Ducts Required - Electrolux Major Appliances, N.A. We reserve the right to improve our products. Printed in areas of quality at electroluxicon.com for installation requirements, as possible. &#... electroluxicon.com CANADA • 5855 Terry Fox Way • Mississauga, ON L5V 3E4 • 1-800-265-8352 • electroluxicon.ca E488WV120S 01/09 © 2009 Electrolux Home Products, Inc. Wall-Mount Canopy Vent Hood E488WV120S 13" max.

Owners Guide
Page 2
...Troubleshooting section of your unit installed, we suggest you keep this manual in a safe place for choosing Electrolux, the new premium brand in the USA Once you have your new hood. This information will need to this manual. In the event you require assistance, please contact the ...information or service, you will help you , please use this information on the serial plate located on the product registration card. ©2005 Electrolux Home Products, Inc. To ensure our ability to continue serving you quickly identify a problem and get it remedied. You can find this ...
...Troubleshooting section of your unit installed, we suggest you keep this manual in a safe place for choosing Electrolux, the new premium brand in the USA Once you have your new hood. This information will need to this manual. In the event you require assistance, please contact the ...information or service, you will help you , please use this information on the serial plate located on the product registration card. ©2005 Electrolux Home Products, Inc. To ensure our ability to continue serving you quickly identify a problem and get it remedied. You can find this ...
Owners Guide
Page 3
... the mail. Do not install or use a damaged appliance. You can register online (at the time your product with Electrolux enhances our ability to validate the registration date. NOTE Registering your Electrolux vent hood was purchased. Warranty coverage begins at the Internet address below) or by dropping your dealer or builder. Please record...
... the mail. Do not install or use a damaged appliance. You can register online (at the time your product with Electrolux enhances our ability to validate the registration date. NOTE Registering your Electrolux vent hood was purchased. Warranty coverage begins at the Internet address below) or by dropping your dealer or builder. Please record...

Owners Guide
Page 4
4 Finding Information TABLE OF CONTENTS Finding Information 2 Please Read And Save This Guide 2 Make A Record For Quick Reference 2 Questions 3 Table Of Contents 4 Safety 5 Important Safety Instructions 5 General Precautions 6 Getting Started 8 Operating Your Hood 8 Care and Cleaning 10 Cleaning Your Hood 10 Maintenance 11 Changing the Bulb 11 Troubleshooting 12 If Service is Required 12 Troubleshooting Guide 13 Warranty Information 14
4 Finding Information TABLE OF CONTENTS Finding Information 2 Please Read And Save This Guide 2 Make A Record For Quick Reference 2 Questions 3 Table Of Contents 4 Safety 5 Important Safety Instructions 5 General Precautions 6 Getting Started 8 Operating Your Hood 8 Care and Cleaning 10 Cleaning Your Hood 10 Maintenance 11 Changing the Bulb 11 Troubleshooting 12 If Service is Required 12 Troubleshooting Guide 13 Warranty Information 14
Owners Guide
Page 6
... where it started. 3)The fire department is being called. 4)You can fight the fire with a close-fitting lid, cookie sheet, or metal tray, then turn hood ON when cooking at high settings.
... where it started. 3)The fire department is being called. 4)You can fight the fire with a close-fitting lid, cookie sheet, or metal tray, then turn hood ON when cooking at high settings.
Owners Guide
Page 7
.... • Clean the filters and all grease-laden surfaces often to prevent grease fires and maintain performance. • If the cooktop and hood are in use an appropriate class dry chemical or foam-type fire extinguisher. • Never leave the appliance unattended when using wet potholders, ...sponges or clothes, as they could blow over the cooktop and hood, resulting in a fire hazard. • Always run the blower whenever a cooktop is located so that you where the fuse or junction box is...
.... • Clean the filters and all grease-laden surfaces often to prevent grease fires and maintain performance. • If the cooktop and hood are in use an appropriate class dry chemical or foam-type fire extinguisher. • Never leave the appliance unattended when using wet potholders, ...sponges or clothes, as they could blow over the cooktop and hood, resulting in a fire hazard. • Always run the blower whenever a cooktop is located so that you where the fuse or junction box is...
Owners Guide
Page 8
... N T Do not operate the vent system without the filters in the hood vicinity by shutting nearby windows and doors, turning off ceiling fans and closing adjacent heating and air conditioning outlets. 5 Place your largest pans, skillets and ... an airflow pattern in the room. 2 Adjust the fan speed according to the volume and weight of the hood's halogen lights and exhaust blower. The blower has a variable speed range between settings. The hood has two knobs that control the function of the cooking exhaust. 3 Always activate the blower whenever using the...
... N T Do not operate the vent system without the filters in the hood vicinity by shutting nearby windows and doors, turning off ceiling fans and closing adjacent heating and air conditioning outlets. 5 Place your largest pans, skillets and ... an airflow pattern in the room. 2 Adjust the fan speed according to the volume and weight of the hood's halogen lights and exhaust blower. The blower has a variable speed range between settings. The hood has two knobs that control the function of the cooking exhaust. 3 Always activate the blower whenever using the...

Owners Guide
Page 10
10 Care and Cleaning CLEANING YOUR HOOD Proper cleaning is necessary to the type and amount of cooking. CAUTION If commercially available stainless steel cleaners are present, rinse thoroughly and dry with a ...
10 Care and Cleaning CLEANING YOUR HOOD Proper cleaning is necessary to the type and amount of cooking. CAUTION If commercially available stainless steel cleaners are present, rinse thoroughly and dry with a ...
Owners Guide
Page 11
... cup, part number 5304448673, supplied with the hood, is designed to the face of the halogen light bulbs, should be performed by a qualified appliance technician. Keep the suction cup in a counter-clockwise direction (as you are facing the bulb). For replacement lamps, contact Electrolux at 1-877-435-3287 and order part number...
... cup, part number 5304448673, supplied with the hood, is designed to the face of the halogen light bulbs, should be performed by a qualified appliance technician. Keep the suction cup in a counter-clockwise direction (as you are facing the bulb). For replacement lamps, contact Electrolux at 1-877-435-3287 and order part number...
Owners Guide
Page 14
...Our obligations for pick up and delivery of the appliance required because of the U.S.A. In Canada, your appliance is warranted by Electrolux Canada Corp. *NORMAL RESPONSIBILITIES OF THE CUSTOMER This warranty applies only to products in materials or workmanship. Expenses for making the ...your bill of loose connections or defects in ordinary household use of the technician's travel to state. 14 Warranty Information HOOD WARRANTY Your hood is protected by this warranty FULL ONE-YEAR WARRANTY WARRANTY PERIOD One year from persons other than such servicers; obtained from...
...Our obligations for pick up and delivery of the appliance required because of the U.S.A. In Canada, your appliance is warranted by Electrolux Canada Corp. *NORMAL RESPONSIBILITIES OF THE CUSTOMER This warranty applies only to products in materials or workmanship. Expenses for making the ...your bill of loose connections or defects in ordinary household use of the technician's travel to state. 14 Warranty Information HOOD WARRANTY Your hood is protected by this warranty FULL ONE-YEAR WARRANTY WARRANTY PERIOD One year from persons other than such servicers; obtained from...

Installation Instructions
Page 1
Installation Instructions Vent Hood E30WV60EPS E36WV60EPS E48WV12EPS E308WV60ES E368WV60ES E488WV120S 5995438602
Installation Instructions Vent Hood E30WV60EPS E36WV60EPS E48WV12EPS E308WV60ES E368WV60ES E488WV120S 5995438602

Installation Instructions
Page 2
NOTE Installer: Leave instructions with owner. For your hood. For toll-free telephone support in the USA and Canada: 1-877- 4ELECTROLUX (1-877-435-3287) For online support and Internet product information: www.electroluxusa.com ©2005 Electrolux Home Products, Inc. Read all safety instructions. ... for getting the best results from your safety, please read and observe all instructions before installing the hood. 2 Finding Information READ AND SAVE THESE INSTRUCTIONS Attach your Hood Use & Care Manual. Post Office Box 212378, Augusta, Georgia 30917, USA All rights reserved.
NOTE Installer: Leave instructions with owner. For your hood. For toll-free telephone support in the USA and Canada: 1-877- 4ELECTROLUX (1-877-435-3287) For online support and Internet product information: www.electroluxusa.com ©2005 Electrolux Home Products, Inc. Read all safety instructions. ... for getting the best results from your safety, please read and observe all instructions before installing the hood. 2 Finding Information READ AND SAVE THESE INSTRUCTIONS Attach your Hood Use & Care Manual. Post Office Box 212378, Augusta, Georgia 30917, USA All rights reserved.

Installation Instructions
Page 3
Finding Information 3 TABLE OF CONTENTS Finding Information 2 Please Read And Save This Guide 2 Questions 2 Table Of Contents 3 Safety 4 Important Safety Instructions 4 Preparing for Installation 7 Verifying Package Contents 7 Installation Planning 7 Specifications and Dimensions 8 Exhaust Duct Locations 9 Duct Locations 9 Duct Preparation 11 Cabinet Preparation 13 Preparing the Cabinets 13 Electrical Power Supply 14 Requirements 14 Installation 15 Installing the Hood 15 Making the Electrical Connection 16 Operation 17 Verifying the Operation 17
Finding Information 3 TABLE OF CONTENTS Finding Information 2 Please Read And Save This Guide 2 Questions 2 Table Of Contents 3 Safety 4 Important Safety Instructions 4 Preparing for Installation 7 Verifying Package Contents 7 Installation Planning 7 Specifications and Dimensions 8 Exhaust Duct Locations 9 Duct Locations 9 Duct Preparation 11 Cabinet Preparation 13 Preparing the Cabinets 13 Electrical Power Supply 14 Requirements 14 Installation 15 Installing the Hood 15 Making the Electrical Connection 16 Operation 17 Verifying the Operation 17
Installation Instructions
Page 6
Contact the nearest Electrolux authorized servicer at (877) 435-3287, or at www.electroluxusa.com for the size of the surface element. Do not use to accumulate on low ... installer, service agency, or dealer. • Keep appliance area clear and free from combustible material. • For general ventilating use an extension cord. b) Always turn hood ON when cooking at high settings.
Contact the nearest Electrolux authorized servicer at (877) 435-3287, or at www.electroluxusa.com for the size of the surface element. Do not use to accumulate on low ... installer, service agency, or dealer. • Keep appliance area clear and free from combustible material. • For general ventilating use an extension cord. b) Always turn hood ON when cooking at high settings.
Installation Instructions
Page 7
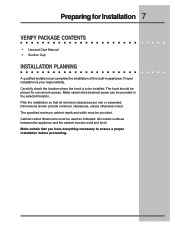
Carefully check the location where the hood is your responsibility. The hood should be used as indicated. Cabinet cutout dimensions must be placed for Installation 7 VERIFY PACKAGE CONTENTS • Use and Care Manual • Suction Cup INSTALLATION ...
Carefully check the location where the hood is your responsibility. The hood should be used as indicated. Cabinet cutout dimensions must be placed for Installation 7 VERIFY PACKAGE CONTENTS • Use and Care Manual • Suction Cup INSTALLATION ...
Installation Instructions
Page 8
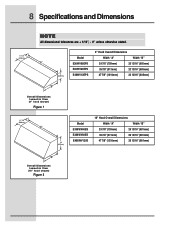
..." (605mm) 9 (229mm) E36WV60EPS E48WV12EPS 35 7/8" (911mm) 47 7/8" (1216mm) 23 13/16" (605mm) 23 13/16" (605mm) "B" Overall Dimensions Isometric View (9" hood shown) Figure 1 11 7/8" (302mm) "A" 18 (457mm) Model E308WV60ES E368WV60ES E488WV120S 18" Hood Overall Dimensions Width "A" Width "B" 29 7/8" (759mm) 26 13/16" (681mm) 35 7/8" (911mm) 26 13/16" (681mm) 47 7/8" (1216mm) 26 13...
..." (605mm) 9 (229mm) E36WV60EPS E48WV12EPS 35 7/8" (911mm) 47 7/8" (1216mm) 23 13/16" (605mm) 23 13/16" (605mm) "B" Overall Dimensions Isometric View (9" hood shown) Figure 1 11 7/8" (302mm) "A" 18 (457mm) Model E308WV60ES E368WV60ES E488WV120S 18" Hood Overall Dimensions Width "A" Width "B" 29 7/8" (759mm) 26 13/16" (681mm) 35 7/8" (911mm) 26 13/16" (681mm) 47 7/8" (1216mm) 26 13...

Installation Instructions
Page 10
E30WV60EPS E308WV60ES E36WV60EPS E368WV60ES E48WV12EPS E488WV120S Electrical Conduit Locations Dimension "A" Conduit Location 9" (752mm) 8" (203mm) 14 7/16" (367mm) 10 Exhaust Duct Locations ELECTRICAL CONDUIT LOCATIONS CL "A" 1 1/2" CL CL (38mm) CL 7/8"ø (11mm) Holes 1 1/2" (38mm) 1 1/2" (38mm) CL CL CL CL "A" 3/4" (19mm) 7/8"ø (11mm) Holes Conduit Location E30WV60EPS, E36WV60EPS, E48WV12EPS, E308WV60ES, E368WV60ES, E488WV120S Top View 9" and 18" Hoods Figure 9 Conduit Location E308WV60ES, E368WV60ES, E488WV120S Rear/Back View 18" Hoods Figure 10 Model No.
E30WV60EPS E308WV60ES E36WV60EPS E368WV60ES E48WV12EPS E488WV120S Electrical Conduit Locations Dimension "A" Conduit Location 9" (752mm) 8" (203mm) 14 7/16" (367mm) 10 Exhaust Duct Locations ELECTRICAL CONDUIT LOCATIONS CL "A" 1 1/2" CL CL (38mm) CL 7/8"ø (11mm) Holes 1 1/2" (38mm) 1 1/2" (38mm) CL CL CL CL "A" 3/4" (19mm) 7/8"ø (11mm) Holes Conduit Location E30WV60EPS, E36WV60EPS, E48WV12EPS, E308WV60ES, E368WV60ES, E488WV120S Top View 9" and 18" Hoods Figure 9 Conduit Location E308WV60ES, E368WV60ES, E488WV120S Rear/Back View 18" Hoods Figure 10 Model No.
Installation Instructions
Page 11
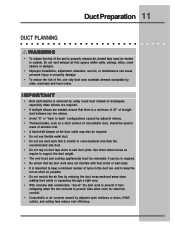
Use sheet metal screws as require to support the duct weight. • The vent hood and cooking appliance(s) must be required. • Do not use flexible metal duct. • Do not use only duct work to prevent it from collapsing ...
Use sheet metal screws as require to support the duct weight. • The vent hood and cooking appliance(s) must be required. • Do not use flexible metal duct. • Do not use only duct work to prevent it from collapsing ...

Installation Instructions
Page 13
... any cooking surface. Thirty inches (30") is 36" (914mm). Cabinet Preparation 13 PREPARING THE CABINET ! Minimum hood clearances are zero inches (0") to provide proper minimum clearance may result in cabinet areas above the cooktop should be avoided. • Do not store...clearance from cooking surface to do so may result in a fire or safety hazard. • To reduce the risk of hood is the minimum distance between the bottom of the hood. Failure to bottom of personal injury caused by reaching over a hot appliance, cabinet storage space located directly above the appliance. ...
... any cooking surface. Thirty inches (30") is 36" (914mm). Cabinet Preparation 13 PREPARING THE CABINET ! Minimum hood clearances are zero inches (0") to provide proper minimum clearance may result in cabinet areas above the cooktop should be avoided. • Do not store...clearance from cooking surface to do so may result in a fire or safety hazard. • To reduce the risk of hood is the minimum distance between the bottom of the hood. Failure to bottom of personal injury caused by reaching over a hot appliance, cabinet storage space located directly above the appliance. ...


