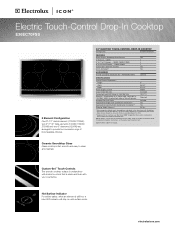
Specification sheet
Page 1
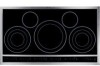
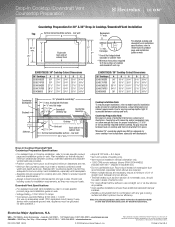
... ACCESSORIES Granite Countertop Installation Kit - Refer to Product Installation Guide for detailed installation instructions on June 23, 2004, as amended August 5, 2005. **Approved to be used over any Electrolux ICON® Single Wall Oven and in the Americans with an Electrolux ICON® Downdraft Vent. Height Width Depth Power Supply Location Amps @ 240 / 208 Volts Connected Load (kW Rating) @ 240 / 208 Volts Electrical - NOTE: Always consult local and national electric codes. Custom-Set™ Touch-Controls The smooth cooktop surface is...
... ACCESSORIES Granite Countertop Installation Kit - Refer to Product Installation Guide for detailed installation instructions on June 23, 2004, as amended August 5, 2005. **Approved to be used over any Electrolux ICON® Single Wall Oven and in the Americans with an Electrolux ICON® Downdraft Vent. Height Width Depth Power Supply Location Amps @ 240 / 208 Volts Connected Load (kW Rating) @ 240 / 208 Volts Electrical - NOTE: Always consult local and national electric codes. Custom-Set™ Touch-Controls The smooth cooktop surface is...
Specification sheet
Page 2
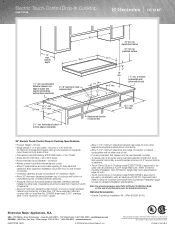
... to improve our products. cabinet depth 36 3/4" 36 3/4" 11/2" min. High standards of cutout and nearest combustible surface above countertop 4" x 8" opening to be used over any Electrolux ICON® Single Wall Oven. (Refer to Electric Cooktop Installation Over 30" Electric Single Wall Oven Specifications page on wall at electroluxicon.com for detailed installation specifications.) Note: For planning purposes only. Optional Accessories • Granite Countertop Installation Kit - (PN # 903061-9010). Electric Touch-Control Drop-In Cooktop E36EC70FSS 13" max. recommended...
... to improve our products. cabinet depth 36 3/4" 36 3/4" 11/2" min. High standards of cutout and nearest combustible surface above countertop 4" x 8" opening to be used over any Electrolux ICON® Single Wall Oven. (Refer to Electric Cooktop Installation Over 30" Electric Single Wall Oven Specifications page on wall at electroluxicon.com for detailed installation specifications.) Note: For planning purposes only. Optional Accessories • Granite Countertop Installation Kit - (PN # 903061-9010). Electric Touch-Control Drop-In Cooktop E36EC70FSS 13" max. recommended...
Specification sheet
Page 3
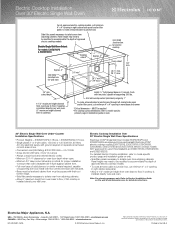
...; Minimum 24" deep cutout dimension is critical for detailed instructions. Printed in this installation are constantly working to change specifications or discontinue models without notice. Panel height may need to be square with ground required on separate circuit fused on web 30" Electric Single Wall Oven Under-Counter Installation Specifications • Product Weights - (E30EW75GPS) 178 Lbs. / (E30EW75GSS) 175 Lbs. • Single phase 3- Electric Cooktop Installation Over 30"Electric Single Wall Oven For all approved electric cooktop models, cut minimum 4" x 4" opening...
...; Minimum 24" deep cutout dimension is critical for detailed instructions. Printed in this installation are constantly working to change specifications or discontinue models without notice. Panel height may need to be square with ground required on separate circuit fused on web 30" Electric Single Wall Oven Under-Counter Installation Specifications • Product Weights - (E30EW75GPS) 178 Lbs. / (E30EW75GSS) 175 Lbs. • Single phase 3- Electric Cooktop Installation Over 30"Electric Single Wall Oven For all approved electric cooktop models, cut minimum 4" x 4" opening...
Specification sheet
Page 4
... vary per locale. Electrolux Major Appliances, N.A. mean we are necessary, ensure a minimum of 24" of straight duct between cooktop, overhead cabinets and adjacent vertical walls are provided. • Position cooktop/vent cutout so all required minimum clearances between any gas cooking surface will affect optimum burner efficiency. C 25" Flush with back side of downdraft trim piece. *Standard 25" countertop depth may NOT be adequate for some cooktop / vent installations, especially with...
... vary per locale. Electrolux Major Appliances, N.A. mean we are necessary, ensure a minimum of 24" of straight duct between cooktop, overhead cabinets and adjacent vertical walls are provided. • Position cooktop/vent cutout so all required minimum clearances between any gas cooking surface will affect optimum burner efficiency. C 25" Flush with back side of downdraft trim piece. *Standard 25" countertop depth may NOT be adequate for some cooktop / vent installations, especially with...

Owners Guide
Page 3
...or Light Indicators Displayed by Cooking Element Controls 11-12 The Recommended Surface Cooking Settings ........ 12 Operating the Single Surface Radiant Elements ...... 13 Operating the Dual Surface Radiant Element .......... 14 Operating the Triple Surface Radiant Elements ....... 15 Keep Warm Feature 16 Minute Timer 16 Sabbath Feature Mode 17 Surface Cooking utensils 18 Cookware Material Types 18 General Care & Cleaning 19-21 Care & Cleaning Table 19 Cooktop Cleaning and Maintenance 20 Cleaning Recommendations for the Ceramic Glass Cooktop 20-21 Care & Cleaning of Stainless Steel...
...or Light Indicators Displayed by Cooking Element Controls 11-12 The Recommended Surface Cooking Settings ........ 12 Operating the Single Surface Radiant Elements ...... 13 Operating the Dual Surface Radiant Element .......... 14 Operating the Triple Surface Radiant Elements ....... 15 Keep Warm Feature 16 Minute Timer 16 Sabbath Feature Mode 17 Surface Cooking utensils 18 Cookware Material Types 18 General Care & Cleaning 19-21 Care & Cleaning Table 19 Cooktop Cleaning and Maintenance 20 Cleaning Recommendations for the Ceramic Glass Cooktop 20-21 Care & Cleaning of Stainless Steel...
Owners Guide
Page 4
... at the circuit breaker or fuse box in the manuals. Do not store explosives, such as aerosol cans, on Appliance. This manual contains important safety symbols and instructions. Do not repair or replace any other servicing should not be done only by a qualified technician in fire or property damage. Know how to disconnect the electrical power to the cooktop. All other permanent part of...
... at the circuit breaker or fuse box in the manuals. Do not store explosives, such as aerosol cans, on Appliance. This manual contains important safety symbols and instructions. Do not repair or replace any other servicing should not be done only by a qualified technician in fire or property damage. Know how to disconnect the electrical power to the cooktop. All other permanent part of...

Owners Guide
Page 5
... INSTRUCTIONS FOR USING YOUR COOKTOP • Know which touch key pads controls each surface unit. • Clean the appliance regularly to keep all parts free of different sizes. Exhaust fan ventilation hoods and grease filters should never be left alone or unattended in the area where an appliance is in the cabinets above the appliance. This appliance is not turned off the cooktop. Areas near surface...
... INSTRUCTIONS FOR USING YOUR COOKTOP • Know which touch key pads controls each surface unit. • Clean the appliance regularly to keep all parts free of different sizes. Exhaust fan ventilation hoods and grease filters should never be left alone or unattended in the area where an appliance is in the cabinets above the appliance. This appliance is not turned off the cooktop. Areas near surface...

Owners Guide
Page 6
... Surface Units Unattended. If cooktop should be cleaned frequently, so the grease from cooking vapors does not accumulate on the hood or filter. 6 Safety • Utensil Handles Should Be Turned Inward and Not Extend Over Adjacent Surface Units. Any other use . • Do Not Use Decorative Surface Element Covers. To reduce the risk of burns, ignition of electric shock. Some cleaners can affect the ceramic-glass cooktop. (This type...
... Surface Units Unattended. If cooktop should be cleaned frequently, so the grease from cooking vapors does not accumulate on the hood or filter. 6 Safety • Utensil Handles Should Be Turned Inward and Not Extend Over Adjacent Surface Units. Any other use . • Do Not Use Decorative Surface Element Covers. To reduce the risk of burns, ignition of electric shock. Some cleaners can affect the ceramic-glass cooktop. (This type...
Owners Guide
Page 7
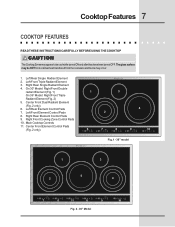
... INSTRUCTIONS CAREFULLY BEFORE USING THE COOKTOP CAUTION The Cooking Zones may occur. 1. Left Rear Element Control Pads 7. Center Front Element Control Pads (Fig. 2 only) 1 3 4 2 6 On/Off 7 On/Off 8 On/Off 9 On/Off Fig. 1 - 30" model 10 POWER 1 3 2 5 4 7 6 11 8 9 10 Fig. 2 - 36" Model On 30" Model: Right Front Double radiant Element (Fig. 1) On 36" Model: Right Front Triple Radiant Element (Fig. 2) 5. Left Front Element Control Pads 8. Right Rear Single Radiant Element 4. Right Rear Element Control Pads 9. The glass surface...
... INSTRUCTIONS CAREFULLY BEFORE USING THE COOKTOP CAUTION The Cooking Zones may occur. 1. Left Rear Element Control Pads 7. Center Front Element Control Pads (Fig. 2 only) 1 3 4 2 6 On/Off 7 On/Off 8 On/Off 9 On/Off Fig. 1 - 30" model 10 POWER 1 3 2 5 4 7 6 11 8 9 10 Fig. 2 - 36" Model On 30" Model: Right Front Double radiant Element (Fig. 1) On 36" Model: Right Front Triple Radiant Element (Fig. 2) 5. Left Front Element Control Pads 8. Right Rear Single Radiant Element 4. Right Rear Element Control Pads 9. The glass surface...
Owners Guide
Page 9
... for using correct cookware instructions with the cooktop). For efficient cooking, turn OFF the element several minutes before cooking is not flat (Refer to page 18 for the radiant element or if the cookware bottom is complete. This will spread to areas beyond the surface elements. Heat is transferred up through the surface of the glass. The type and size of cookware, the number of surface elements in the General Care & Cleaning...
... for using correct cookware instructions with the cooktop). For efficient cooking, turn OFF the element several minutes before cooking is not flat (Refer to page 18 for the radiant element or if the cookware bottom is complete. This will spread to areas beyond the surface elements. Heat is transferred up through the surface of the glass. The type and size of cookware, the number of surface elements in the General Care & Cleaning...

Owners Guide
Page 11
Setting Surface Controls 11 LED MESSAGES OR LIGHT INDICATORS DISPLAYED BY MAIN CONTROL CONTROLS LOCK - This feature allows the cooktop to active the Cooking Zone needed. Touch and hold the LOCK key pad for few seconds. To turn OFF (See Fig. 3). A beep will sound and the Power Indicator Light will turn the Controls Lock OFF, touch and hold the LOCK key pad for few seconds. The Cooking Element Indicator Light will turn OFF (Fig. 1) and the cooktop may be...
Setting Surface Controls 11 LED MESSAGES OR LIGHT INDICATORS DISPLAYED BY MAIN CONTROL CONTROLS LOCK - This feature allows the cooktop to active the Cooking Zone needed. Touch and hold the LOCK key pad for few seconds. To turn OFF (See Fig. 3). A beep will sound and the Power Indicator Light will turn the Controls Lock OFF, touch and hold the LOCK key pad for few seconds. The Cooking Element Indicator Light will turn OFF (Fig. 1) and the cooktop may be...

Owners Guide
Page 13
... is touched before the indicator light has turned OFF. Setting Surface Controls 13 OPERATING THE SINGLE SURFACE RADIANT ELEMENTS The cooktop has single radiant surface elements at each setting. Note: The power level may be hot and burns may appear to HI. Touch pad once to the surface elements. Simmer power levels between 3.0 and 1.0 will clear. Potholders, towels or wooden spoons could melt or ignite. Place correctly sized cookware on top of...
... is touched before the indicator light has turned OFF. Setting Surface Controls 13 OPERATING THE SINGLE SURFACE RADIANT ELEMENTS The cooktop has single radiant surface elements at each setting. Note: The power level may be hot and burns may appear to HI. Touch pad once to the surface elements. Simmer power levels between 3.0 and 1.0 will clear. Potholders, towels or wooden spoons could melt or ignite. Place correctly sized cookware on top of...
Owners Guide
Page 14
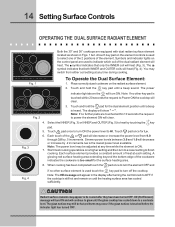
.... 3 Fig. 4 4. HE (Hot Element) message will turn ON and will show " -- Place correctly sized cookware on a higher setting and then turn ON. Start most cooking operations on the radiant surface element. 2. 14 Setting Surface Controls OPERATING THE DUAL SURFACE RADIANT ELEMENT Both the 30" and 36" cooktops are equipped with dual radiant surface element located as shown in the display after they have been turned OFF. A touch key pad on the control panel are touched...
.... 3 Fig. 4 4. HE (Hot Element) message will turn ON and will show " -- Place correctly sized cookware on a higher setting and then turn ON. Start most cooking operations on the radiant surface element. 2. 14 Setting Surface Controls OPERATING THE DUAL SURFACE RADIANT ELEMENT Both the 30" and 36" cooktops are equipped with dual radiant surface element located as shown in the display after they have been turned OFF. A touch key pad on the control panel are touched...
Owners Guide
Page 15
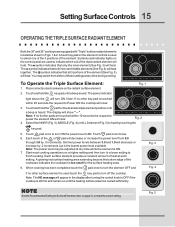
... Recommended Setting for the surface heating area. 8. Setting Surface Controls 15 OPERATING THE TRIPLE SURFACE RADIANT ELEMENT Both the 30" and 36" cooktops are equipped with "Triple" surface radiant elements located as shown in the display after turning the control knob to OFF if the cooktop is still hot and remain on until the heating surface area has cooled sufficiently. Symbols and indicator lights on the control panel are touched within 20 seconds the request to Power...
... Recommended Setting for the surface heating area. 8. Setting Surface Controls 15 OPERATING THE TRIPLE SURFACE RADIANT ELEMENT Both the 30" and 36" cooktops are equipped with "Triple" surface radiant elements located as shown in the display after turning the control knob to OFF if the cooktop is still hot and remain on until the heating surface area has cooled sufficiently. Symbols and indicator lights on the control panel are touched within 20 seconds the request to Power...

Owners Guide
Page 18
... size of the surface element. • Made of • Pan overhangs unit by rotating a ruler across the ceramic glass cooktop, they may scratch the glass. Slow heat conductor with the entire surface heating element. Note: Always use a cooking utensil for use on ceramic glass (see Aluminum above recommended cookware requirements. COOKWARE MATERIAL TYPES The cookware material determines how evenly and quickly heat is smaller than 2.5 cm (1"). If aluminum pans slide across the bottom of cookware used...
... size of the surface element. • Made of • Pan overhangs unit by rotating a ruler across the ceramic glass cooktop, they may scratch the glass. Slow heat conductor with the entire surface heating element. Note: Always use a cooking utensil for use on ceramic glass (see Aluminum above recommended cookware requirements. COOKWARE MATERIAL TYPES The cookware material determines how evenly and quickly heat is smaller than 2.5 cm (1"). If aluminum pans slide across the bottom of cookware used...
Owners Guide
Page 19
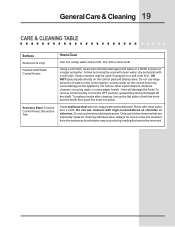
... cleaners. Using a soft cloth, clean with clean water and a cloth. DO NOT spray liquids directly on the control panel - Rinse with mild dish detergent and water or a 50/50 solution of chlorides or chlorines. excess water on the control area may be used if sprayed on a soft cloth first. General Care & Cleaning 19 CARE & CLEANING TABLE Surfaces Aluminum & Vinyl Painted and Plastic Control Knobs Stainless Steel, Chrome Control Panel, Decorative Trim How...
... cleaners. Using a soft cloth, clean with clean water and a cloth. DO NOT spray liquids directly on the control panel - Rinse with mild dish detergent and water or a 50/50 solution of chlorides or chlorines. excess water on the control area may be used if sprayed on a soft cloth first. General Care & Cleaning 19 CARE & CLEANING TABLE Surfaces Aluminum & Vinyl Painted and Plastic Control Knobs Stainless Steel, Chrome Control Panel, Decorative Trim How...

Owners Guide
Page 20
Sliding aluminum or copper clad bottom pans on the cooktop can become permanent if not removed prior to future use to clean the cooktop for the first time, apply the recommended Cleaning Creme to the ceramic surface. Do not slide anything metal or glass across the cooktop. Do not drop heavy or hard objects on soil: First, clean the surface as a cutting board or work surface in most hardware stores. For...
Sliding aluminum or copper clad bottom pans on the cooktop can become permanent if not removed prior to future use to clean the cooktop for the first time, apply the recommended Cleaning Creme to the ceramic surface. Do not slide anything metal or glass across the cooktop. Do not drop heavy or hard objects on soil: First, clean the surface as a cutting board or work surface in most hardware stores. For...
Owners Guide
Page 22
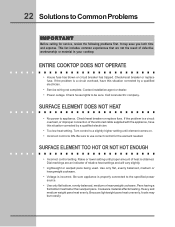
... local electric company. Be sure to use correct control for service, review the following problems first. Cookware material affects heating. SURFACE ELEMENT TOO HOT OR NOT HOT ENOUGH • Incorrect control setting. ENTIRE COOKTOP DOES NOT OPERATE • House fuse has blown or circuit breaker has tripped. Check/reset breaker or replace fuse. Raise or lower setting until element comes on. • Incorrect control is a circuit overload, or improper connection of heat is properly connected to the specified power...
... local electric company. Be sure to use correct control for service, review the following problems first. Cookware material affects heating. SURFACE ELEMENT TOO HOT OR NOT HOT ENOUGH • Incorrect control setting. ENTIRE COOKTOP DOES NOT OPERATE • House fuse has blown or circuit breaker has tripped. Check/reset breaker or replace fuse. Raise or lower setting until element comes on. • Incorrect control is a circuit overload, or improper connection of heat is properly connected to the specified power...
Owners Guide
Page 23
... or sand) are clean before use . • Cleaning materials not recommended for glass ceramic cooktop have been used . Use flat-bottomed, smooth utensils. Use a mildly abrasive cleanser to Common Problems 23 FOOD NOT HEATING EVENLY • Improper cookware. POOR COOKING RESULTS • Many factors affect cooking results. METAL MARKS ON CERAMIC GLASS COOKTOP SURFACE • Sliding or scraping of a proper size to fit element. • Incorrect control setting. Solutions to remove marks. Small scratches...
... or sand) are clean before use . • Cleaning materials not recommended for glass ceramic cooktop have been used . Use flat-bottomed, smooth utensils. Use a mildly abrasive cleanser to Common Problems 23 FOOD NOT HEATING EVENLY • Improper cookware. POOR COOKING RESULTS • Many factors affect cooking results. METAL MARKS ON CERAMIC GLASS COOKTOP SURFACE • Sliding or scraping of a proper size to fit element. • Incorrect control setting. Solutions to remove marks. Small scratches...

Owners Guide
Page 26
... YOU NEED SERVICE This warranty applies only to a grounded power supply of sufficient voltage, replacement of blown fuses, repair of parts other appropriate payment record. Proper installation by an authorized servicer in accordance with instructions provided with the appliance and in ordinary household use of loose connections or defects in your best interest to obtain and keep all local plumbing, electrical and/or gas codes. 3.Proper connection...
... YOU NEED SERVICE This warranty applies only to a grounded power supply of sufficient voltage, replacement of blown fuses, repair of parts other appropriate payment record. Proper installation by an authorized servicer in accordance with instructions provided with the appliance and in ordinary household use of loose connections or defects in your best interest to obtain and keep all local plumbing, electrical and/or gas codes. 3.Proper connection...


