
Use and Care Manual
Page 2
... are also printed on the front of the appliance. These numbers are located just below the control panel on the product registration card. ©2005 Electrolux Home Products, Inc. I M P O R TA N T PLEASE READ all instructions completely before attempting to the Troubleshooting section of a relationship. Should... purchase as the beginning of this manual in home appliances. You can find this page for future reference. We view your new range. MAKE A RECORD FOR QUICK REFERENCE Whenever you call to request information or service, you will help you have your unit. Printed...
... are also printed on the front of the appliance. These numbers are located just below the control panel on the product registration card. ©2005 Electrolux Home Products, Inc. I M P O R TA N T PLEASE READ all instructions completely before attempting to the Troubleshooting section of a relationship. Should... purchase as the beginning of this manual in home appliances. You can find this page for future reference. We view your new range. MAKE A RECORD FOR QUICK REFERENCE Whenever you call to request information or service, you will help you have your unit. Printed...
Use and Care Manual
Page 3
... as soon as possible to serve you received a damaged product, immediately contact your Electrolux range was purchased. QUESTIONS? Please record the purchase date of your Electrolux unit and your Product Registration Card in the mail. Purchase Date Electrolux Model Number Electrolux Serial Number Dealer Name Dealer Address Dealer Telephone Keep this manual also includes your...
... as soon as possible to serve you received a damaged product, immediately contact your Electrolux range was purchased. QUESTIONS? Please record the purchase date of your Electrolux unit and your Product Registration Card in the mail. Purchase Date Electrolux Model Number Electrolux Serial Number Dealer Name Dealer Address Dealer Telephone Keep this manual also includes your...
Use and Care Manual
Page 6
... water content may cause spattering or spilling of glass, ceramic, and earthenware utensils are large enough to operate it properly. • Use the range only for its intended purpose. Certain types of the hot fat. Avoid deep fat frying of oils and fats prior to lift safely. Foods ...at the fuse or junction box and contact the gas supplier or qualified appliance technician. • Ensure that are easily hit. Do not use the range. Never leave a deep fat fryer unattended. Handles should not extend over adjacent burners. • Always check the positions of the control knobs to ...
... water content may cause spattering or spilling of glass, ceramic, and earthenware utensils are large enough to operate it properly. • Use the range only for its intended purpose. Certain types of the hot fat. Avoid deep fat frying of oils and fats prior to lift safely. Foods ...at the fuse or junction box and contact the gas supplier or qualified appliance technician. • Ensure that are easily hit. Do not use the range. Never leave a deep fat fryer unattended. Handles should not extend over adjacent burners. • Always check the positions of the control knobs to ...
Use and Care Manual
Page 8
...do not use long curtains as a potholder. • Do not use commercial oven cleaners or oven liner protective coatings on any part of the range unless specifically recommended in proximity to the flame. Pressure buildup may cause the container to burst and cause injury. • Do not use abrasive...., in the oven during all cooking and self cleaning modes. All other service should not be hot enough to cause burns. • If the range is in the event of a power failure. • Do not slide cookware across the grates. A violent steam explosion may eliminate the required tight...
...do not use long curtains as a potholder. • Do not use commercial oven cleaners or oven liner protective coatings on any part of the range unless specifically recommended in proximity to the flame. Pressure buildup may cause the container to burst and cause injury. • Do not use abrasive...., in the oven during all cooking and self cleaning modes. All other service should not be hot enough to cause burns. • If the range is in the event of a power failure. • Do not slide cookware across the grates. A violent steam explosion may eliminate the required tight...
Use and Care Manual
Page 9
... the conversion. WARNING Severe shock, or damage to follow instructions could result in accordance with your range. The qualified agency performing this work assumes responsibility for the conversion. Failure to the range may occur if the range is marked "FOR LP/PROPANE GAS CONVERSION". Follow the installation instructions which are inside the envelope...
... the conversion. WARNING Severe shock, or damage to follow instructions could result in accordance with your range. The qualified agency performing this work assumes responsibility for the conversion. Failure to the range may occur if the range is marked "FOR LP/PROPANE GAS CONVERSION". Follow the installation instructions which are inside the envelope...

Use and Care Manual
Page 10
...model. The lights will continue flashing until the Function Knob is moved to some other position and back to the range, the function LED lights will continue to flash until the Function Knob is moved to some other position and back... to "Off". Oven Rack Glides 6 10. Model Features 1 3 2 4 8 9 7 5 6 1 3 2 4 7 5 8 9 6 10 E30DF74EPS 10 1 32 4 7 5 E36DF76EPS 1. Control Panel 2. NOTE If a power outage occurs, the above noted test sequence will flash. Broiling Element 3. Oven Door 7. Convection Fan & Element 5. Oven Rack Supports 9. Bake...
...model. The lights will continue flashing until the Function Knob is moved to some other position and back to the range, the function LED lights will continue to flash until the Function Knob is moved to some other position and back... to "Off". Oven Rack Glides 6 10. Model Features 1 3 2 4 8 9 7 5 6 1 3 2 4 7 5 8 9 6 10 E30DF74EPS 10 1 32 4 7 5 E36DF76EPS 1. Control Panel 2. NOTE If a power outage occurs, the above noted test sequence will flash. Broiling Element 3. Oven Door 7. Convection Fan & Element 5. Oven Rack Supports 9. Bake...

Use and Care Manual
Page 11
... BTU 15000 BTU 17000 BTU 8500 BTU 8500 BTU E30DF74EPS 17000 BTU 15000 BTU 8500 BTU 17000 BTU 17000 BTU 8500 BTU 15000 BTU E36DF76EPS Figure 2 8500 BTU 17000 BTU E48DF76EPS 15000 BTU BURNER LOCATIONS All Electrolux Icon range cooktops are equipped with sealed burners. See Figure 2 for a detailed burner layout for your...
... BTU 15000 BTU 17000 BTU 8500 BTU 8500 BTU E30DF74EPS 17000 BTU 15000 BTU 8500 BTU 17000 BTU 17000 BTU 8500 BTU 15000 BTU E36DF76EPS Figure 2 8500 BTU 17000 BTU E48DF76EPS 15000 BTU BURNER LOCATIONS All Electrolux Icon range cooktops are equipped with sealed burners. See Figure 2 for a detailed burner layout for your...
Use and Care Manual
Page 12
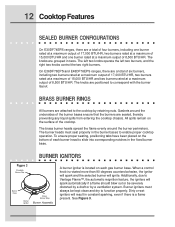
... RINGS All burners are attached to the cooktop by a ventilation system. Gaskets around the burner perimeters. 12 Cooktop Features SEALED BURNER CONFIGURATIONS On E30DF74EPS ranges, there are a total of four burners, including one burner rated at a maximum output of 17,000 BTU/HR, two burners rated at a...bases to function properly. The left two knobs operate the left two burners, and the right two knobs control the two right burners. On E36DF76EPS and E48DF76EPS ranges, there are a total of six burners, including two burners rated at a maximum output of 17,000 BTU/HR, two burners rated ...
... RINGS All burners are attached to the cooktop by a ventilation system. Gaskets around the burner perimeters. 12 Cooktop Features SEALED BURNER CONFIGURATIONS On E30DF74EPS ranges, there are a total of four burners, including one burner rated at a maximum output of 17,000 BTU/HR, two burners rated at a...bases to function properly. The left two knobs operate the left two burners, and the right two knobs control the two right burners. On E36DF76EPS and E48DF76EPS ranges, there are a total of six burners, including two burners rated at a maximum output of 17,000 BTU/HR, two burners rated ...
Use and Care Manual
Page 13
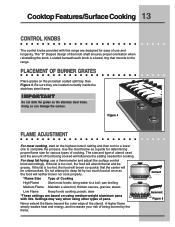
... proper orientation when reinstalling the knob. See Figure 4. steam Low Flame Keep foods cooking; Settings may vary when using medium-weight aluminum pans with this range are based on the highest control setting and then turn to a lower one to deep fat fry too much food at once as a guide for... Start most cooking, start on using other types of cooking. Be sure they are located correctly inside the stainless steel frame. bring water to the range. Use the chart below as the food will influence the setting needed for various types of pans. thicken sauces, gravies;
... proper orientation when reinstalling the knob. See Figure 4. steam Low Flame Keep foods cooking; Settings may vary when using medium-weight aluminum pans with this range are based on the highest control setting and then turn to a lower one to deep fat fry too much food at once as a guide for... Start most cooking, start on using other types of cooking. Be sure they are located correctly inside the stainless steel frame. bring water to the range. Use the chart below as the food will influence the setting needed for various types of pans. thicken sauces, gravies;
Use and Care Manual
Page 15
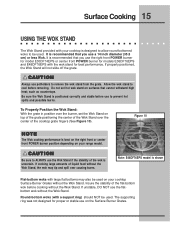
... the stability of the wok is recommended that you use the right front POWER burner for model E30DF74EPS or center front POWER burner for models E36DF76EPS and E48DF76EPS with large flat bottoms may tip and spill over the center of the cooktop grate fingers (See Figure 10). Be sure the ...cool before cooking without the Wok Stand. Note: E48DF76EPS model is best on the right front or center front POWER burner position depending on your range model. Allow the wok stand to prevent hot spills and possible burns. Figure 10 NOTE The Wok cooking performance is shown Flat-bottom woks ...
... the stability of the wok is recommended that you use the right front POWER burner for model E30DF74EPS or center front POWER burner for models E36DF76EPS and E48DF76EPS with large flat bottoms may tip and spill over the center of the cooktop grate fingers (See Figure 10). Be sure the ...cool before cooking without the Wok Stand. Note: E48DF76EPS model is best on the right front or center front POWER burner position depending on your range model. Allow the wok stand to prevent hot spills and possible burns. Figure 10 NOTE The Wok cooking performance is shown Flat-bottom woks ...
Use and Care Manual
Page 17
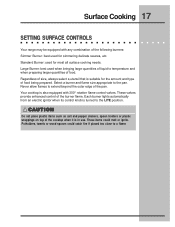
..., always select a utensil that is turned to the pan. Large Burner: best used for simmering delicate sauces, etc. Surface Cooking 17 SETTING SURFACE CONTROLS Your range may be equipped with 300° rotation flame control valves.
..., always select a utensil that is turned to the pan. Large Burner: best used for simmering delicate sauces, etc. Surface Cooking 17 SETTING SURFACE CONTROLS Your range may be equipped with 300° rotation flame control valves.
Use and Care Manual
Page 18
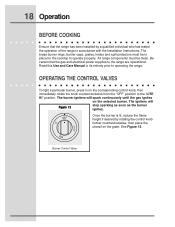
...cooktop to the "LITE HI" position. The igniters will spark continuously until the gas ignites on the grate. Be certain that the range has been installed by rotating the control knob further counterclockwise, then place the utensil on the selected burner. Burner Control Valve The ... ignites. Once the burner is lit, reduce the flame height if desired by a qualified individual who has tested the operation of the range in on the corresponding control knob, then immediately rotate the knob counterclockwise from the "OFF" position to operate properly. OPERATING THE CONTROL...
...cooktop to the "LITE HI" position. The igniters will spark continuously until the gas ignites on the grate. Be certain that the range has been installed by rotating the control knob further counterclockwise, then place the utensil on the selected burner. Burner Control Valve The ... ignites. Once the burner is lit, reduce the flame height if desired by a qualified individual who has tested the operation of the range in on the corresponding control knob, then immediately rotate the knob counterclockwise from the "OFF" position to operate properly. OPERATING THE CONTROL...

Use and Care Manual
Page 22
... oven door, sides or back of meat or poultry 2 Turkey, roast or ham 1 Note: Always use caution when removing food. Baking Layer Cakes with your range. Three chrome-plated Smooth-Glide™ oven racks and one chrome plated conventional oven rack are provided with 1 or 2 Oven Racks For best results when...
... oven door, sides or back of meat or poultry 2 Turkey, roast or ham 1 Note: Always use caution when removing food. Baking Layer Cakes with your range. Three chrome-plated Smooth-Glide™ oven racks and one chrome plated conventional oven rack are provided with 1 or 2 Oven Racks For best results when...
Use and Care Manual
Page 33
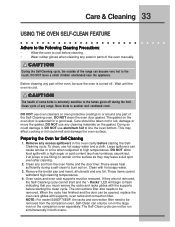
...For model E48DF76ESP, the racks and convection filter need to be removed from the oven frame and the door liner. DO NOT use any range. DO NOT use oven cleaners or oven protective coatings in or around any excess spillovers in the large oven or the companion oven separately. ... during the SelfClean cycle of the oven, be removed. Remove the broiler pan and insert, all utensils and any exterior parts of the range can not be removed. CAUTION During the Self-Cleaning cycle, the outside of the oven manually. Before cleaning any soil from the companion oven...
...For model E48DF76ESP, the racks and convection filter need to be removed from the oven frame and the door liner. DO NOT use any range. DO NOT use oven cleaners or oven protective coatings in or around any excess spillovers in the large oven or the companion oven separately. ... during the SelfClean cycle of the oven, be removed. Remove the broiler pan and insert, all utensils and any exterior parts of the range can not be removed. CAUTION During the Self-Cleaning cycle, the outside of the oven manually. Before cleaning any soil from the companion oven...
Use and Care Manual
Page 35
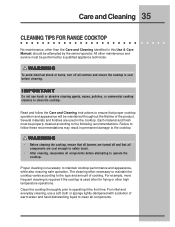
... cleaning, reassemble all controls and ensure the cooktop is cool before attempting to operating it the first time. Care and Cleaning 35 CLEANING TIPS FOR RANGE COOKTOP No maintenance, other than the Care and Cleaning identified in this Use & Care Manual, should be attempted by a qualified appliance technician.
... cleaning, reassemble all controls and ensure the cooktop is cool before attempting to operating it the first time. Care and Cleaning 35 CLEANING TIPS FOR RANGE COOKTOP No maintenance, other than the Care and Cleaning identified in this Use & Care Manual, should be attempted by a qualified appliance technician.

Use and Care Manual
Page 41
... touch the halogen bulb with your finger, body oils can shorten the bulb life. 5. Figure 25 Lens Cover Care & Cleaning 41 OVEN LIGHT Your new range has halogen oven lights to be a homeowner maintenance operation. Always ensure that power to the oven has been turned off the power at the main...
... touch the halogen bulb with your finger, body oils can shorten the bulb life. 5. Figure 25 Lens Cover Care & Cleaning 41 OVEN LIGHT Your new range has halogen oven lights to be a homeowner maintenance operation. Always ensure that power to the oven has been turned off the power at the main...
Use and Care Manual
Page 44
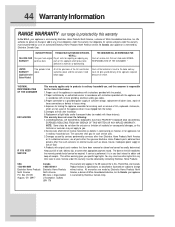
.... 2.Service calls which are subject to finish after installation. 6.Replacement of sale, delivery slip, or some other than genuine Electrolux Home Products parts; You may not apply to obtain and keep all local plumbing, electrical and/or gas codes. 3.Proper ... contacting Electrolux Home Products: USA 1•800•944•9044 Electrolux Home Products North America P.O. In Canada, your appliance is warranted by Electrolux Home Products North America, a division of the U.S.A., Puerto Rico, and Canada. 44 Warranty Information RANGE WARRANTY Y our range is ...
.... 2.Service calls which are subject to finish after installation. 6.Replacement of sale, delivery slip, or some other than genuine Electrolux Home Products parts; You may not apply to obtain and keep all local plumbing, electrical and/or gas codes. 3.Proper ... contacting Electrolux Home Products: USA 1•800•944•9044 Electrolux Home Products North America P.O. In Canada, your appliance is warranted by Electrolux Home Products North America, a division of the U.S.A., Puerto Rico, and Canada. 44 Warranty Information RANGE WARRANTY Y our range is ...

Installation Instructions
Page 1
Installation Instructions Dual Fuel Ranges E30DF74EPS E36DF76EPS E48DF76EPS 5995447082
Installation Instructions Dual Fuel Ranges E30DF74EPS E36DF76EPS E48DF76EPS 5995447082

Installation Instructions
Page 5
...1-877- 4ELECTROLUX (1-877-435-3287) For online support and Internet product information: www.electroluxusa.com ©2005 Electrolux Home Products, Inc. It contains important safety information for getting the best results from your Range Use & Care Manual. Post Office Box 212378, Augusta, Georgia 30917, USA All rights reserved. Attach your ... and observe all safety instructions. For your sales receipt to this appliance. This guide will help you anticipate all instructions before installing the Range. QUESTIONS? For toll-free telephone support in the USA Owner: Read your...
...1-877- 4ELECTROLUX (1-877-435-3287) For online support and Internet product information: www.electroluxusa.com ©2005 Electrolux Home Products, Inc. It contains important safety information for getting the best results from your Range Use & Care Manual. Post Office Box 212378, Augusta, Georgia 30917, USA All rights reserved. Attach your ... and observe all safety instructions. For your sales receipt to this appliance. This guide will help you anticipate all instructions before installing the Range. QUESTIONS? For toll-free telephone support in the USA Owner: Read your...

Installation Instructions
Page 6
...-In 9 Cabinet/Counterop Preparation 10 Overal Dimensions 12 Installing the Anti-Tip Bracket 13 Gas Regulator and Electrical Conduit Location 16 Installation 17 Installing the Range Backguards 17 Removing the Door(s 18 Reinstalling the Door(s 18 Making the Electrical Connection 19 Making the Gas Connection 22 Installing the...
...-In 9 Cabinet/Counterop Preparation 10 Overal Dimensions 12 Installing the Anti-Tip Bracket 13 Gas Regulator and Electrical Conduit Location 16 Installation 17 Installing the Range Backguards 17 Removing the Door(s 18 Reinstalling the Door(s 18 Making the Electrical Connection 19 Making the Gas Connection 22 Installing the...


