
Use and Care Manual
Page 4
... Setting Oven Controls 21 Companion Oven 23 Setting Oven Controls 24 Selector Knob Functions 24 Oven Functions 25 Cooking Instructions 26 Baking 26 Baking Problems 27 Convection Baking 28 Convection Roasting 29 Broiling 31 Care and Cleaning 33 Using the Self-Clean Feature 33 Starting the Self-Clean Cycle 34 Cleaning Tips 35 Cleaning Stainless Steel Surfaces 37 Cleaning Porcelain Grates 37 Cleaning Knobs and Bezels 38 Cleaning Burner Bases 38 Cleaning Burner Rings 39 Cleaning Burner Igniters 39 General Cleaning 40 Oven Light 41 Solutions to Common Problems 42 Warranty...
... Setting Oven Controls 21 Companion Oven 23 Setting Oven Controls 24 Selector Knob Functions 24 Oven Functions 25 Cooking Instructions 26 Baking 26 Baking Problems 27 Convection Baking 28 Convection Roasting 29 Broiling 31 Care and Cleaning 33 Using the Self-Clean Feature 33 Starting the Self-Clean Cycle 34 Cleaning Tips 35 Cleaning Stainless Steel Surfaces 37 Cleaning Porcelain Grates 37 Cleaning Knobs and Bezels 38 Cleaning Burner Bases 38 Cleaning Burner Rings 39 Cleaning Burner Igniters 39 General Cleaning 40 Oven Light 41 Solutions to Common Problems 42 Warranty...
Use and Care Manual
Page 6
... clean and maintain as recommended in cooktop applications. • When cooking, set the burner controls so that the flame heats only the bottom of the utensil and does not extend up the sides of the utensil. • When deep fat frying, be certain that the pan is located so that are easily hit. Immediately turn off the gas supply at the shut off valve, disconnect electrical power...
... clean and maintain as recommended in cooktop applications. • When cooking, set the burner controls so that the flame heats only the bottom of the utensil and does not extend up the sides of the utensil. • When deep fat frying, be certain that the pan is located so that are easily hit. Immediately turn off the gas supply at the shut off valve, disconnect electrical power...

Use and Care Manual
Page 7
...; Clean only those parts listed in this appliance. Let hot air or steam escape before looking or reaching into the oven. • Position oven racks in desired locations when the oven is cool. (If a rack must be repositioned after the oven is already hot, be certain that a burner flame goes out and gas escapes, turn off the gas supply by closing the gas shut-off valve and turning off the gas control and open a window or door...
...; Clean only those parts listed in this appliance. Let hot air or steam escape before looking or reaching into the oven. • Position oven racks in desired locations when the oven is cool. (If a rack must be repositioned after the oven is already hot, be certain that a burner flame goes out and gas escapes, turn off the gas supply by closing the gas shut-off valve and turning off the gas control and open a window or door...
Use and Care Manual
Page 8
... gasket, may eliminate the required tight door seal. • DO NOT TOUCH INTERIOR SURFACES OF THE OVEN. Sliding may cause permanent damage. Do not use a towel or bulky cloth as these may damage the finish of the oven. • Do not clean the door gasket, because rubbing, moving or in the oven during all cooking and self cleaning modes. Venting from the oven may result. Never...
... gasket, may eliminate the required tight door seal. • DO NOT TOUCH INTERIOR SURFACES OF THE OVEN. Sliding may cause permanent damage. Do not use a towel or bulky cloth as these may damage the finish of the oven. • Do not clean the door gasket, because rubbing, moving or in the oven during all cooking and self cleaning modes. Venting from the oven may result. Never...
Use and Care Manual
Page 9
... be performed by a qualified service technician in accordance with the kit instructions and all codes and requirements of the authority having jurisdiction. It is not installed by a qualified service technician in accordance with the manufacturer's instructions and all local codes and requirements. The qualified agency performing this work assumes responsibility for use with Natural Gas and Propane Gas. Safety 9 LIQUIFIED PETROLEUM (PROPANE) GAS CONVERSION This appliance can be used with natural gas.
... be performed by a qualified service technician in accordance with the kit instructions and all codes and requirements of the authority having jurisdiction. It is not installed by a qualified service technician in accordance with the manufacturer's instructions and all local codes and requirements. The qualified agency performing this work assumes responsibility for use with Natural Gas and Propane Gas. Safety 9 LIQUIFIED PETROLEUM (PROPANE) GAS CONVERSION This appliance can be used with natural gas.

Use and Care Manual
Page 10
... function LED lights will take place. Convection Fan & Element 5. Bake Element 8 6. Oven Racks 9 8. See Figure 1 for a detailed control panel layout for use . NOTE If a power outage occurs, the above noted test sequence will flash while the electronic control completes its self test mode. The function LED lights will continue flashing until the Function Knob is ready for your range, become familiar with the features and control panel layout. Broiling Element 3. Oven Rack Supports 9. Control Panel 2. Oven Door 7. Companion Oven Figure 1 E48DF76EPS At this time...
... function LED lights will take place. Convection Fan & Element 5. Bake Element 8 6. Oven Racks 9 8. See Figure 1 for a detailed control panel layout for use . NOTE If a power outage occurs, the above noted test sequence will flash while the electronic control completes its self test mode. The function LED lights will continue flashing until the Function Knob is ready for your range, become familiar with the features and control panel layout. Broiling Element 3. Oven Rack Supports 9. Control Panel 2. Oven Door 7. Companion Oven Figure 1 E48DF76EPS At this time...
Use and Care Manual
Page 18
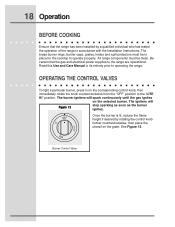
All range components must be clean. See Figure 12. The burner igniters will Figure 12 stop sparking as soon as the burner ignites. Read this Use and Care Manual in accordance with the Installation Instructions. OPERATING THE CONTROL VALVES To light a particular burner, press in place for the cooktop to operate properly. The igniters will spark continuously until the gas ignites on the corresponding control knob, then immediately rotate the knob counterclockwise from the "OFF...
All range components must be clean. See Figure 12. The burner igniters will Figure 12 stop sparking as soon as the burner ignites. Read this Use and Care Manual in accordance with the Installation Instructions. OPERATING THE CONTROL VALVES To light a particular burner, press in place for the cooktop to operate properly. The igniters will spark continuously until the gas ignites on the corresponding control knob, then immediately rotate the knob counterclockwise from the "OFF...

Use and Care Manual
Page 25
... rack baking or roasting. As in the rear of complete meals. The Self Clean time is directed back onto the oven chamber through the convection baffle. In this combination convection/radiant function, the bake, broil and convection elements provide the heat. The heated air is 3 hours. The high wattage, top heating element supplies the heat when using the broil function. Broiling is performed with the oven door closed. The baffle distributes the heated air evenly to 500° F. Setting Oven Controls 25 OVEN FUNCTIONS All oven functions...
... rack baking or roasting. As in the rear of complete meals. The Self Clean time is directed back onto the oven chamber through the convection baffle. In this combination convection/radiant function, the bake, broil and convection elements provide the heat. The heated air is 3 hours. The high wattage, top heating element supplies the heat when using the broil function. Broiling is performed with the oven door closed. The baffle distributes the heated air evenly to 500° F. Setting Oven Controls 25 OVEN FUNCTIONS All oven functions...

Use and Care Manual
Page 28
...°F): 1 After the oven has already been set to the temperature the recipe recommends. General Convection Bake Instructions 1 When using the convection bake mode, the temperature is directed back into the chamber through the convection baffle. Time reductions will vary depending on so heated air can reduce standard bake temperatures by the electronic oven control, so the oven cooking temperature should be used to bake on the amount and type of food to be cooked. 2 Baking pans with no sides...
...°F): 1 After the oven has already been set to the temperature the recipe recommends. General Convection Bake Instructions 1 When using the convection bake mode, the temperature is directed back into the chamber through the convection baffle. Time reductions will vary depending on so heated air can reduce standard bake temperatures by the electronic oven control, so the oven cooking temperature should be used to bake on the amount and type of food to be cooked. 2 Baking pans with no sides...

Use and Care Manual
Page 31
... the oven. Cooking Instructions 31 BROILING Broiling is a method of cooking tender cuts of meat by direct heat under the broil element of the broiler. Foods will stick if placed on the second side. Increase or decrease broiling times, or move the broiling pan to a different rack position to suit for some smoke to be present to BROIL. CAUTION Should an oven fire occur, turn and cook on hot metal.) To preheat, set the control...
... the oven. Cooking Instructions 31 BROILING Broiling is a method of cooking tender cuts of meat by direct heat under the broil element of the broiler. Foods will stick if placed on the second side. Increase or decrease broiling times, or move the broiling pan to a different rack position to suit for some smoke to be present to BROIL. CAUTION Should an oven fire occur, turn and cook on hot metal.) To preheat, set the control...

Use and Care Manual
Page 32
... each use. Use hot pads because the broiler pan is 500°F. The exposed grease could ignite. 2 Arrange the interior oven rack and place the broiler pan on the broiler pan. Be sure to broil: 1 Place the broiler pan insert on the rack. Clean the broiler pan as soon as cooking is turned to Broil. To set the oven to center the broiler pan directly under the broiler element. DO NOT cover the broiler pan insert with foil. 32 Cooking Instructions Setting Broil The selector knob controls the Broil feature.
... each use. Use hot pads because the broiler pan is 500°F. The exposed grease could ignite. 2 Arrange the interior oven rack and place the broiler pan on the broiler pan. Be sure to broil: 1 Place the broiler pan insert on the rack. Clean the broiler pan as soon as cooking is turned to Broil. To set the oven to center the broiler pan directly under the broiler element. DO NOT cover the broiler pan insert with foil. 32 Cooking Instructions Setting Broil The selector knob controls the Broil feature.
Use and Care Manual
Page 38
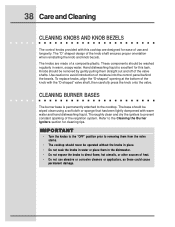
38 Care and Cleaning CLEANING KNOBS AND KNOB BEZELS The control knobs provided with this task. Use caution to avoid introduction of use abrasive or corrosive cleaners or applicators, as these could cause permanent damage. Thoroughly clean and dry the igniters to direct flame, hot utensils, or other sources of the reignition system. Hand dishwashing liquid is permanently attached to the Cleaning the Burner Igniters section for cleaning tips. CLEANING BURNER BASES...
38 Care and Cleaning CLEANING KNOBS AND KNOB BEZELS The control knobs provided with this task. Use caution to avoid introduction of use abrasive or corrosive cleaners or applicators, as these could cause permanent damage. Thoroughly clean and dry the igniters to direct flame, hot utensils, or other sources of the reignition system. Hand dishwashing liquid is permanently attached to the Cleaning the Burner Igniters section for cleaning tips. CLEANING BURNER BASES...

Use and Care Manual
Page 41
.... 4. Figure 25 Lens Cover Replace halogen bulb taking care not to enhance the view into the oven. Always ensure that power to access the light housing. 3. Part Number 64428), as well as a light fixture housing. Light bulb replacement is in order to the oven has been turned off the power at the main power supply. 2. To replace the light bulb: 1. Remove rack supports in place when using the oven. Care & Cleaning 41 OVEN LIGHT Your new range has halogen oven lights to touch the...
.... 4. Figure 25 Lens Cover Replace halogen bulb taking care not to enhance the view into the oven. Always ensure that power to access the light housing. 3. Part Number 64428), as well as a light fixture housing. Light bulb replacement is in order to the oven has been turned off the power at the main power supply. 2. To replace the light bulb: 1. Remove rack supports in place when using the oven. Care & Cleaning 41 OVEN LIGHT Your new range has halogen oven lights to touch the...
Use and Care Manual
Page 42
... not open. Contact gas company. Clean burner ring ports with straightened paper clip, needle or wire. Check installation, replace regullator, or set for the wrong type of cooktop matches the gas supply (natural gas or L.P. Contact power company. Burners ignite but no flame ignition Gas shut-off " position. Power outage in OVEN OPERATION Igniters do not spark. Have polarity corrected. Follow mode selection and temperature settings as specified in Self-Clean mode. Oven light will not heat after flame ignition. Gas supply is...
... not open. Contact gas company. Clean burner ring ports with straightened paper clip, needle or wire. Check installation, replace regullator, or set for the wrong type of cooktop matches the gas supply (natural gas or L.P. Contact power company. Burners ignite but no flame ignition Gas shut-off " position. Power outage in OVEN OPERATION Igniters do not spark. Have polarity corrected. Follow mode selection and temperature settings as specified in Self-Clean mode. Oven light will not heat after flame ignition. Gas supply is...
Use and Care Manual
Page 44
... plumbing, electrical and/or gas codes. 3.Proper connection to a grounded power supply of sufficient voltage, replacement of blown fuses, repair of loose connections or defects in house wiring. 4. Service under this limitation or exclusion may also have been removed or altered and cannot be readily determined. Proper installation by an authorized servicer in accordance with instructions provided with the appliance and in accordance with these features). Expenses...
... plumbing, electrical and/or gas codes. 3.Proper connection to a grounded power supply of sufficient voltage, replacement of blown fuses, repair of loose connections or defects in house wiring. 4. Service under this limitation or exclusion may also have been removed or altered and cannot be readily determined. Proper installation by an authorized servicer in accordance with instructions provided with the appliance and in accordance with these features). Expenses...
Installation Instructions
Page 2
... serious injury. WARNING WARNING indicates a potentially hazardous situation which is important but not hazard related. I M P O R TA N T Indicates installation, operation or maintenance information which , if not avoided, could result in minor or moderate injury. 2 Safety IMPORTANT SAFETY INSTRUCTIONS Safety Precautions Do not attempt to avoid possible injury or death. Safety items throughout this manual. It is the...
... serious injury. WARNING WARNING indicates a potentially hazardous situation which is important but not hazard related. I M P O R TA N T Indicates installation, operation or maintenance information which , if not avoided, could result in minor or moderate injury. 2 Safety IMPORTANT SAFETY INSTRUCTIONS Safety Precautions Do not attempt to avoid possible injury or death. Safety items throughout this manual. It is the...

Installation Instructions
Page 5
... operating this page for getting the best results from your Range Use & Care Manual. Owner: Read your Range. Read all safety instructions. and Canada: 1-877- 4ELECTROLUX (1-877-435-3287) For online support and Internet product information: www.electroluxusa.com ©2005 Electrolux Home Products, Inc. QUESTIONS? For toll-free telephone support in the USA Finding Information 5 READ AND SAVE THESE INSTRUCTIONS NOTE Installer: Leave instructions...
... operating this page for getting the best results from your Range Use & Care Manual. Owner: Read your Range. Read all safety instructions. and Canada: 1-877- 4ELECTROLUX (1-877-435-3287) For online support and Internet product information: www.electroluxusa.com ©2005 Electrolux Home Products, Inc. QUESTIONS? For toll-free telephone support in the USA Finding Information 5 READ AND SAVE THESE INSTRUCTIONS NOTE Installer: Leave instructions...

Installation Instructions
Page 6
... 6 Preparing for Installation 7 Verifying Package Contents 7 Gas Supply Requirements 7 Gas and Electric Requirements Table 7 Electrical Power Supply Requirements 8 Gas and Electrical Rough-In 9 Cabinet/Counterop Preparation 10 Overal Dimensions 12 Installing the Anti-Tip Bracket 13 Gas Regulator and Electrical Conduit Location 16 Installation 17 Installing the Range Backguards 17 Removing the Door(s 18 Reinstalling the Door(s 18 Making the Electrical Connection 19 Making the Gas Connection 22 Installing the Range 23 Installing the Burner Components 23 Operation 24 Verifying...
... 6 Preparing for Installation 7 Verifying Package Contents 7 Gas Supply Requirements 7 Gas and Electric Requirements Table 7 Electrical Power Supply Requirements 8 Gas and Electrical Rough-In 9 Cabinet/Counterop Preparation 10 Overal Dimensions 12 Installing the Anti-Tip Bracket 13 Gas Regulator and Electrical Conduit Location 16 Installation 17 Installing the Range Backguards 17 Removing the Door(s 18 Reinstalling the Door(s 18 Making the Electrical Connection 19 Making the Gas Connection 22 Installing the Range 23 Installing the Burner Components 23 Operation 24 Verifying...

Installation Instructions
Page 7
... by opening the oven door and looking through the inlet air cooling grill. GAS AND ELECTRIC REQUIREMENTS TABLE Refer to the rating label located on the kick panel and/or the table below for the gas service being installed is correct for gas supply requirements. For LP conversion see the accompanying LP Conversion Kit. The electrical information in accordance with natural gas. Preparing for Installation 7 VERIFY PACKAGE CONTENTS • Use & Care Manual • Broiler Pan/Insert • Anti-tip Bracket •...
... by opening the oven door and looking through the inlet air cooling grill. GAS AND ELECTRIC REQUIREMENTS TABLE Refer to the rating label located on the kick panel and/or the table below for the gas service being installed is correct for gas supply requirements. For LP conversion see the accompanying LP Conversion Kit. The electrical information in accordance with natural gas. Preparing for Installation 7 VERIFY PACKAGE CONTENTS • Use & Care Manual • Broiler Pan/Insert • Anti-tip Bracket •...

Installation Instructions
Page 24
... burner with the oven selector knob. Repeat the ignition test for ignition to occur, at the shut-off valve during any pressure testing exceeding 1/2 psi (3.5kPa). • The range must be disconnected from the gas supply piping during any pressure testing at a time counterclockwise to "350" and selecting "BAKE" with gas flowing to adjust the flame height progressively. When installed properly, the flame will stop the heating process. Turn on the gas supply...
... burner with the oven selector knob. Repeat the ignition test for ignition to occur, at the shut-off valve during any pressure testing exceeding 1/2 psi (3.5kPa). • The range must be disconnected from the gas supply piping during any pressure testing at a time counterclockwise to "350" and selecting "BAKE" with gas flowing to adjust the flame height progressively. When installed properly, the flame will stop the heating process. Turn on the gas supply...


