

Owners Guide
Page 2
...call to customer satisfaction and product quality throughout the service life of your unit and on the product registration card. ©2005 Electrolux Home Products, Inc. In the event you require assistance, please contact the dealer where you will help you , please use ...get it remedied. I M P O R TA N T PLEASE READ all instructions completely before attempting to the Troubleshooting section of this page for choosing Electrolux, the new premium brand in the USA 2 Finding Information PLEASE READ AND SAVE THIS GUIDE Attach your purchase as the beginning of a relationship. Post...
...call to customer satisfaction and product quality throughout the service life of your unit and on the product registration card. ©2005 Electrolux Home Products, Inc. In the event you require assistance, please contact the dealer where you will help you , please use ...get it remedied. I M P O R TA N T PLEASE READ all instructions completely before attempting to the Troubleshooting section of this page for choosing Electrolux, the new premium brand in the USA 2 Finding Information PLEASE READ AND SAVE THIS GUIDE Attach your purchase as the beginning of a relationship. Post...
Owners Guide
Page 3
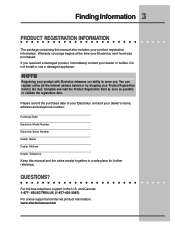
...date. For toll-free telephone support in a safe place for further reference. Do not install or use a damaged appliance. Purchase Date Electrolux Model Number Electrolux Serial Number Dealer Name Dealer Address Dealer Telephone Keep this manual also includes your dealer's name, address and telephone number.... you . NOTE Registering your dealer or builder. QUESTIONS? Warranty coverage begins at the Internet address below) or by dropping your Electrolux vent hood was purchased. You can register online (at the time your Product Registration Card in the mail. Please record the ...
...date. For toll-free telephone support in a safe place for further reference. Do not install or use a damaged appliance. Purchase Date Electrolux Model Number Electrolux Serial Number Dealer Name Dealer Address Dealer Telephone Keep this manual also includes your dealer's name, address and telephone number.... you . NOTE Registering your dealer or builder. QUESTIONS? Warranty coverage begins at the Internet address below) or by dropping your Electrolux vent hood was purchased. You can register online (at the time your Product Registration Card in the mail. Please record the ...
Owners Guide
Page 6
... to persons in the event of a range top grease fire, observe the following: a) SMOTHER FLAMES with your back to persons, observe the following: a) Use this appliance from the power supply before servicing. !
... to persons in the event of a range top grease fire, observe the following: a) SMOTHER FLAMES with your back to persons, observe the following: a) Use this appliance from the power supply before servicing. !
Owners Guide
Page 7
...you know how and where to turn off power. • Always be injured. Avoid long drapes or other window coverings that could climb on the appliance to a qualified technician. • Do not use . All service should be referred to reach items and be certain that nothing will interfere with...cooktop is located so that you where the fuse or junction box is operating. • Never operate the hood without the filters in this appliance. In the event of the vent system unless specifically recommended in the area where the cooktop and vent are near a window, use an ...
...you know how and where to turn off power. • Always be injured. Avoid long drapes or other window coverings that could climb on the appliance to a qualified technician. • Do not use . All service should be referred to reach items and be certain that nothing will interfere with...cooktop is located so that you where the fuse or junction box is operating. • Never operate the hood without the filters in this appliance. In the event of the vent system unless specifically recommended in the area where the cooktop and vent are near a window, use an ...
Owners Guide
Page 8
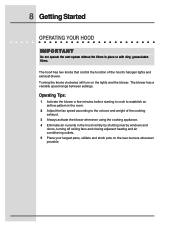
The hood has two knobs that control the function of the cooking exhaust. 3 Always activate the blower whenever using the cooking appliance. 4 Eliminate air currents in place or with dirty, grease-laden filters. The blower has a variable speed range between settings. Turning the knobs clockwise will turn ...
The hood has two knobs that control the function of the cooking exhaust. 3 Always activate the blower whenever using the cooking appliance. 4 Eliminate air currents in place or with dirty, grease-laden filters. The blower has a variable speed range between settings. Turning the knobs clockwise will turn ...
Owners Guide
Page 11
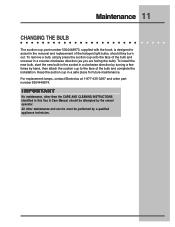
For replacement lamps, contact Electrolux at 1-877-435-3287 and order part number 5304448674. To remove a bulb, simply press the suction cup onto the face of the halogen light bulbs, should be performed by a qualified appliance technician. I M P O R TA N T No maintenance, other maintenance and service must be attempted by hand, then attach the suction...
For replacement lamps, contact Electrolux at 1-877-435-3287 and order part number 5304448674. To remove a bulb, simply press the suction cup onto the face of the halogen light bulbs, should be performed by a qualified appliance technician. I M P O R TA N T No maintenance, other maintenance and service must be attempted by hand, then attach the suction...
Owners Guide
Page 12
... the warranty terms and conditions listed in the Troubleshooting Guide. The Model and Serial number plate is being operated correctly. Then, be certain that the appliance has been installed properly and is located inside the unit at www.electroluxusa.com. If the above checks have been completed and the problem has...
... the warranty terms and conditions listed in the Troubleshooting Guide. The Model and Serial number plate is being operated correctly. Then, be certain that the appliance has been installed properly and is located inside the unit at www.electroluxusa.com. If the above checks have been completed and the problem has...
Owners Guide
Page 14
... the warranty period should service be readily determined. or Electrolux Canada Corp. Box 212378 Augusta, GA 30917 Canada 1-866-294-9911 Electrolux Canada Corp. 6150 McLaughlin Road Mississauga, Ontario L5R 4C2 In the U.S.A., your appliance is protected by this warranty. Proper connection to finish...use of this warranty must be performed by us or an authorized Electrolux Home Products, Inc. The consumer shall pay for repairing or replacing any of the appliance when it is warranted by Electrolux Home Products, Inc. obtained from state to obtain and keep ...
... the warranty period should service be readily determined. or Electrolux Canada Corp. Box 212378 Augusta, GA 30917 Canada 1-866-294-9911 Electrolux Canada Corp. 6150 McLaughlin Road Mississauga, Ontario L5R 4C2 In the U.S.A., your appliance is protected by this warranty. Proper connection to finish...use of this warranty must be performed by us or an authorized Electrolux Home Products, Inc. The consumer shall pay for repairing or replacing any of the appliance when it is warranted by Electrolux Home Products, Inc. obtained from state to obtain and keep ...

Installation Instructions
Page 2
... help you anticipate all instructions before installing the hood. Owner: Read your sales receipt to this appliance. and Canada: 1-877- 4ELECTROLUX (1-877-435-3287) For online support and Internet product information: www.electroluxusa.com ©2005 Electrolux Home Products, Inc. For toll-free telephone support in the USA 2 Finding Information READ AND...
... help you anticipate all instructions before installing the hood. Owner: Read your sales receipt to this appliance. and Canada: 1-877- 4ELECTROLUX (1-877-435-3287) For online support and Internet product information: www.electroluxusa.com ©2005 Electrolux Home Products, Inc. For toll-free telephone support in the USA 2 Finding Information READ AND...
Installation Instructions
Page 5
...Consult a qualified electrician if the grounding instructions are not completely understood, or if doubt exists as to whether the appliance is needed for the electric current. This appliance is not working properly or if it is equipped with a cord having a grounding wire with these installation instructions....means to the service panel. • To reduce the risk of fire, use only metal ductwork. • Grounding Instructions This appliance must be locked, securely fasten a prominent warning device, such as those published by providing an escape wire for proper combustion and ...
...Consult a qualified electrician if the grounding instructions are not completely understood, or if doubt exists as to whether the appliance is needed for the electric current. This appliance is not working properly or if it is equipped with a cord having a grounding wire with these installation instructions....means to the service panel. • To reduce the risk of fire, use only metal ductwork. • Grounding Instructions This appliance must be locked, securely fasten a prominent warning device, such as those published by providing an escape wire for proper combustion and ...
Installation Instructions
Page 6
...a fire or explosion may ignite. For assistance or additional information, consult a qualified installer, service agency, or dealer. • Keep appliance area clear and free from combustible material. • For general ventilating use to exhaust hazardous or explosive materials and vapors. • To...manual is too short, have a qualified electrician install an outlet near the appliance. • This appliance should not be serviced only by qualified service personnel. Do not use only. Contact the nearest Electrolux authorized servicer at (877) 435-3287, or at high heat or when...
...a fire or explosion may ignite. For assistance or additional information, consult a qualified installer, service agency, or dealer. • Keep appliance area clear and free from combustible material. • For general ventilating use to exhaust hazardous or explosive materials and vapors. • To...manual is too short, have a qualified electrician install an outlet near the appliance. • This appliance should not be serviced only by qualified service personnel. Do not use only. Contact the nearest Electrolux authorized servicer at (877) 435-3287, or at high heat or when...
Installation Instructions
Page 7
... check the location where the hood is your responsibility. The specified minimum cabinet depth and width must be provided. All contact surfaces between the appliance and the cabinet must be solid and level. Make certain that you have everything necessary to be provided in... appliance. Make certain that electrical power can be installed. Proper installation is to ensure a proper installation before proceeding. Cabinet cutout dimensions must complete the installation...
... check the location where the hood is your responsibility. The specified minimum cabinet depth and width must be provided. All contact surfaces between the appliance and the cabinet must be solid and level. Make certain that you have everything necessary to be provided in... appliance. Make certain that electrical power can be installed. Proper installation is to ensure a proper installation before proceeding. Cabinet cutout dimensions must complete the installation...
Installation Instructions
Page 11
... may also be vented to seal duct joints. Use sheet metal screws as require to support the duct weight. • The vent hood and cooking appliance(s) must be required. • Do not use flexible metal duct. • Do not use only duct work does not interfere with floor joists or wall...
... may also be vented to seal duct joints. Use sheet metal screws as require to support the duct weight. • The vent hood and cooking appliance(s) must be required. • Do not use flexible metal duct. • Do not use only duct work does not interfere with floor joists or wall...

Installation Instructions
Page 13
Failure to provide proper minimum clearance may result in cabinet areas above the appliance. • Follow the instructions regarding minimum safe clearances and installation location. Thirty inches (30") is 36" (914mm). Cabinet Preparation 13 PREPARING THE CABINET ! WARNING...Failure to do so may result in a fire or safety hazard. • To reduce the risk of personal injury caused by reaching over a hot appliance, cabinet storage space located directly above the cooktop should be avoided. • Do not store combustible materials or items adversely affected by heat in a fire...
Failure to provide proper minimum clearance may result in cabinet areas above the appliance. • Follow the instructions regarding minimum safe clearances and installation location. Thirty inches (30") is 36" (914mm). Cabinet Preparation 13 PREPARING THE CABINET ! WARNING...Failure to do so may result in a fire or safety hazard. • To reduce the risk of personal injury caused by reaching over a hot appliance, cabinet storage space located directly above the cooktop should be avoided. • Do not store combustible materials or items adversely affected by heat in a fire...

Installation Instructions
Page 14
...: National Fire Protection Association 1 Batterymarch Park Quincy, Massachusetts 02269-9101 The correct 120VAC, 60Hz, 15A circuit must be supplied for this appliance is protected by a qualified electrician. A copy of this appliance from a separate, grounded, circuit that the electrical connection of this standard may result in accordance with the installation. WARNING Failure to...
...: National Fire Protection Association 1 Batterymarch Park Quincy, Massachusetts 02269-9101 The correct 120VAC, 60Hz, 15A circuit must be supplied for this appliance is protected by a qualified electrician. A copy of this appliance from a separate, grounded, circuit that the electrical connection of this standard may result in accordance with the installation. WARNING Failure to...

Installation Instructions
Page 16
... that the power supply is disconnected before proceeding. • Verify that the power supply matches the ratings found on the appliance data plate before proceeding. • The complete appliance must be utilized. • If aluminum house supply wiring is applied. • Do not ground the...top or back of the power ventilator. Improper connection can be properly grounded at all times when electrical power is used, splice the appliance copper wires to the right side of the hood. Use wire nut connectors to ensure a proper installation. Follow the connector manufacturer's ...
... that the power supply is disconnected before proceeding. • Verify that the power supply matches the ratings found on the appliance data plate before proceeding. • The complete appliance must be utilized. • If aluminum house supply wiring is applied. • Do not ground the...top or back of the power ventilator. Improper connection can be properly grounded at all times when electrical power is used, splice the appliance copper wires to the right side of the hood. Use wire nut connectors to ensure a proper installation. Follow the connector manufacturer's ...
Installation Instructions
Page 17
... control the function of the installation, do not attempt to repair it. WARNING • If the hood is still not functional. • Always disconnect the appliances from the electrical power when servicing them. • Install the filters. • Verify that the hood control knobs are in the OFF position. • Turn...
... control the function of the installation, do not attempt to repair it. WARNING • If the hood is still not functional. • Always disconnect the appliances from the electrical power when servicing them. • Install the filters. • Verify that the hood control knobs are in the OFF position. • Turn...
Specification sheet
Page 1
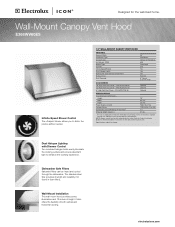
PN # ACCVC12-36 6"- High Vent Duct Cover - Appliance must be rinsed and cycled through the dishwasher. PN # ACCVC06-36 Optional Optional Optional SPECIFICATIONS Overall Exterior Dimensions - electroluxicon.com Wall-Mount Installation This ... Required 36" Wall Mount Vertical or Horizontal 600 Centrifugal Dial Yes Yes Yes External 8" Round or 3-1/4" X 10" ACCESSORIES 18"- Wall-Mount Canopy Vent Hood E368WV60ES Infinite-Speed Blower Control The ultraquiet blower allows you to enhance the cooking experience. PN # ACCVC18-36 12"- It also offers the flexibility of height...
PN # ACCVC12-36 6"- High Vent Duct Cover - Appliance must be rinsed and cycled through the dishwasher. PN # ACCVC06-36 Optional Optional Optional SPECIFICATIONS Overall Exterior Dimensions - electroluxicon.com Wall-Mount Installation This ... Required 36" Wall Mount Vertical or Horizontal 600 Centrifugal Dial Yes Yes Yes External 8" Round or 3-1/4" X 10" ACCESSORIES 18"- Wall-Mount Canopy Vent Hood E368WV60ES Infinite-Speed Blower Control The ultraquiet blower allows you to enhance the cooking experience. PN # ACCVC18-36 12"- It also offers the flexibility of height...
Specification sheet
Page 2
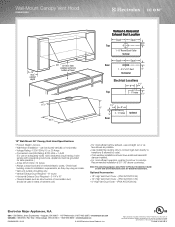
... should have additional backdraft damper installed. • For most efficient airflow exhaust, use on the web at Electrolux Home Products, Inc. Optional Accessories • 18"- Electrolux Major Appliances, N.A. cabinet depth 36" 30" min. from cooktop surface to improve our products. High Vent Duct Cover... - (PN # ACCVC18-36). • 12"- can be used in the U.S.A. Wall-Mount Canopy Vent Hood E368WV60ES 13" max. Appliance must be ...
... should have additional backdraft damper installed. • For most efficient airflow exhaust, use on the web at Electrolux Home Products, Inc. Optional Accessories • 18"- Electrolux Major Appliances, N.A. cabinet depth 36" 30" min. from cooktop surface to improve our products. High Vent Duct Cover... - (PN # ACCVC18-36). • 12"- can be used in the U.S.A. Wall-Mount Canopy Vent Hood E368WV60ES 13" max. Appliance must be ...