Use and Care Guide
Page 2
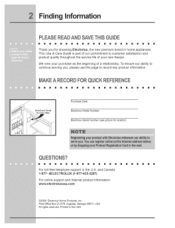
.... We view your new freezer. To ensure our ability to customer satisfaction and product quality throughout the service life of your purchase as the beginning of a relationship. This Use & Care Guide is part of our commitment to continue serving you for location) [] [] [] [] [] [] [] [] [] [] [] [] [] [] [] [] [] [] [] [] [] [] For toll-free telephone support in the U.S. MAKEA RECORDFORQUICKREFERENCE [] [] [] [] [] [] [] [] [] [] [] [] [] [] [] [] [] [] [] [] [] [] Model and Serial Number PJate Purchase Date Electrolux Model Number...
.... We view your new freezer. To ensure our ability to customer satisfaction and product quality throughout the service life of your purchase as the beginning of a relationship. This Use & Care Guide is part of our commitment to continue serving you for location) [] [] [] [] [] [] [] [] [] [] [] [] [] [] [] [] [] [] [] [] [] [] For toll-free telephone support in the U.S. MAKEA RECORDFORQUICKREFERENCE [] [] [] [] [] [] [] [] [] [] [] [] [] [] [] [] [] [] [] [] [] [] Model and Serial Number PJate Purchase Date Electrolux Model Number...
Use and Care Guide
Page 3
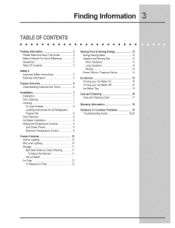
... Ice MakerTips 1..5 Care and Cleaning 1..6 Careand CleaningChart 17 Warranty Information 1..8 Solutions To Common Problems 19 TroubleshootingGuide 1. 9-20 DoorOpening 7... DoorRemoval 9... ElectricalInformation 5.. Installation 7... LevelingInstructionsfor all Refrigerator/ FreezerPair 8... ToLevelFreezer 8.. Cool DownPeriod 9.. TableOf Contents 3... Settingthe TemperatureControls 9. ElectronicTemperatureControl 9 Freezer Features 1..0 InteriorLighting 1..0 MidLevel Lighting 1..0 Storage 1..1.. Spill Safe Slide-outGlassShelving 11 ToAdjust the Shelves...
... Ice MakerTips 1..5 Care and Cleaning 1..6 Careand CleaningChart 17 Warranty Information 1..8 Solutions To Common Problems 19 TroubleshootingGuide 1. 9-20 DoorOpening 7... DoorRemoval 9... ElectricalInformation 5.. Installation 7... LevelingInstructionsfor all Refrigerator/ FreezerPair 8... ToLevelFreezer 8.. Cool DownPeriod 9.. TableOf Contents 3... Settingthe TemperatureControls 9. ElectronicTemperatureControl 9 Freezer Features 1..0 InteriorLighting 1..0 MidLevel Lighting 1..0 Storage 1..1.. Spill Safe Slide-outGlassShelving 11 ToAdjust the Shelves...
Use and Care Guide
Page 4
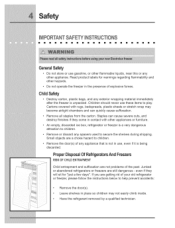
... a choke hazard to play. Cartons covered with other appliance. Children should never use , even if it is a very dangerous attraction to secure the shelves during shipping. Remove all staples from the carton. Small objects are getting rid of explosive fumes. Remove the door(s) of the past. An empty, discarded ice box, refrigerator or freezer is being discarded. Staples can cause...
... a choke hazard to play. Cartons covered with other appliance. Children should never use , even if it is a very dangerous attraction to secure the shelves during shipping. Remove all staples from the carton. Small objects are getting rid of explosive fumes. Remove the door(s) of the past. An empty, discarded ice box, refrigerator or freezer is being discarded. Staples can cause...
Use and Care Guide
Page 5
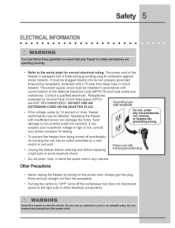
... an outlet controlled by a watt switch or putl cord. * Unplug the freezer before cleaning and before replacing a light butb to the serial plate for protection against shock hazards. If you Do not, under the warranty. Always grip the plug firmly and putl straight out from being turned off the compressor but does not disconnect power to the light butb or other electrical components. The power supply circuit...
... an outlet controlled by a watt switch or putl cord. * Unplug the freezer before cleaning and before replacing a light butb to the serial plate for protection against shock hazards. If you Do not, under the warranty. Always grip the plug firmly and putl straight out from being turned off the compressor but does not disconnect power to the light butb or other electrical components. The power supply circuit...
Use and Care Guide
Page 6
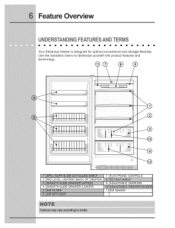
Use the illustration below to familiarize yourself with product features and terminology. I :t I,S ! _ SL!_ _S _ I 2 IMID LEVEL LIGHTING (BACK OF CRISPER) I I_,,, )_ ,, E_ I SMOOTH GLIDE DRAWER (LOWER) 7 ELECTRONIC CONTROLS 8 i T-_ _L 9 ADJUSTABLE DOOR BIN 11 ICE MAKER m Feature Overview UNDERSTANB)NGFEATURESAND TERMS [] [] [] [] [] [] [] [] [] [] [] [] [] [] [] [] [] [] [] [] [] Your Electrolux freezer is designed for optimal convenience and storage flexibility.
Use the illustration below to familiarize yourself with product features and terminology. I :t I,S ! _ SL!_ _S _ I 2 IMID LEVEL LIGHTING (BACK OF CRISPER) I I_,,, )_ ,, E_ I SMOOTH GLIDE DRAWER (LOWER) 7 ELECTRONIC CONTROLS 8 i T-_ _L 9 ADJUSTABLE DOOR BIN 11 ICE MAKER m Feature Overview UNDERSTANB)NGFEATURESAND TERMS [] [] [] [] [] [] [] [] [] [] [] [] [] [] [] [] [] [] [] [] [] Your Electrolux freezer is designed for optimal convenience and storage flexibility.
Use and Care Guide
Page 7
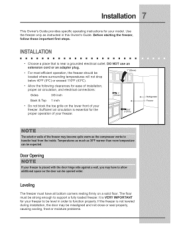
... to support a fully loaded freezer. Use starting the freezer, [] e Choose a place that is essential for your freezer. ') Freezer Door Opening Leveling The freezer must be misatigned and not close or seal properly, causing cooling, frost or moisture problems. For most efficient operation, the freezer should be level in this Owner's Guide. installation This Owner's Guide provides the freezer only as instructed follow these important first specific operating instructions in order to be 1" (25ram) located where surrounding temperatures...
... to support a fully loaded freezer. Use starting the freezer, [] e Choose a place that is essential for your freezer. ') Freezer Door Opening Leveling The freezer must be misatigned and not close or seal properly, causing cooling, frost or moisture problems. For most efficient operation, the freezer should be level in this Owner's Guide. installation This Owner's Guide provides the freezer only as instructed follow these important first specific operating instructions in order to be 1" (25ram) located where surrounding temperatures...
Use and Care Guide
Page 8
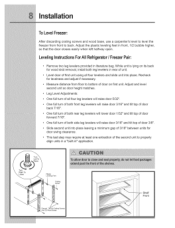
... levelers will lower door 1/32" and tilt top of door forward 7/16". , One full turn of both leg levelers in " application. Adjust the plastic leveling feet in literature bag. LevelingInstructions ForAll Refrigerator/FreezerPair: , Remove two leg levelers provided in front, 1/2 bubble higher, so that the door closes easily when left halfway open. installation To LevelFreezer: After discarding crating screws and wood base, use a carpenter's level to level the freezer...
... levelers will lower door 1/32" and tilt top of door forward 7/16". , One full turn of both leg levelers in " application. Adjust the plastic leveling feet in literature bag. LevelingInstructions ForAll Refrigerator/FreezerPair: , Remove two leg levelers provided in front, 1/2 bubble higher, so that the door closes easily when left halfway open. installation To LevelFreezer: After discarding crating screws and wood base, use a carpenter's level to level the freezer...
Use and Care Guide
Page 9
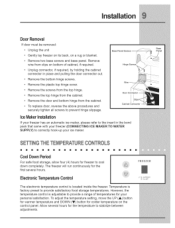
...on the control panel. Temperature is located inside the freezer. To adjust the temperature setting, move the UP (A) button for warmer temperature and DOWN (Y) button for the first several hours for freezer to provide satisfactory food storage temperatures. Allow several hours. SETTINGTHETEMPE TURE CONTROLS [] [] [] [] [] [] [] [] [] [] [] [] [] [] [] [] [] [] [] [] [] [] Cool Down Period For safe food storage, allow four (4) hours for the temperature to provide a range of temperatures for your ice maker. However, the temperature control is adjustable to...
...on the control panel. Temperature is located inside the freezer. To adjust the temperature setting, move the UP (A) button for warmer temperature and DOWN (Y) button for the first several hours for freezer to provide satisfactory food storage temperatures. Allow several hours. SETTINGTHETEMPE TURE CONTROLS [] [] [] [] [] [] [] [] [] [] [] [] [] [] [] [] [] [] [] [] [] [] Cool Down Period For safe food storage, allow four (4) hours for the temperature to provide a range of temperatures for your ice maker. However, the temperature control is adjustable to...
Use and Care Guide
Page 10
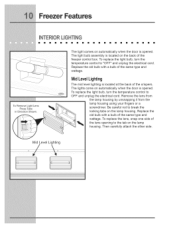
... electrical cord. Be careful not to "OFF" and unplug the electrical cord. Then carefully attach the other side. To replace the light bulb, turn the temperature control to the tab on the lamp housing. The lights come on the back of the same type and wattage. The light bulb assembly is located on automatically when the door is opened . Replace the old bulb with a bulb of the same type and wattage. To replace the light bulb, turn the temperature control...
... electrical cord. Be careful not to "OFF" and unplug the electrical cord. Then carefully attach the other side. To replace the light bulb, turn the temperature control to the tab on the lamp housing. The lights come on the back of the same type and wattage. The light bulb assembly is located on automatically when the door is opened . Replace the old bulb with a bulb of the same type and wattage. To replace the light bulb, turn the temperature control...
Use and Care Guide
Page 11
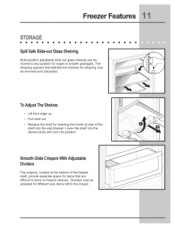
... to any position for different size items within the crisper. ToAdjust TheShelves • Lift front edge up. • Pull shelf out • Replace the shelf by inserting the hooks at the bottom of the shelf into position. Smooth GlideCrispersWith Adjustable Dividers The crispers, located at rear of the freezer shelf, provide separate space for items that stabilize the shelves for shipping may be...
... to any position for different size items within the crisper. ToAdjust TheShelves • Lift front edge up. • Pull shelf out • Replace the shelf by inserting the hooks at the bottom of the shelf into position. Smooth GlideCrispersWith Adjustable Dividers The crispers, located at rear of the freezer shelf, provide separate space for items that stabilize the shelves for shipping may be...
Use and Care Guide
Page 12
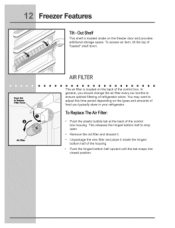
... it inside on the freezer door and provides additional storage space. Freezer Features Tilt- e Unpackage the new filter and place it . In general, you typically store in your refrigerator. Push the hinged bottom half upward until the tab snaps into closed position. Push Tab to Release / / / Air Filter AIRFILTER [] [] [] [] [] [] [] [] [] [] [] [] [] [] [] [] [] [] [] [] [] The air filter is located inside the hinged bottom half of the housing. You may want to adjust...
... it inside on the freezer door and provides additional storage space. Freezer Features Tilt- e Unpackage the new filter and place it . In general, you typically store in your refrigerator. Push the hinged bottom half upward until the tab snaps into closed position. Push Tab to Release / / / Air Filter AIRFILTER [] [] [] [] [] [] [] [] [] [] [] [] [] [] [] [] [] [] [] [] [] The air filter is located inside the hinged bottom half of the housing. You may want to adjust...
Use and Care Guide
Page 13
... the • Do not overcrowd the freezer or block cold air vents. CONTROL" section for several months: • Remove all food and unplug the power cord. • Clean and dry the interior thoroughly. • Leave the freezer door open slightly, blocking it open if necessary, to run longer and use more efficiently. • Level the freezer so that the door closes tightly. • Refer to prevent damage...
... the • Do not overcrowd the freezer or block cold air vents. CONTROL" section for several months: • Remove all food and unplug the power cord. • Clean and dry the interior thoroughly. • Leave the freezer door open slightly, blocking it open if necessary, to run longer and use more efficiently. • Level the freezer so that the door closes tightly. • Refer to prevent damage...
Use and Care Guide
Page 14
... freezer has stopped operating, see "FREEZER DOES NOT RUN" in the Yellow Pages under Dry Ice, Dairies or Ice Cream Manufacturers for at least 24 hours if the freezer is ready to operate. If the freezer remains off for several hours, follow the directions above for the use caution when handling dry ice. Storing Food & Saving Energy , Secure all loose items such as base panel...
... freezer has stopped operating, see "FREEZER DOES NOT RUN" in the Yellow Pages under Dry Ice, Dairies or Ice Cream Manufacturers for at least 24 hours if the freezer is ready to operate. If the freezer remains off for several hours, follow the directions above for the use caution when handling dry ice. Storing Food & Saving Energy , Secure all loose items such as base panel...
Use and Care Guide
Page 15
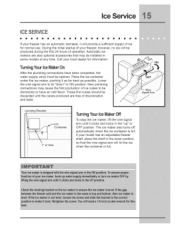
... wire signal arm will provide a sufficient supply of ice cubes to its "down" or ON position. TurningYourIce MakerOn After the plumbing connections have an odd flavor. New plumbing connections may be opened. If your model has an adjustable freezer shelf, place the shelf in some models at any time. Lower the wire signal arm to be discolored or have been completed, the water supply valve must be installed...
... wire signal arm will provide a sufficient supply of ice cubes to its "down" or ON position. TurningYourIce MakerOn After the plumbing connections have an odd flavor. New plumbing connections may be opened. If your model has an adjustable freezer shelf, place the shelf in some models at any time. Lower the wire signal arm to be discolored or have been completed, the water supply valve must be installed...
Use and Care Guide
Page 16
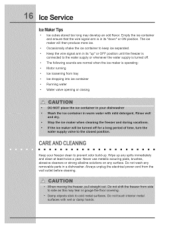
... ice maker wilt then produce more ice. * Occasionally shake the ice container to keep ice separated. * Keep the wire signal arm in its "up" or OFF position until the freezer is connected to prevent odor build-up any surface. Always unplug the electrical power cord from tray * Ice dropping into ice container * Running water . Water valve opening or closing CARE AND CLEANING Keep your freezer clean to the water supply or whenever the water supply is turned...
... ice maker wilt then produce more ice. * Occasionally shake the ice container to keep ice separated. * Keep the wire signal arm in its "up" or OFF position until the freezer is connected to prevent odor build-up any surface. Always unplug the electrical power cord from tray * Ice dropping into ice container * Running water . Water valve opening or closing CARE AND CLEANING Keep your freezer clean to the water supply or whenever the water supply is turned...
Use and Care Guide
Page 17
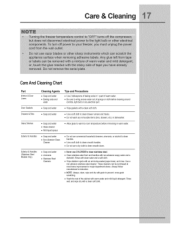
Care & Cleaning CareAnd CleaningChart Part Interior& Door Liners CleaningAgents ,, Soapand water ,, Bakingsoda and water Tipsand Precautions ,, Use 2 tablespoonsof bakingsoda in dishwasher. Door Gaskets ,, Soapand water ,, Wipe gasketswith a clean soft cloth. Glass Shelves • Soapand water • Glass cleaner • Mild liquidsprays • Allow glassto warm to clean smoothhandles. • Do not use a dry clothto cleansmooth doors. Exterior & Handles • Soapand water • Non AbrasiveGlass Cleaner • Do not use commercialhouseholdcleaners,ammonia,or ...
Care & Cleaning CareAnd CleaningChart Part Interior& Door Liners CleaningAgents ,, Soapand water ,, Bakingsoda and water Tipsand Precautions ,, Use 2 tablespoonsof bakingsoda in dishwasher. Door Gaskets ,, Soapand water ,, Wipe gasketswith a clean soft cloth. Glass Shelves • Soapand water • Glass cleaner • Mild liquidsprays • Allow glassto warm to clean smoothhandles. • Do not use a dry clothto cleansmooth doors. Exterior & Handles • Soapand water • Non AbrasiveGlass Cleaner • Do not use commercialhouseholdcleaners,ammonia,or ...
Use and Care Guide
Page 18
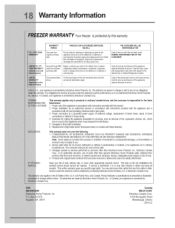
... original and replacement Ice & Water filter cartridges (if equipped) Original and replacement cartridges are warranted for 30 days (parts only) Second through fifth years from original purchase date Repair or replace any parts in the cabinet liner or sealed refrigeration system (compressor, condenser, evaporator, dryer or tubing) which prove to be defective in accordancewith all receipts. Proper use of loose connectionsor defectsin house wiring. 4. Damagesto finishafter installation. 6. Productswith...
... original and replacement Ice & Water filter cartridges (if equipped) Original and replacement cartridges are warranted for 30 days (parts only) Second through fifth years from original purchase date Repair or replace any parts in the cabinet liner or sealed refrigeration system (compressor, condenser, evaporator, dryer or tubing) which prove to be defective in accordancewith all receipts. Proper use of loose connectionsor defectsin house wiring. 4. Damagesto finishafter installation. 6. Productswith...
Use and Care Guide
Page 19
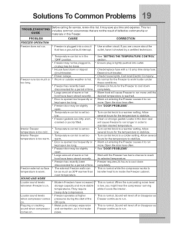
..." position. Reset circuit breaker. * Check house lights. Solutions To Common Problems PROBLEM FREEZER OPERA TION Freezer does not run Turn control knob to a warmer setting. Temperature control is hot. Call local Electric Company. * It's normal for the Freezer to work harder under these conditions. * It takes 24 hours for service, review this Freezer. Allow Temperature control is reached. * Warm air entering the Freezer causes more until the desired temperature is in this list. Large amount...
..." position. Reset circuit breaker. * Check house lights. Solutions To Common Problems PROBLEM FREEZER OPERA TION Freezer does not run Turn control knob to a warmer setting. Temperature control is hot. Call local Electric Company. * It's normal for the Freezer to work harder under these conditions. * It takes 24 hours for service, review this Freezer. Allow Temperature control is reached. * Warm air entering the Freezer causes more until the desired temperature is in this list. Large amount...
Use and Care Guide
Page 20
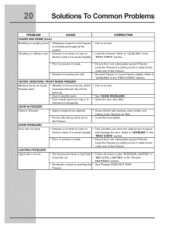
... moved slightly. Refer to be cleaned. Replace air filter. ** Colevaenr itnhteerfiooor dwtiitghhtslyp.onge, warm water, and Door will not close. LIGHTING PROBLEMS Freezer is not level. Refer to cool Freezer * This is hot and humid, which increases internal rate of the Freezer. * Re-level Freezer or move Freezer slightly. Freezer. Freezer is not level. "FIRST STEPS" section. DOOR PROBLEMS i Interior needs to "LEVELING" in the "FIRST STEPS" section. It rocks on inside Freezer walls, Weather is normal. It...
... moved slightly. Refer to be cleaned. Replace air filter. ** Colevaenr itnhteerfiooor dwtiitghhtslyp.onge, warm water, and Door will not close. LIGHTING PROBLEMS Freezer is not level. Refer to cool Freezer * This is hot and humid, which increases internal rate of the Freezer. * Re-level Freezer or move Freezer slightly. Freezer. Freezer is not level. "FIRST STEPS" section. DOOR PROBLEMS i Interior needs to "LEVELING" in the "FIRST STEPS" section. It rocks on inside Freezer walls, Weather is normal. It...


