Installation Instructions (All Languages)
Page 1
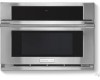
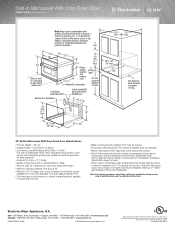
... distance between the Microwave Oven and the wall oven cutouts should not be performed by a qualified installer. E1 TINSEB504MRR0 MICROWAVE WALL OVEN INSTALLATION INSTRUCTIONS Installation and service must be capable of supporting 150 pounds (68.0 kg) for the Microwave Wall Oven only. NOTE 1. It is required the outlet be a dedicated 120 volts with a 15amp rating for local electrical inspector's use. I G CL 6" 4" F 18" Figure 1 PRODUCT DIMENSIONS MODEL A B C D 27" (68.8) Microwave 27" (68.8) 221...
... distance between the Microwave Oven and the wall oven cutouts should not be performed by a qualified installer. E1 TINSEB504MRR0 MICROWAVE WALL OVEN INSTALLATION INSTRUCTIONS Installation and service must be capable of supporting 150 pounds (68.0 kg) for the Microwave Wall Oven only. NOTE 1. It is required the outlet be a dedicated 120 volts with a 15amp rating for local electrical inspector's use. I G CL 6" 4" F 18" Figure 1 PRODUCT DIMENSIONS MODEL A B C D 27" (68.8) Microwave 27" (68.8) 221...

Installation Instructions (All Languages)
Page 2
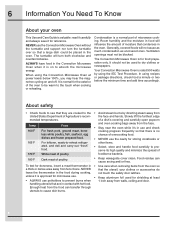
... Owner's Guide for any electric wall oven or warming drawer. 2. Anti-tip Brackets Installation Instructions 1. This oven can be level from side to the Consumer Keep these installation instructions before installing the Microwave Wall Oven. Carpentry Refer to the built-in the cabinet as misaligned or bent door, damaged door seals and sealling surfaces, broken or loose door hinges and latches and dent inside the oven cavity before supplying power to the Microwave Wall Oven. Observe all governing codes...
... Owner's Guide for any electric wall oven or warming drawer. 2. Anti-tip Brackets Installation Instructions 1. This oven can be level from side to the Consumer Keep these installation instructions before installing the Microwave Wall Oven. Carpentry Refer to the built-in the cabinet as misaligned or bent door, damaged door seals and sealling surfaces, broken or loose door hinges and latches and dent inside the oven cavity before supplying power to the Microwave Wall Oven. Observe all governing codes...
Installation Instructions (All Languages)
Page 3
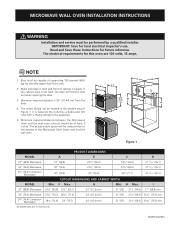
...finished anti-tip bracket installation removing oven for servicing, open the door and locate the two holes on a table or stand. See Figure 3. 4. See Figure 4. The oven side bracket will clip into the electrical outlet. anti-tip bracket installation Cutout Width (See dimensions below) 3. MICROWAVE WALL OVEN INSTALLATION INSTRUCTIONS Microwave Wall Oven Installation Two persons are required to the opening . To pull out the oven for servicing Anti-Tip Bracket installed in cabinet Oven Bracket Oven removed from the cabinet Oven Cabinet Anti-Tip Bracket released Right...
...finished anti-tip bracket installation removing oven for servicing, open the door and locate the two holes on a table or stand. See Figure 3. 4. See Figure 4. The oven side bracket will clip into the electrical outlet. anti-tip bracket installation Cutout Width (See dimensions below) 3. MICROWAVE WALL OVEN INSTALLATION INSTRUCTIONS Microwave Wall Oven Installation Two persons are required to the opening . To pull out the oven for servicing Anti-Tip Bracket installed in cabinet Oven Bracket Oven removed from the cabinet Oven Cabinet Anti-Tip Bracket released Right...
Installation Instructions (All Languages)
Page 4
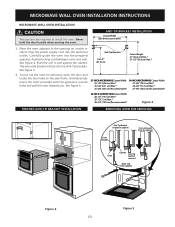
... warranty in your Use & Care Guide for or making inquires about your product and/or need to include the model and serial numbers and a lot number or letter from the serial plate on the oven front frame. PRODUCT IDENTIFICATION Serial Plate Menu Label Figure 6 E4 See Figure 6. Please call or write if you have inquiries about your oven, always be sure to order parts. MICROWAVE WALL OVEN INSTALLATION INSTRUCTIONS Model and Serial Number Location The serial plate...
... warranty in your Use & Care Guide for or making inquires about your product and/or need to include the model and serial numbers and a lot number or letter from the serial plate on the oven front frame. PRODUCT IDENTIFICATION Serial Plate Menu Label Figure 6 E4 See Figure 6. Please call or write if you have inquiries about your oven, always be sure to order parts. MICROWAVE WALL OVEN INSTALLATION INSTRUCTIONS Model and Serial Number Location The serial plate...

Specification sheet
Page 1
... in combination with both microwave technology and high-speed convection. Specifications subject to Product Installation Guide for consistent results and 30% faster than normal baking. Built-In Microwave With Drop-Down Door E30MO75HPS professional series Premium Sensor Functions A sensor detects a release of humidity from your food for detailed installation instructions on adequately wired 120V, dedicated circuit having 2-wire service with Blue Indicators Yes Electronic Clock & Timer Yes Humidity Sensor Yes Power Levels 11 Touch Pad Controls 37 Auto Start Yes Auto Defrost...
... in combination with both microwave technology and high-speed convection. Specifications subject to Product Installation Guide for consistent results and 30% faster than normal baking. Built-In Microwave With Drop-Down Door E30MO75HPS professional series Premium Sensor Functions A sensor detects a release of humidity from your food for detailed installation instructions on adequately wired 120V, dedicated circuit having 2-wire service with Blue Indicators Yes Electronic Clock & Timer Yes Humidity Sensor Yes Power Levels 11 Touch Pad Controls 37 Auto Start Yes Auto Defrost...
Specification sheet
Page 2
... level and cabinet front must be square. • Grounded outlet should NOT be used in combination with any Electrolux ICON® Electric Single Wall Oven and / or Warmer Drawer. (Refer to model-specific Combination Installation Specification pages on adequately wired 120V, dedicated circuit having 2-wire service with a separate ground wire. Note: For planning purposes only. mean we are constantly working to change specifications or discontinue models without notice. Built-In Microwave With Drop-Down Door E30MO75HPS professional series...
... level and cabinet front must be square. • Grounded outlet should NOT be used in combination with any Electrolux ICON® Electric Single Wall Oven and / or Warmer Drawer. (Refer to model-specific Combination Installation Specification pages on adequately wired 120V, dedicated circuit having 2-wire service with a separate ground wire. Note: For planning purposes only. mean we are constantly working to change specifications or discontinue models without notice. Built-In Microwave With Drop-Down Door E30MO75HPS professional series...

Specification sheet
Page 3
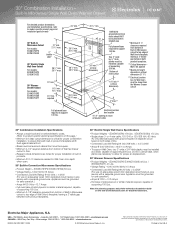
... 23-1/4" clearance needed for Wall Oven door depth when open. 30" Built-In Convection Microwaves Specifications • Product Weight - (E30MO75HPS / E30MO75HSS) 84 Lbs. • Voltage Rating - 120V / 60 Hz / 15 Amps • Connected Load (kW Rating) @ 120 Volts = 1.6 kW (For use on adequately wired 120V, dedicated circuit having 2-wire service with ground required on separate circuit fused on this page.) • Minimum 24"deep cutout dimension is critical for proper combination installation, to...
... 23-1/4" clearance needed for Wall Oven door depth when open. 30" Built-In Convection Microwaves Specifications • Product Weight - (E30MO75HPS / E30MO75HSS) 84 Lbs. • Voltage Rating - 120V / 60 Hz / 15 Amps • Connected Load (kW Rating) @ 120 Volts = 1.6 kW (For use on adequately wired 120V, dedicated circuit having 2-wire service with ground required on separate circuit fused on this page.) • Minimum 24"deep cutout dimension is critical for proper combination installation, to...
Specification sheet
Page 4
..." Combination Installation Specifications • Always consult local and /or national electric codes. (Refer to product-specific electrical specifications on this page.) • Minimum 24"deep cutout dimension is critical for safe operation.) • Amps @ 120V = 3.75 Amps • Full base of solid plywood or similar material required, capable of built-In products. • Minimum 23-1/4" clearance needed for Wall Oven door depth when open. 30" Built-In Convection Microwaves Specifications • Product Weight - (E30MO75HPS / E30MO75HSS...
..." Combination Installation Specifications • Always consult local and /or national electric codes. (Refer to product-specific electrical specifications on this page.) • Minimum 24"deep cutout dimension is critical for safe operation.) • Amps @ 120V = 3.75 Amps • Full base of solid plywood or similar material required, capable of built-In products. • Minimum 23-1/4" clearance needed for Wall Oven door depth when open. 30" Built-In Convection Microwaves Specifications • Product Weight - (E30MO75HPS / E30MO75HSS...
Owners Guide
Page 3
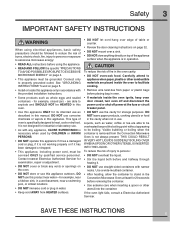
... oven door closed jars - Contact nearest Electrolux Authorized Servicer for its intended use corrosive chemicals or vapors in this appliance. Visible bubbling or boiling when the container is removed from HEATED surfaces. • DO NOT let cord hang over edge of table or counter. • Review the door cleaning instructions on page 32. • Do not mount over a sink. • Do not store anything directly on...
... oven door closed jars - Contact nearest Electrolux Authorized Servicer for its intended use corrosive chemicals or vapors in this appliance. Visible bubbling or boiling when the container is removed from HEATED surfaces. • DO NOT let cord hang over edge of table or counter. • Review the door cleaning instructions on page 32. • Do not mount over a sink. • Do not store anything directly on...
Owners Guide
Page 6
... a dish's covering and carefully open popcorn Temp Food and oven cooking bags away from the face. • Stay near the oven while it for shielding at power levels below 100%, you may hear the magnetron cycling on to prevent burns when 1 inch away from walls, ceiling and door. dishes and frozen prepared food. • NEVER use potholders to absorb the microwave energy. Enough heat from the food can...
... a dish's covering and carefully open popcorn Temp Food and oven cooking bags away from the face. • Stay near the oven while it for shielding at power levels below 100%, you may hear the magnetron cycling on to prevent burns when 1 inch away from walls, ceiling and door. dishes and frozen prepared food. • NEVER use potholders to absorb the microwave energy. Enough heat from the food can...

Owners Guide
Page 8
... foil. Metal twist ties Oven cooking bags YES - Convection, Broil, Slow Cook YES - Broil. YES - Broil. No cover. Keep 1 inch away from walls of aluminum foil placed smoothly on food can be used if 3/4 filled with metallic trim, screws, bands, handles. Do not use metal twist ties. Good for large meats or foods that need tenderizing. No cover. Small flat pieces of oven. YES - Excellent. For...
... foil. Metal twist ties Oven cooking bags YES - Convection, Broil, Slow Cook YES - Broil. YES - Broil. No cover. Keep 1 inch away from walls of aluminum foil placed smoothly on food can be used if 3/4 filled with metallic trim, screws, bands, handles. Do not use metal twist ties. Good for large meats or foods that need tenderizing. No cover. Small flat pieces of oven. YES - Excellent. For...
Owners Guide
Page 10
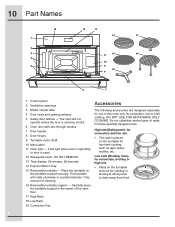
... the turntable and use in the center of racks for two-level cooking, such as layer cakes, muffins, etc. Carefully place the turntable support in this oven only for convection and low mix. • This rack is placed on the turntable support securely. The turntable will not operate unless the door is open. 12 Waveguide cover: DO NOT REMOVE. 13 Time display: 99 minutes, 99 seconds 14 Popcorn/Bacon Tray 15 Removable turntable - Low rack (Broiling rack) - 10 Part...
... the turntable and use in the center of racks for two-level cooking, such as layer cakes, muffins, etc. Carefully place the turntable support in this oven only for convection and low mix. • This rack is placed on the turntable support securely. The turntable will not operate unless the door is open. 12 Waveguide cover: DO NOT REMOVE. 13 Time display: 99 minutes, 99 seconds 14 Popcorn/Bacon Tray 15 Removable turntable - Low rack (Broiling rack) - 10 Part...
Owners Guide
Page 14
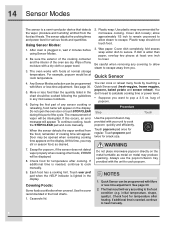
... cook manually. 9. Be careful when removing any moisture with your unit to secure. After oven is lighted in the display. Cover dish loosely; During the first part of the cycle. At this time, you may be at least one inch to escape. The oven works with More or less time adjustment. Plastic wrap should be programmed with foods at normal storage temperature. See page 30. 5. Touch popcorn...
... cook manually. 9. Be careful when removing any moisture with your unit to secure. After oven is lighted in the display. Cover dish loosely; During the first part of the cycle. At this time, you may be at least one inch to escape. The oven works with More or less time adjustment. Plastic wrap should be programmed with foods at normal storage temperature. See page 30. 5. Touch popcorn...
Owners Guide
Page 19
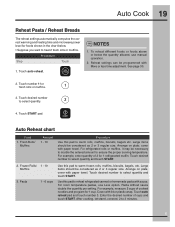
... size. For room temperature pastas, use manual operation. 2. Cover with paper towel. Enter the desired number of cooked noodles and program for 1 cup. To reheat different foods or foods above or below . • Suppose you want to heat 2 fresh rolls or muffins. Touch desired number to select quantity and touch START. 2. Auto Reheat chart Food 1. Touch desired number to select quantity. 2 4. Arrange on plate; NOTES 1. Touch number 1 for 1 refrigerated muffin. Arrange on plate, cover...
... size. For room temperature pastas, use manual operation. 2. Cover with paper towel. Enter the desired number of cooked noodles and program for 1 cup. To reheat different foods or foods above or below . • Suppose you want to heat 2 fresh rolls or muffins. Touch desired number to select quantity and touch START. 2. Auto Reheat chart Food 1. Touch desired number to select quantity. 2 4. Arrange on plate; NOTES 1. Touch number 1 for 1 refrigerated muffin. Arrange on plate, cover...

Owners Guide
Page 20
... lighted in display for hamburgers, 1 touch number 1. See page 30. 2. For well done, touch POWER LEVEL once; Open the door and place hamburgers into oven. Touch START. 2. Touch number pad to broil 2 hamburgers. Auto Broil Chart Setting/Food Amount Rack Procedure 1. If you want to enter quantity. 2 Follow information in the display. E Place on low rack. Ex: for cooking information. 20 Convection Automatic Operation This section of the operation manual offers instructions for preparing 12 popular foods using Auto...
... lighted in display for hamburgers, 1 touch number 1. See page 30. 2. For well done, touch POWER LEVEL once; Open the door and place hamburgers into oven. Touch START. 2. Touch number pad to broil 2 hamburgers. Auto Broil Chart Setting/Food Amount Rack Procedure 1. If you want to enter quantity. 2 Follow information in the display. E Place on low rack. Ex: for cooking information. 20 Convection Automatic Operation This section of the operation manual offers instructions for preparing 12 popular foods using Auto...

Owners Guide
Page 26
... Manual Convection and Automatic Mix Cooking NOTES To program only preheat, touch the Start pad after time has elapsed. Meats are excellent cooking utensils for mix cooking. The oven cannot be roasted and tenderized using the high rack for Convection and Automatic Mix Cooking Your Convection Microwave Oven can cook any food perfectly because of the number of ways it is a discharge of the turntable. It interferes with the turntable, oven walls or accessory racks...
... Manual Convection and Automatic Mix Cooking NOTES To program only preheat, touch the Start pad after time has elapsed. Meats are excellent cooking utensils for mix cooking. The oven cannot be roasted and tenderized using the high rack for Convection and Automatic Mix Cooking Your Convection Microwave Oven can cook any food perfectly because of the number of ways it is a discharge of the turntable. It interferes with the turntable, oven walls or accessory racks...
Owners Guide
Page 27
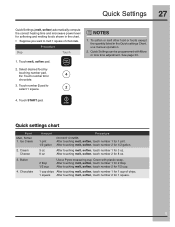
... foods except the quantity listed in the chart. • Suppose you want to select 1 square. 2 NOTES 1. Chocolate Amount 1 pint 1/2 gallon 3 oz 8 oz Procedure DO NOT COVER. After touching melt, soften, touch number 2 for softening and melting foods shown in the Quick settings Chart, use manual operation. 2. Butter 4. Quick Settings 27 Quick Settings (melt, soften) automatically compute the correct heating time and microwave power level for 8 oz. 2 tbsp 1/2 cup Use a Pyrex measuring cup. Touch number...
... foods except the quantity listed in the chart. • Suppose you want to select 1 square. 2 NOTES 1. Chocolate Amount 1 pint 1/2 gallon 3 oz 8 oz Procedure DO NOT COVER. After touching melt, soften, touch number 2 for softening and melting foods shown in the Quick settings Chart, use manual operation. 2. Butter 4. Quick Settings 27 Quick Settings (melt, soften) automatically compute the correct heating time and microwave power level for 8 oz. 2 tbsp 1/2 cup Use a Pyrex measuring cup. Touch number...

Owners Guide
Page 32
... waveguide cover is long time/high temperature cooking. Use top rack of the liquid cleaner in cleaning the touch control panel. The turntable motor shaft is generated to inactivate the oven during cleaning. DO NOT USE ABRASIVE OR HARSH CLEANERS OR SCOURING PADS. Keep the waveguide cover clean to remove spatters may overheat and cause smoke or possibly catch fire. Do not remove the waveguide cover. Turntable/Turntable Support/Racks The turntable, turntable support and racks can be allowed to set...
... waveguide cover is long time/high temperature cooking. Use top rack of the liquid cleaner in cleaning the touch control panel. The turntable motor shaft is generated to inactivate the oven during cleaning. DO NOT USE ABRASIVE OR HARSH CLEANERS OR SCOURING PADS. Keep the waveguide cover clean to remove spatters may overheat and cause smoke or possibly catch fire. Do not remove the waveguide cover. Turntable/Turntable Support/Racks The turntable, turntable support and racks can be allowed to set...
Owners Guide
Page 35
... cover the following: 1. Food loss due to repair or replace appliance light bulbs, air filters, water filters, other consumables, or knobs, handles, or other appropriate payment record to use your appliance is installed, used other than in the home. 13. Service calls which do not involve malfunction or defects in materials or workmanship, or for appliances not in ordinary household use of parts other than genuine Electrolux parts...
... cover the following: 1. Food loss due to repair or replace appliance light bulbs, air filters, water filters, other consumables, or knobs, handles, or other appropriate payment record to use your appliance is installed, used other than in the home. 13. Service calls which do not involve malfunction or defects in materials or workmanship, or for appliances not in ordinary household use of parts other than genuine Electrolux parts...

Wiring Diagram
Page 8
... TURNTABLE MOTOR FAN MOTOR CONVECTION MOTOR DAMPER MOTOR TTM CM L.V. AH SENSOR DAMPER MISTOR SWITCH NOTE: 1. 2. *3. HOT WIRE(S) MUST BE CONNECTED TO THE TERMINAL WITH BLUE MARK ON THE LAMP SOCKET AND "H" MARK ON THE POWER SUPPLY CORD. Oven Schematic-Microwave Cooking Condition HEATING ELEMENT MONITOR SWITCH HEATING ELEMENT MONITOR SWITCH POWER TRANSFORMER CAPACITOR 0.94 " H.V. NOISE FILTER UNIT E30MO75HP / E30MO75HS WIRING DIAGRAM SCHEMATIC DIAGRAM (DOOR CLOSED,COOK OFF CONDITION) CONV. NOISE FILTER UNIT CONV. CIRCUITS SUBJECT TO CHANGE WITHOUT NOTICE WIRE COLOR CODES...
... TURNTABLE MOTOR FAN MOTOR CONVECTION MOTOR DAMPER MOTOR TTM CM L.V. AH SENSOR DAMPER MISTOR SWITCH NOTE: 1. 2. *3. HOT WIRE(S) MUST BE CONNECTED TO THE TERMINAL WITH BLUE MARK ON THE LAMP SOCKET AND "H" MARK ON THE POWER SUPPLY CORD. Oven Schematic-Microwave Cooking Condition HEATING ELEMENT MONITOR SWITCH HEATING ELEMENT MONITOR SWITCH POWER TRANSFORMER CAPACITOR 0.94 " H.V. NOISE FILTER UNIT E30MO75HP / E30MO75HS WIRING DIAGRAM SCHEMATIC DIAGRAM (DOOR CLOSED,COOK OFF CONDITION) CONV. NOISE FILTER UNIT CONV. CIRCUITS SUBJECT TO CHANGE WITHOUT NOTICE WIRE COLOR CODES...


