Specification sheet
Page 1
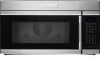
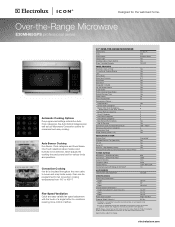
... must be programmed for safe operation. Specifications subject to brown and crisp foods evenly. Over-the-Range Microwave E30MH65GPS professional series Automatic Cooking Options Pre-programmed settings include five Auto Cook categories, five Auto Defrost categories as well as four...humidity to 450° F. High Speed (2 Level) Charcoal Filters (Recirculated Installation) / Grease Filters Convertible* Yes Yes Yes Yes 1 / 2 POWER RATINGS Microwave - (Watts@120 Volts) Convection - (Watts@120 Volts) Amps @ 120 Volts Frequency (Mhz) Voltage Rating Connected Load (kW Rating) @ 120 Volts&#...
... must be programmed for safe operation. Specifications subject to brown and crisp foods evenly. Over-the-Range Microwave E30MH65GPS professional series Automatic Cooking Options Pre-programmed settings include five Auto Cook categories, five Auto Defrost categories as well as four...humidity to 450° F. High Speed (2 Level) Charcoal Filters (Recirculated Installation) / Grease Filters Convertible* Yes Yes Yes Yes 1 / 2 POWER RATINGS Microwave - (Watts@120 Volts) Convection - (Watts@120 Volts) Amps @ 120 Volts Frequency (Mhz) Voltage Rating Connected Load (kW Rating) @ 120 Volts&#...
Specification sheet
Page 2
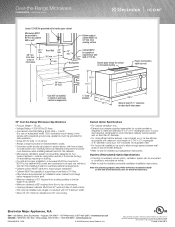
...33" maximum width. • Allow 25-1/2" minimum clearance for outside , using either vertical or horizontal ducting; Electrolux Major Appliances, N.A. High standards of microwave 16 1/2" min. Over-the-Range Microwave E30MH65GPS professional series Locate 120V/60Hz grounded outlet inside . • Refer to web for detailed instructions. Printed in....com CANADA • 5855 Terry Fox Way • Mississauga, ON L5V 3E4 • 1-800-265-8352 • electroluxicon.ca E30MH65GPS 12/08 © 2008 Electrolux Home Products, Inc. We reserve the right to improve our products.
...33" maximum width. • Allow 25-1/2" minimum clearance for outside , using either vertical or horizontal ducting; Electrolux Major Appliances, N.A. High standards of microwave 16 1/2" min. Over-the-Range Microwave E30MH65GPS professional series Locate 120V/60Hz grounded outlet inside . • Refer to web for detailed instructions. Printed in....com CANADA • 5855 Terry Fox Way • Mississauga, ON L5V 3E4 • 1-800-265-8352 • electroluxicon.ca E30MH65GPS 12/08 © 2008 Electrolux Home Products, Inc. We reserve the right to improve our products.
Installation Instructions
Page 1
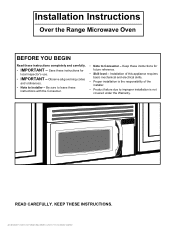
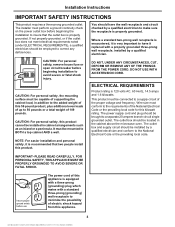
Keep these instructions completely and carefully. • IMPORTANT - READ CAREFULLY. Installation Instructions Over the Range Microwave Oven BEFORE YOU BEGIN Read these instructions for local inspector's use. • IMPORTANT - Be sure to Consumer - Installation of this appliance requires basic mechanical and ...
Keep these instructions completely and carefully. • IMPORTANT - READ CAREFULLY. Installation Instructions Over the Range Microwave Oven BEFORE YOU BEGIN Read these instructions for local inspector's use. • IMPORTANT - Be sure to Consumer - Installation of this appliance requires basic mechanical and ...
Installation Instructions
Page 2
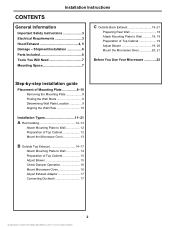
...Rear Wall 18 Attach Mounting Plate to Wall 18, 19 Preparation of Top Cabinet 19 Adjust Blower 19, 20 Mount the Microwave Oven 20, 21 Before You Use Your Microwave 22 Step-by-step installation guide Placement of Mounting Plate 8-10 Removing the Mounting Plate 8 Finding the Wall Studs 8 ... the Wall Plate 10 Installation Types 11-21 A Recirculating 12-13 Attach Mounting Plate to Wall 12 Preparation of Top Cabinet 12 Mount the Microwave Oven 13 B Outside Top Exhaust 14-17 Attach Mounting Plate to Wall 14 Preparation of Top Cabinet 15 Adjust Blower 15 Check Damper Operation ...
...Rear Wall 18 Attach Mounting Plate to Wall 18, 19 Preparation of Top Cabinet 19 Adjust Blower 19, 20 Mount the Microwave Oven 20, 21 Before You Use Your Microwave 22 Step-by-step installation guide Placement of Mounting Plate 8-10 Removing the Mounting Plate 8 Finding the Wall Studs 8 ... the Wall Plate 10 Installation Types 11-21 A Recirculating 12-13 Attach Mounting Plate to Wall 12 Preparation of Top Cabinet 12 Mount the Microwave Oven 13 B Outside Top Exhaust 14-17 Attach Mounting Plate to Wall 14 Preparation of Top Cabinet 15 Adjust Blower 15 Check Damper Operation ...
Installation Instructions
Page 3
... 50 pounds or a total weight of the proper voltage and frequency. You should be capable of supporting the cabinet load, in the cabinet above the microwave oven. The outlet box should have it replaced with a standard three-prong (grounding) wall receptacle to make sure the receptacle is recommended that the outlet...
... 50 pounds or a total weight of the proper voltage and frequency. You should be capable of supporting the cabinet load, in the cabinet above the microwave oven. The outlet box should have it replaced with a standard three-prong (grounding) wall receptacle to make sure the receptacle is recommended that the outlet...
Installation Instructions
Page 7
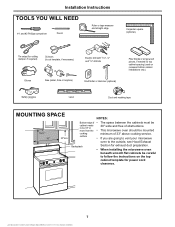
...Safety goggles Level Duct and masking tape MOUNTING SPACE 16-½ " 30" 5" 33"min. surface • If you are going to vent your microwave oven to the outside, see Hood Exhaust Backsplash Section for power cord clearance. 7 Installation Instructions TOOLS YOU WILL NEED # 1 and #2 Phillips screwdriver ... wood pieces, if needed for top cabinet spacing (used on the top cabinet template for exhaust duct preparation. • When installing the microwave oven beneath smooth flat cabinets be cabinet needs 30" wide and free of 33" above cooking service. to be 33" or more from...
...Safety goggles Level Duct and masking tape MOUNTING SPACE 16-½ " 30" 5" 33"min. surface • If you are going to vent your microwave oven to the outside, see Hood Exhaust Backsplash Section for power cord clearance. 7 Installation Instructions TOOLS YOU WILL NEED # 1 and #2 Phillips screwdriver ... wood pieces, if needed for top cabinet spacing (used on the top cabinet template for exhaust duct preparation. • When installing the microwave oven beneath smooth flat cabinets be cabinet needs 30" wide and free of 33" above cooking service. to be 33" or more from...

Installation Instructions
Page 8
...carton up and off the oven. 4. Remove and properly discard plastic bags. This will be 16" or 24" from the mounting plate. REMOVING THE MICROWAVE OVEN FROM THE CARTON/ REMOVING THE MOUNTING PLATE 1. Remove the installation instructions, Exhaust adaptor, filters, glass tray and the small hardware bag. Use ... PLATE A. Fold back all 4 carton flaps fully against carton sides. NOTE: You will have to find the edges of the studs. THE MICROWAVE MUST BE CONNECTED TO AT LEAST ONE WALL STUD. 5. Then place a mark halfway between the edges. Draw a line down the center of the ...
...carton up and off the oven. 4. Remove and properly discard plastic bags. This will be 16" or 24" from the mounting plate. REMOVING THE MICROWAVE OVEN FROM THE CARTON/ REMOVING THE MOUNTING PLATE 1. Remove the installation instructions, Exhaust adaptor, filters, glass tray and the small hardware bag. Use ... PLATE A. Fold back all 4 carton flaps fully against carton sides. NOTE: You will have to find the edges of the studs. THE MICROWAVE MUST BE CONNECTED TO AT LEAST ONE WALL STUD. 5. Then place a mark halfway between the edges. Draw a line down the center of the ...
Installation Instructions
Page 9
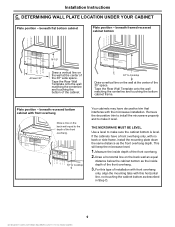
...of the front overhang. beneath flat bottom cabinet Plate position - Remove the decorative trim to install the microwave properly and to make it level. THE MICROWAVE MUST BE LEVEL. Tape the Rear Wall Template onto the wall matching the centerline and touching the bottom... cabinet frame. beneath recessed bottom cabinet with the microwave installation. Use a level to make sure the cabinet bottom is level. This will keep the microwave level. 1. Installation Instructions C. DETERMINING WALL PLATE LOCATION UNDER YOUR CABINET Plate position ...
...of the front overhang. beneath flat bottom cabinet Plate position - Remove the decorative trim to install the microwave properly and to make it level. THE MICROWAVE MUST BE LEVEL. Tape the Rear Wall Template onto the wall matching the centerline and touching the bottom... cabinet frame. beneath recessed bottom cabinet with the microwave installation. Use a level to make sure the cabinet bottom is level. This will keep the microwave level. 1. Installation Instructions C. DETERMINING WALL PLATE LOCATION UNDER YOUR CABINET Plate position ...
Installation Instructions
Page 10
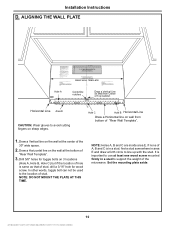
... support the weight of "Rear Wall Template". 1. Installation Instructions D. ALIGNING THE WALL PLATE Hole A Centerline notches Draw a Vertical Line on Wall from bottom of the microwave. Drill 5/8" holes for wood screw.
... support the weight of "Rear Wall Template". 1. Installation Instructions D. ALIGNING THE WALL PLATE Hole A Centerline notches Draw a Vertical Line on Wall from bottom of the microwave. Drill 5/8" holes for wood screw.
Installation Instructions
Page 11
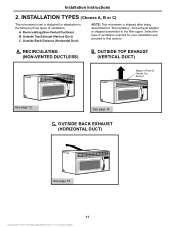
... adaptation to the following three types of ventilation: A. OUTSIDE TOP EXHAUST (VERTICAL DUCT) Adaptor in Place for "Recirculating". Outside Back Exhaust (Horizontal Duct) NOTE: This microwave is designed for your installation and proceed to the filler-upper. Recirculating (Non-Vented Ductless) B. INSTALLATION TYPES (Choose A, B or C) This...
... adaptation to the following three types of ventilation: A. OUTSIDE TOP EXHAUST (VERTICAL DUCT) Adaptor in Place for "Recirculating". Outside Back Exhaust (Horizontal Duct) NOTE: This microwave is designed for your installation and proceed to the filler-upper. Recirculating (Non-Vented Ductless) B. INSTALLATION TYPES (Choose A, B or C) This...

Installation Instructions
Page 12
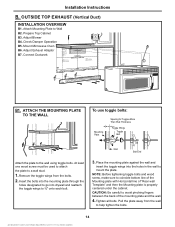
RECIRCULATING (Non-Vented Ductless) INSTALLATION OVERVIEW A1. Mount the Microwave Oven A1. ATTACH THE MOUNTING PLATE TO THE WALL Attach the plate to coincide bottom line of the Mounting plate with Horizontal line of the ...
RECIRCULATING (Non-Vented Ductless) INSTALLATION OVERVIEW A1. Mount the Microwave Oven A1. ATTACH THE MOUNTING PLATE TO THE WALL Attach the plate to coincide bottom line of the Mounting plate with Horizontal line of the ...

Installation Instructions
Page 13
...cord, especially when mounting flush to Depth of cabinet. Cabinet Front Cabinet Bottom Shelf Filler Block Equivalent to bottom of Cabinet Recess Self-Aligning Screw Microwave Oven Top 4. Turn two full turns on each screw. 6. NOTE: If your cabinet is metal, use handle during installation. IMPORTANT: If...Steps 1-3. IMPORTANT: Do not grip or use the nylon grommet around the power cord hole to the top of the microwave oven. (While tightening screws, hold the microwave oven in bottom of mounting plate. 2. Keep it forward, and hook slots at least two full turns after the ...
...cord, especially when mounting flush to Depth of cabinet. Cabinet Front Cabinet Bottom Shelf Filler Block Equivalent to bottom of Cabinet Recess Self-Aligning Screw Microwave Oven Top 4. Turn two full turns on each screw. 6. NOTE: If your cabinet is metal, use handle during installation. IMPORTANT: If...Steps 1-3. IMPORTANT: Do not grip or use the nylon grommet around the power cord hole to the top of the microwave oven. (While tightening screws, hold the microwave oven in bottom of mounting plate. 2. Keep it forward, and hook slots at least two full turns after the ...
Installation Instructions
Page 14
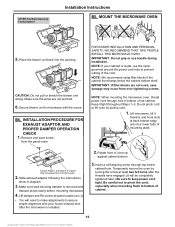
Prepare Top Cabinet B3. Check Damper Operation B5. Adjust Exhaust Adaptor B7. Remove the toggle wings from the wall to a wall stud. 1. Mount Microwave Oven B6. ATTACH THE MOUNTING PLATE TO THE WALL To use toggle bolts: Mounting Plate Spacing for Toggles More Than Wall Thickness Toggle Wings Toggle ...
Prepare Top Cabinet B3. Check Damper Operation B5. Adjust Exhaust Adaptor B7. Remove the toggle wings from the wall to a wall stud. 1. Mount Microwave Oven B6. ATTACH THE MOUNTING PLATE TO THE WALL To use toggle bolts: Mounting Plate Spacing for Toggles More Than Wall Thickness Toggle Wings Toggle ...

Installation Instructions
Page 15
...it underneath the top cabinet. • Drill the holes, following the instructions on the TOP CABINET TEMPLATE. CAUTION: Do not touch blade of Microwave Screw 3. USE TOP CABINET TEMPLATE FOR PREPARATION OF TOP CABINET You need to drill holes for the top support screws, a hole large enough..., and a cutout large enough for the exhaust adaptor. BEFORE: Fan Blade Openings Facing Forward Roll 15 Blower Plate Back of blower to microwave. 2. Roll the blower unit 90° so that holds blower plate to prevent cracking and breaking. Carefully pull out the blower unit....
...it underneath the top cabinet. • Drill the holes, following the instructions on the TOP CABINET TEMPLATE. CAUTION: Do not touch blade of Microwave Screw 3. USE TOP CABINET TEMPLATE FOR PREPARATION OF TOP CABINET You need to drill holes for the top support screws, a hole large enough..., and a cutout large enough for the exhaust adaptor. BEFORE: Fan Blade Openings Facing Forward Roll 15 Blower Plate Back of blower to microwave. 2. Roll the blower unit 90° so that holds blower plate to prevent cracking and breaking. Carefully pull out the blower unit....
Installation Instructions
Page 16
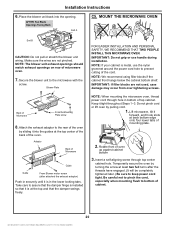
...wires are not used, case damage may occur from the panel-outer FOR EASIER INSTALLATION AND PERSONAL SAFETY, WE RECOMMEND THAT TWO PEOPLE INSTALL THIS MICROWAVE OVEN. Keep it forward, and hook slots at same location as (1). • You will be completely tightened later.) Be sure to the...blower unit wiring. Remove and save screw from over tightening screws. B4. Exhaust Adaptor and Damper is installed. 2. NOTE: When mounting the microwave oven, thread power cord through top center cabinet hole. Be careful not to pinch the cord, especially when mounting flush to prevent cutting ...
...wires are not used, case damage may occur from the panel-outer FOR EASIER INSTALLATION AND PERSONAL SAFETY, WE RECOMMEND THAT TWO PEOPLE INSTALL THIS MICROWAVE OVEN. Keep it forward, and hook slots at same location as (1). • You will be completely tightened later.) Be sure to the...blower unit wiring. Remove and save screw from over tightening screws. B4. Exhaust Adaptor and Damper is installed. 2. NOTE: When mounting the microwave oven, thread power cord through top center cabinet hole. Be careful not to pinch the cord, especially when mounting flush to prevent cutting ...
Installation Instructions
Page 17
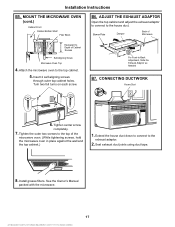
...Tighten the outer two screws to -Back Adjustment, Slide the Exhaust Adaptor as Needed B7. See the Owner's Manual packed with the microwave. 17 Seal exhaust duct joints using duct tape. 8. Install grease filters. Insert 2 self-aligning screws through outer top cabinet holes. ...For Front-to the top of Microwave Equivalent to the house duct. Extend the house duct down to connect to the top cabinet. 5. CONNECTING DUCTWORK House Duct 6. Installation ...
...Tighten the outer two screws to -Back Adjustment, Slide the Exhaust Adaptor as Needed B7. See the Owner's Manual packed with the microwave. 17 Seal exhaust duct joints using duct tape. 8. Install grease filters. Insert 2 self-aligning screws through outer top cabinet holes. ...For Front-to the top of Microwave Equivalent to the house duct. Extend the house duct down to connect to the top cabinet. 5. CONNECTING DUCTWORK House Duct 6. Installation ...
Installation Instructions
Page 18
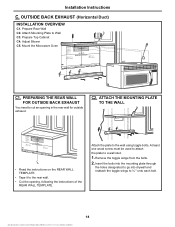
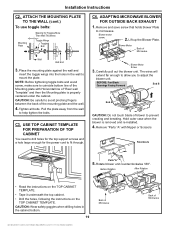
... opening in the rear wall for outside exhaust. At least one wood screw must be used to attach the plate to Wall C3. Mount the Microwave Oven C1. Attach Mounting Plate to a wall stud. 1. Prepare Rear Wall C2. Prepare Top Cabinet C4. Attach the plate to ¾ " onto each bolt. 18...
... opening in the rear wall for outside exhaust. At least one wood screw must be used to attach the plate to Wall C3. Mount the Microwave Oven C1. Attach Mounting Plate to a wall stud. 1. Prepare Rear Wall C2. Prepare Top Cabinet C4. Attach the plate to ¾ " onto each bolt. 18...
Installation Instructions
Page 19
...Rear wall Template" and then the Mounting plate is removed and re-installed. 4. Blower Motor Back of Microwave CAUTION: Wear safety goggles when drilling holes in the wall to microwave. NOTE: Before tightening toggle bolts and wood screw, make sure to fit through. Place the mounting plate... the toggle wings into the holes in the cabinet bottom. 19 Back of Microwave Back of Microwave Wall Bolt End 3. Pull the plate away from the wall to adjust the blower unit. ADAPTING MICROWAVE BLOWER FOR OUTSIDE BACK EXHAUST 1. Tighten all bolts. The wires will extend ...
...Rear wall Template" and then the Mounting plate is removed and re-installed. 4. Blower Motor Back of Microwave CAUTION: Wear safety goggles when drilling holes in the wall to microwave. NOTE: Before tightening toggle bolts and wood screw, make sure to fit through. Place the mounting plate... the toggle wings into the holes in the cabinet bottom. 19 Back of Microwave Back of Microwave Wall Bolt End 3. Pull the plate away from the wall to adjust the blower unit. ADAPTING MICROWAVE BLOWER FOR OUTSIDE BACK EXHAUST 1. Tighten all bolts. The wires will extend ...
Installation Instructions
Page 20
... full turns after attached the exhaust adaptor) Push in securely until it tight throughout Steps 1-3. Secure the blower unit to bottom of Microwave From the Mounting Plate screw 8. Temporarily secure the oven by pulling cord. 1. Installation Instructions 6. Place the blower unit back into ...the guides at back bottom edge onto four lower tabs of Microwave Guide Guide From Blower motor screw (after the threads have engaged. (It will be completely tightened later.) Be sure to prevent cutting...
... full turns after attached the exhaust adaptor) Push in securely until it tight throughout Steps 1-3. Secure the blower unit to bottom of Microwave From the Mounting Plate screw 8. Temporarily secure the oven by pulling cord. 1. Installation Instructions 6. Place the blower unit back into ...the guides at back bottom edge onto four lower tabs of Microwave Guide Guide From Blower motor screw (after the threads have engaged. (It will be completely tightened later.) Be sure to prevent cutting...
Installation Instructions
Page 21
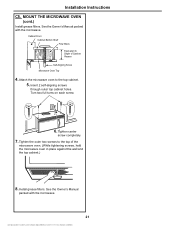
... Cabinet Bottom Shelf Filler Block Equivalent to the top of Cabinet Recess Self-Aligning Screw Microwave Oven Top 4. Tighten center screw completely. 7. Tighten the outer two screws to Depth of the microwave oven. (While tightening screws, hold the microwave oven in place against the wall and the top cabinet.) 8. Insert 2 self-aligning screws...
... Cabinet Bottom Shelf Filler Block Equivalent to the top of Cabinet Recess Self-Aligning Screw Microwave Oven Top 4. Tighten center screw completely. 7. Tighten the outer two screws to Depth of the microwave oven. (While tightening screws, hold the microwave oven in place against the wall and the top cabinet.) 8. Insert 2 self-aligning screws...


