
Use and Care Manual
Page 1
A Use & Care Guide Induction Cooktop Dishwasher 318 200 630 (0602) Rev.
A Use & Care Guide Induction Cooktop Dishwasher 318 200 630 (0602) Rev.
Use and Care Manual
Page 2
Post Office Box 212378, Augusta, Georgia 30917, USA All rights reserved. For toll-free telephone support in the USA QUESTIONS? Printed in the U.S. 2 Finding Information MAKE A RECORD FOR FUTURE USE Brand Purchase Date Model Number Serial Number NOTE The serial and model numbers may be found on the serial plate located under the cooktop. and Canada: 1-877-4ELECTROLUX (1-877-435-3287) For online support and internet product information: www.electrolux.com ©2006 Electrolux Home Products, Inc.
Post Office Box 212378, Augusta, Georgia 30917, USA All rights reserved. For toll-free telephone support in the USA QUESTIONS? Printed in the U.S. 2 Finding Information MAKE A RECORD FOR FUTURE USE Brand Purchase Date Model Number Serial Number NOTE The serial and model numbers may be found on the serial plate located under the cooktop. and Canada: 1-877-4ELECTROLUX (1-877-435-3287) For online support and internet product information: www.electrolux.com ©2006 Electrolux Home Products, Inc.
Use and Care Manual
Page 3
... use 2 Questions 2 Safety 4-6 Important Safety Instructions 4 Induction Cooktop Features 7-8 Induction Cooktop Display Messages .......... 9-10 LED Messages or Light Indicators Displayed by Main Control 9 LED Messages or Light Indicators Displayed by Cooking Zone Controls 9-10 Before Using the Cooktop 11-13 Use the Correct Cookware Type 11 Minimum Pan... Heat Food 21 Cooking Zone Heats Food Too Hot or Not Enough 22 Food Does Not Heat Evenly 22 Poor Cooking Results 22 Cooktop Zone Control Displays E and 2 Digits LED Main Control Displays 00, 03, 04, 05, 06 or 07 ........ 22 Cooking ...
... use 2 Questions 2 Safety 4-6 Important Safety Instructions 4 Induction Cooktop Features 7-8 Induction Cooktop Display Messages .......... 9-10 LED Messages or Light Indicators Displayed by Main Control 9 LED Messages or Light Indicators Displayed by Cooking Zone Controls 9-10 Before Using the Cooktop 11-13 Use the Correct Cookware Type 11 Minimum Pan... Heat Food 21 Cooking Zone Heats Food Too Hot or Not Enough 22 Food Does Not Heat Evenly 22 Poor Cooking Results 22 Cooktop Zone Control Displays E and 2 Digits LED Main Control Displays 00, 03, 04, 05, 06 or 07 ........ 22 Cooking ...
Use and Care Manual
Page 4
... these instructions for a class B digital device, pursuant to situations that may cause bodily injury or property damage. Be sure your electric cooktop, follow all instructions before using your appliance is encouraged to try to correct the interference by a qualified technician in operation, as the ...or similar medical device manufacturer about your particular situation. • Remove all tape and packaging wrap before using or standing near an induction unit while it is in accordance with the instructions, may affect the working of the following : This unit has been tested ...
... these instructions for a class B digital device, pursuant to situations that may cause bodily injury or property damage. Be sure your electric cooktop, follow all instructions before using your appliance is encouraged to try to correct the interference by a qualified technician in operation, as the ...or similar medical device manufacturer about your particular situation. • Remove all tape and packaging wrap before using or standing near an induction unit while it is in accordance with the instructions, may affect the working of the following : This unit has been tested ...
Use and Care Manual
Page 5
... using the appliance. During and after use your dealer to reach items could be stored near the appliance. Moist or damp pot holders on the cooktop to recommend a qualified technician and an authorized repair service. Buildup of a pot holder. • Do Not Heat Unopened Food Containers. CAUTION Do not store items...
... using the appliance. During and after use your dealer to reach items could be stored near the appliance. Moist or damp pot holders on the cooktop to recommend a qualified technician and an authorized repair service. Buildup of a pot holder. • Do Not Heat Unopened Food Containers. CAUTION Do not store items...
Use and Care Manual
Page 6
...break, cleaning solutions and spillovers may melt or become damaged. • Protective Liners. FOR CERAMIC-GLASS COOKTOP ONLY • Do Not Clean or Operate a Broken Cooktop. IMPORTANT SAFETY NOTICE The California Safe Drinking Water and Toxic Enforcement Act requires the Governor of California to... could cause glass to hood manufacturer's instructions for cleaning. • Use Proper Pan Size. Any other glazed utensils are suitable for cooktop use aluminum foil to wipe spills on the Cooking Zones. Only certain types of glass, glass/ceramic, ceramic, earthenware, or other...
...break, cleaning solutions and spillovers may melt or become damaged. • Protective Liners. FOR CERAMIC-GLASS COOKTOP ONLY • Do Not Clean or Operate a Broken Cooktop. IMPORTANT SAFETY NOTICE The California Safe Drinking Water and Toxic Enforcement Act requires the Governor of California to... could cause glass to hood manufacturer's instructions for cleaning. • Use Proper Pan Size. Any other glazed utensils are suitable for cooktop use aluminum foil to wipe spills on the Cooking Zones. Only certain types of glass, glass/ceramic, ceramic, earthenware, or other...
Use and Care Manual
Page 7
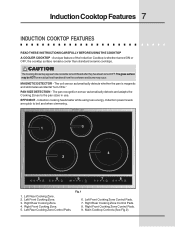
.../Off 9 POWER 7 On/Off 8 On/Off 1. PAN SIZE DETECTION - Right Front Cooking Zone. 5. Induction Cooktop Features 7 INDUCTION COOKTOP FEATURES READ THESE INSTRUCTIONS CAREFULLY BEFORE USING THE COOKTOP A COOLER COOKTOP - The glass surface may occur. MAGNETIC DETECTOR - Induction cooking heats faster while using less energy. Induction power levels are quick to the pan sizes in use. Left Front Cooking...
.../Off 9 POWER 7 On/Off 8 On/Off 1. PAN SIZE DETECTION - Right Front Cooking Zone. 5. Induction Cooktop Features 7 INDUCTION COOKTOP FEATURES READ THESE INSTRUCTIONS CAREFULLY BEFORE USING THE COOKTOP A COOLER COOKTOP - The glass surface may occur. MAGNETIC DETECTOR - Induction cooking heats faster while using less energy. Induction power levels are quick to the pan sizes in use. Left Front Cooking...
Use and Care Manual
Page 8
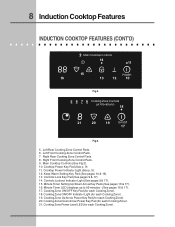
... Timer Setting Up/Down Arrow Key Pads (See pages 16 & 17). 16. Cooking Zone ON/OFF Key Pad (for each Cooking Zone). 21. 8 Induction Cooktop Features INDUCTION COOKTOP FEATURES (CONT'D) 9 Main Cooktop Controls 14 11 15 POWER 16 13 12 10 Fig 2. 5 6 7 8 Cooking Zone Controls (at 4 locations) 18 21 20 19 On/Off 17 Fig...
... Timer Setting Up/Down Arrow Key Pads (See pages 16 & 17). 16. Cooking Zone ON/OFF Key Pad (for each Cooking Zone). 21. 8 Induction Cooktop Features INDUCTION COOKTOP FEATURES (CONT'D) 9 Main Cooktop Controls 14 11 15 POWER 16 13 12 10 Fig 2. 5 6 7 8 Cooking Zone Controls (at 4 locations) 18 21 20 19 On/Off 17 Fig...
Use and Care Manual
Page 9
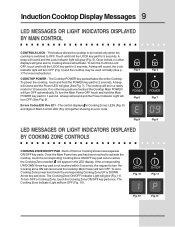
...to turn OFF automatically. To power the cooktop, touch and hold the LOCK key pad for more instructions). The cooktop will turn OFF (Fig. 4) and the cooktop may be locked only when the cooktop is not touched within 5 seconds, the request to OFF. Induction Cooktop Display Messages 9 LED MESSAGES OR LIGHT ...LIGHT INDICATORS DISPLAYED BY COOKING ZONE CONTROLS COOKING ZONE ON/OFF PAD - Once the Main Power key pad has been touched to activate the cooktop, touch the corresponding Cooking Zone ON/OFF key pad once to be used normally (See p. 17 for 5 seconds. Touch and hold ...
...to turn OFF automatically. To power the cooktop, touch and hold the LOCK key pad for more instructions). The cooktop will turn OFF (Fig. 4) and the cooktop may be locked only when the cooktop is not touched within 5 seconds, the request to OFF. Induction Cooktop Display Messages 9 LED MESSAGES OR LIGHT ...LIGHT INDICATORS DISPLAYED BY COOKING ZONE CONTROLS COOKING ZONE ON/OFF PAD - Once the Main Power key pad has been touched to activate the cooktop, touch the corresponding Cooking Zone ON/OFF key pad once to be used normally (See p. 17 for 5 seconds. Touch and hold ...
Use and Care Manual
Page 10
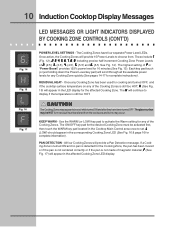
10 Induction Cooktop Display Messages LED MESSAGES OR LIGHT INDICATORS DISPLAYED BY COOKING ZONE CONTROLS (CONT'D) Fig....Levels of P or "Power Boost" provides 125% power level for cooking and turned OFF, and if the cooktop surface temperature on any Cooking Zone quickly (See pages 14-17 for complete information). All four Cooking Zones will ... a Pan Detection message. Once any of the Cooking Zones. KEEP WARM - L (LOW) should appear in the Cooktop Main Control area once to activate the Warm setting for the affected Cooking Zone. The glass surface may occur. The Cooking...
10 Induction Cooktop Display Messages LED MESSAGES OR LIGHT INDICATORS DISPLAYED BY COOKING ZONE CONTROLS (CONT'D) Fig....Levels of P or "Power Boost" provides 125% power level for cooking and turned OFF, and if the cooktop surface temperature on any Cooking Zone quickly (See pages 14-17 for complete information). All four Cooking Zones will ... a Pan Detection message. Once any of the Cooking Zones. KEEP WARM - L (LOW) should appear in the Cooktop Main Control area once to activate the Warm setting for the affected Cooking Zone. The glass surface may occur. The Cooking...
Use and Care Manual
Page 11
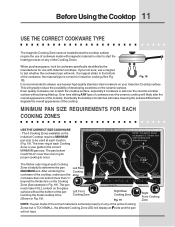
... FULL contact on the glass surface without being lifted up. On/Off POWER Right Rear Cooking Zone Fig. 19 NOTE: If a pan made with Induction cooktops. On/Off On/Off Right Front Cooking Zone If a magnet sticks to the bottom of the pan Left Front touching the metal... cooktop trims Cooking Zone (Shown in order to start the heating process on any of developing scratches on the Induction Cooktop require a MINIMUM pan size to occur. The 4 Cooking Zones available on the ceramic surface. ...
... FULL contact on the glass surface without being lifted up. On/Off POWER Right Rear Cooking Zone Fig. 19 NOTE: If a pan made with Induction cooktops. On/Off On/Off Right Front Cooking Zone If a magnet sticks to the bottom of the pan Left Front touching the metal... cooktop trims Cooking Zone (Shown in order to start the heating process on any of developing scratches on the Induction Cooktop require a MINIMUM pan size to occur. The 4 Cooking Zones available on the ceramic surface. ...
Use and Care Manual
Page 12
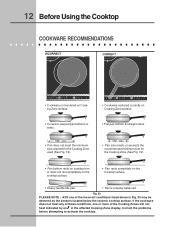
...or more of the incorrect conditions listed above in the affected Cooking Zone display. 12 Before Using the Cooktop COOKWARE RECOMMENDATIONS INCORRECT CORRECT On/Off On/Off POWER • Cookware not centered on the Cooktop surface. • Heavy handle tilts pan. • Pan is properly balanced. On/Off On/Off..., one of the Cooking Zones will not heat indicated by an F in Fig. 20 may be detected by the sensors located below the ceramic cooktop surface. If the cookware does not meet the minimum size required for the Cooking Zone used (See Fig. 19). • Pan size meets ...
...or more of the incorrect conditions listed above in the affected Cooking Zone display. 12 Before Using the Cooktop COOKWARE RECOMMENDATIONS INCORRECT CORRECT On/Off On/Off POWER • Cookware not centered on the Cooktop surface. • Heavy handle tilts pan. • Pan is properly balanced. On/Off On/Off..., one of the Cooking Zones will not heat indicated by an F in Fig. 20 may be detected by the sensors located below the ceramic cooktop surface. If the cookware does not meet the minimum size required for the Cooking Zone used (See Fig. 19). • Pan size meets ...
Use and Care Manual
Page 13
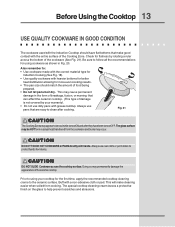
...8226; The pan size should have been turned OFF. Check for flatness by your cooktop for the first time, apply the recommended cooktop cleaning creme to : • Use cookware made with the correct material type for Induction Cooking (See Fig. 18). • Use quality cookware with heavier bottoms for .... CAUTION DO NOT TOUCH HOT COOKWARE or PANS directly with a non-abrasive cloth or pad. Before Using the Cooktop 13 USE QUALITY COOKWARE IN GOOD CONDITION The cookware used with the Induction Cooktop should match the amount of food being prepared. • Do not let pans boil dry.
...8226; The pan size should have been turned OFF. Check for flatness by your cooktop for the first time, apply the recommended cooktop cleaning creme to : • Use cookware made with the correct material type for Induction Cooking (See Fig. 18). • Use quality cookware with heavier bottoms for .... CAUTION DO NOT TOUCH HOT COOKWARE or PANS directly with a non-abrasive cloth or pad. Before Using the Cooktop 13 USE QUALITY COOKWARE IN GOOD CONDITION The cookware used with the Induction Cooktop should match the amount of food being prepared. • Do not let pans boil dry.

Use and Care Manual
Page 14
... the Cooking Zone by touching either the or key pad. If the key pad is touched within 10 seconds the request to Power ON the cooktop will beep once). If the finger is best for the On/Off Cooking Zones needed. The Power POWER Indicator light located above the key pad... will show 0 indicating no other key pad is shown in Fig. 22. OPERATING THE COOKING ZONES The Induction cooktop has four Cooking Zones designed for 2 seconds (or until a beep sounds). Place the prepared food using the correct type and size cookware on the Zone...
... the Cooking Zone by touching either the or key pad. If the key pad is touched within 10 seconds the request to Power ON the cooktop will beep once). If the finger is best for the On/Off Cooking Zones needed. The Power POWER Indicator light located above the key pad... will show 0 indicating no other key pad is shown in Fig. 22. OPERATING THE COOKING ZONES The Induction cooktop has four Cooking Zones designed for 2 seconds (or until a beep sounds). Place the prepared food using the correct type and size cookware on the Zone...
Use and Care Manual
Page 15
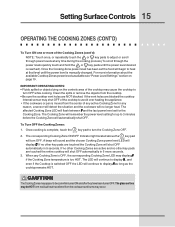
... situation and the cookware will no other key pads are active and no longer heat. The LED will continue to display H , and even if the Cooktop is manually changed. Setting Surface Controls 15 OPERATING THE COOKING ZONES (CONT'D) To Turn ON one or more of the Cooking Zones (cont'd) NOTE: Touch... quickly touch and hold the or key pads until the power level is switched OFF the LED will continue to display H as long as the cooktop remains HOT. To Turn OFF the Cooking Zones: 1. If no other Cooking Zones are touched the Cooking Zone will automatically shut OFF. For more ...
... situation and the cookware will no other key pads are active and no longer heat. The LED will continue to display H , and even if the Cooktop is manually changed. Setting Surface Controls 15 OPERATING THE COOKING ZONES (CONT'D) To Turn ON one or more of the Cooking Zones (cont'd) NOTE: Touch... quickly touch and hold the or key pads until the power level is switched OFF the LED will continue to display H as long as the cooktop remains HOT. To Turn OFF the Cooking Zones: 1. If no other Cooking Zones are touched the Cooking Zone will automatically shut OFF. For more ...
Use and Care Manual
Page 16
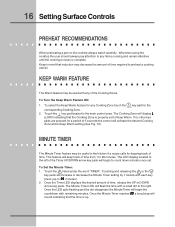
... located to any Cooking Zone touch the key pad for a period of 5 seconds the control will keep track of time. Whenever using the cooktop the user should always pay attention to the left of time, release the UP or DOWN Arrow key pads. 16 Setting Surface Controls PREHEAT RECOMMENDATIONS... When preheating a pan on the cooktop always watch carefully. KEEP WARM FEATURE The Warm feature may be useful in mind that induction may be used with each key press (up . Touch the key pad located in the main ...
... located to any Cooking Zone touch the key pad for a period of 5 seconds the control will keep track of time. Whenever using the cooktop the user should always pay attention to the left of time, release the UP or DOWN Arrow key pads. 16 Setting Surface Controls PREHEAT RECOMMENDATIONS... When preheating a pan on the cooktop always watch carefully. KEEP WARM FEATURE The Warm feature may be useful in mind that induction may be used with each key press (up . Touch the key pad located in the main ...
Use and Care Manual
Page 17
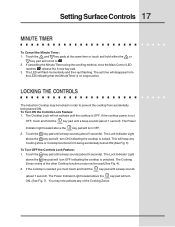
Setting Surface Controls 17 MINUTE TIMER To Cancel the Minute Timer: 1. LOCKING THE CONTROLS The Induction Cooktop may now be locked in order to 00. 2. POWER 2. Touch the key pad until a beep sounds (about 1 second). The Cooking Zones or any of the ... turn OFF. If cancelling the Minute Timer using the scrolling method, once the Main Control LED reaches 00, release the Arrow key pad. 3. If the cooktop is unlocked. To Turn ON the Controls Lock Feature: 1. The Power POWER Indicator light located above the key pad will turn POWER ON. (See Fig...
Setting Surface Controls 17 MINUTE TIMER To Cancel the Minute Timer: 1. LOCKING THE CONTROLS The Induction Cooktop may now be locked in order to 00. 2. POWER 2. Touch the key pad until a beep sounds (about 1 second). The Cooking Zones or any of the ... turn OFF. If cancelling the Minute Timer using the scrolling method, once the Main Control LED reaches 00, release the Arrow key pad. 3. If the cooktop is unlocked. To Turn ON the Controls Lock Feature: 1. The Power POWER Indicator light located above the key pad will turn POWER ON. (See Fig...
Use and Care Manual
Page 18
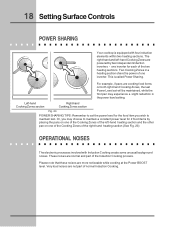
... setting. These noises are more noticeable while cooking at the Power BOOST level. Or, you wish to maintain a constant power level for each of the Induction Cooking process. The right-hand and left-hand Cooking Zones are powered by placing the pans on one of the Cooking Zones of the left...POWER SHARING TIPS: Remember to set will be maintained, while the first pan may choose to maintain last. 18 Setting Surface Controls POWER SHARING Your cooktop is called Power Sharing. For example, if pans are not part of the right-hand heating section (See Fig. 23). This is equipped with...
... setting. These noises are more noticeable while cooking at the Power BOOST level. Or, you wish to maintain a constant power level for each of the Induction Cooking process. The right-hand and left-hand Cooking Zones are powered by placing the pans on one of the Cooking Zones of the left...POWER SHARING TIPS: Remember to set will be maintained, while the first pan may choose to maintain last. 18 Setting Surface Controls POWER SHARING Your cooktop is called Power Sharing. For example, if pans are not part of the right-hand heating section (See Fig. 23). This is equipped with...
Use and Care Manual
Page 19
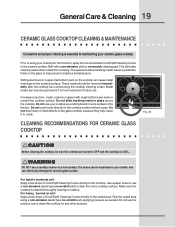
... a non-abrasive plastic type no-scratch pad to clean the entire cooktop surface. WARNING DO NOT use to clean the cooktop for the first time, apply the recommended CookTop® Cleaning Creme to the cooktop. For light to moderate soil: Apply a few drops of CookTop® Cleaning Creme directly to the ceramic surface. Make sure the...
... a non-abrasive plastic type no-scratch pad to clean the entire cooktop surface. WARNING DO NOT use to clean the cooktop for the first time, apply the recommended CookTop® Cleaning Creme to the cooktop. For light to moderate soil: Apply a few drops of CookTop® Cleaning Creme directly to the ceramic surface. Make sure the...
Use and Care Manual
Page 20
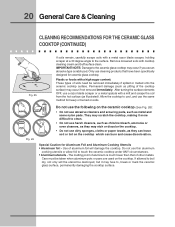
...loosened soils with a metal razor blade scraper, holding scraper at a 30 degree angle to the surface. Plastic or foods with a high sugar content: These types of soils need be taken when aluminum pots or pans are used on the ceramic cooktop (See Fig. 26): • Do not use abrasive cleaners and..., and use the same method for Aluminum Foil and Aluminum Cooking Utensils • Aluminum foil - Fig. 26 Do not use the following on the cooktop. Do not use an abrasive type scratch pad. IMPORTANT NOTE: Damage to clean. • Do not use cleaning products that of aluminum is much...
...loosened soils with a metal razor blade scraper, holding scraper at a 30 degree angle to the surface. Plastic or foods with a high sugar content: These types of soils need be taken when aluminum pots or pans are used on the ceramic cooktop (See Fig. 26): • Do not use abrasive cleaners and..., and use the same method for Aluminum Foil and Aluminum Cooking Utensils • Aluminum foil - Fig. 26 Do not use the following on the cooktop. Do not use an abrasive type scratch pad. IMPORTANT NOTE: Damage to clean. • Do not use cleaning products that of aluminum is much...


