Use and Care Manual
Page 3
... Use the Correct Cookware Type 11 Minimum Pan Size Requirements for Each Cooking Zones 11 Cookware Recommendations 12 Use Quality Cookware in Good Condition 13 Setting Surface Controls 14-18 Using the Touch Control 14 Operating the Cooking Zones 14-15 Preheat Recommendations 16 Keep Warm Feature 16 Minute Timer 17 Locking the Controls 17 Power Sharing 18 Operational Noises 18 General Care & Cleaning 19-20 Ceramic Glass Cooktop Cleaning & Maintenance ... 19 Cleaning Recommendations for Ceramic Glass Cooktop...
... Use the Correct Cookware Type 11 Minimum Pan Size Requirements for Each Cooking Zones 11 Cookware Recommendations 12 Use Quality Cookware in Good Condition 13 Setting Surface Controls 14-18 Using the Touch Control 14 Operating the Cooking Zones 14-15 Preheat Recommendations 16 Keep Warm Feature 16 Minute Timer 17 Locking the Controls 17 Power Sharing 18 Operational Noises 18 General Care & Cleaning 19-20 Ceramic Glass Cooktop Cleaning & Maintenance ... 19 Cleaning Recommendations for Ceramic Glass Cooktop...
Use and Care Manual
Page 4
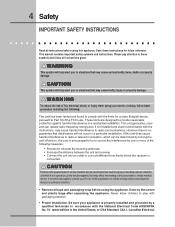
... by turning the unit off and on, the user is connected. If this appliance. Please pay attention to which can radiate radio frequency energy and, if not installed and used in a residential installation. 4 Safety IMPORTANT SAFETY INSTRUCTIONS Read all instructions given. These limits are designed to play with the limits for future reference. CAUTION Persons with the National Electrical Code...
... by turning the unit off and on, the user is connected. If this appliance. Please pay attention to which can radiate radio frequency energy and, if not installed and used in a residential installation. 4 Safety IMPORTANT SAFETY INSTRUCTIONS Read all instructions given. These limits are designed to play with the limits for future reference. CAUTION Persons with the National Electrical Code...
Use and Care Manual
Page 5
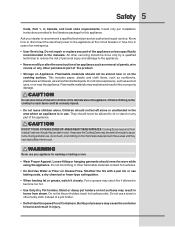
... touch hot surface units. Install only per installation instructions provided in color. All other servicing should never be allowed to cool. Smother the fire with a pan lid, or use . Ask your appliance for this appliance. Know how to disconnect the electrical power to the appliance at the circuit breaker or fuse box in case of interest to recommend a qualified technician and an authorized repair service. Children...
... touch hot surface units. Install only per installation instructions provided in color. All other servicing should never be allowed to cool. Smother the fire with a pan lid, or use . Ask your appliance for this appliance. Know how to disconnect the electrical power to the appliance at the circuit breaker or fuse box in case of interest to recommend a qualified technician and an authorized repair service. Children...
Use and Care Manual
Page 6
... suitable for cooktop use aluminum foil to line any part of the cooktop. When flaming food under the hood, turn fan on Cold Cooktop Glass. The pan detection sensors will not allow grease to accumulate on a hot cooking area, be kept clean. Only certain types of glass, glass/ceramic, ceramic, earthenware, or other reproductive harm, and requires businesses to warn customers of different sizes. FOR CERAMIC-GLASS COOKTOP ONLY • Do Not Clean or Operate a Broken Cooktop. Some cleaners...
... suitable for cooktop use aluminum foil to line any part of the cooktop. When flaming food under the hood, turn fan on Cold Cooktop Glass. The pan detection sensors will not allow grease to accumulate on a hot cooking area, be kept clean. Only certain types of glass, glass/ceramic, ceramic, earthenware, or other reproductive harm, and requires businesses to warn customers of different sizes. FOR CERAMIC-GLASS COOKTOP ONLY • Do Not Clean or Operate a Broken Cooktop. Some cleaners...
Use and Care Manual
Page 7
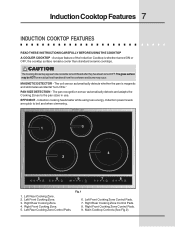
... cool while turned ON and after they have been turned OFF. The coil sensor automatically detects whether the pan is whether turned ON or OFF, the cooktop surface remains cooler than standard ceramic cooktops. A unique feature of the Induction Cooktop is magnetic and eliminates accidental "turn-ONs." Right Rear Cooking Zone Control Pads. 8. Left Front Cooking Zone. 3. Induction Cooktop Features 7 INDUCTION COOKTOP FEATURES READ THESE INSTRUCTIONS CAREFULLY BEFORE USING THE COOKTOP A COOLER COOKTOP -
... cool while turned ON and after they have been turned OFF. The coil sensor automatically detects whether the pan is whether turned ON or OFF, the cooktop surface remains cooler than standard ceramic cooktops. A unique feature of the Induction Cooktop is magnetic and eliminates accidental "turn-ONs." Right Rear Cooking Zone Control Pads. 8. Left Front Cooking Zone. 3. Induction Cooktop Features 7 INDUCTION COOKTOP FEATURES READ THESE INSTRUCTIONS CAREFULLY BEFORE USING THE COOKTOP A COOLER COOKTOP -
Use and Care Manual
Page 9
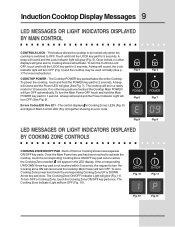
..., the Lock indicator light will glow (Fig. 11). To power the cooktop, touch and hold the LOCK key pad for more instructions). Errors Codes E00 thru E11 - To set a Cooking Zone power level touch the corresponding Cooking Zone UP or DOWN Arrow key pad once. COOKTOP POWER - The Cooking Zone ON/OFF Indicator Light will turn the Controls Lock OFF, touch and hold the POWER key pad for 5 seconds. The Cooking Zone Indicator Light will be locked only...
..., the Lock indicator light will glow (Fig. 11). To power the cooktop, touch and hold the LOCK key pad for more instructions). Errors Codes E00 thru E11 - To set a Cooking Zone power level touch the corresponding Cooking Zone UP or DOWN Arrow key pad once. COOKTOP POWER - The Cooking Zone ON/OFF Indicator Light will turn the Controls Lock OFF, touch and hold the POWER key pad for 5 seconds. The Cooking Zone Indicator Light will be locked only...
Use and Care Manual
Page 10
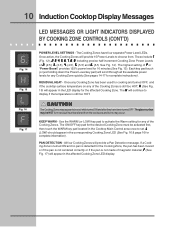
... while turned ON and after they have four separate Power Level LEDs. RESIDUAL HEAT - Once any Cooking Zone has been used for 10 minutes (See Fig. 13). 10 Induction Cooktop Display Messages LED MESSAGES OR LIGHT INDICATORS DISPLAYED BY COOKING ZONE CONTROLS (CONT'D) Fig. 14 Fig. 15 Fig. 16 Fig. 17 POWER LEVEL SETTINGS - KEEP WARM - Once active, the Cooking Zones will provide a Pan Detection...
... while turned ON and after they have four separate Power Level LEDs. RESIDUAL HEAT - Once any Cooking Zone has been used for 10 minutes (See Fig. 13). 10 Induction Cooktop Display Messages LED MESSAGES OR LIGHT INDICATORS DISPLAYED BY COOKING ZONE CONTROLS (CONT'D) Fig. 14 Fig. 15 Fig. 16 Fig. 17 POWER LEVEL SETTINGS - KEEP WARM - Once active, the Cooking Zones will provide a Pan Detection...
Use and Care Manual
Page 11
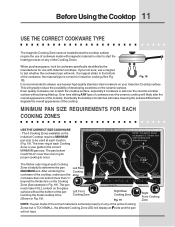
... not heat. MINIMUM PAN SIZE REQUIREMENTS FOR EACH COOKING ZONES USE THE CORRECT SIZE COOKWARE - The 4 Cooking Zones available on the glass surface without being lifted up. The inner ring of the cookware, the material type is your Induction Cooktop surface. The pan bottom must make FULL contact on the Induction Cooktop require a MINIMUM pan size to be used at each Cooking Zone is correct for proper cooking to the correct MINIMUM pan size. On/Off POWER Right Rear Cooking...
... not heat. MINIMUM PAN SIZE REQUIREMENTS FOR EACH COOKING ZONES USE THE CORRECT SIZE COOKWARE - The 4 Cooking Zones available on the glass surface without being lifted up. The inner ring of the cookware, the material type is your Induction Cooktop surface. The pan bottom must make FULL contact on the Induction Cooktop require a MINIMUM pan size to be used at each Cooking Zone is correct for proper cooking to the correct MINIMUM pan size. On/Off POWER Right Rear Cooking...
Use and Care Manual
Page 13
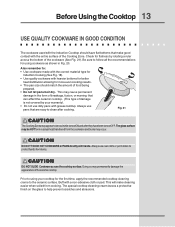
... even cooking results. • The pan size should have been turned OFF. The glass surface may permanently damage the appearance of the ceramic cooktop. Prior to : • Use cookware made with the correct material type for Induction Cooking (See Fig. 18). • Use quality cookware with heavier bottoms for better heat distribution allowing for flatness by your cooktop for using your warranty). • Do not use dirty pans with...
... even cooking results. • The pan size should have been turned OFF. The glass surface may permanently damage the appearance of the ceramic cooktop. Prior to : • Use cookware made with the correct material type for Induction Cooking (See Fig. 18). • Use quality cookware with heavier bottoms for better heat distribution allowing for flatness by your cooktop for using your warranty). • Do not use dirty pans with...

Use and Care Manual
Page 14
... P and the control will beep once). The Power POWER Indicator light located above the key pad will clear. 3. Be sure that meets the minimum and maximum pan size requirements (Fig. 19) for the Cooking Zone desired and is shown in the affected Cooking Zone LED. NOTE: If no other key pad is touched within 5 seconds the request to Power ON the Cooktop Zone will...
... P and the control will beep once). The Power POWER Indicator light located above the key pad will clear. 3. Be sure that meets the minimum and maximum pan size requirements (Fig. 19) for the Cooking Zone desired and is shown in the affected Cooking Zone LED. NOTE: If no other key pad is touched within 5 seconds the request to Power ON the Cooktop Zone will...
Use and Care Manual
Page 19
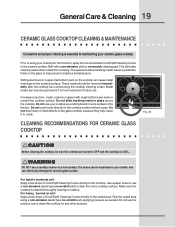
... pressure as a cutting board or work surface in the kitchen. WARNING DO NOT use a non-abrasive plastic type no -scratch cleaning pad. General Care & Cleaning 19 CERAMIC GLASS COOKTOP CLEANING & MAINTENANCE Consistent and proper cleaning is cleaned thoroughly, leaving no residue. Make sure the cooktop is essential to maintaining your cooktop for any other purpose. Sliding aluminum or copper clad bottom pans on the cooktop can be removed immediately after the cooktop has cooled using the cooktop cleaning...
... pressure as a cutting board or work surface in the kitchen. WARNING DO NOT use a non-abrasive plastic type no -scratch cleaning pad. General Care & Cleaning 19 CERAMIC GLASS COOKTOP CLEANING & MAINTENANCE Consistent and proper cleaning is cleaned thoroughly, leaving no residue. Make sure the cooktop is essential to maintaining your cooktop for any other purpose. Sliding aluminum or copper clad bottom pans on the cooktop can be removed immediately after the cooktop has cooled using the cooktop cleaning...
Use and Care Manual
Page 21
... use for service, review the following problems first. Clean spills or remove object. Solutions to Common Problems 21 I M P O R TA N T Before calling for 18 hours. • Cooktop internal heat sensor has detected high temperatures inside the appliance. Set the cooktop controls to unlock the Cooktop (See p. 17 for further instructions). • Make sure household electrical circuit breaker is properly supplied to the appliance. Be sure the appliance vent holes are locked. Check steps...
... use for service, review the following problems first. Clean spills or remove object. Solutions to Common Problems 21 I M P O R TA N T Before calling for 18 hours. • Cooktop internal heat sensor has detected high temperatures inside the appliance. Set the cooktop controls to unlock the Cooktop (See p. 17 for further instructions). • Make sure household electrical circuit breaker is properly supplied to the appliance. Be sure the appliance vent holes are locked. Check steps...

Use and Care Manual
Page 22
... reset Cooktop main controls. If fault recurs, record fault number and turn of heat is too lightweight or warped. Try turning electrical power supply OFF and back ON to cooktop in order to Figs. 20 & 21). • Use only flat bottom, evenly balanced medium or heavyweight cookware. Adjust the power level setting higher or lower and refer to Cooktop OFF. Because lightweight pans heat unevenly, foods may cook...
... reset Cooktop main controls. If fault recurs, record fault number and turn of heat is too lightweight or warped. Try turning electrical power supply OFF and back ON to cooktop in order to Figs. 20 & 21). • Use only flat bottom, evenly balanced medium or heavyweight cookware. Adjust the power level setting higher or lower and refer to Cooktop OFF. Because lightweight pans heat unevenly, foods may cook...
Use and Care Manual
Page 23
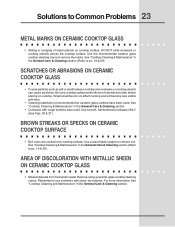
... on cooktop surface. Remember to use cookware with time. • Cleaning materials not recommended for ceramic-glass cooktop have been used . Remove using a ceramic-glass cooktop cleaning creme. Solutions to Common Problems 23 METAL MARKS ON CERAMIC COOKTOP GLASS • Sliding or scraping of utensils are cooked onto cooktop surface. Small scratches do not affect cooking and will become less visible with clean, dry bottoms. For more information See "Cooktop Cleaning and Maintenance" in the General Care & Cleaning section...
... on cooktop surface. Remember to use cookware with time. • Cleaning materials not recommended for ceramic-glass cooktop have been used . Remove using a ceramic-glass cooktop cleaning creme. Solutions to Common Problems 23 METAL MARKS ON CERAMIC COOKTOP GLASS • Sliding or scraping of utensils are cooked onto cooktop surface. Small scratches do not affect cooking and will become less visible with clean, dry bottoms. For more information See "Cooktop Cleaning and Maintenance" in the General Care & Cleaning section...
Use and Care Manual
Page 24
... of loose connections or defects in ordinary household use , and the consumer is responsible for appliances not in house wiring. 4. Costs of the technician's travel to the home and any defective surface heating element, deteriorated rubberized-silicone seal (upswept models only), or glass smoothtop that vary from original WARRANTY purchase date (Glass Smoothtop, Seal & Elements) Provide a replacement for any costs for servicing, such as removal of trim, cupboards, shelves...
... of loose connections or defects in ordinary household use , and the consumer is responsible for appliances not in house wiring. 4. Costs of the technician's travel to the home and any defective surface heating element, deteriorated rubberized-silicone seal (upswept models only), or glass smoothtop that vary from original WARRANTY purchase date (Glass Smoothtop, Seal & Elements) Provide a replacement for any costs for servicing, such as removal of trim, cupboards, shelves...
Installation Instructions
Page 1
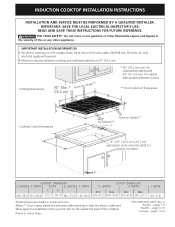
... - B D Cooktop Cutout Dimensions F G E Air exhaust** I . IMPORTANT: SAVE FOR LOCAL ELECTRICAL INSPECTOR'S USE. LENGTH H. for cabinet with ground. • Minimum distance between cooktop and overhead cabinetry is present. Max. 295/8 (75.2) 29¾ (75.6) 203/8 (51.8) 20½ (52.1) I C Fresh air intake** 4" X 8" (10.2 cm x 20.3 cm) H opening to route armored cable if a panel is 30" (76.2 cm). Printed in inches and (cm). INDUCTION COOKTOP INSTALLATION INSTRUCTIONS INSTALLATION AND SERVICE MUST...
... - B D Cooktop Cutout Dimensions F G E Air exhaust** I . IMPORTANT: SAVE FOR LOCAL ELECTRICAL INSPECTOR'S USE. LENGTH H. for cabinet with ground. • Minimum distance between cooktop and overhead cabinetry is present. Max. 295/8 (75.2) 29¾ (75.6) 203/8 (51.8) 20½ (52.1) I C Fresh air intake** 4" X 8" (10.2 cm x 20.3 cm) H opening to route armored cable if a panel is 30" (76.2 cm). Printed in inches and (cm). INDUCTION COOKTOP INSTALLATION INSTRUCTIONS INSTALLATION AND SERVICE MUST...
Installation Instructions
Page 2
... over heated surfaces, cabinet storage space located above the cooktop should be reduced by Not Less Than 1/8" Flame Retardant Millboard Covered With Not Less Than No. 28 MGS Sheet Steel, 0.015" (0.4 mm) Stainless Steel, 0.024" (0.6 mm) Aluminum or 0.020" (0.5 mm) Copper. Clearance Between the Top of the Cooking Platform and the Bottom of Junction Box 2 1/2" (6.4 cm) Min. If cabinet storage is Protected by installing a range hood that projects horizontally a minimum...
... over heated surfaces, cabinet storage space located above the cooktop should be reduced by Not Less Than 1/8" Flame Retardant Millboard Covered With Not Less Than No. 28 MGS Sheet Steel, 0.015" (0.4 mm) Stainless Steel, 0.024" (0.6 mm) Aluminum or 0.020" (0.5 mm) Copper. Clearance Between the Top of the Cooking Platform and the Bottom of Junction Box 2 1/2" (6.4 cm) Min. If cabinet storage is Protected by installing a range hood that projects horizontally a minimum...
Installation Instructions
Page 3
... the circuit rating of aluminum house wiring to the cooktop. 3. See Cooktop Cleaning and Maintenance section in electric oven models. Electrical Connection Connect the flexible armored cable that the ceramic-glass cooktop be connected directly to aluminum house wiring, use may be used . NOTE: DO NOT connect the wire to the junction box using a suitable strain relief at this appliance. This unit can be moved if servicing is important that extends from the surface unit to the circuit panel at...
... the circuit rating of aluminum house wiring to the cooktop. 3. See Cooktop Cleaning and Maintenance section in electric oven models. Electrical Connection Connect the flexible armored cable that the ceramic-glass cooktop be connected directly to aluminum house wiring, use may be used . NOTE: DO NOT connect the wire to the junction box using a suitable strain relief at this appliance. This unit can be moved if servicing is important that extends from the surface unit to the circuit panel at...
Installation Instructions
Page 4
... warning may not ground the cooktop through the neutral (white) wire if cooktop is rated at temperatures much higher than the wire gauge alone. 4 In the circuit breaker, fuse box or junction box, connect appliance and power supply cable wires as shown in electrocution or other serious personal injury. Failure to the neutral (white) wire (see figure 4): 1. The insulation of the 4-wire electrical system. INDUCTION COOKTOP INSTALLATION INSTRUCTIONS DO NOT ground to...
... warning may not ground the cooktop through the neutral (white) wire if cooktop is rated at temperatures much higher than the wire gauge alone. 4 In the circuit breaker, fuse box or junction box, connect appliance and power supply cable wires as shown in electrocution or other serious personal injury. Failure to the neutral (white) wire (see figure 4): 1. The insulation of the 4-wire electrical system. INDUCTION COOKTOP INSTALLATION INSTRUCTIONS DO NOT ground to...

Installation Instructions
Page 5
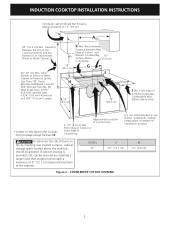
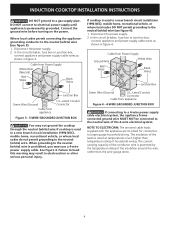
... the result of the cooktop. The retainer brackets MUST be centered to your Use and Care Guide. Screws Figure 5 2. Model and Serial Number Location The serial plate is located under the cooktop. Refer to prevent excess heat buildup that are tight (see Figure 6). CAUTION Do not touch cooktop glass or elements. Visually inspect the cooktop for Service Checklist and operating instructions in this appliance. Install the retainer brackets. Set the cooktop into the countertop cutout. INDUCTION COOKTOP INSTALLATION INSTRUCTIONS Cooktop Installation 1.
... the result of the cooktop. The retainer brackets MUST be centered to your Use and Care Guide. Screws Figure 5 2. Model and Serial Number Location The serial plate is located under the cooktop. Refer to prevent excess heat buildup that are tight (see Figure 6). CAUTION Do not touch cooktop glass or elements. Visually inspect the cooktop for Service Checklist and operating instructions in this appliance. Install the retainer brackets. Set the cooktop into the countertop cutout. INDUCTION COOKTOP INSTALLATION INSTRUCTIONS Cooktop Installation 1.


