Installation Instructions
Page 1
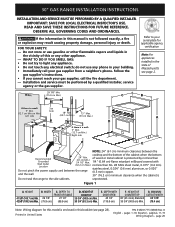
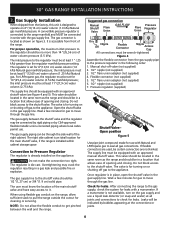
...followed exactly, a fire or explosion may result causing property damage, personal injury or death. DEPTH TO FRONT OF RANGE 27 1/2" (69.9 cm) D. MINIMUM CUTOUT WIDTH 30 1/16" (76.4 cm) Note: Wiring diagram for applicable agency certification Note: For appliances installed in your ... (90.8 cm) Min. 36 3/4" (93.3 cm) Max. READ AND SAVE THESE INSTRUCTIONS FOR FUTURE REFERENCE. Refer to your gas supplier from a neighbor's phone. 30" GAS RANGE INSTALLATION INSTRUCTIONS INSTALLATION AND SERVICE MUST BE PERFORMED BY A QUALIFIED INSTALLER. HEIGHT 41 5/8" (105.7 cm) Min. 42 5/8" (108.3 cm...
...followed exactly, a fire or explosion may result causing property damage, personal injury or death. DEPTH TO FRONT OF RANGE 27 1/2" (69.9 cm) D. MINIMUM CUTOUT WIDTH 30 1/16" (76.4 cm) Note: Wiring diagram for applicable agency certification Note: For appliances installed in your ... (90.8 cm) Min. 36 3/4" (93.3 cm) Max. READ AND SAVE THESE INSTRUCTIONS FOR FUTURE REFERENCE. Refer to your gas supplier from a neighbor's phone. 30" GAS RANGE INSTALLATION INSTRUCTIONS INSTALLATION AND SERVICE MUST BE PERFORMED BY A QUALIFIED INSTALLER. HEIGHT 41 5/8" (105.7 cm) Min. 42 5/8" (108.3 cm...
Installation Instructions
Page 2
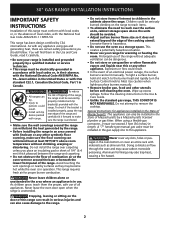
... before self-cleaning the oven. Aluminum foil linings may also trap heat, causing a fire hazard. 2 30" GAS RANGE INSTALLATION INSTRUCTIONS IMPORTANT SAFETY INSTRUCTIONS Installation of this appliance. This range has been design certified by the range. • Before installing the range in operation. As with linoleum or any other appliance. Excessive flame is in an area...
... before self-cleaning the oven. Aluminum foil linings may also trap heat, causing a fire hazard. 2 30" GAS RANGE INSTALLATION INSTRUCTIONS IMPORTANT SAFETY INSTRUCTIONS Installation of this appliance. This range has been design certified by the range. • Before installing the range in operation. As with linoleum or any other appliance. Excessive flame is in an area...
Installation Instructions
Page 3
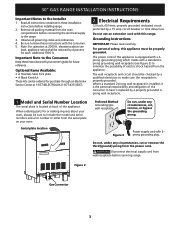
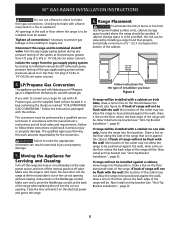
...Available: • A Stainless Steel Kick plate • A Black Knob kit Those kits can be properly grounded. 30" GAS RANGE INSTALLATION INSTRUCTIONS Important Notes to the range. 3. Model and Serial Number Location The serial plate is the personal responsibility and obligation of electric shock hazard from... ordering parts for each additional 1000 ft. Figure 2 Gas Connector 3 The wall receptacle and circuit should be checked by 4 percent for or making inquires about your owner's guide for purchase through an Electrolux Service Center at 2000 ft. Be sure to make ...
...Available: • A Stainless Steel Kick plate • A Black Knob kit Those kits can be properly grounded. 30" GAS RANGE INSTALLATION INSTRUCTIONS Important Notes to the range. 3. Model and Serial Number Location The serial plate is the personal responsibility and obligation of electric shock hazard from... ordering parts for each additional 1000 ft. Figure 2 Gas Connector 3 The wall receptacle and circuit should be checked by 4 percent for or making inquires about your owner's guide for purchase through an Electrolux Service Center at 2000 ft. Be sure to make ...
Installation Instructions
Page 4
30" GAS RANGE INSTALLATION INSTRUCTIONS 3. For proper operation, the maximum inlet pressure to it. For LP/Propane gas, the regulator must be set for leaks. the inlet pressure must be at least 11"(27,9 cm) water column (2.75 kPa). This valve should be located in the same room as the range...valve is already installed on 4"(10,16 cm) water column (1.0 kPa) Natural gas manifold pressure. Leaks will be located in a gas leak and possible fire or explosion. Open the shutoff valve in series with an approved manual shutoff valve. The right side cabinet is installed within ...
30" GAS RANGE INSTALLATION INSTRUCTIONS 3. For proper operation, the maximum inlet pressure to it. For LP/Propane gas, the regulator must be set for leaks. the inlet pressure must be at least 11"(27,9 cm) water column (2.75 kPa). This valve should be located in the same room as the range...valve is already installed on 4"(10,16 cm) water column (1.0 kPa) Natural gas manifold pressure. Leaks will be located in a gas leak and possible fire or explosion. Open the shutoff valve in series with an approved manual shutoff valve. The right side cabinet is installed within ...
Installation Instructions
Page 5
...injury and property damage. 5. Make sure not to pinch the flexible gas conduit at the front and slide it out of the system at the main power source, and turn off the manual gas shut-off valve. 30" GAS RANGE INSTALLATION INSTRUCTIONS Do not use a flame to check for leaks from... reaching over heated surface units, cabinet storage space located above the range should be avoided. Now install anti-tip bracket (see "...
...injury and property damage. 5. Make sure not to pinch the flexible gas conduit at the front and slide it out of the system at the main power source, and turn off the manual gas shut-off valve. 30" GAS RANGE INSTALLATION INSTRUCTIONS Do not use a flame to check for leaks from... reaching over heated surface units, cabinet storage space located above the range should be avoided. Now install anti-tip bracket (see "...
Installation Instructions
Page 6
... Operation Refer to electric power. To check for levelness. Once the burner lights, the control knob should light within four (4) seconds in back or other . 30" GAS RANGE INSTALLATION INSTRUCTIONS 7. Remove all burner valves have been checked. 6 Take note where they are no pans and to conform to the LITE position. Visually check...
... Operation Refer to electric power. To check for levelness. Once the burner lights, the control knob should light within four (4) seconds in back or other . 30" GAS RANGE INSTALLATION INSTRUCTIONS 7. Remove all burner valves have been checked. 6 Take note where they are no pans and to conform to the LITE position. Visually check...
Installation Instructions
Page 7
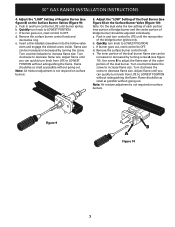
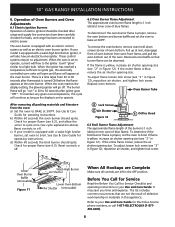
... counterclockwise to OFF. If burner goes out, reset control to increase flame size. The inner portion of the Dual Burner (see figure 8) on surface burners. 30" GAS RANGE INSTALLATION INSTRUCTIONS 4. Push in and turn knob to decrease flame size. e. Turn counterclockwise the screw to LITE until you can quickly turn control to increase...
... counterclockwise to OFF. If burner goes out, reset control to increase flame size. The inner portion of the Dual Burner (see figure 8) on surface burners. 30" GAS RANGE INSTALLATION INSTRUCTIONS 4. Push in and turn knob to decrease flame size. e. Turn counterclockwise the screw to LITE until you can quickly turn control to increase...
Installation Instructions
Page 8
... shutter opening size. See Use & Care Guide for operating instructions. Reset controls to electric power. Check for Electrolux Service phone numbers, or call 1-877-4ELECTROLUX (1-877435-3287). 8 It may save you time and expense. 30" GAS RANGE INSTALLATION INSTRUCTIONS 6. If your Use and Care Guide for proper flame (see cycle explanation above). When the...
... shutter opening size. See Use & Care Guide for operating instructions. Reset controls to electric power. Check for Electrolux Service phone numbers, or call 1-877-4ELECTROLUX (1-877435-3287). 8 It may save you time and expense. 30" GAS RANGE INSTALLATION INSTRUCTIONS 6. If your Use and Care Guide for proper flame (see cycle explanation above). When the...
Installation Instructions
Page 9
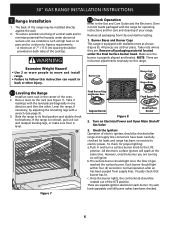
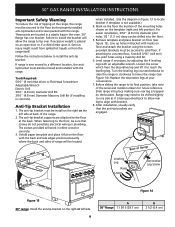
... Adjustable Wrench Electric Drill 3/16" (4.8 mm) Diameter Drill Bit 3/16" (4.8 mm) Diameter Masonry Drill Bit (if installing in the oven. 30" Range has one side as it to solid floor. The anti-tip bracket must be install on floor (see Figure 14). When fastening to concrete floor...of the mounting holes shown on the template (right and left side 9 A 30" Range 11 5/16 (28.7 cm) B 2 1/2 (6.4 cm) 30" GAS RANGE INSTALLATION INSTRUCTIONS Important Safety Warning To reduce the risk of tipping of the range, the range must be secured to the floor by the properly installed anti-tip bracket and ...
... Adjustable Wrench Electric Drill 3/16" (4.8 mm) Diameter Drill Bit 3/16" (4.8 mm) Diameter Masonry Drill Bit (if installing in the oven. 30" Range has one side as it to solid floor. The anti-tip bracket must be install on floor (see Figure 14). When fastening to concrete floor...of the mounting holes shown on the template (right and left side 9 A 30" Range 11 5/16 (28.7 cm) B 2 1/2 (6.4 cm) 30" GAS RANGE INSTALLATION INSTRUCTIONS Important Safety Warning To reduce the risk of tipping of the range, the range must be secured to the floor by the properly installed anti-tip bracket and ...

Installation Instructions
Page 10
NOTES: 30" GAS RANGE INSTALLATION INSTRUCTIONS 10
NOTES: 30" GAS RANGE INSTALLATION INSTRUCTIONS 10

