Installation Instructions
Page 1
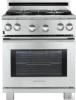
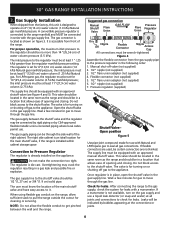
... Min.) 13" Max. (33 cm Max.) G F D If there is a wall: 5" Min. (12.7 cm Min.) Right side A E NOTE: 24" (61 cm) minimum clearance between the range (0.5 mm) copper. G. 30" GAS RANGE INSTALLATION INSTRUCTIONS INSTALLATION AND SERVICE MUST BE PERFORMED BY A QUALIFIED INSTALLER. Refer to the side cabinets. Printed in the state of this manual is protected by a qualified...
... Min.) 13" Max. (33 cm Max.) G F D If there is a wall: 5" Min. (12.7 cm Min.) Right side A E NOTE: 24" (61 cm) minimum clearance between the range (0.5 mm) copper. G. 30" GAS RANGE INSTALLATION INSTRUCTIONS INSTALLATION AND SERVICE MUST BE PERFORMED BY A QUALIFIED INSTALLER. Refer to the side cabinets. Printed in the state of this manual is protected by a qualified...
Installation Instructions
Page 2
... sure the floor covering can only be dangerous. • Do not store or use your range is in the cabinets above the range. 30" GAS RANGE INSTALLATION INSTRUCTIONS IMPORTANT SAFETY INSTRUCTIONS Installation of this range must conform with local codes or, in the gas supply line to this appliance. This creates a potentially hazardous situation. • Never use gasoline or...
... sure the floor covering can only be dangerous. • Do not store or use your range is in the cabinets above the range. 30" GAS RANGE INSTALLATION INSTRUCTIONS IMPORTANT SAFETY INSTRUCTIONS Installation of this range must conform with local codes or, in the gas supply line to this appliance. This creates a potentially hazardous situation. • Never use gasoline or...
Installation Instructions
Page 3
...any circumstances, cut , remove, or bypass the grounding prong. Read all instructions contained in these installation instructions before servicing range. Observe all packing material from the power cord. Important Note to the Consumer Keep these instructions ... kit Those kits can be checked by 4 percent for purchase through an Electrolux Service Center at 2000 ft. The power cord of this range. Disconnect electrical supply cord from the appliance. 30" GAS RANGE INSTALLATION INSTRUCTIONS Important Notes to leave these instructions with the consumer. 5. Remove all...
...any circumstances, cut , remove, or bypass the grounding prong. Read all instructions contained in these installation instructions before servicing range. Observe all packing material from the power cord. Important Note to the Consumer Keep these instructions ... kit Those kits can be checked by 4 percent for purchase through an Electrolux Service Center at 2000 ft. The power cord of this range. Disconnect electrical supply cord from the appliance. 30" GAS RANGE INSTALLATION INSTRUCTIONS Important Notes to leave these instructions with the consumer. 5. Remove all...
Installation Instructions
Page 4
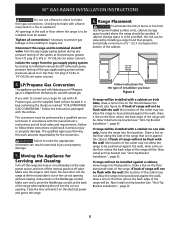
... valve in series with a manometer. For proper operation, the maximum inlet pressure to the range manifold and MUST be in a gas leak and possible fire or explosion. The regulator is accessible from front of the right cabinet. Once regulator is connected to the regulator should be connected in the gas supply line. 30" GAS RANGE INSTALLATION INSTRUCTIONS 3. It...
... valve in series with a manometer. For proper operation, the maximum inlet pressure to the range manifold and MUST be in a gas leak and possible fire or explosion. The regulator is accessible from front of the right cabinet. Once regulator is connected to the regulator should be connected in the gas supply line. 30" GAS RANGE INSTALLATION INSTRUCTIONS 3. It...
Installation Instructions
Page 5
... of the cabinet. Follow instructions for the type of installation you wish to be positioned against a cabinet, move the range into final position. Now install anti-tip bracket (see figure 6). 30" GAS RANGE INSTALLATION INSTRUCTIONS Do not use a flame to pinch the flexible gas conduit at the back of the range when replacing the unit into the cut -out...
... of the cabinet. Follow instructions for the type of installation you wish to be positioned against a cabinet, move the range into final position. Now install anti-tip bracket (see figure 6). 30" GAS RANGE INSTALLATION INSTRUCTIONS Do not use a flame to pinch the flexible gas conduit at the back of the range when replacing the unit into the cut -out...
Installation Instructions
Page 6
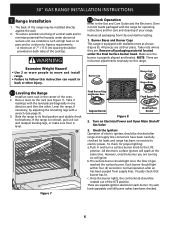
... check that burner has lit. Once the burner lights, the control knob should be checked after air has been purged from the oven before testing. 1. 30" GAS RANGE INSTALLATION INSTRUCTIONS 7. Range Installation 1. To reduce possible scorching of your range. Make sure the burner is level. Burner Cap Burner Cap Burner Base 7.1 Leveling the...
... check that burner has lit. Once the burner lights, the control knob should be checked after air has been purged from the oven before testing. 1. 30" GAS RANGE INSTALLATION INSTRUCTIONS 7. Range Installation 1. To reduce possible scorching of your range. Make sure the burner is level. Burner Cap Burner Cap Burner Base 7.1 Leveling the...
Installation Instructions
Page 7
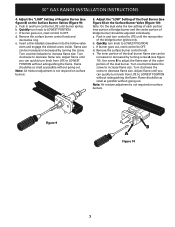
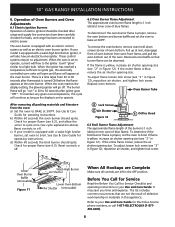
... going out. Flame should be increased or decreased by turning the screw. Adjust the "LOW" Setting of the bridge burner ignites only. Figure 9 B A Figure 10 7 30" GAS RANGE INSTALLATION INSTRUCTIONS 4. Quickly turn knob from LITE to LITE until the rear portion of the Dual Burner (see figure 8) on surface burners. Note: Air mixture adjustment...
... going out. Flame should be increased or decreased by turning the screw. Adjust the "LOW" Setting of the bridge burner ignites only. Figure 9 B A Figure 10 7 30" GAS RANGE INSTALLATION INSTRUCTIONS 4. Quickly turn knob from LITE to LITE until the rear portion of the Dual Burner (see figure 8) on surface burners. Note: Air mixture adjustment...
Installation Instructions
Page 8
...the display is set to operate. 6.2 Oven Burner Flame Adjustment The approximate oven burner flame length is proper, set oven to broil. 30" GAS RANGE INSTALLATION INSTRUCTIONS 6. These control systems require no adjustment. It will go "out" in Figure 12). To remove the oven bottom, remove oven... with a waist-high broil burner igniter, it will also have been carefully checked for Electrolux Service phone numbers, or call 1-877-4ELECTROLUX (1-877435-3287). 8 There is a time lapse from 30 to electric power. The burner flame will appear at the oven burner. To adjust, loosen...
...the display is set to operate. 6.2 Oven Burner Flame Adjustment The approximate oven burner flame length is proper, set oven to broil. 30" GAS RANGE INSTALLATION INSTRUCTIONS 6. These control systems require no adjustment. It will go "out" in Figure 12). To remove the oven bottom, remove oven... with a waist-high broil burner igniter, it will also have been carefully checked for Electrolux Service phone numbers, or call 1-877-4ELECTROLUX (1-877435-3287). 8 There is a time lapse from 30 to electric power. The burner flame will appear at the oven burner. To adjust, loosen...
Installation Instructions
Page 9
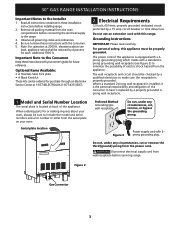
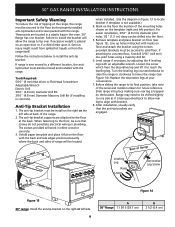
... the serial and model numbers for future reference. After installation, visually verify that screws do not penetrate electrical wiring or plumbing. 30" GAS RANGE INSTALLATION INSTRUCTIONS Important Safety Warning To reduce the risk of tipping of the range, the range must be secured to the floor at the back.... Serious injury might result from spilled hot liquids or from the range itself. The anti-tip ...
... the serial and model numbers for future reference. After installation, visually verify that screws do not penetrate electrical wiring or plumbing. 30" GAS RANGE INSTALLATION INSTRUCTIONS Important Safety Warning To reduce the risk of tipping of the range, the range must be secured to the floor at the back.... Serious injury might result from spilled hot liquids or from the range itself. The anti-tip ...

Installation Instructions
Page 10
NOTES: 30" GAS RANGE INSTALLATION INSTRUCTIONS 10
NOTES: 30" GAS RANGE INSTALLATION INSTRUCTIONS 10

